Search My Blog!

Use the Search box below to find keywords that you're looking for quickly and easily!

Search Feature

Showing posts sorted by date for query resin. Sort by relevance Show all posts

Thursday, September 14, 2023

Some Finishing Touches For Roz's Kitchen

There were a few things to finish up before Roz could invite the whole treehouse gang over to have the first celebration in her kitchen. I had to wait for my liquid hairspray to arrive so that I could pin and spray the aprons into a "natural looking hang" when placed on the pegs of the shelf. I learned the liquid hairspray trick many years ago from the amazingly creative Casey of Casey's Minis. She's got a wealth of knowledge from her decades making minis, and though she rarely posts these days, she is still often thought of and appreciated!


And finally this last shelf for the kitchen can be checked off the list!


If you remember from the chair cushion tutorial, I still needed to finish up the ties for the chairs. I was able to adapt the bow making video from Heather at My Mini Front Porch for my 1/8" ribbon. I added them to the cushion ties (all 16 of them) and I really like the "fairytale" look this gives to the chairs. Roz's chairs all match the one on the right and the other two are Goldie's.


Once the chairs were finished I made a runner and a vase of flowers for the table. It is ready to be set now with all the goodies for the party. 


Roz and I went back and forth on whether or not she wanted curtains of any kind. She didn't want to block the light or interfere with her herb pots in the kitchen window, but she does really love how a nice café curtain adds to the décor. So, the compromise was to add a floral swag valance above the half round windows in the breakfast nook. It won't block the light but still adds the charm she loves so much. 


Just a side note here for anyone building a trunkhouse with an addition in the back with no access except through the main room's opening... Decorate the room before you attach it! Holy buckets it is nearly impossible to reach in there and if you can manage that you'll have to guess where to put things because you can't see past your own arm!!! I hope the valences are fairly straight and close to where they are supposed to be because there are no do-overs!

Sneak peek - still needs touch-ups.

The final, final touch was preparing all the food for the party. Roz asked me to help because she wanted the treehouse gang to be surprised. Believe me - I warned Roz that my worst skill in life (besides sewing) is cooking/baking. Oh, I make a few good things, but they're limited because I really prefer anything else to being in the kitchen. Unless I am cooking with company. Then it's fun. I told Roz since we were doing it together I would be her sous chef.

No matter what the fairytale is, there always has to be a little reality behind the "magic". I got out all my food making stuff (a lot of it acquired and never used when I was planning Pound Cake) to see what I might be able to learn to make quickly. I had some molds and some Hearty air dry clay. I mixed a little dough color into the clay, brushed the molds with cornstarch and made a few loaves of French bread, some tart crusts and some crackers. 


To add the fresh baked look I brushed on some Tamiya Baking Master chalk.


I filled the tart crusts with lemon and strawberry slices and "cherries" (no hole beads). I made the appropriate color sauces using UV resin and artists chalk. They came out pretty good.


I wanted to make a few cakes, too. The more I made the greater the odds at least one would come out well enough to use. I had a bunch of 3/4" round chipboard circles left over from some project or another, so I stacked them into "layer cakes". Half would be base painted "chocolate cake" and half "white cake". I found that by drilling holes and adding toothpick handles, I could do a better job decorating them. Spinning them to paint on the "frosting" was genius!


You can see in the background a bunch of Bundt cakes, too. They were leftover from the last time I experimented using molds and air dry clay to make food. Three are "chocolate" and two are "vanilla/lemon". This was beginning to make me very hungry! 


All the chocolate cakes got a layer of "frosting" - Mod Podge mixed with a little "chocolate" paint made a lovely ganache. One got "nut sprinkles" added to the sides. I think I got the nuts on Etsy but a lot of my dessert making supplies came from Stewarts Dollhouse Creations during the planning of the bakery project.

I was trying to put the nuts on just the sides of a white cake, too, but wasn't careful and got it on the top. That left me no choice but to cover the whole thing with nuts. Then you could still see the white frosting under them so my fix was to paint "chocolate" over it. Now it's a Nestle Crunch cake. Sounds delicious, right?!? See? Good thing I made extras for accidents!

I had roses from Stewarts, a pineapple cane, Tamiya Deco SaucesSugar Sprinkles and 3/8" wooden furniture plugs that I made simple cupcakes from. The hardest part was deciding how to use my ingredients to decorate each one and then being brave enough to try. I'd say they came out pretty well and after I pick some things for Roz I'll have a good start on the bakery's displays.


Speaking of displays... back when I was planning the bakery I bought some things to experiment making cake stands. I thought gluing plates on top of vases from Natty Collection on Etsy would make unique cake stands. I really like the way they turned out.


I had cabuchon settings and various metal bead caps and spacers to try out, too. Since Pound Cake has a black-white-gray color theme, I painted them all black.


And here's what I ended up with, though Roz's party preparations are still not finished!


Hopefully, and with some focused effort, Roz's kitchen and her party will be ready to share with you next week! 🤞🙏👷‍♀️

I'm going to go take a nap now! 😜

xo xo,

Jodi


Thursday, August 17, 2023

If You Can't Stand The Heat...

Don't work on the kitchen!!!

Hi Guys! What a week! Summer always seems to pull me away from minis, but add heat to the equation (anything over 85 degrees), and my productivity plummets! If I am plopped right in front of several fans I can reasonably cope. But when temps get to a certain point there's just no relief from the heat. Call it my reasonor if you prefer, my excuse, but due to an increasingly common (and unwelcome) PNW heat wave, I have little kitchen progress to share. I do have a few good things started, though!


At my desk with 3 fans blowing in the room.
That's 36 Celsius, my friends. 
At 12:34 AM Wednesday, it was still 88!

I did try to tackle some items. The first thing Roz's kitchen needed were groceries. I had Grocery can blanks to make labels for, so I decided to make a few other common food labels/packages, as well. Some products I already had perfect digital images for and only had to resize them. Some labels were readily available with Google searches. And some things I totally made up on my own. Fairy Beary Godmothers should use products like "Nice Flour", "Sweet's Sugar" and "Friendship Coffee", don't you think? 


And I know Rozario, like every growing dragon, loves to eat his Chari-O's for breakfast! 


It's easy to measure for how large to make a label when your grocery item is a box, but what about making a label for a dowel or canned goods? If you're lacking a bendable ruler with enough small increments, it's a challenge. Luckily, we live in modern times when Google makes it almost like cheating! Finding out how long to make a label for a simple oatmeal container, for example (and all your cans), is only a few keystrokes away. The number you need is is the Circumference. If you're like me, it's been a LONG TIME since you had to remember that factoid! 🤯

First, you'll need to find the Diameter of your dowel. Measure across the widest part of the circle. Or to find the Radius, measure half of the circle (the results will be the same). Enter the Diameter (or Radius) into the circumference calculator and you will know the Circumference (the minimum length in inches you need to wrap a label completely around the dowel).

In my case, for my Rolled Oats canister, my dowel is 5/8" or a .625 Diameter or a .3125 Radius for a Circumference of 1.9635 inches. That means if I make my label around 2" long, it will leave just a little extra to overlap. 


Thanks Google! That was easy!


I also wanted to include a few glass canning jars and some honey. Polymer clay canes, alcohol ink and UV resin made quick work of this task! 

Last fall I made 3D printed egg cartons and little separate eggs to go inside them. It was fun to finally use them, though the "brown" I mixed up for my eggs needs a little more adjusting. Next time Tasha brings me her farm fresh eggs, I'll use it for reference and keep notes!


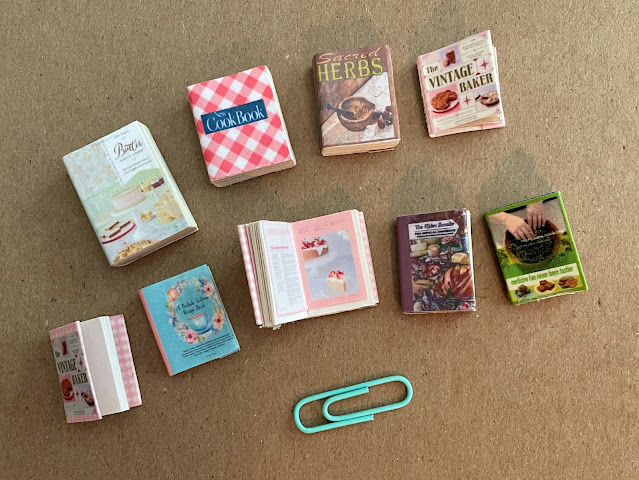
I worked on some cookbooks for one of Roz's shelves. Some will open and some are "just for looks". Though she could totally whip up a delicious meal with just her wand, she actually enjoys the whole cooking process! 


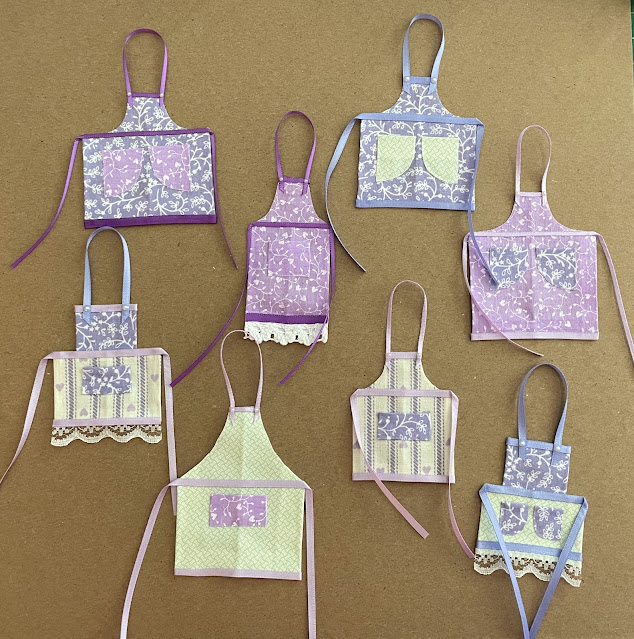
I made a ton of aprons (actually, only 8 😊), figuring I might as well do some for Goldie while I had all the stuff pulled out. I still need to make them hang in a natural looking way on their hooks (they're not for Flat Stanley, after all!), and to add the bows to the ties. But they're just as cute as I'd hoped for! At some point Roz and Goldie will have to have a fitting, too.


One very special thing I worked on will be a surprise for Roz. Shhhhh! Don't tell! She misses the old gang back in Germany so much! She'll be delighted when she sees this framed photo of her, Rozario, Fluby and Rosey taken by Birgit just before she set sail (or wing?) for America! It will be hung so that she can see her dear friends as she starts each day at the breakfast table. There will be lots more "family photos" in various places throughout the trunkhouse, too.

Fluby, left. Roz, center. Rosey, right. Rozario, front.

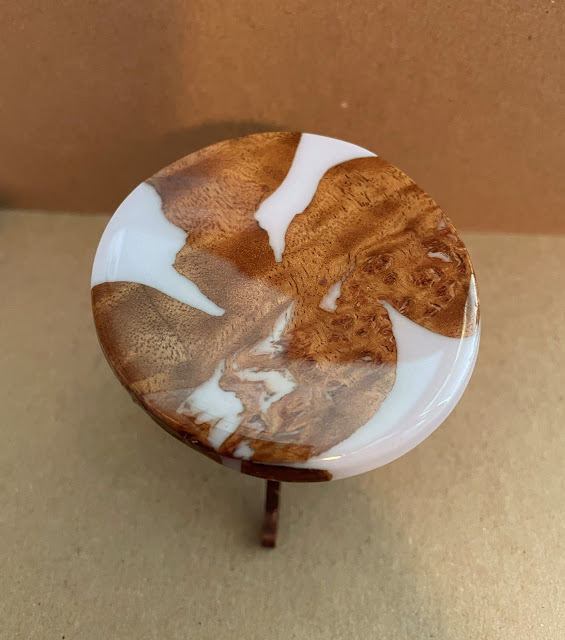
You all know by now how much joy I get from minis, but the most unexpected and precious thing I have received from being involved in this passion is the opportunity to meet and connect with so many kindred spirits! It is because of Birgit's kindness in creating Roz for me that I get to work on this wonderful trunkhouse. And because of the trunkhouse, I have received another amazing gesture of kindness from a longtime reader and friend, Sharon. You see, Sharon's talented husband and son made a gorgeous epoxy river table for their family game room. When Sharon saw it she thought a mini version would be perfect for someplace in the Fairytale Treehouse project! She shared the photo and asked me if I thought so too. After I got up from falling out of my chair I said "Yes! YES! Yes, Please!!!" 😄😄😄

Here is the table Sharon's husband and son made for her... Incredible, right?!?

And Sharon's pretty toes! 😍

And here is the mini version made just for me!

W~O~W! 😍

So beautiful!

Isn't it absolutely jaw dropping?!? It is hard to tell with my wacky lighting, but the resin is the most beautiful soft lavender color! It's so perfect for this dwelling! Sharon has even placed the epoxy river table top onto a House Of Miniatures Tilt Top Table kit that she beautifully finished for me! 


Thank you so much for your kind thoughtfulness and generosity, Sharon! 💗 And a special thanks to your incredibly talented husband, too! It must have been quite a challenge to perform this kind of craftsmanship at 1/12th the scale he's used to! Mini people really are the nicest people there are! And so talented, too! The entire treehouse gang LOVES the table so much that they are currently debating where it can be best appreciated. I think, to be fair, every room should get to have a turn with it!

And that, my friends, is the sum total of all I could do in the heat this week. This weekend the kids et al will be here to help us with a backyard project. My job is to keep everyone fed. Yep - it's the hot kitchen for me no matter what it takes. At least I'll have great company!

Back sometime soon with, hopefully, better progress!

xo xo,

Jodi
Thursday, August 10, 2023

Running Water

It doesn't matter whether you live in a fancy McMansion or a pioneer log cabin in the woods. Let's face it - running water is a necessity! It is one of the first things on the priority list of every housing project everywhere in the world. And a trunkhouse made for a Fairy Beary Godmother is no different.


Thank goodness the folks who will inhabit this multi-family forest abode have Wayne, the resident handyman/craftsperson. Practically as soon as I had that Chrysnbon Dry Sink kit completed Wayne was working to address the "Dry" part. First, he drilled a hole in the sink for the water to escape through. Then, he installed the drain and pipe system. Don't ask me where the water will drain to - that's Roz's department (though I suspect that she has some magic recapturing system in mind for watering her flowers).

Pot metal drain and pipe purchased on eBay.

It can be handy to be so small!

Sometimes it takes two pipe wrenches for the job!

Once the sink was ready to receive water, Wayne could install the source of it. Again, please contact the "Magic Department" for technical information. 😜

Wayne went with the same pump system that he installed for Goldie and Alice. It is a reliable method, after all, so why reinvent the wheel? Everyone loves the classic, rustic patina! And when your sink already has that "lived in" look, a messy cook is so much more at ease and can concentrate on her cooking.


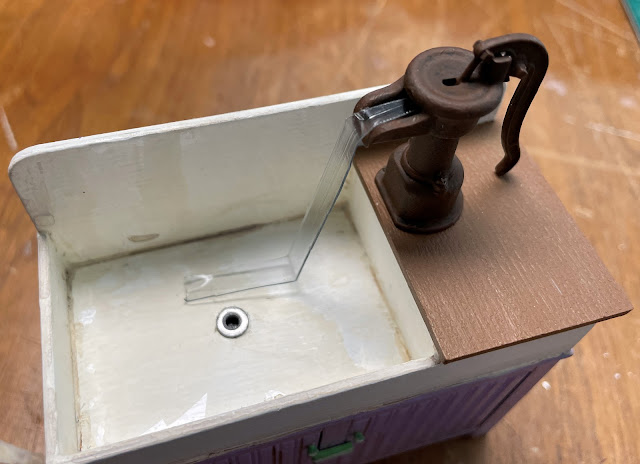
When it came time for the H2O, Wayne only had to provide the infrastructure. Roz's magic did the rest! A simple piece of plastic packaging, bent at the right angles was the substrate for a UV resin waterfall. 


Add a drip, shine the UV flashlight and keep going until you like the flow rate!


On and off.

Wayne got to be the first one to wash his hands... Looks like I'll need to make some soap!


And then Roz and Rozario got in on the fun! The gang is celebrating being one step closer to moving in!


Thanks to some amazing knowledge and great advice from Betsy and Julia, I knew what a Victorian cook stove and a parlor stove's fire light should look like! Thanks so much, ladies! I'm so grateful for your help! 

For the parlor stove, I added a bottom to the Chrysnbon kit. As it comes, the kit's bottom piece is actually a grate so the light shows through. Both advisers said that for a coal stove (any stove, really) that is a bad sign! It means the bottom is likely rusted through and a very unwelcome event is imminent! We don't want that - especially in a trunkhouse! After installing a solid bottom, I added an extra orange LED bulb in the main compartment to give off better ambiance.

Original kit design with bottom grate.

Light leaked out the bottom before.

With piece of cardstock glued in to block light.

Firelight with one bulb under "coals".

Now with extra orange LED chip light added.
No need for a sweater in the parlor!

For the cook stove, apparently there should not be a great amount of light from the flames coming out the vents, as that is also a bad sign. I am going to leave the cook stove's "fire" as is.

With a couple major tasks completed for Roz's kitchen (and the parlor), it was time to think about food and dish storage. With round walls and a very cozy amount of space, it was prudent to go with open shelving like in Medieval times. I utilized more Sonotube scrap for the back of the units (because it is already curved perfectly), then just added horizontal chipboard shelving at the lengths and depths I needed.


I painted and added trims, then gave them a little aging with an antique linen ink stamp pad. It seems to go on well, then I turn my back and the ink practically disappears. Anyone else have that happen? Maybe it just dries a lot lighter. I'll keep working at it.


I am working on gathering and making all the things Roz will need for a fully functioning kitchen. Luckily, I have many "prototypes" left over from the 3D kitchen item adventure I went on last fall. Hopefully, Roz will like them. She's going to need lots of groceries, too. I hear Rozario eats his weight in food every day! 

Until next time...

xo xo,

Jodi