Search My Blog!

Use the Search box below to find keywords that you're looking for quickly and easily!

Search Feature

Showing posts sorted by relevance for query resin. Sort by date Show all posts

Tuesday, May 12, 2020

Good Works

Hello dear friends! I hope all of you are well and that those celebrating Mother's Day had a lovely one to remember! Just getting to be the mom of my two amazing kids would have been enough for me, but Natasha (33 in July), and Ande (31 in July), went out of their way to make sure I felt loved and appreciated!

Ande came by for a hug (the first one I've gotten from him since social distancing started) and brought these beautiful roses, gourmet cinnamon bears from Tacoma Brothers (a wonderful local grocery store), and let me keep my grandpuppy Rosie overnight.


My daughter Natasha, who is known to spoil me rotten, got me a 3D printer! The learning curve is going to require a lot of trial and patience, but I am so excited to get started actually printing my own miniature designs in the future! What thoughtful people my incredible kids have become! There is no gift greater than that!


When I last posted about the vanities, I had found a silicone mold making kit in my "someday" stash. I had a lot of fun working with the stuff and got great results with almost everything I tried!


The process is simple enough: Mix equal parts of an "A" and "B" liquid substance, place your model into a container, pour the combined mixture over the piece you want to mold (pot life 50 mins). and wait about 4 hours to demold. I used a couple Unique and Falcon Miniatures pieces that I had to experiment with.


The mold will end up the size and shape of the container you used to hold the model, so it is good to have one close in size to the item you are molding. It is recommended that you fill the silicone about 1/2" above the piece you are molding so that it is strong enough to handle many future casts. I used cheap dollar store plastic storage tubs as my model holder and they were wonderful! I need a little practice on my level filling skills, but it was easy enough to clean up the opening with my Xacto knife after the mold had cured.


I cast many brackets using the leftover colored resin from the tiny product bottles I was making. This is great because one of these brackets alone costs around $5. If you need a lot of them in a build, molding and casting is the way to go! With a coat of gesso and then paint you'll never know there is colored resin beneath. The detail is amazing!


Speaking of product bottles, I made a mold for those, as well. The mold has 5 bottles in three sizes.


I experimented with different mediums to color the resin including alcohol ink, chalk and paint as I have always done. But just to broaden my horizons, I'll be ordering a set of mica powders to try the next time I do resin work. The chalk was pretty good, but the paint and alcohol ink were difficult to get the exact color I was after. In order to achieve lavender I had to mix red and blue inks. If I'd had a purple it would have been easier to achieve, The mottled ones below were a combo of chalk with a little white acrylic paint mixed in. It took a lot longer to cure and not all of the bubbles came out. If you're going for a scrubbing body wash or a bubble bath this can work in your favor!


One mold did not work well at all. In fact, I broke the model piece just trying to remove it from the mold. This type of intricate and thin model may require a mold release agent, which I did not try this time. I think I can still use the mold, however, if it is in a setting where I want the detail to look as though it is old and has seen many layers of paint over the years.


These are what I ended up with the first time through with the bottle mold and colored resin. Not perfect, but not bad. I have some ideas to try out which I believe will perfect the method, and I will keep you posted! I found and ordered better bottle tops from Bindle's, too, so that should help the overall appearance to be more authentic. I need to improve the scale of the labels, too. Maybe use slide decals instead.


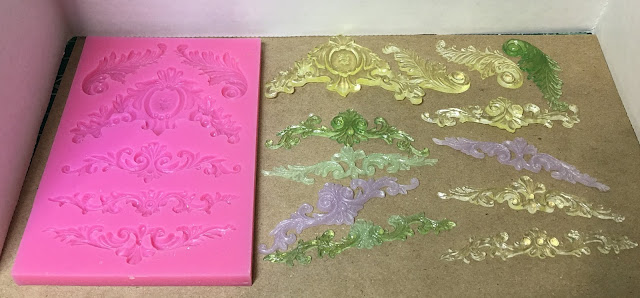
While I had the resin out, I took the opportunity to use the excess resin in an Architectural Flourishes mold I picked up from AlphaStamps a while back. These came out beautifully, and it makes me want to do a small project just to use them!


Now let's get to the other accessories for the vanity sets. You remember the candles and pillars (tutorial here)...


I also made baskets based on Casey's Very Easy Basket Tutorial, only adding some 1/16" silk ribbon to the top and bottom and painting in coordinating colors.


And filled them with towels I made up and printed on fabric. Here are the towels and rugs for you to use if you like.


Then I was on to the arrangements for the vases that will sit on the vanity countertops. I made eucalyptus branches from an SDK kit and lavender based on the We Love Miniatures tutorial on YouTube. I had enough left over to make up some heart shaped grapevine wreath hangings, too.


Next I made some framed art with the eucalyptus and lavender theme using free art found on the internet. I used the Cricut to make matting and back covers, then painted 1-3/16" x 1-7/16" frames in coordinating colors. Here's the art if you'd like it, too.


In looking at the vessel sink height, I decided to raise up the faucet unit by adding a booster piece beneath. Now the faucets are at a much better height to function. I finally added the mirror material too!


The sink itself is a bisque bowl painted and then given a gloss coat. For the illusion of the drain, I use a flat washer topped with a round nail head stud. This is supposed to look like the more modern 'push to toggle open and closed' type of drain plug.


Now it's back to work on the product bottles to see if I can make them better. I'll be back soon with the perfected vanity and accessories for the giveaway! In the meantime, I encourage you to see what ways you can help those in your communities. Food banks are great, making masks is great, or even bringing a batch of homemade cookies down to your local fire station. It'll make a difference, I promise! And it'll make you feel so good!

xo xo,
Jodi

Friday, February 12, 2016

Containers, Fountains and Resins - Oh My!

I made a lot of containers when I went through my whole 3D design spree last November. I had so much fun, and one idea would just sprout another idea and so on until I ended up with a whole lot of them. When I gathered them all up this morning, I sat and stared trying to figure out if I'd use them on Alki Point, and if so, how?


I had originally designed the Enliven square nesting bowl set to be used as a decor item. I quickly used up all of the space inside, so I decided that they could become planters for the outside. Except, then I looked at them, and thought "fountains"! I mixed and matched the bowls with some of the other containers to piece together a couple fountain designs. Since the effect from the 3D printing process leaves a kind of stepped texture, I thought painting them to look like concrete would be fun.


I decided I'd make two different fountains. For the first, I would use the middle and smallest sized square bowls, with the middle sized on top of another square planter, tilted forward so that it's water would run into the smaller bowl. I had to do some caulking and glue to make them appear as though they were one solid piece. After it dries I may have to add more due to shrinkage, and then touch it up with some additional paint. Don't you just love the texture!


I needed something to support the "water" as it cascaded into the smaller bowl, so I just cut a ramp (I guess you'd call it) from a piece of saved plastic packaging (see Russ, I told you I'd use it someday!) and glued that in. I sort of tapered it and I am hoping in the end it will look more realistic.


For the second fountain, I used the large bowl from the set and added the Resplendent Vase to the center as the water spout. I glued in a small piece of clear plastic straw to also give the "water" something to cling to. I am always looking for twigs and rocks and things when we explore our beautiful surroundings, and these tiny rocks are just the right size and variation in color!


To make the "water" I am trying a new product for the first time. It is called Magic Water, and I ordered it from miniatures.com when I had a 20% off coupon. I have to honestly say that for a full price cost of $29.39, I was expecting A LOT more.


It is pretty typical of epoxy/resin as there is a "part A" to be mixed with a "Part B". In the case of this product, it is two parts resin to one part hardener. It was disappointing that for the price, there was no measuring device, cups or stir stick included. I used the big bottle cap to measure both and just cleaned it with a paper towel after each part. I didn't want to put any of it on my measuring spoons. I poured it into one of the disposable Dixie cups I keep around just for this type of occasion. It cautions you to stir it for 5 minutes, then again for another 5 minutes, so I stirred it for a long time. The drying time is 24 hours for about 1/2" in thickness - kind of a long time to me.


I used the stir stick to drizzle the resin into the water spout on the one fountain, then over the ramp on the other, then pinched the Dixie cup into a spout to carefully pour over the rocks, letting it settle in before pouring more. The directions say that you can add Mod Podge over the top to simulate ripples, so I may give that a try tomorrow. If not that, I'll use some 5 minute epoxy and wait till it starts getting thick before I apply it to the waterfall ramp.


I'll get better photos of everything once they are all finished up, and let you know how the Magic Water did.

A note about my experience with other epoxy/resins:

I have used many other epoxy/resin brands and types in the past, so it will be interesting to compare how Magic Water stacks up. On hand, I have Amazing Casting Resin and Amazing Clear Cast. Right off the bat I can tell you they are both over $10 less per kit than the Magic Water, and there is a lot more resin and hardener - at least twice as much. Plus you get several measuring cups and a couple of stirrers.


I made items from these resins for my Starbucks project in 2013, and they are still holding up perfectly. The clear also takes 24 hours to dry, but the regular dries pretty clear and much faster. I have added artist chalk shavings into both to color my castings. It comes out still clear but colored like like soda pop. I have also added acrylic paint, and it comes out about the color quality of a creamsicle - a little milky, which was perfect when I cast gallon whole milk jugs! The white artists chalk worked awesome for 2% milk jugs. Unless the Magic Water unleashes the magic little people to come finish my landscaping for me tonight, I probably will stick to the Amazing brand in the future. To be continued...


Thursday, August 3, 2023

Totally Analog

You may have noticed that during the whole trunkhouse portion of the Fairytale Treehouse project, in spite of having a wonderful "Machine Park" (Birgit's name for my Cricut Maker and 3D printers) at my fingertips, I haven't used any of it. It isn't an oversite, and in fact, has been totally intentional. You see, an important goal for me on this whole adventure was to reconnect with the joy and freedom that came with minis in the early days of my miniature passion. Before my need for tougher challenges and perfectionistic aspirations faded that joy a little. Before adding in so many complications and steep learning curves. I wanted to concentrate on creativity, whimsy, exploration and analog ingenuity. I wanted to use up good things from my stash, utilize recycled materials and to enjoy many aspects of making minis that I hadn't for a long time. One of those "old loves" was making minis from kits. 

There are some fantastic old time kits that are still being made and/or sold as New Old Stock, many of which I've had in my stash but had yet to experience. The majority of Roz's fixtures and furnishings will be made from kits. Chrysnbon, House Of Miniatures, and Calico are among them. Some I have had in my stash for a very long time, and some are new arrivals. Some I will reimagine in order to suit her personality (and to accommodate the trunkhouse's particular round room challenges). Others, I will simply play with products and finishes that sound fun. 

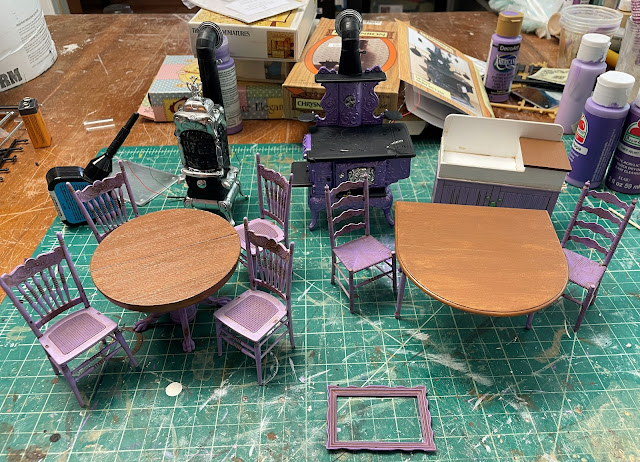
I started with the Chrysnbon kits. A Parlor Stove, Cook Stove, Dry Sink and table and chairs for Roz's kitchen. I also had a table and chairs for Alice and Goldie's kitchen so I decided to get it done at the same time. I love the compact scale of these kits as well as the detail and accessories that come with them.


I've gotten the tables and most of the chairs assembled (two more are on the way after a "mind change"), but I have many more rounds to go with all of them while I experiment with aging techniques. Nothing I've tried so far is "It", but I'm far from giving up yet. 


For the parlor stove, I didn't like the way that the provided acetate fit into the kit's windowed pieces, so I played with another option. I blocked off the openings from the back side with masking tape, then carefully applied UV resin to each of the windows in the grid from the front side. Once hardened, I applied another layer of the resin over the back where the tape had left a bumpy residue. It seemed to smooth it out and clarify it better.

Taped back side.

Resin to be applied in each square.

Before the application of additional resin over the tape texture.

After applying the resin over the tape texture.

I sanded the "chrome" pieces a bit before assembly to take down the intense shine. I like the way it seemed to age the pieces and leave some black wear marks behind. I had a particularly troublesome time assembling the "chromed" kit pieces, even after carefully scraping off the glue joint areas. I ended up assembling the base surround onto the stove rather than as a separate assembly because of it. It worked out okay in the end, but boy are those "chrome" pieces slippery! 


For the stove's interior fire light, I wanted it to be very subtle. I didn't want it to be the first thing you noticed when you looked into the parlor and I didn't want it to seem like it was too hot in this tiny room. Just a feeling of warmth is all it needs. It is so hard to tell at this point if I have achieved that, so I'm not going to actually install the stove until the last thing. That way I can adjust the lighting, if necessary.

Should the light spill out the bottom?
Should more "flame" appear in the windows?
More research is needed...

That was also my goal for the kitchen's cook stove fire light. To start with, I only added one orange LED chip light. 

Placed inside the cap of Cricut blade packaging to keep
it from moving around inside the stove.

The LED's resister needed an enlarged hole.

Seems pretty bright with a 9 volt battery.

Light is only supposed to peek out of the baffles on the side, I guess. You can see the flame reflected on the wall, and that may be enough - we'll see. If not, I suppose I can punch a few holes in the wall separating the oven from the fire.


Other than starting on the kits, I was able to get the front and balcony doors affixed to the trunkhouse. I am super excited to see them once they're nestled into the bark of the tree! But that is going to be a bit farther down the road.

Roz's front door.

From inside the parlor.

The bedroom balcony door.

Seen from inside.

Current status of the exterior of the trunkhouse.

What comes in the next few posts will probably be a mixed up jumble of things. Hopefully, in a few weeks, everything will come together and I can get Roz and Rozario moved into their house in time for... 

Brace yourself... A four letter "f" word is coming... 

Fall!

That's right! Time flies, especially Summer! And for those of you living through the record breaking heat, fall will be most welcome!

Hope you're all enjoying your time whatever the season!

xo xo,

Jodi