Search My Blog!

Use the Search box below to find keywords that you're looking for quickly and easily!

Search Feature

Showing posts with label Lisa's Country Cottage. Show all posts

Wednesday, February 3, 2021

Twenty~Two Tomorrows...

I am shocked at the degree to which time just slips away from me this past year. No excuses. Suffice to say that many times since December 10th, when I'd look at the roofing left to be completed on both Vera and Virgil's cottages, I'd say "tomorrow". There were at least Twenty~Two Tomorrows... But finally, the roofing is finished!


In looking at the last dozen of my mini projects, I managed to avoid using traditional wooden shingles on nine of them. There's no denying I have an aversion to them - probably because I am hyper critical of my results and therefore try to come up with any other kind of roofing that will do the job. If I need accountability, I look no farther than my "leftover shingles" drawer. There are at least four giant bags of various kinds in there to choose from, all from projects where I managed to avoid using them in favor of a metal roof, Paperclay tiles, or simply no roof at all. But this time, I faced my fears and made a deal with myself to accept and love the results no matter the outcome. It turns out I actually really enjoyed the process this time! Take the judgement out and I reconnect to the fun of mini building.


Now what's left on the cottages are the furnishings, the little details and to make a final decision on how I want to incorporate the plug strips for the wiring. These I can do as the urge to make furniture kits or cleverly hide wiring inspire me. Like with the bakery or the Storybook cottage, I hope that inspiration to finish them comes sometime. Until then, as is my true MO, I have started on a new project that has me captivated. I'll share more on that in my next post. Hopefully, it won;t be so long until the next one.


Stay safe, hopeful and patient, my friends.

xo xo,

Jodi

Thursday, December 10, 2020

A Porch For Vera

When driving through neighborhoods, one of the things about houses that practically make me slam my breaks on is a charming front porch. I have been known to park and take photos. My grandparents had a super good one growing up. It had fancy carved posts painted white along with carved wooden panels stretched between. Set against the red brick structure with 8 foot high curved windows and beautiful Corinthian molding, it was as 'Leave It To Beaver' as they come.  The best part about that porch was it's size. It was large enough to amply accommodate my using it as my home when playing house. I'd drag all the boxes, blankets and kitchen items my grandma would let me get away with and set up my cozy abode. I was the envy of the neighborhood kids. It was devastating years later when my grandpa enclosed it. Sure, it made sense to have an airlock during cold Montana winters to keep the cold from invading the living room, but it really just ruined the charm of the front facade. We won't even discuss how grandpa later removed the front bay window, too. Grandpa was a practical man to the bone, but what a tragedy! I wish I could have found photos to share with you, but you'll just have to imagine it.


When it came to thinking about the kind of porch that would make both Vera and I happy, it was clear that it would need to be Victorian in style and coloring, with a good bit of interesting detail. But not so complicated that it ruined the fun of doing it. I dug through my "someday" drawers to try things out, and settled on fancy carved posts and laser cut cardboard low fencing pieces for the balustrade. Once that was settled it was time for a mock up and measuring.

The blocky posts on the right came with the Lisa's kit.


Once I had the measurements, I used some 1/4" x 1/4" basswood for the base. To make channels for the fencing, I sandwiched a piece of 1/16" x 1/8" between two 1/8" x 1/4" pieces. This created the frames that I could slide the fence pieces into which would then attach to the posts. With all of that worked out, it was time for tedious painting and fitting.


Then methodical gluing...


But patience persevered!


Vera and I are happy with the outcome, and she is already working on a layout for all her flowers and decor...


And asking when I might have time to assemble her rocking chair.


Soon, sweet lady. Soon... But first, the roofing.

Xo Xo,

Jodi


Thursday, December 3, 2020

Cornucopia

 Hi Guys!

This week has been abundant with various and sundry activities, not any of them concluded, but all of them fun! So this post is going to be an amalgamation of the week and I hope you enjoy the variety!

First off I'll share that I made a little start on the porches for Vera and Virgil's cottages. I dug through my supply drawers and auditioned options, and at least figured out that each cottage porch will have a totally different aesthetic. For Vera, I am going with something very feminine and almost Victorian in detail...


For Virgil, something a little more country/rustic. I had some fencing assemblies left over from a Creatin' Contest kit, and what a great opportunity to use them!


I am slowly making progress, but haven't had a good chunk of time yet this week to dedicate.

Over the long Thanksgiving weekend, we opted for safety above getting the family together. Since it was just Russ and I here at home, we took on a couple fun new activities together. One was assembling the LEGO Mandalorian Razor Crest set. We hadn't built LEGOs since our kids were growing up, and had never done one together. It turned out to be a lot of fun and we are just starting bag 3 out of 6. There are over 1000 pieces, so it will take us a while longer. It's not technically minis, but if I can convince Russ that working on small things together can be fun, he may just start to imagine us creating a cool, MANLY mini project together in the future. ;o)


We also got a new game for the Nintendo Switch. It's called Animal Crossing New Horizons. It's a lot of fun, filled with wit, humor and some fun facts about the flora and fauna that you collect in the game. If you don't want to become addicted or have another adorable activity take over your free time, I recommend avoiding it, lol!


Back in the spring, I mentioned that I was participating in another Instagram group swap. We would each be given only 1 person, anonymously, and would be given questionnaires filled out by them in order to make gifts perfectly tailored to our recipients current project. Based on my recipient's requests, I made a bathroom vanity and lots of accessories. Due to all of the Covid craziness, the deadline to mail the packages was pushed to October 31st. 


When I received my package and saw that it was from Australia, I squealed a little because I knew it was from Sam (BluePrint Minis). If you know her, you know she paints incredible mini paintings. You can see a past swap gift I received from Sam in a post titled So Thankful.

This time, I was working on Pound Cake, the bakery, so I asked for bakery related things. Sam not only painted a cupcake series and framed them in the coordinating colors of the bakery, she spoiled me rotten with other handmade and purchased treasures, too! Thanks Sam! I am so lucky to have been assigned to you! I love every single thing!


Sam is a busy lady so mostly posts on Instagram now. You can find and follow her @blueprintminis.

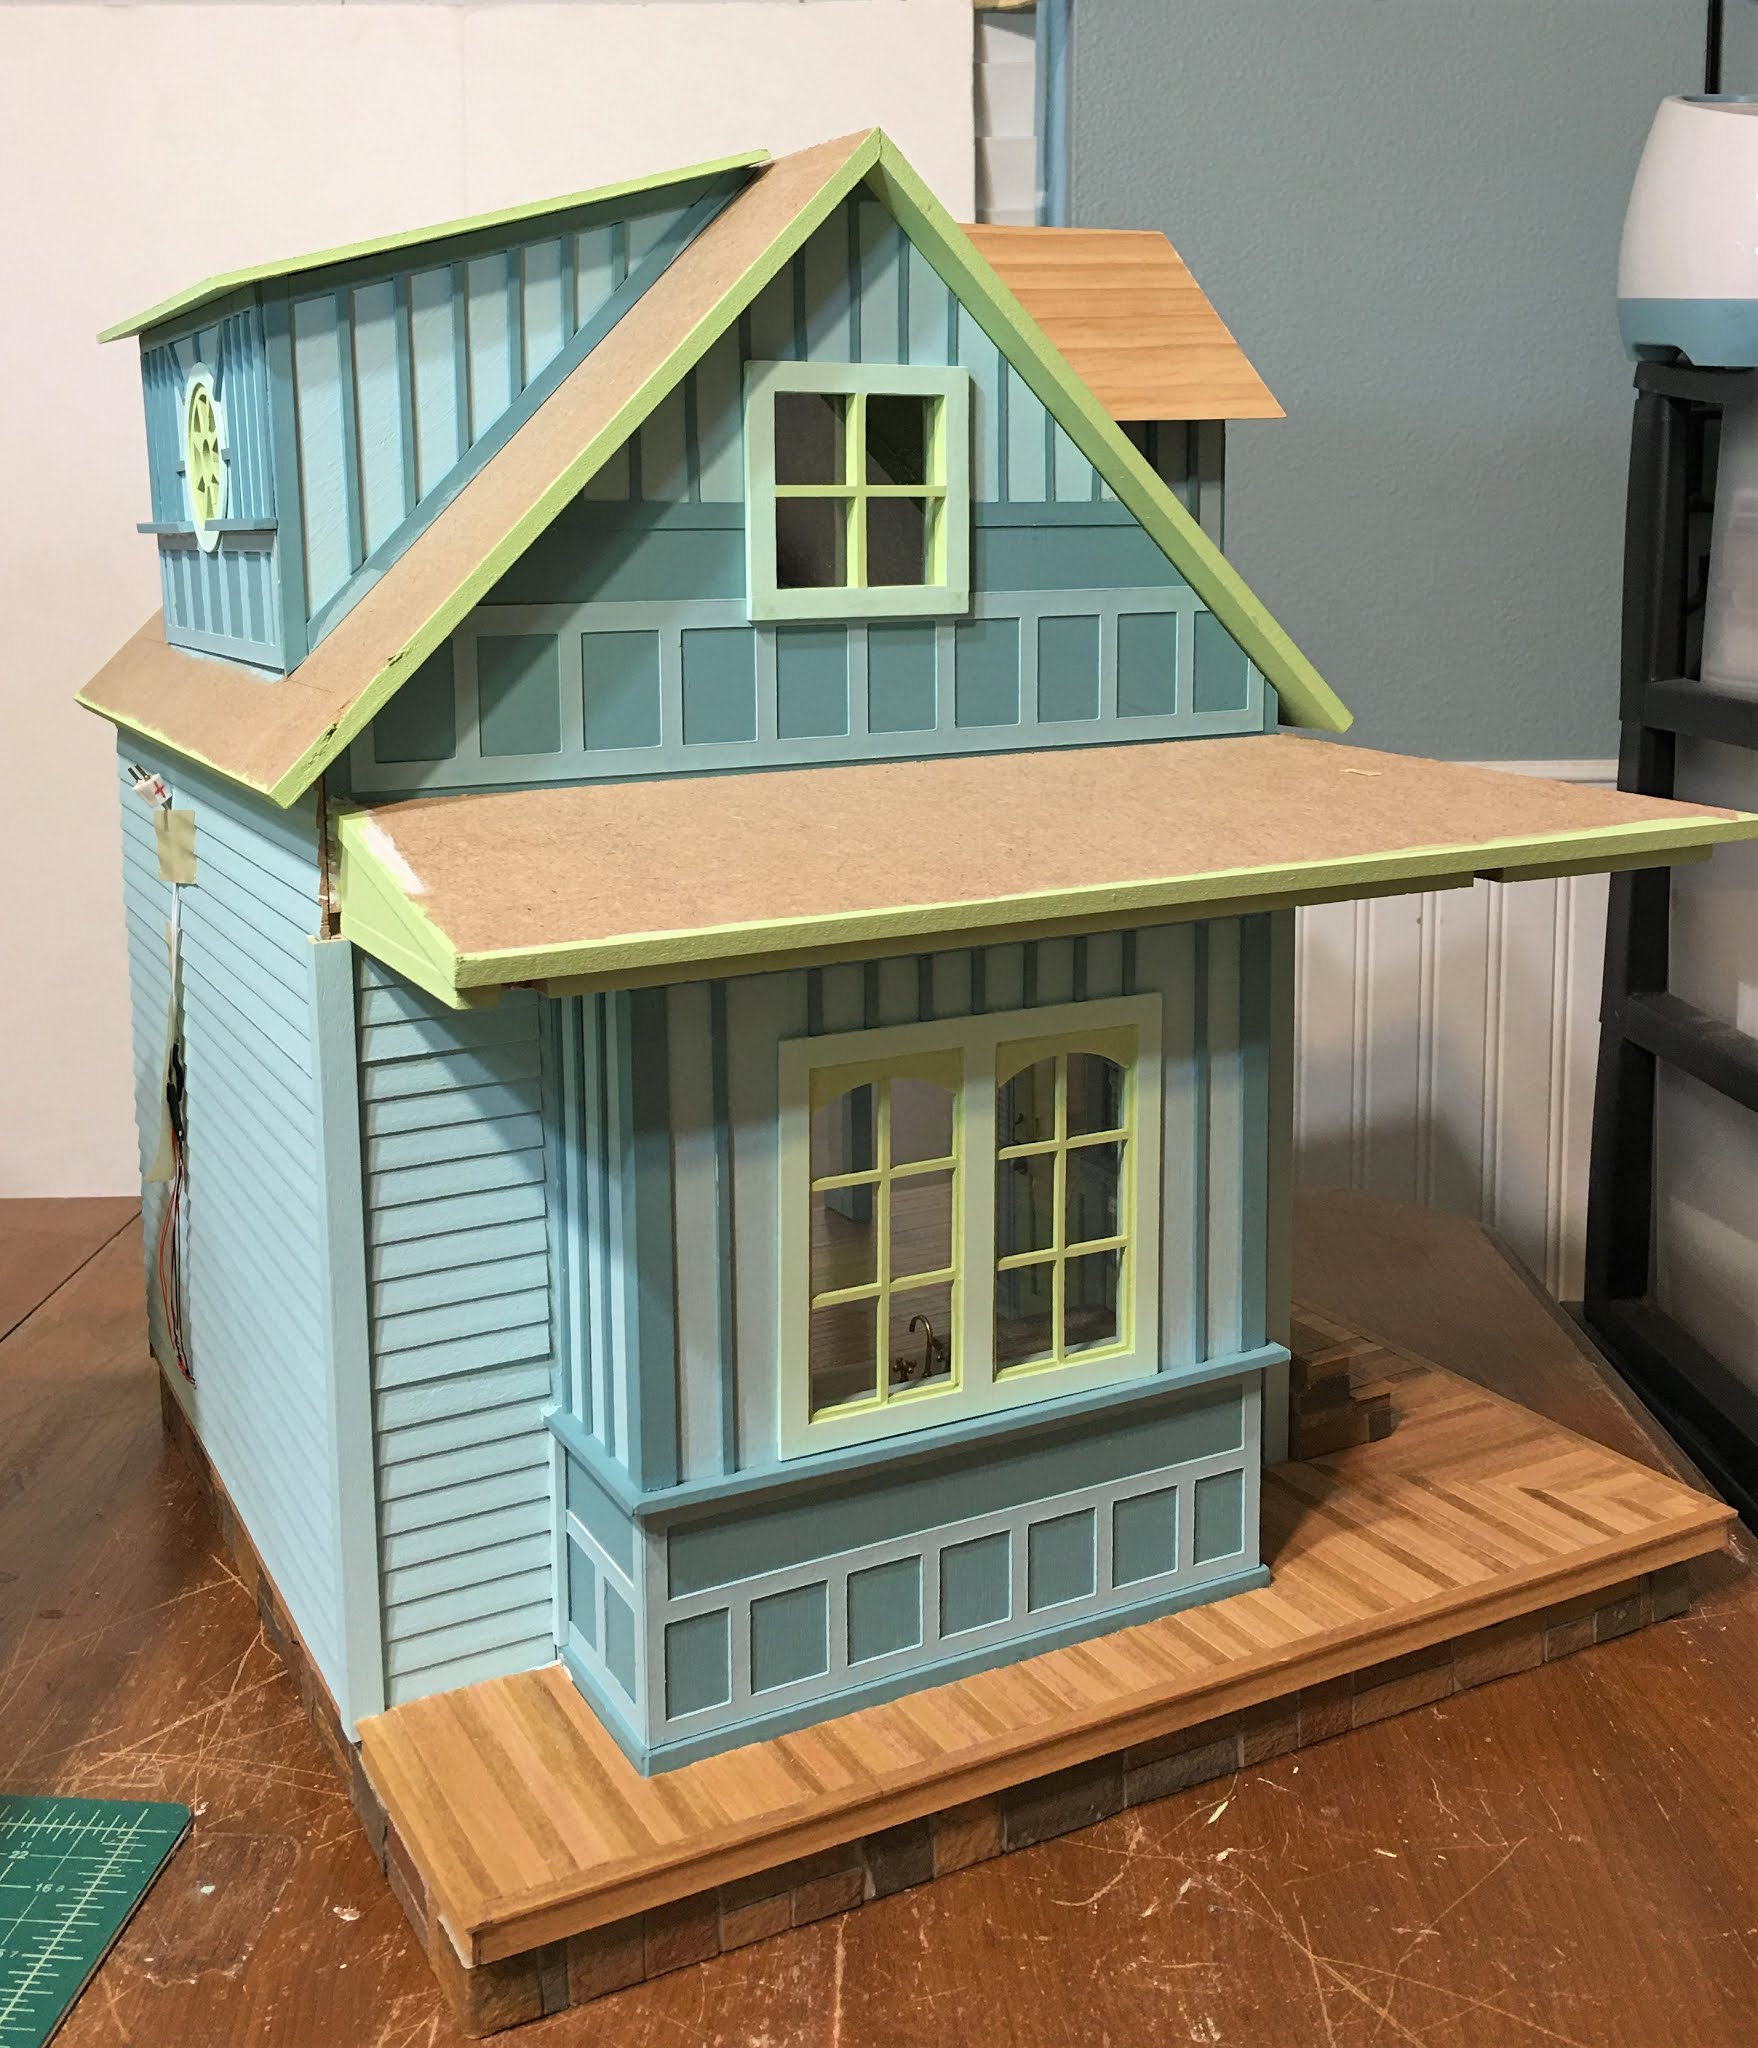
And I think, finally this week, I should tell you about a new project in the works. You know me... I never reach the end of one project before I become obsessed with a new idea. This time, it's for someone else, someone very special to me. That's the best motivation for me to finish a project! And this person, in spite of my best efforts, has not shown much interest in minis. Until now. And believe me, I have seized upon this. For now, I'll share the structure...


And one of the amazing items that will become a part of the project. Maybe it will give you a clue...


The rest will come soon enough. After I finish (I am determined) Vera and Virgil's cottages. Porches, roofing and wiring to go!

In spite of the state of the world these days, I hope life is busy but good for each of you, too. Happiness can sometimes be achieved simply in the way we choose to frame the events surrounding us. I'm trying hard to make my frames as positive as possible, and to help others do the same.

xo xo,

Jodi

Thursday, November 19, 2020

Closing Up For Winter

When Vera and Virgil first came and asked me to build their dream cottages, I don't think they were planning on my taking August through October off. I wasn't either, so it didn't surprise me in our last meeting when they expressed concerns. After all, every sign, in the house and out in the world, was pointing toward trouble. Darkening skies, cold nighttime temperatures and the sound of wind swept rain as it played it's threatening tune against my southern facing work room window. Winter was coming, and while it has never rained in the work room, the cottages, with no roofs installed, were exposed to whatever may happen in there. I assured them that I was concerned, too, and would focus great energy toward winterizing the cottages right away.


The first task was to get the porch ceiling and then the porch roofs installed. Luckily, this was a pretty straight forward process since the Lisa's Country Cottage kits are so well made. Sure, I had to make some revisions due to the added pop outs, but that was, thankfully, an easy job, too.


With the porch roofs completed, it was finally time to move on to the main roofs. I had cut the openings for the dormers when I first dry fit the kit. Heck - I even had the ceiling sides primed. All they really needed at this point was to have the wallpapers added. 

Once the papers had been applied and the paste had set, it was time to get the roof pieces installed on the cottages. It's such a great sense of accomplishment as you see the pile of components on a kit build dwindle down!


I'm so glad that I planned ahead and had both the gabled and shed dormers for each cottage as finished and as ready to install as possible. This meant that there was no lag in getting to see the cottages nearly complete. The facades, which I had only seen in a rough dry fit and in my imagination, were now a more tangible and nearly realized dream.

Here are photos of the inside of Vera's bedroom with ceiling and dormers installed. It's fun at this point to remember the original kit design and know that, by simply dropping the floor, there is a real and functional living space for these mice. 


And Virgil's


And the gabled pop out roofs, the trickiest roofs I've ever taken on. They were challenging because they have to tie in to both the porch and the big roof, and connect flush into the wall. I did pretty okay with them, thanks to Russ' help. Gaps will become a secret once the roofing is installed and the inside ceilings trimmed.


There is still much trim work and touch up to do. And actual roofing shingles to be installed...


But with such promising progress, Vera, Virgil and I are ecstatic! It looks like the cottages truly will be closed up and secured for the winter.


I hope your winter preparations (or summer for our down under friends) are coming along in a hopeful way, as well.

xo xo,

Jodi