Search My Blog!

Use the Search box below to find keywords that you're looking for quickly and easily!

Search Feature

Showing posts with label Inspiration Projects. Show all posts

Saturday, December 30, 2023

The LEGO UP! House

Hello my friends! It has been much too long since my last post and I have missed connecting and being inspired by all the creative things you've been up to. I am going to keep this post positive so we'll move right on in to my newest creative pursuit. For the 'why' of the absence, I'll leave that at the end. If you don't like sad news, just ignore it.

My son Ande and I have always enjoyed seeing Disney and Pixar films together. Since the first Toy Story movie, it has kind of been our thing. Since he is a fully grown up thirty-something-man, our opportunities to see new movies together face significant challenges. But we still try to fold watching them into our family gatherings. We both hope that one day he will have a little one to share them with.

This year for Christmas, knowing that I had limited time, Ande and his fiancé Alexis (Lex) bought me the LEGO UP! movie house. It is absolutely adorable, so I couldn't resist getting started on it right away! What a joy it was to assemble! It kept my mind occupied and when it did wander, it wandered to happy times.


Russ has assembled many LEGO sets in the last few years, mostly Star Wars space ships. Each time I dust them I worry that they will fall to the ground, pieces exploding everywhere. Yikes! So I decided to glue mine together as I assembled. I read so many differing and conflicting recommendations for adhesives, but finally decided on Testors Liquid Plastic Cement. I would not recommend it as after letting the first pieces sit for a day or so, they came right apart. Next time, when I have more time, I will order Le Glue and give that a try. Luckily, my kit only included four bags and roughly 500 pieces. One of Russ' had 8000!!!


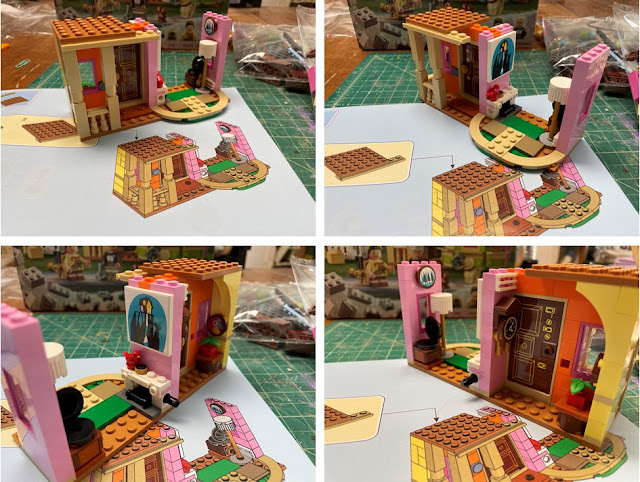
First came Russell, the boy scout who was working on his last badge: Helping the Elderly. His figure is adorable and so detailed - right down to his backpack loaded with camping equipment.


The rest of bag 1 consisted of mostly the first floor of the house. It was great to see so many of the references from the movie included in the details. Like the compass, the front door with all the locks Carl installed to keep the changing world away and the giant painting of Paradise Falls above the fireplace. I wish they'd had a way to incorporate Ellie's chair alongside Carl's like in the movie. Seeing her empty seat next to Carl's in the movie conveyed his loneliness for her in such an impactful way.


Bag 2 started off with Carl. One side of his LEGO face is smiling, and the other sports his all too familiar frown. I chose to display the smile, of course! I love that LEGO included his walker. And what a great head of hair he has for an old guy! I think this may all be 1/4" scale, as Carl and Russell are both about 1-1/2" tall.


By the end of bag 2 we see the bay windows and the second story taking shape.


Bag 3 starts off with Doug the faithful dog. The kit also includes his irresistible distraction, Squirrel (you'll see him later).


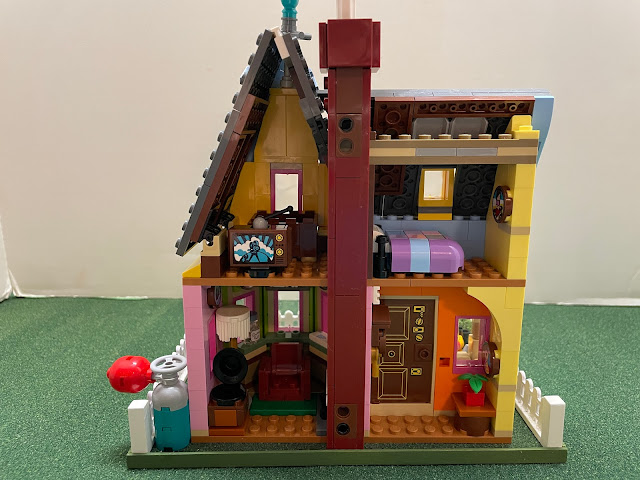
By the end of bag 3 we have a roof, the chimney, Carl's bed and TV and even Ellie and Carl's Adventure Book stored in an old crate!


The final bag was all about the balloons and display details. The kit provided a wedge for two fence pieces, a helium tank, the mailbox and Squirrel. 


It was cute but I thought the house deserved an actual display base so I set to work making one. I created the base using two pieces of 4-3/4" x 7" art board laminated together. I added a piece of model railroad grass to the top and lined the edges of the board with 1/8" x 1/4" basswood painted green to match the grass.


I wanted to keep the integrity of the LEGO set while honoring the original house and yard in the movie. So in Design Space I replicated the LEGO fence in the kit but also kept the gate design from the movie animation. 

Movie Screenshot


Lego fence, my fence and gate pieces.


I used Kraft cardboard for the fences and gate so I made several layers to laminate together. I made the gate wide so that I could trim to fit once the fences were in place.


The LEGO fences had bottom boards that lifted them off the ground, so I made basswood frames to tuck my fence board pieces into.


The movie house had decorative round finials on each gate post. I had some in my stash and made them sturdy by using a toothpick "biscuit" to join all the pieces.


Here are the fence sections installed on the display base. The gate functions with three kraft card hinges, glue welded, painted then Mod Podged for a secure bond.


Of course I had to take the opportunity to add some fun detail. I deconstructed the LEGO fence display piece and included some of the pieces on the display board. The helium tank will now sit next to the house. The mailbox has been installed (with toothpick) next to the gate (like in the movie house) and has a few blades of long grass, missed by the mower, protruding from the base. I installed two Squeeze Me bushes to the front corners of the yard. They are mounted on kraft card circles dusted with potting soil and secured with hairspray. And a couple art board pavers have been added. Squirrel has a permanent place on the fence post, affixed with a toothpick, and will drive Doug to distraction whenever he goes out for "business", lol!


And here's the display complete with the LEGO UP! house and all the characters that come with it. I hope to add a dust cover, one day.


And here's another peek inside...


What a fun distraction and a beautiful reminder of life's wonderful things! Thanks Ande and Lex! 💗

I hope to be back as soon as I can and to catch up on everyone's blog posts as I find the time.

Give all your loved ones some extra love today.

xo xo,

Jodi

Last July my mom began to experience significant back pain. She really dislikes going to doctors so decided to try and manage it on her own. I sent CBDs, some with THC and some without to try and give her some relief until the pain subsided or she agreed to see a doctor. The THC ones were great because she could finally get some sleep. Fast forward to November and her back pain still shadowed her days. I flew down with my daughter and mom finally saw a doctor. That doctor referred her to a urologist and a couple weeks later she got an explanation for her symptoms: cancer. Since then my family and I have moved into a new and sobering reality. Since then Mom has had more challenges, no real answers, no real plan and an unexpected hospital stay after an alarming complication. Back and forth my brother and I go to Arizona, to support, spend time, encourage and love my parents through this process. We are all praying for a better picture and a plan after her surgery on January 19th. The first surgery was postponed for a month in the hope of getting mom strong enough to have it. A blood transfusion helped her to feel much stronger so she may have one more before the surgery. If there is a bit of good news it is that her back pain has mysteriously disappeared. Minis, though an invaluable source of calm and joy for me, have obviously taken a back seat. I'll do what I can when I can and post as it is possible. Small and portable projects might be the answer in the near future. Your prayers and good thoughts for our family are so appreciated!

Tuesday, November 22, 2022

She Had A Dream...

As you may have noticed, I haven't posted in a while - November 1st seems like such a long time ago! But once I was finished with all the 3D printed kitchen stuff, I had to take a breather. I got my craft space ready for mini work again, and I began to think about what I'd like to do next. Finishing the Willowcrest kitchen seemed like the obvious choice (it's the project that sparked the 3D kitchen accessories to begin with), but I just couldn't muster any motivation to get going on it. In the meantime, I was contacted with a request to design and create a couple architectural elements for a very special project that had been waiting in someone's basement for a very long time.


You may remember my customer, Diana, from my doing her Breakfast At Tiffany's brownstone windows and door replicas last year. One of the projects she's been dreaming about since the 90's is recreating the historically significant Dexter Avenue Baptist Church in Montgomery Alabama. Back then she purchased the Real Good Toys Country Church Kit at a miniatures show to house it in. Then she had custom stained glass windows made by a miniature stained glass artisan. But, like for many of us mini dreamers, other projects moved ahead in line and there the kit sat, waiting for its turn. The project was never truly forgotten. Diana collected a whole lot of lovely resin sitting folks all decked out in their Sunday best to add to the congregation over the years. When she saw the project on it's basement shelf a few months ago while looking for something else, these patient people reignited her inspiration!


What Diana wanted me to tackle was the elaborate carved doorway behind the pulpit, as well as the lattice panel behind the organ area. It was challenging, as the only details I had to go by were the limited photos found on the web. The proportions and measurements had to be estimated. Additionally, Diana only had 10" of  ceiling height (minus the height of her crown molding), and I estimated the doorway in the original church to be about 18 feet tall! I would need to find a way to pay homage to the original within the height limitations, while still balancing the proportions and ending up with something that was worthy of being a focal point in her project.


Challenge accepted! Diana and I traded ideas back and forth on three slightly different models before we both agreed the version below was perfect! It kept the proportions balanced, included as many of the carved details as space would allow, and finished up at 9-7/16" tall by 6-13/16" wide. 

I got to experiment with creating dental molding and fluted columns for the first time with this doorway, and I had so much fun figuring it out!


I am so fortunate that Tasha and Ande gifted me the bigger 3D printer for my birthday last year! My first printer would not have been able to accommodate this big job, other than in pieces needing to be assembled post production.


I think the doorway is so pretty, and I just love how the dental molding, fluted columns and corbels turned out! 


The lattice piece was pretty challenging, too. In scrutinizing the church photos online, I realized that it was created in three panels. The middle panel is slightly shorter which allows room for the wood molding of the lower organ area. It is installed in a raised position on top of and joining the other two panels. The lattice detail itself is done in four levels, not including the main frame and the stepped picture frame molding on top of that. It was a challenge not only to create, but to figure out how to engineer it for a successful print. I felt that eliminating the half circles in the homage version gives the piece more balance and accommodates better the measurements that Diana had to work with.


Level detail close up.


It was such an honor to be trusted with this piece of the job and to help Diana realize her longtime dream!

In other exciting news, I have been busy rediscovering cooking joy with our new Instant Pot! Even Russ has joined in the culinary delight around here! This is all thanks to our big hearted and generous son, Ande! He uses my Prime membership from time to time, and if I leave stuff in my cart and he sees it, he likes to surprise me with it! 💗 This time, it was the Instant pot and accessories I was considering. What a great kid we made!!! He and Lex and Tasha and Brent love theirs, too!


We have run out of fingers and toes counting our blessings, among them, going to Tasha and Brent's new home for their first Thanksgiving there! I hope each of you has more to be thankful for than digits, too!

Happy Thanksgiving!

xo xo,

Jodi

Thursday, October 21, 2021

A Breakfast At Tiffany's Happy Ending!

This past week I was able to focus on the last few tasks for the Breakfast At Tiffany's custom order. The big job, creating a door based on the brownstone's, was challenging! You see, the dollhouse kit's door openings are much slimmer, and instead of a copy of the original basement door, the client wanted both doors to match. Here's the comparison photo to refresh your memory:

Client's Park Avenue Kit Left, BAT house right.

I had to try to capture the detail and feel of the door in a much more compact design. The main BAT door has two windows on top. The client said she could live without them, but I was determined to try and make that feature a reality for her. Since she wanted to paint the doors herself, this created another challenge because I had to make the glass removable. I cut the doors from 2 mm chipboard, two outer layers and an inner core, with the Maker. This allowed me to create a recess for the glass to slide into. This sequence of photos shows how the window feature will function:

Lexan and trim piece cut to size.

Slide Lexan into recess.

Lexan seated into cavity.

Insert top trim piece.

A pin hinge has to fit here, too. Tight!

I created the door parts in Tinkercad, then 3D printed detail molding pieces to fit into the chipboard recesses. Here are the doors with the detail molding glued in, dry fit into the door frames and with the two different pediment options. I included both pediment options for the client to choose from once she's seen a live dry fit. The basement door does not have windows per the client's request. I also added the same 1/16" x 1/4" trim detail onto the door frame to match the window frames. This is to try to recreate the stepped depth look of the original facade details. I think she could even add an additional 1/16" x 1/8" piece on top of all of the frames to even further the effect.


If you remember, the client had sent me both doors and their frames from the kit so that I would have exact measurements. This was great so that once I made the new doors, I could actually mount the doors into the frames. After priming, sanding and drilling holes for the pin hinges, I mounted them. The client asked that the doors open from the left instead of the right, so I changed the hinge pin holes on the door frames, as well.

Basement door front and back

Main door front and back

Doors Opened. The chipboard has been rounded off so it does not get hung up on the frame.

The client thought, after seeing the fancier large window pediment, maybe she'd want the large window above the entry to match all seven of the other slim windows. I printed a simple rounded pediment and sent both so that she could choose her favorite once she'd seen them both in person.

Large window with fancier pediment, with simpler pediment and slim window.

I was surprised that the door portion of the project went so well and so quickly! Because of that, I was able to get final approval from the client, get paid and ship her package well before the one month time frame that I quoted to her! Here's a collage of the final order, though I included a lot of extra architectural elements (not pictured) for fun.


I can't emphasize enough what an amazing opportunity this was! I was challenged in many new ways, learned so much about the possibilities of my tools and myself, and was able to help a fellow miniaturist fulfill a dream! It just doesn't get any better than that!

Now that this fun distraction is finished, I'm looking forward to getting back to the Beachside Bungalow's kitchen. Hopefully, I'll have some progress to share with you next week!

xo xo,

Jodi