Search My Blog!

Use the Search box below to find keywords that you're looking for quickly and easily!

Search Feature

Showing posts sorted by date for query cricut. Sort by relevance Show all posts

Thursday, February 29, 2024

An Unexpected Detour

Hi Guys! I hope you won't be disappointed that there's no update (other than the two photos below) on the Fairytale Treehouse's great room fireplace. I had fully expected it to be my sole focus this week. Until...

Cricut cut parts assembled, herringbone "brick" affixed to firebox.

Test fit in the great room. Goldie can't wait to roast marshmallows!

As I'm sure you've all experienced, life has a way of landing us into unexpected adventures. That's exactly what happened to Russ and me last weekend. What follows is not a post about miniatures, but is quite an exciting development for us in any case. So if you're up for something other than minis, read on...

Russ and I have both had trouble sleeping for a few years now. Sometimes the aches and pains of our aging bodies is the culprit. Sometimes it feels like we can't find the right pillow. Still other times it feels like our mattress is seeking revenge for all our tossing and turning. Whatever the plethora of causes, it's annoying! We finally came to the point where enough was enough!

Our solution and plan was to install our new, firmer mattress. After all, it's been in its box for a little over a year now!!! Then we would assemble a new frame (also a year old now) for the old mattress (which I love but Russ does not) and put it in the second guest bedroom (we seem to be finding more and more occasions for needing a second guest bedroom lately). So our plan to get a new mattress for our bedroom had additional motivating factors. 

To give more context, in 2018 we replaced the carpet with wood flooring in two of our four bedrooms. We set one up as a guest bedroom at the time. The other has been sitting empty since we finished. The last bedroom (other than ours) I'm ashamed to say is a catchall for all the stuff we don't know what to do with but can't yet decide to part with. It will stay as is until we find inspiring motivation.

As we began to tackle the mattress swap last weekend, our plans drastically expanded. At first we decided it wouldn't be that hard to empty the room so that we could install new flooring. It is long overdue. And, we thought, while we were already in DIY mode, it might be smart to go ahead and repaint, as well. One thing lead to another and soon, thanks in part to our income tax refund, we had a pretty great makeover in the works. 

Here are a few of the elements that will go into making up our new environment. It seems serene and lovely on paper, but if we still can't sleep in here after all this then there is no hope for either of us, lol! But we do hope. We hope by the end of March we'll be sleeping in our newly redecorated room. And we hope to have two guest bedrooms ready in time for Easter company. And we hope our aging bodies are up to the task!

The background color, Cream Puff, is the same color we painted in the other bedrooms.
The more I've lived with it, the more I really love it!

Under the guise of saving money, I'll be making new wall art for the room. That means I'll get to carve out some creative time. It's the next best thing to mini time! I hope you're up for expanded adventures and will enjoy the transformation with us, too!

xo xo,

Jodi

Thursday, February 22, 2024

First Things First

Sometimes I get working happily away and then suddenly realize, with shocking clarity, that I'm about to make a big problem for myself. I am so grateful for that little voice that screams inside my head! Here I was, totally engrossed, making furnishings and fillings for Wayne's apartment. Thanks to that little voice, I began pondering when I should glue his partition wall and where I would run the wiring for his lights. Then it hit me: you're going to have to attach the roof. That realization sent me into an existential crisis about what I had left to do, how those tasks would affect future tasks and exactly what order of operations was going to be the most beneficial/least problematic!

That's when I totally changed gears from Wayne's place to the great room. As a reminder, it became "great" when I cut big swaths out of the second and attic floors leaving behind only the balconies. A three story room is pretty great, right? God I LOVE dollhouses!!!


You see, I always wanted something really great and worthy of a great room. And that meant a fantastic fireplace. Last February (Valentines Day to be exact), while gathering ideas about what the treehouse wanted to look like, I came across this photo. OMG instant crush!!! Cupid's arrow hit me hard. I knew I had to try and achieve the vibe of this amazing fireplace, but how? I've spent the last year working out possibilities.


First, because a lot of the wiring had to run behind the fireplace down the center of the treehouse, I'd need a hollow wall. But not a thick wall because the floorspace in the great room, thanks to the balcony, was already pretty limited. So a wall thin enough to be passable to the eye and also allow for the wiring. Thank goodness I did not attach Wayne's wall because that provided my pattern for the gabled roof. And thank goodness I did not attach the roof because I might have had a dickens of a time getting this hulking fireplace installed afterwards. I created a gabled roof pattern on cardboard from Wayne's partition wall and with this, and a few more measurements, I created the great room fireplace wall.


As you can see I used art board for the wall and lined three sides with 1/4" x 1/4" basswood to create the hollow, also providing a nice gluing surface.


And then I had to come up with a substrate for the fireplace. The gnarled tree bark will get created from paperclay or paper mache but I needed something with the basic tree trunk shape to attach everything to and to lend stability. Hello Design Space. Hello chipboard.


I started off with a bottle shape then sliced and welded until I achieved roughly the shape and size I wanted. Because my Cricut Maker only cuts chipboard that is 10.5 x 10.5 inches, I had to make the substrate in two sections to achieve the 22 inch height. The front would have a cutout for the firebox and a niche high up the chimney. The back would be solid. I was able to replicate the shape of the openings in the balcony and staircase windows to tie the firebox opening/niche in with the fairytale theme of the treehouse.


I attached the bottom and top sections of the front and back fireplace pieces, gluing art board across the inside seams to lend strength. For the sides of the fireplace I used more art board scrap. It can easily be scored to make the gentle bends I needed but also makes for a sturdy substrate. 


Once I had the sides securely glued it was time to make the firebox and the framing for the niche.


And that is where I'll stop for today, my friends. Today is mine and Russ' 37th wedding anniversary and he's playing hooky from work. 😉 

A shotgun, Vegas wedding, no money for rings and no clue what was ahead. But here we are, 37 years later, still in love, still really liking each other and proving love truly does conquer all. 💘💗💘💗💘

February 22, 1987

One last thing before I go... I made a bunch of newspapers for Wayne's apartment and thought I'd share the printies. They are great for filler or to use as props under mini art projects, on attic walls or shop windows, crumpled in trash bins or stacked in messy rooms. 


xo xo,

Jodi

Friday, February 2, 2024

Miracles

Hi Guys! February already? Seems like 2024 is going to go by just as fast as 2023 did! Yikes!

In spite of the calendar, I have been able to make a little progress on the treehouse over the last couple weeks. And I got a task completed that had me a little anxious: The Roof!


When I build out of sequence (Who? Me?), adding things on and rearranging components, I never know what kinds of issues I might be creating for myself later. Miraculously, this time, it wasn't too bad. I started by finding all the roof pieces, removing them from the kit's sheets and sanding. Oh the sanding! The fancy gable deco pieces took a lot of sanding and a good bit of assembly. Listening to Steven King's Fairytale audiobook through the process made it very enjoyable!

Gable Deco Components

Then paint. Does everyone struggle with what paint color to put where like I do? The final weathered look I have in my mind is not so bold, but it has to start out that way. Once the gable deco was painted and assembled, the rest of the roof pieces could be assembled. 

I had a 1/4" gap on the left side of the right front gable and couldn't account for why. I had Russ, the handy construction consultant, look at it with me, too. Neither of us could figure out why, so maybe it was just a factory kit piece cutting issue? We'll probably never know. But, luckily, a little filler strip of art board took care of the issue.


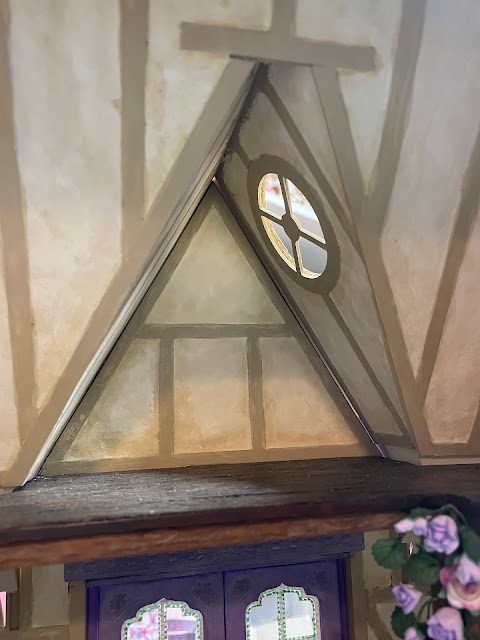
I wanted to bring a little natural light into the dark recesses of the gables. So, each of them got a window designed and cut with the Cricut Maker. Wayne's apartment gable will have an arched dormer window and the girls' bathtub gable a round skylight,

Wayne's Dormer Window

Pointed at the stars for nighttime viewing from bed.

Bathtub alcove skylight.

Other than the gap, the roof fit pretty good. I marked where the walls and floors met the roof and then...

First look with the roof on... finally!

Wayne's Apartment

Bathtub Alcove

Left it removable for now so that it would be a lot easier to do the wall treatments.

Removable Lid

Easy To Work On

After priming the walls and painting the gable trim color, I added the timbers using 1/16" x 1/4" basswood strips. The dividing wall between Wayne's apartment and the great room got thicker basswood, 1/8", to give the appearance of thickness since it'll be viewed from the side profile. I made it from art board.

Wayne's Timbers


I painted the timbers to match the majority of the rest of the house (except the girls' room which has purple timbers).


And then I spent some lovely hours applying the Paperclay. It took just under 8 ounces for the attic walls. I'm pretty messy with the Paperclay, so it requires I sand off some timbers then touch up the paint. Followed by age washes.


Almost Ready For Move-In!

Once I permanently affix the roof piece on to the treehouse, I'll have to install baseboard trim where the front roof and floors meet. And Wayne's apartment needs steps and trims, too. But before I install the roof, I have lighting to add.


And there are so many half scale furnishings and fixtures to make for Wayne's apartment. It's going to be interesting to work in that scale!

With a little luck and maybe a few miracles I'll be back next week with more progress. Until then, I hope you're finding time for creative joy, as well!

xo xo,

Jodi

Wonderful news about mom! She had her post surgery consultation this morning. The doctor says the mass was not cancerous!!! I can't even express how amazing that news is! We are all just so relieved and grateful! She still has some underlying health issues to resolve, but with this news, she is ready to face the next problem head on! I can't thank you all enough for your thoughts, prayers and condolences! I told mom, just maybe, it's a miracle!!!

Thursday, January 18, 2024

Thank Heaven For Little Girls

Hi Guys! Hope the New Year is being kind to everyone! For me and my family it has been a strange time of waiting. Waiting to find out exactly what we're dealing with with mom's illness and how we can help her through it. Thankfully, when my mind gets stuck in worry about things I can't change, I have minis to help pull my hands and mind into something productive. And thank Heaven, I have two little girls that I get to make things for.


During my last visit to mom's, my new bottles of Fred's Weathering Stuff came in so I had all I needed to finish the treehouse's wood flooring. Like the first floor, I used the veneer strips that came with the Linfield kit to cover the second and third floors. Just to refresh your memory, that included the girls' bedroom, Wayne's attic apartment and the second and third floor balconies that frame two sides of the great room.

Goldie and Alice's bedroom floors pre-staining.

Wayne's attic apartment floors pre-staining.

One of the dangers in bouncing around the processes of a project for me is forgetting the important things I need to remember. Such as running ceiling light wiring before I install the flooring on the floor above. 🤦‍♀️ Oh well. At least the masking tape and sharpie help "mask" the wires, and they'll be almost totally under an area rug.

Kitchen's ceiling lantern.

Wiring from the ceiling lantern coming up through the floor.
covered with masking tape.

Sharpie camouflage.

Once the floors were finished with stain and sealer, I could finally install them into the treehouse. Like a layer cake I positioned the kitchen's stove wall with glue and clamps, then applied the glue to the girls' bedroom floor and let everything cure overnight. The next day I did the balcony and Wayne's floors.

The Paperclay stones I applied to the oven wall had caused the chipboard beneath
it to warp a little as it dried. I had to weigh it and clamp it while the
glue set to flatten it back out. Luckily, it worked!

Girls' fireplace wall permanently installed.

Unfortunately, the stain from the new bottle and the stain from the older bottle weren't a perfect match. The new floors got a little darker. Fortunately, the only place where the new and old meet is the transition from the balcony into the girls' room. You have to really crane your neck or peep through windows to see it. The transition strip makes it look clean, at least.


Here is a photo of the treehouse interior with all of the floors finally installed! The only structural pieces left of the kit are the roof pieces, and with all those gables, it's going to be challenging!

I also made the wiring mistake on Wayne's floor/girls ceiling fixture.
I "fixed" it the same way. He will also have a fireplace wall and a rug.

All the floors are installed! Yippee!

You may have noticed some furnishing in the girls' room. Back when I made Roz's bedroom chair I also made a couple chairs for Alice and Goldie. They are a little larger, true 1/12th scale, and are covered in a more youthful and jovial butterfly fabric. I also used my graphics program to combine aspects of three different Pottery Barn Kids rugs to print the perfect rug for the girls. I am delighted with my new printer and will share about it in an upcoming post.

It is wonderful to finally see the ceiling and flooring in the girls' room!

I bet you also spied the dollhouse bookshelf and a dollhouse. I designed those in Design Space and cut them with the Cricut Maker. I hope to figure out how to make the projects available to everyone sometime this year. The dollhouse is 1/144th scale.

Dollhouse bookshelf with secret cubby.


I'm making board games, paper dolls and lots of other things the girls will love to play with when the weather forces them inside. Currently, I've got a big batch of real opening books for the bookshelf in progress on my craft table. Through The Looking Glass and The Three Bears will be included, of course, along with many other children's favorites and fairytales. 

Trixie Potter lives just down the holler across the creek.
She generously gifted the girls with every volume of her works.

My own love of reading bloomed with my first library book, a pop up dollhouse.
I can't wait to introduce them to Beverly Cleary, too.
They both share so many personality traits with Ramona!

I'll share more about all of that fun stuff in my next post. If you want the mom update, scroll past my signature. Otherwise, I hope you're all finding loads of things to be grateful for in the new year, and I hope it includes minis!

xo xo,

Jodi

Mom's surgery is Friday and hopefully, shortly thereafter, we will have more answers, a thorough diagnosis of her cancer, and a treatment plan. To our delight she continues to feel much, much better than before her hospital stay last month. Her blood analysis looks better and so far, no need for another transfusion. She's even insisting on cleaning her own house!!! I hope to start posting more regularly again and will, of course, keep you updated. I can't thank you enough for your kind thoughts, well wishes, prayers and love!

 xo xo

Thursday, August 3, 2023

Totally Analog

You may have noticed that during the whole trunkhouse portion of the Fairytale Treehouse project, in spite of having a wonderful "Machine Park" (Birgit's name for my Cricut Maker and 3D printers) at my fingertips, I haven't used any of it. It isn't an oversite, and in fact, has been totally intentional. You see, an important goal for me on this whole adventure was to reconnect with the joy and freedom that came with minis in the early days of my miniature passion. Before my need for tougher challenges and perfectionistic aspirations faded that joy a little. Before adding in so many complications and steep learning curves. I wanted to concentrate on creativity, whimsy, exploration and analog ingenuity. I wanted to use up good things from my stash, utilize recycled materials and to enjoy many aspects of making minis that I hadn't for a long time. One of those "old loves" was making minis from kits. 

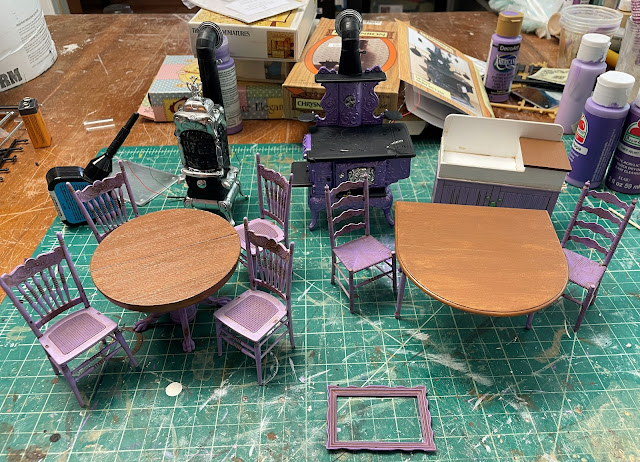
There are some fantastic old time kits that are still being made and/or sold as New Old Stock, many of which I've had in my stash but had yet to experience. The majority of Roz's fixtures and furnishings will be made from kits. Chrysnbon, House Of Miniatures, and Calico are among them. Some I have had in my stash for a very long time, and some are new arrivals. Some I will reimagine in order to suit her personality (and to accommodate the trunkhouse's particular round room challenges). Others, I will simply play with products and finishes that sound fun. 

I started with the Chrysnbon kits. A Parlor Stove, Cook Stove, Dry Sink and table and chairs for Roz's kitchen. I also had a table and chairs for Alice and Goldie's kitchen so I decided to get it done at the same time. I love the compact scale of these kits as well as the detail and accessories that come with them.


I've gotten the tables and most of the chairs assembled (two more are on the way after a "mind change"), but I have many more rounds to go with all of them while I experiment with aging techniques. Nothing I've tried so far is "It", but I'm far from giving up yet. 


For the parlor stove, I didn't like the way that the provided acetate fit into the kit's windowed pieces, so I played with another option. I blocked off the openings from the back side with masking tape, then carefully applied UV resin to each of the windows in the grid from the front side. Once hardened, I applied another layer of the resin over the back where the tape had left a bumpy residue. It seemed to smooth it out and clarify it better.

Taped back side.

Resin to be applied in each square.

Before the application of additional resin over the tape texture.

After applying the resin over the tape texture.

I sanded the "chrome" pieces a bit before assembly to take down the intense shine. I like the way it seemed to age the pieces and leave some black wear marks behind. I had a particularly troublesome time assembling the "chromed" kit pieces, even after carefully scraping off the glue joint areas. I ended up assembling the base surround onto the stove rather than as a separate assembly because of it. It worked out okay in the end, but boy are those "chrome" pieces slippery! 


For the stove's interior fire light, I wanted it to be very subtle. I didn't want it to be the first thing you noticed when you looked into the parlor and I didn't want it to seem like it was too hot in this tiny room. Just a feeling of warmth is all it needs. It is so hard to tell at this point if I have achieved that, so I'm not going to actually install the stove until the last thing. That way I can adjust the lighting, if necessary.

Should the light spill out the bottom?
Should more "flame" appear in the windows?
More research is needed...

That was also my goal for the kitchen's cook stove fire light. To start with, I only added one orange LED chip light. 

Placed inside the cap of Cricut blade packaging to keep
it from moving around inside the stove.

The LED's resister needed an enlarged hole.

Seems pretty bright with a 9 volt battery.

Light is only supposed to peek out of the baffles on the side, I guess. You can see the flame reflected on the wall, and that may be enough - we'll see. If not, I suppose I can punch a few holes in the wall separating the oven from the fire.


Other than starting on the kits, I was able to get the front and balcony doors affixed to the trunkhouse. I am super excited to see them once they're nestled into the bark of the tree! But that is going to be a bit farther down the road.

Roz's front door.

From inside the parlor.

The bedroom balcony door.

Seen from inside.

Current status of the exterior of the trunkhouse.

What comes in the next few posts will probably be a mixed up jumble of things. Hopefully, in a few weeks, everything will come together and I can get Roz and Rozario moved into their house in time for... 

Brace yourself... A four letter "f" word is coming... 

Fall!

That's right! Time flies, especially Summer! And for those of you living through the record breaking heat, fall will be most welcome!

Hope you're all enjoying your time whatever the season!

xo xo,

Jodi