Search My Blog!

Use the Search box below to find keywords that you're looking for quickly and easily!

Search Feature

Sunday, March 6, 2022

Supplements For The Soul

I believe it was while creating the garden for the Storybook Cottage that I discovered my joy for making mini flowers. Since then, each time a project calls for flowers, plants and herbs, I get excited about the creativity involved in making them. There is such a variety of ways to color or paint them, including acrylic paint, alcohol ink and markers. It's so much fun to research each species and then figure out what you want to do! Whether I make them from a kit, punches, cut leaves and petals using the Cricut or a combination, it's an endeavor that completely fulfills me!


I'd collected kits over the years from Bonnie Lavish, Mary Kinloch, Little Goodies, SDK Miniatures among others, and because my projects to date never had much need for purple, I had many Bonnie Lavish kits in purple hues to start with. One of the things I love most about making these fun flower kits is, with a little imagination, you can add supplemental buds in various stages of growth to make them stretch farther. As you can imagine, making TWO flower shops at once, I need a lot of flowers!


For Bonnie Lavish kits, I cut extra lengths of floral wire to make buds. I dipped the ends of the wires in Fast Grab Tacky Glue, forming a ball, then let dry. Once dry, I made a mix of a pea sized drop of Fast Grab Tacky Glue and green acrylic paint in a color close to the leaf sheet, dipped to cover the white area and also let dry. Once dry, I matched the flower petal paper color in acrylic paint (sometimes having to mix the color myself if I didn't have a match ready made), dipped the top half of the green bud into the colored paint, then let dry. These looked like newly opening buds.


For buds that had opened farther, I used the extra colored paper surrounding the kit's cutouts to make supplemental buds. Using the smallest five petal flower punch, I pierced a center hole and then slid it up to the colored paint. Wrapping it around the paint/glue ball gives the appearance of  an opening bud. Using these supplemental buds I was able to turn 3 - six flower kits into 54 stems - plenty to make bouquets and pots in both shops. And, they'll look even prettier and closer to natural flowers.


I followed much the same method for the Zinnias, though when it came to the leaves for some of the buds I ran short. Using this Mini Punch Bunch leaf I was able to punch them out from the kit's leaf paper, then just remove the side leaves. I also added a vein down the center of all of the leaves with a straight edge tool and an ink pad. One kit made 36 stems with these supplements. 


The last Bonnie Lavish kits I wanted to use from my stash were Hydrangeas. I had three kits (and a partial leftover kit). They are so full that I didn't think they'd need to be supplemented, but I'll keep that idea open when I start assembling vases and pots. For the leaves on several of these kits, I have a leaf press that creates veins. It really does add a nice detail.


I also had a few S.D.K. Miniatures kits in my stash, so I decided to start with poppies. These flower shops are going to have flowers from every season, and we're just going to pretend that they are sourced from some magic greenhouse somewhere in the south of France. ;O)


I Googled "poppy colors" on my phone, and the first picture that popped up inspired me. I thought that the melon colored poppy would look wonderful in both the blue and peach color schemes of the shops.


I got out my alcohol markers and decided it would be great to have a color chart of the various shades I have for this project. Sometimes I find that the color on the marker looks very different on different types of paper. The SDK kits use silk paper, the Bonnie Lavish kits use colored printer paper. In general, the silk paper comes out a bit more intense, so I have to consider this when choosing colors. It also takes quite a while for the alcohol to evaporate, so I try to color the paper and leaves ahead of when I want to begin assembly.


There was enough materials in the SDK kit to make 12 poppies, so I decided to make six pale pink and six pastel pink. I also Googled the growing stages of poppies to see if I could include some buds of varying maturity. Using the glue/paint ball method, I also added some fuzzy looking green foam to the tops of some of the buds to replicate the fuzzy stage. I made supplemental buds that were opened a bit using a four petal punch and the extra space around the flower sheet. I had plenty of extra leaves, so I just cut them down a bit to use on the smaller buds.


This gave me many stems to make up a few full pots and add a few to mixed bouquets. I really love both colors and am glad I decided to use two.


After these, I worked on a sunflower kit, then some tulips. I'd like to try the 1/2 scale tulip kit, as I think that size would be much better in mixed bouquet vases. These ones look like they were fed Miracle Grow!


As you can see I have filled up one large Styrofoam tray. Here is the other side with the Bonnie Lavish flowers.


I'm working on a daffodil kit now, and that makes me really excited because it reminds me that spring is only a couple weeks away!  These stems will probably get planted in pots.


I have many more varieties to make, and my goal is to be finished with these shops around Easter time. That is when I'll get to give the blue shop to someone who is very special to me. It will be her first miniature anything, and is the one gift I can give that my whole heart goes into. I hope it turns out as amazing as she is, and I hope she loves it!

xo xo,

Jodi


Sunday, February 27, 2022

Creative Solutions Found In My Stash

The little flower shops received a bit of progress over the past couple weeks by way of adding lighting. I'd have gone crazy here (working candles, lamps etc.), but had to reign myself in. Each shop needed to run from a single nine volt battery pack, and because of this, I was limited to five bulbs for each shop. A three bulb chandelier and then two single bulb side lights to supplement.


One of the restrictions that I have put on myself over the past couple years is to try and use what supplies I have on hand whenever possible. I began to feel a bit obscene buying more minis and supplies when I'd already accumulated so much. In addition to feeling better about myself and my footprint on the world, this policy also forces me to be creative, which is where I find the most fulfilling enjoyment with this hobby anyway. 

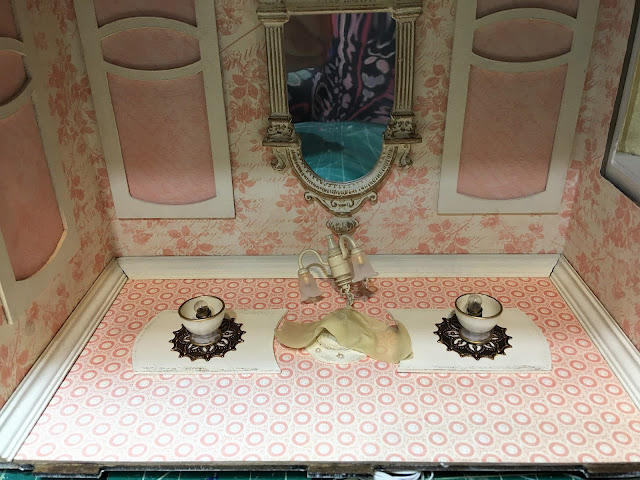
So for the supplemental lighting on each side of the chandeliers (which were already in my stash from an eBay lot sale), I made my own fixtures using clear plastic footed bowls and 12 volt bulbs and sockets, also from my stash. I drilled holes large enough for the screw bases to seat a little into the hole so the bulb would only stick out the bottom a little.


Then to make the clear bowl opaque, I mixed a little off white paint and Tacky glue and applied it to the inside of the bowl. I finished the edges with gold paint marker.


Here's what they look like with the lights off...

Peach shop


Blue shop


And with lights on...

Peach shop


Blue shop


The 9 volt battery packs will sit on top of the roof, hidden behind the protruding sign portion of the front wall. I am likely going to add a lean to type removable roof piece to camouflage it. The battery packs were in my stash, and I had extra 9 volt batteries leftover from the last time I changed all the smoke alarm batteries.


But first, I am in the midst of shop fixture auditions and finalizing the color scheme for each of the shops. It is great fun getting to work on two opposing colorways at once! In this endeavor, I am also trying to use up what I have in my stash, though if I need to create a fixture or an accessory, it's nice to know the Maker and the 3D printer are close at hand.


Stay grateful for all the liberties you enjoy, and keep those not so fortunate in your constant prayers. There but for the grace of God go I.

xo xo,

Jodi

Sunday, February 20, 2022

Filling The Happy Tank

When you love something so much, when it's just an integral part of who you are, and nearly nothing else in life fulfills you as much or creates as much internal joy, it's really hard to give it up. Over the past couple months I felt my SELF shrinking somehow. Don't misunderstand - my heart has been FULL of family and plans for a future making incredible memories together, but still, something important was missing.

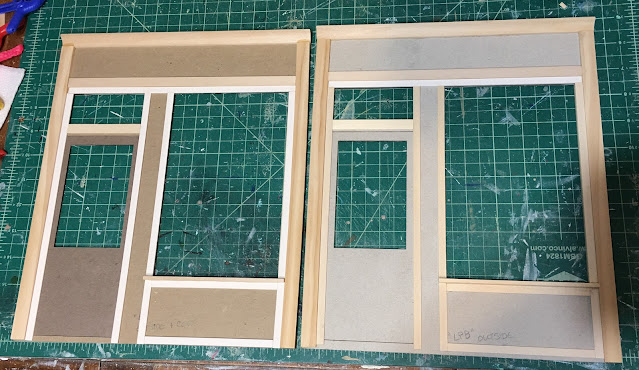
Last week, I found myself in between domestic projects and longing for something creative to do. Did I have a small kit or project I could do? It was then I looked across from my desk and saw the incomplete flower shops waiting patiently on my shelves. So patiently, as I haven't worked on them since February of 2017. When I did the math on that one I nearly fell out of my chair! Could it really be 5 years?!?!? That was when I started the chipboard storefront kits from Alpha Stamps that had the working title Botanique. One was planned for me to keep and one to give to a special person in my life.

When I left off on the projects I had only just scratched the surface - wallpapering and adorning the interior walls and ceiling with trim.


Then a panicked thought shot through me! Where had I put the kit's front pieces??? It had been five years, after all. And loads of other "stuff" has come into my possession in that time. I should learn to trust myself more. They were safely stored in the first drawer I went to. Phew!


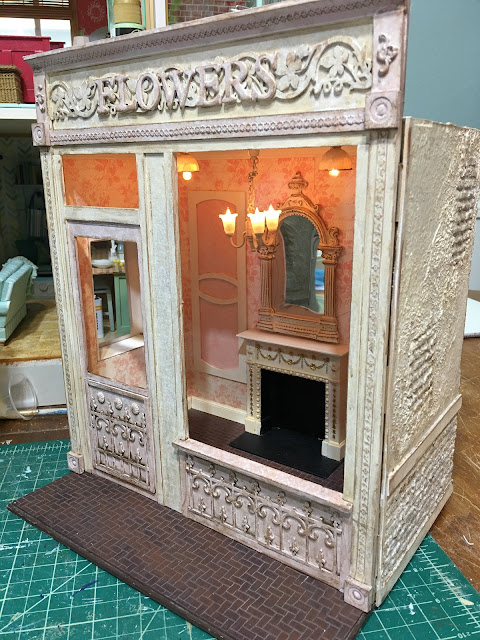
They were blank canvases! Nothing holds more possibility than that! So, what could they become? My original ideas came flooding back into my mind. And in fact, I had started an idea folder for them on my computer way back then. Looking through the saved photos, my heart was still leaning in the same direction: A sort of old Paris type street shop that had seen a couple centuries, but was loaded with gorgeous fresh stems of all varieties and bouquets of every colorful combination. Herbs and plants, too!


So to start, I added a little detail and it didn't hurt that adding the wood trims strengthened the chipboard storefront, too.


And then came the fun part: the details! I used Dresden trims, jewelry findings, laser cut fretwork trim pieces leftover from other projects and some chipboard lettering.


I was having so much fun, and my happy tank was once again overflowing! This project was exactly what I needed, and here they were waiting for their turn in my hands! Hallelujah!

I forgot to mention that these shops come in two sizes: a standard depth and a deep version. I have one of each.


To finish the outside, I thought to keep them the way it might have been a couple centuries ago. A brick building encased in stucco. Of course, the shop has been through many things in it's lifetime, so some of the stucco has fallen away with time, exposing brick beneath. Luckily, I have some Magic Brik materials and Greenleaf Stucco mix in my stash from past projects.

The photos below are just after applying the Magic Brik around the foundation and in strategic areas on the walls.


And then below, laying on the stucco. The best tool for the job turned out to be my finger! I smeared it where I wanted, then took a moistened sponge to remove my fingerprints. And what a mess I made! A vacuuming break was imperative while the stucco dried.

Not knowing just how much of the original bricks color I wanted to show through, I painted individual bricks with washes in tans and grays. I got out the heat gun to assist the water evaporating. Time is of the essence!


The shop owners over the years have opted for the inexpensive approach, painting the exposed brick and the stucco in a unifying color, and not spending the money to make restorative repairs. But time and grime have left their mark, lending character. This was achieved with many layers of color washes and sponging until I liked the look. Right before I had taken them into the garage to apply spray sealer, I realized that I could add another layer of character by going over some edges with an ink pad. I hope to get to that fun step later today! 


Each of the shops will have a 12 volt chandelier hanging in the center of the shop, with a supplemental bulb on either side. Hopefully, this will be enough to light the shops well. If not, I may add candles with candleflame bulbs to the fireplace and lamps. The only issue there is concealing the wires. I would like them all to come out through the ceiling. That way, the battery pack or transformer can be hidden beneath a false lean to roof on the back behind the sign portion of the front cover. We'll see!

I can't say whether these shops will reach their conclusion this year or five years from now. I only know I am so grateful to have found the time and the enthusiasm to work on them again. It has been so good for the soul!

I miss my daily visits to everyone's blogs to see your progress, but hope to be able to roll that passion back into my routine soon. Until then, I hope each of you are filling your happy tanks and making progress on all your mini dreams!

xo xo,

Jodi

Tuesday, February 1, 2022

Planning For The Future...

Hello everyone! Long time no post, right?!? Well, a lot has happened since November in my family life, so there wasn't a whole lot of time for making minis. We hosted the holidays at our place, my parents came up from AZ and then we all got snowed in for an extra week. During that time our daughter Tasha and her partner Brent bought their first house. They finally got to begin living there last weekend, and are really excited about their future!

Russ and I had a lot of opportunity to begin thinking about our future, too. With Tasha moving a two hour drive away, and our son well on his own and saving for his first house, we just don't need our 2,500 square foot house any longer. A one level ranch with half that square footage would work really well for us. It just so happens that Tasha's property is five acres, is zoned for a guest cottage and in addition to their house, already has an additional septic and services at the opposite end of the property. And, she and Brent really want us to come homestead with them. Pretty exciting, huh? It's pretty great when your grown up kids enjoy having you around. :O)


So what does this mean? It means Russ and I have a one year goal to reduce the amount of our possessions, prep the house for selling and to pack the stuff we can't live without. Also, it means researching what type of dwelling is the best option for us to move into. Mobile home? Build a structure? Or go with something like a Boxabl Casita? There's already a 1,700 sq ft shop on the property, so hobby space outside the actual house is possible.

Of course I've been thinking a lot about my miniature projects. Which ones will I never part with? Which ones could I let go of? What should I do with them? Would anyone want them? What's the best method for selling them: dismantle or sell complete? What's the best platform? Ebay? Etsy? Facebook?Craigslist? I would so much appreciate any advice!

In addition to the minis, I also have an entire household of "stuff" to sort, sell, donate or pack. I think this may be a very busy year! Hopefully, I'll still be able to sneak in some mini time here and there to save my soul! I have so missed my creative outlet!

Hope to be back really soon to share the progress on the Beachside Bungalow's bedroom, as well as some new lamp designs I got to play with using the 3D printer!

Hope everyone is well and making great progress on your dreams!

xo xo,

Jodi