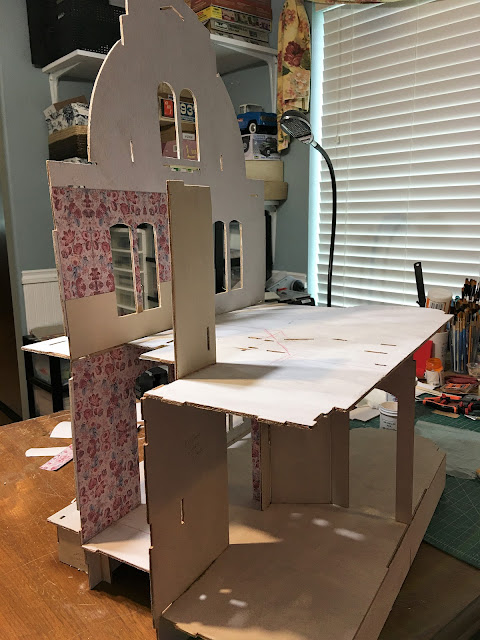
If I'm trying to describe my mini work atmosphere over the last week or so, I'd be using words like chaotic, scattered, disorganized, interrupted and uncharacteristically unsystematic. I mean, just as I would think I found my path and a direction to dedicate myself to, I'd remember some other important tasks that needed doing first. Trying to communicate my process and photos into a linear and understandable timeline will be challenging, but here goes...
 |
| The "progress" part. |
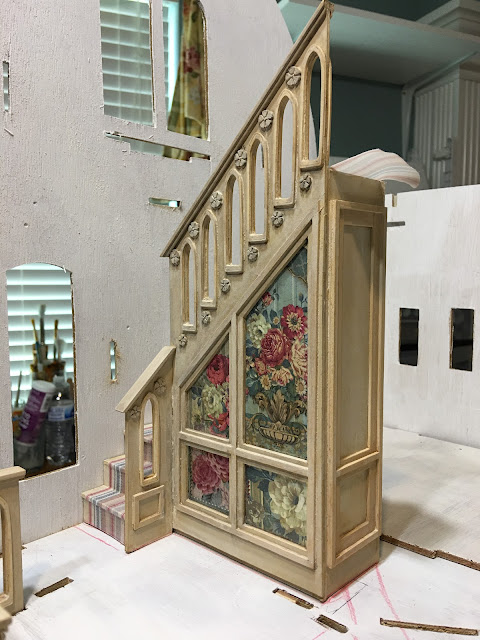
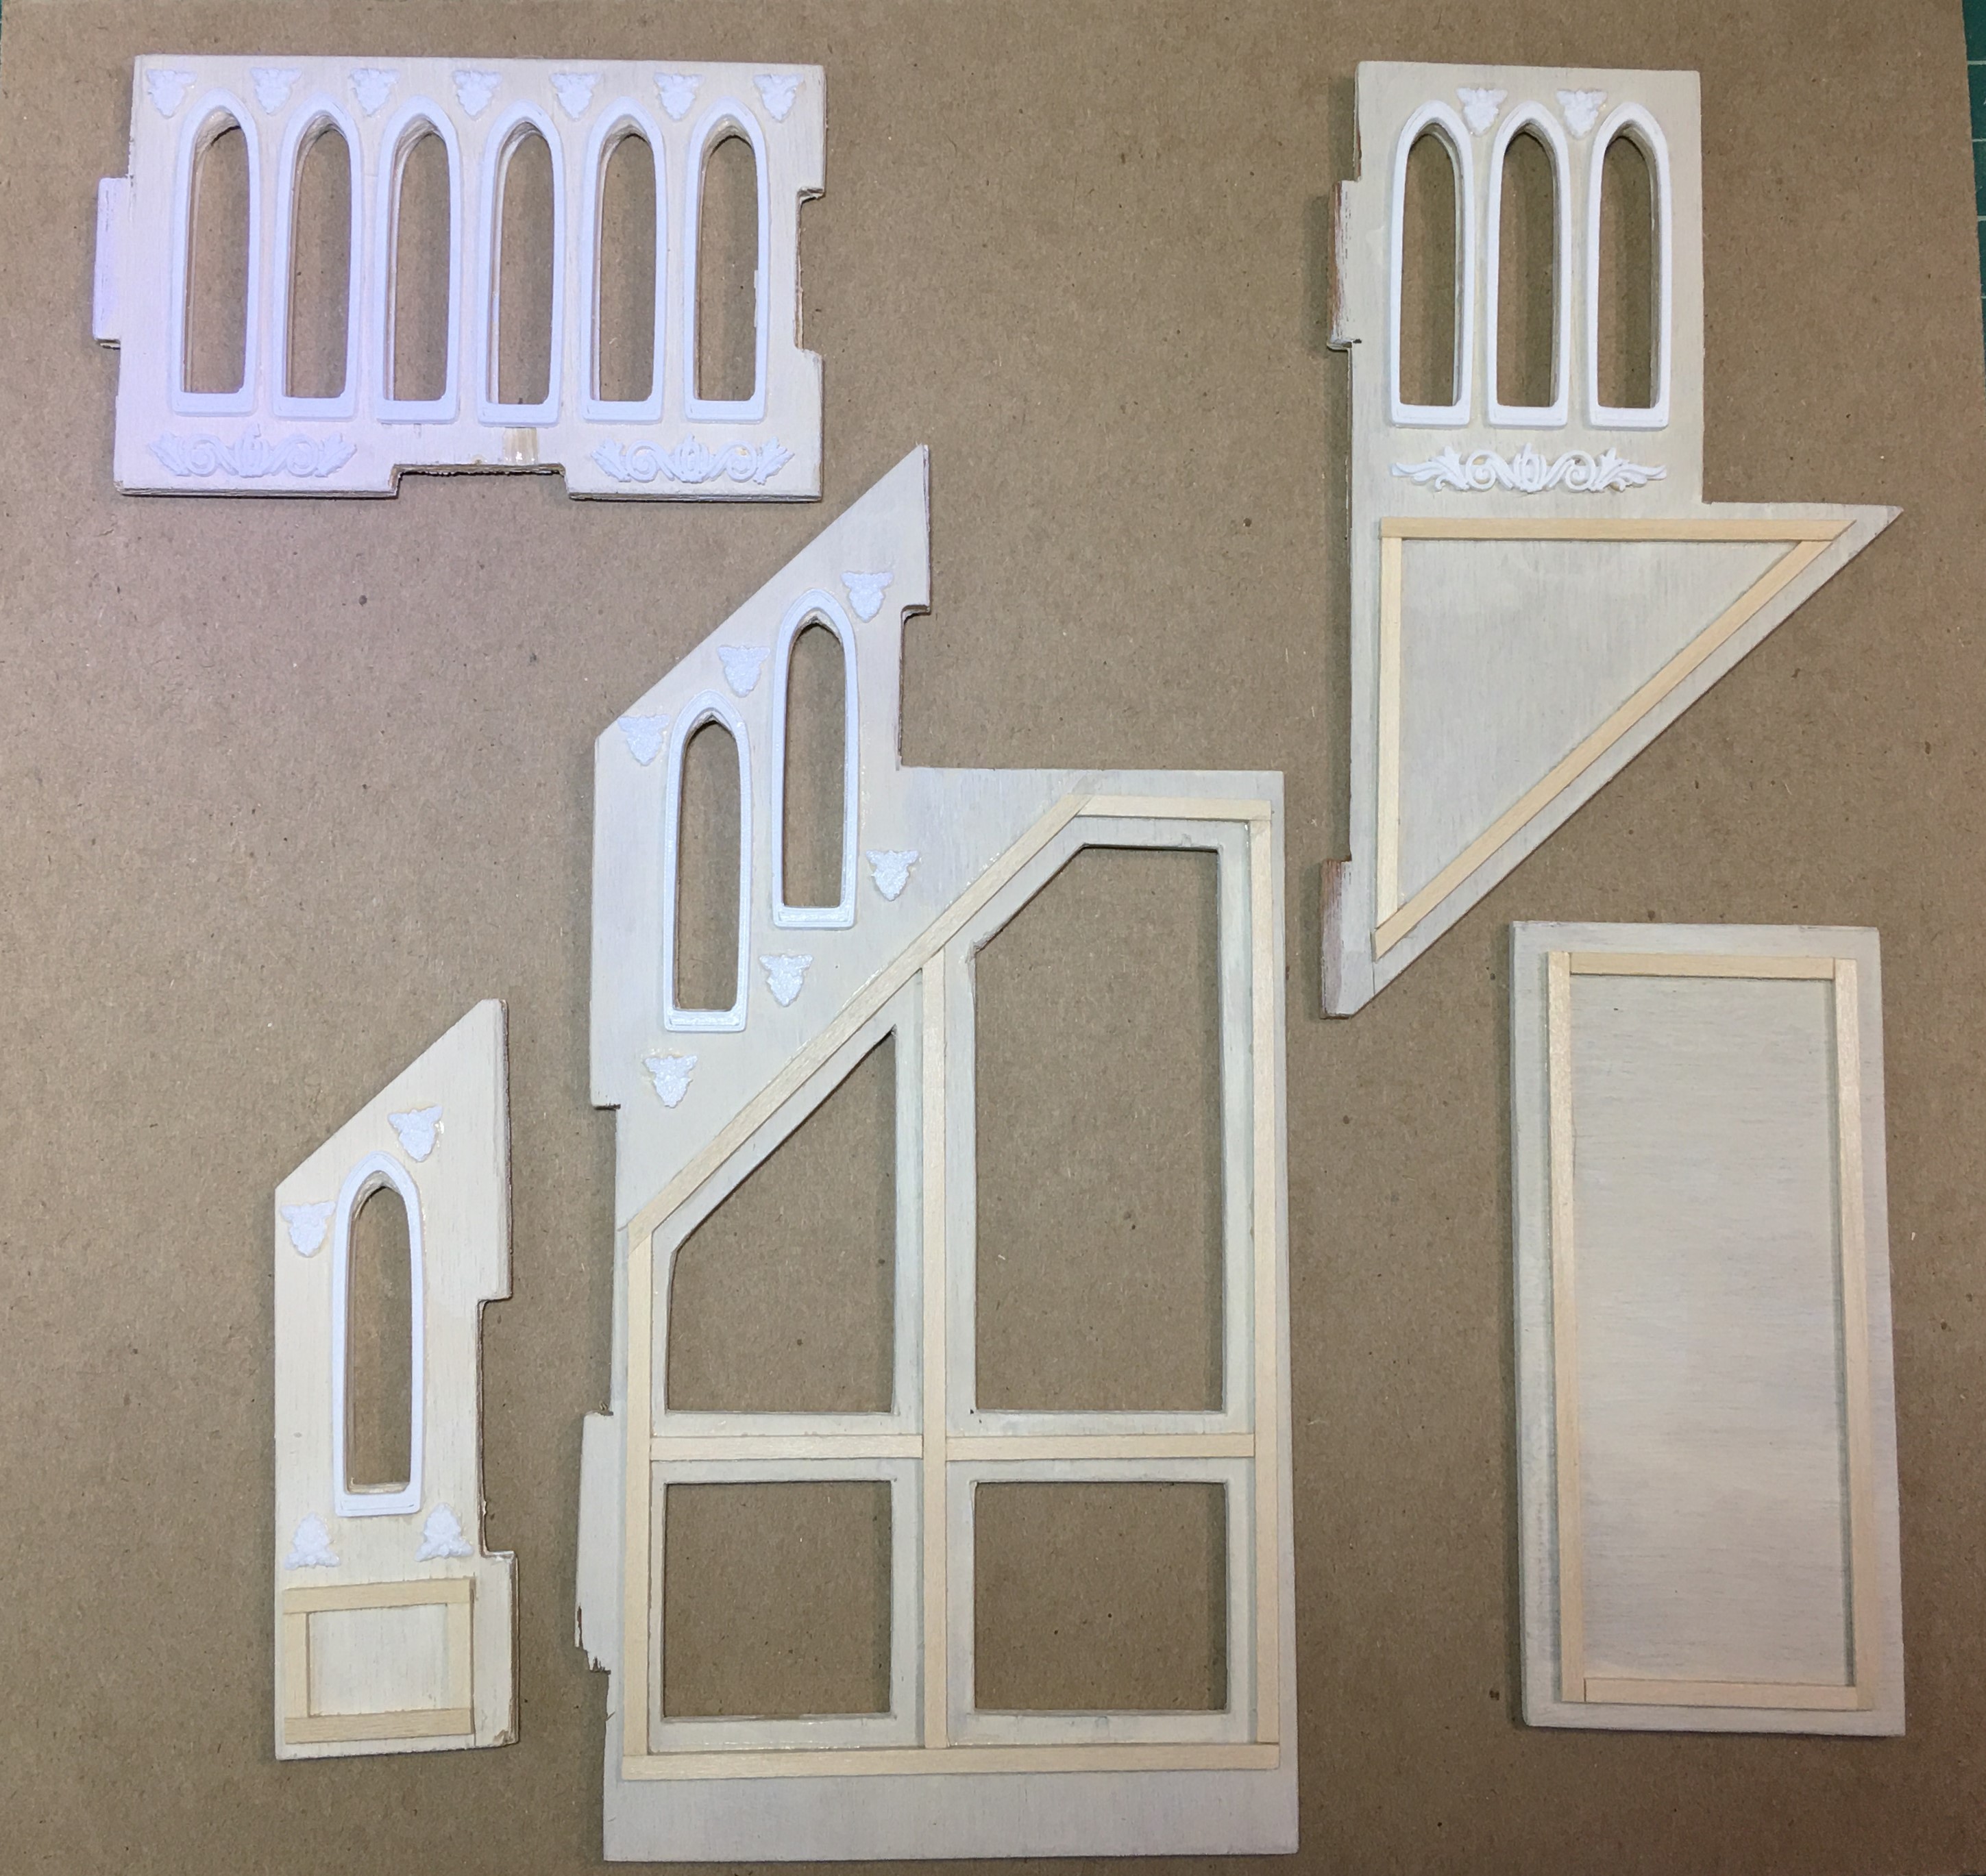
I started off with the best intentions to get the staircases completely finished. I replicated the arch cutout in the stairway railings in Tinkercad, along with some fancy "carvings" so I could add a bit of dimensional detail. I got them printed and applied to the staircase railings.
 |
| 3D printed details added to stair parts. |
 |
| Second floor staircase railings. |
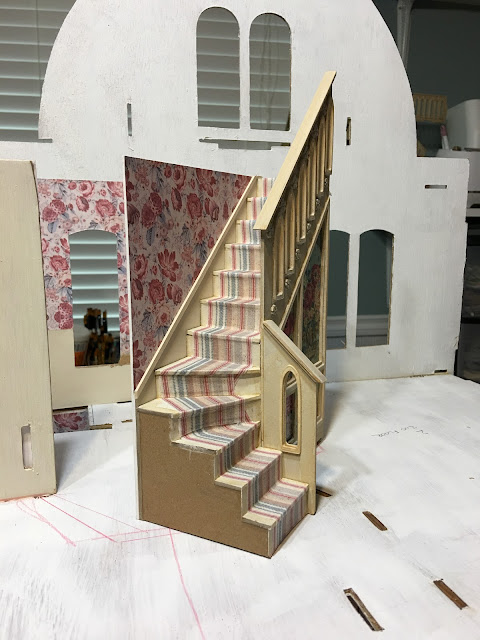
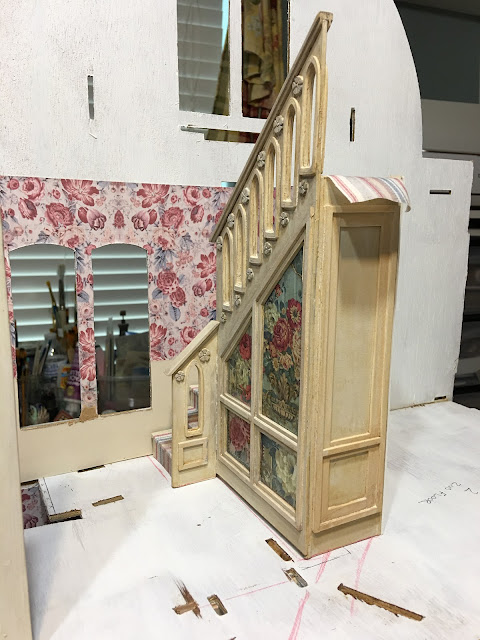
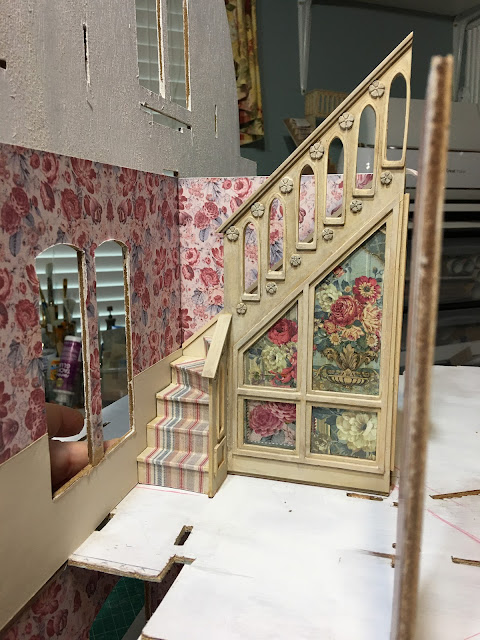
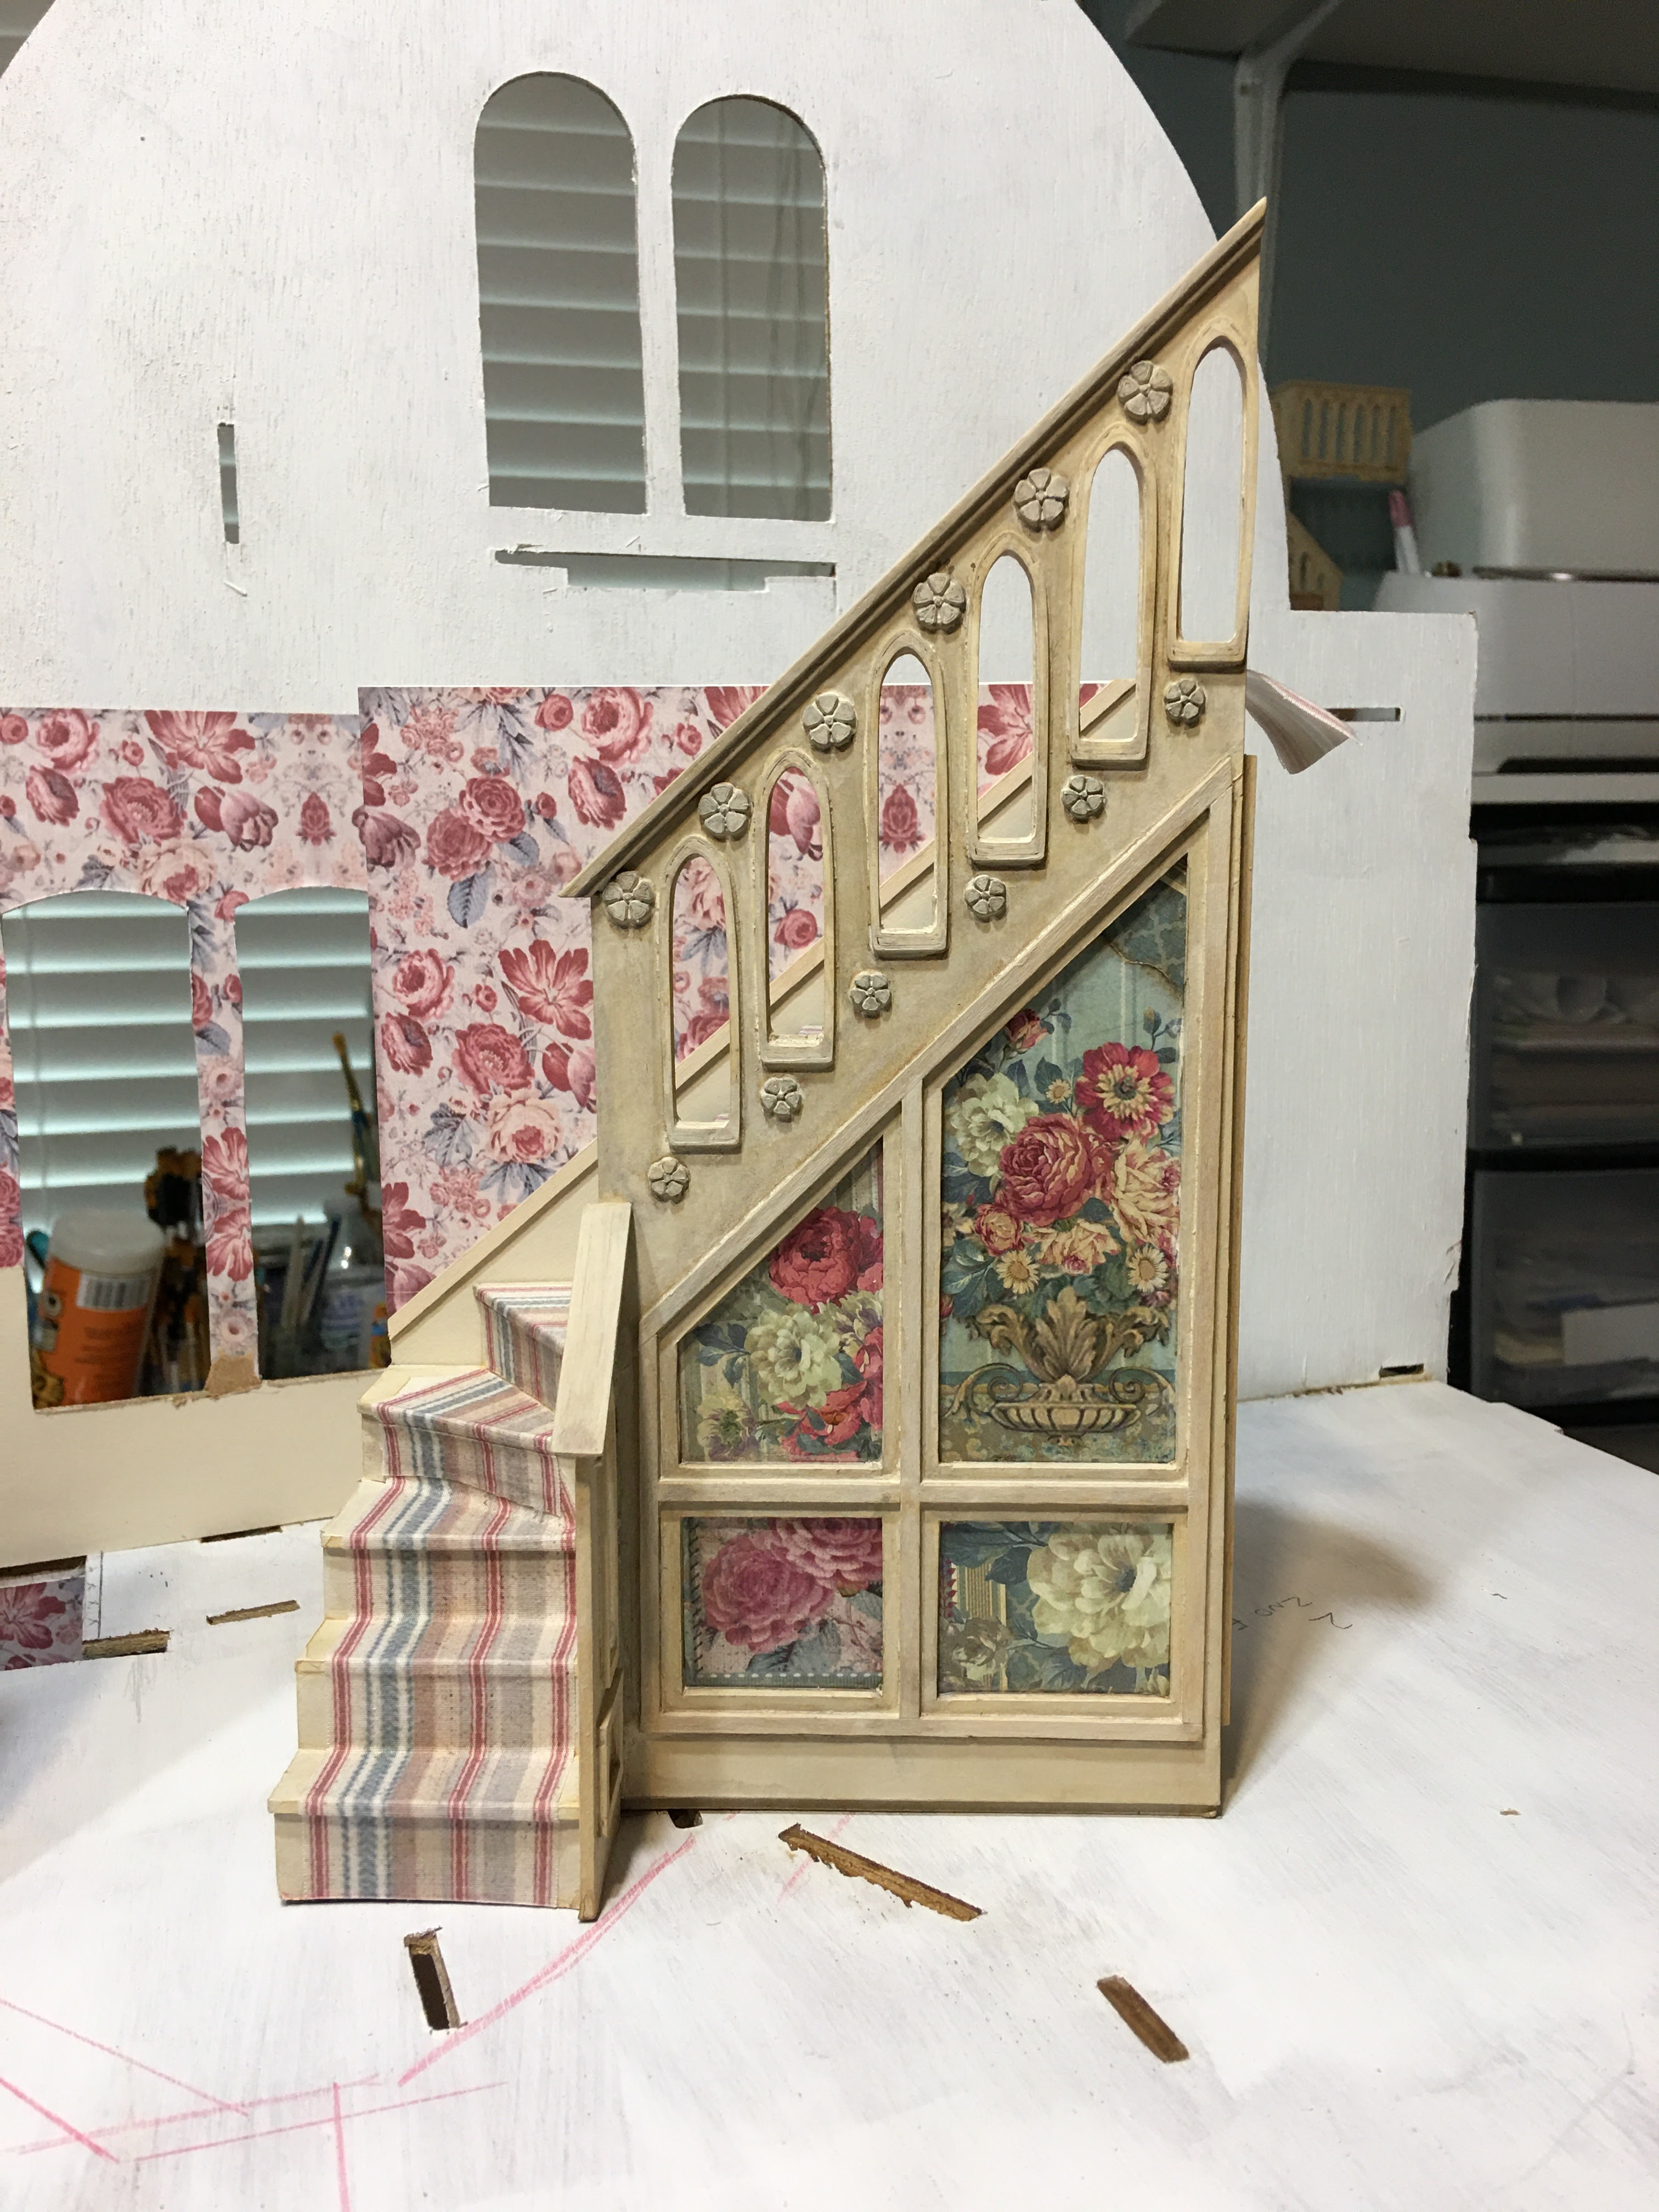
I kept going with the stairs, adding trim and wallpaper, painting, aging, and dry fitting a bunch of times to help the fit or mark for ceiling paper and flooring. I also scanned one of the papers from the Grand Hotel paper pack, a stripe, printed it onto cotton, then made runners for the stairs. A stripe on turning staircases was probably a more challenging pattern than a floral would have been, but I think it came out fine. It has the same colors as the wallpaper, and I love it when florals/patterns/stripes/gingham match in a room.
 |
| Entry stairs. |
 |
| Dry fitting to find and eliminate gaps. |
 |
Second floor staircase with embellishments and trim added,
painted, aged, carpeted and in place. |
 |
| Both staircases in their places. |
 |
| View of the landing. |
It seemed like a good time to install the wallpaper to the entry/second floor hall. The sister paper to the stripe in the Grand Hotel pack was a floral that I really loved, but the scale was just way too large. I decided to scan it, reduce it, mirror it and print it onto matte photo paper.
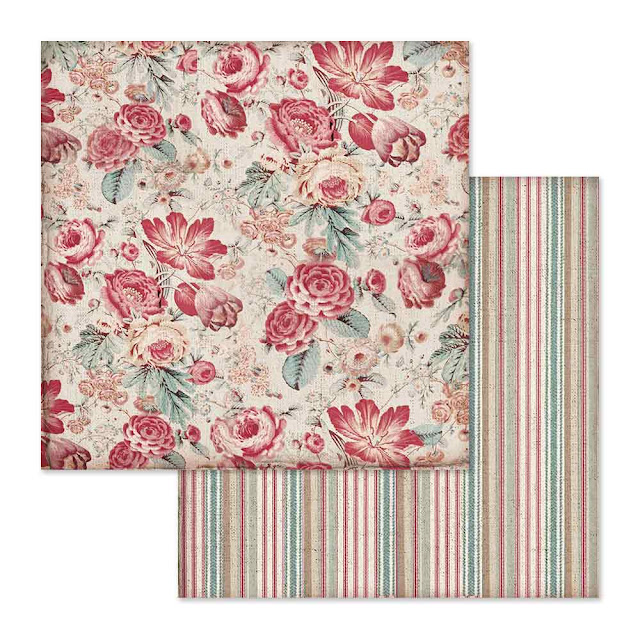 |
| Original papers in 12" x 12" dimensions. |
Despite trying many settings and color adjustments on my printer, I just could not capture the worn/aged patina of the original. So, to make lemonade, I installed it, sealed it with Mod Podge Paper (which still blead the ink if I wasn't super gentle and tried not to go over the same spot twice) and then applied a brownish/yellow age wash. You can see in the photo below the paper between the window openings is not aged and the paper around it has been. I really liked the effect - it's totally in keeping with the time worn look I have envisioned for this project.
 |
Wallpaper and wainscoting with age wash applied. Ageing always looks terrible
at first, but the trick is to keep going. Suddenly, it looks perfect and you look
like an expert instead of a really dumb crafter. 😊 |
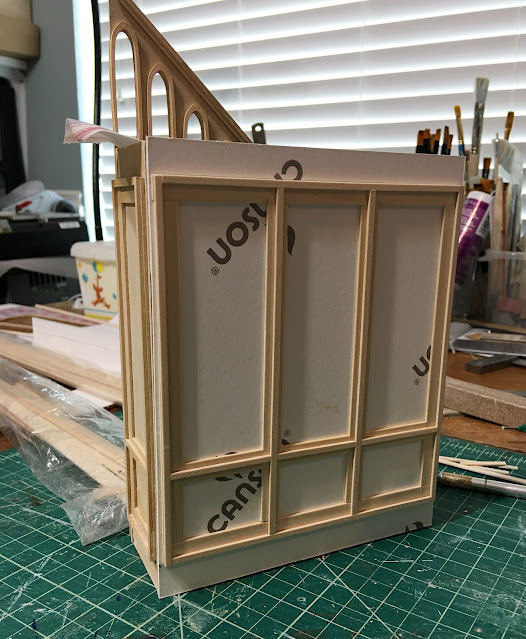
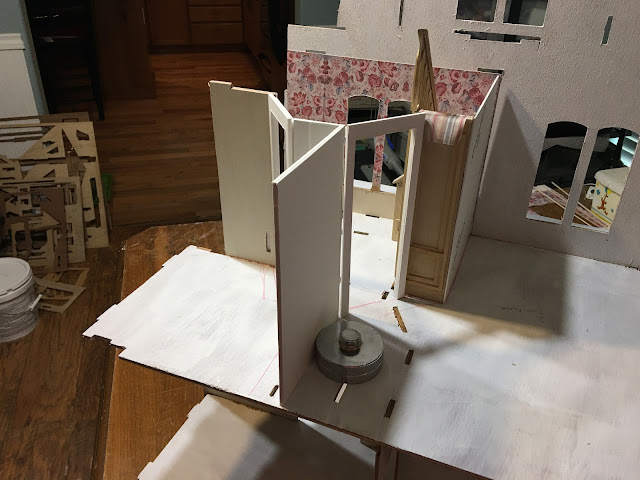
To finish off the second floor staircase so that I could install it, I had to create the separation wall to the bedroom, paper it, add the stair stringer and trim and attach it.
 |
| Bedroom wall attached, wallpapered and stair stringer/trim added to wall. |
Then the bedroom side needed trims, painting and aging. I left room at the top and bottom for later baseboard and crown moldings.
 |
| Trims added to bedroom side of wall. |
 |
| Painted and aged. Space left for baseboard and crown molding. |
Russ lent me some long bar clamps so that I could get the staircase glued in and have the front wall and floor at perfect 90 degree angles. Sorry, there aren't any photos - I was pretty scattered!
Getting the staircase glued in was an essential step in creating the new walls and doorways to the bathroom/bedroom. I also had to install the wall separating the entry from the kitchen first.
 |
Front, first floor, center wall, foundations and entry/kitchen/bathroom
wall have been glued together. No more rickety-ness! |
 |
| Second floor staircase has been glued to front wall and second floor. |
 |
| Hooray for Russ' clamps! No gaps! |
With the staircase installed, I could get accurate angles and measurements to create the new walls/doorways for the bathroom/bedroom. After looking at the kit's original plywood wall with tabs and doors cut into it, I decided it would be easier/cleaner to cut the new walls from illustration art boards. When doubled, they are just about exactly as thick as the kit's plywood.
 |
| Kit's original bedroom wall compared with doubled art board. |
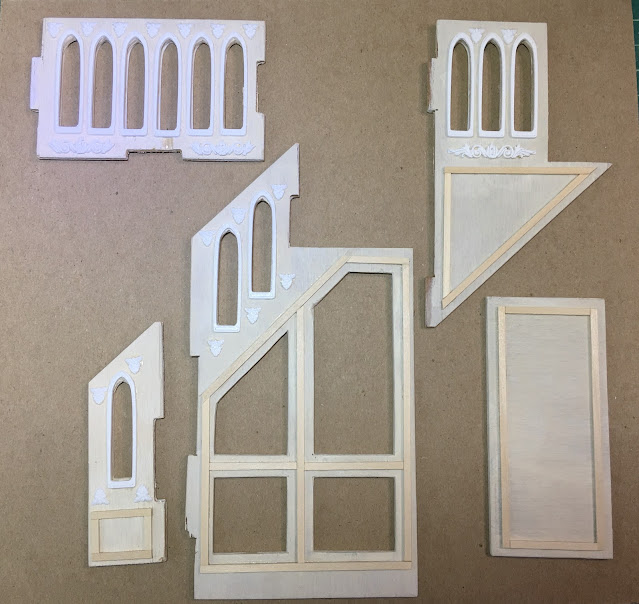
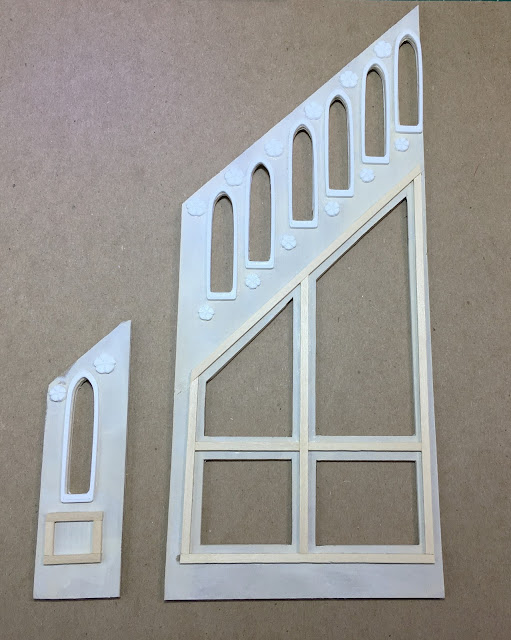
Once I knew what widths the doors would be, I cut the walls for the doorways. Once they were cut, and I knew how wide the doors and the frames had to be, I could create them in Tinkercad. But what style? I did some poking around to look at second empire interior doors. There were lots of styles to choose from, but I really liked this Divided Arch door from an This Old House article talking about choosing the right doors for your historical home. This door echoes the long, tall arched windows in the kit without having to be curved itself and therefore hard to hinge. Of course, I added extra details in keeping with the rest of the features in this house.
 |
| Divided arch door style typical of second empire homes. |
 |
| My rendered interpretation of the double arched door. |
I printed an inside and outside frame for each of the doorways. I also printed the doors in an inside and outside half so that the door is flat on the print bed. It is easier and cleaner to glue the sides together than to add support for the recesses and then clean it up after the print. I used the frames as the pattern to cut the door openings in the new walls.
 |
| You can see this was before the stairs were attached or trim added to the stairwell/bedroom wall. |
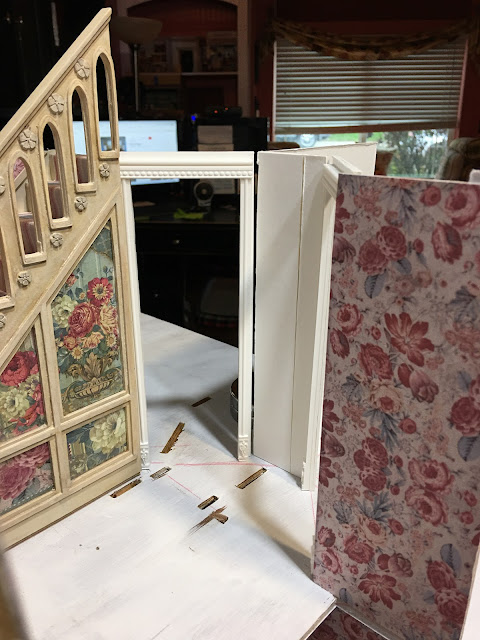 |
| Dry fit with exterior door frames attached to angled door walls. |
When the exterior door frames were glued to the angled walls and the openings cut, I was able to glue them into the house. The bedroom's angled door wall was attached to the stairway wall, the bathroom's to the kit's entry/kitchen/bathroom dividing wall. This totally changed the angles the doors had to be placed at, so a new separating wall and dividing wall had to be cut. Once these were all tied together, they were stable and strong.
|
| New configuration has less of an angle but leaves more room in the rooms. |
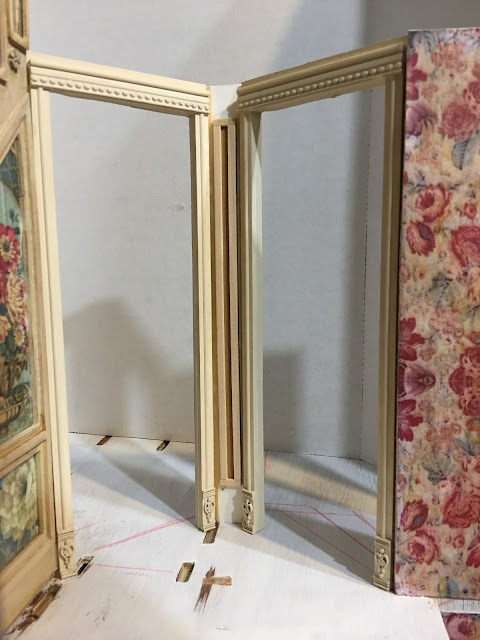 |
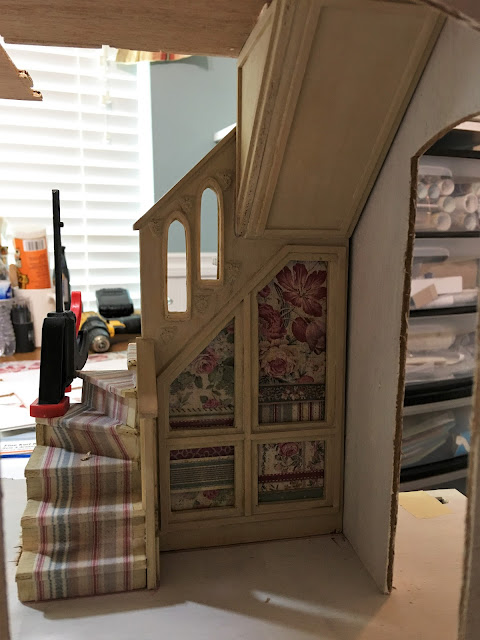
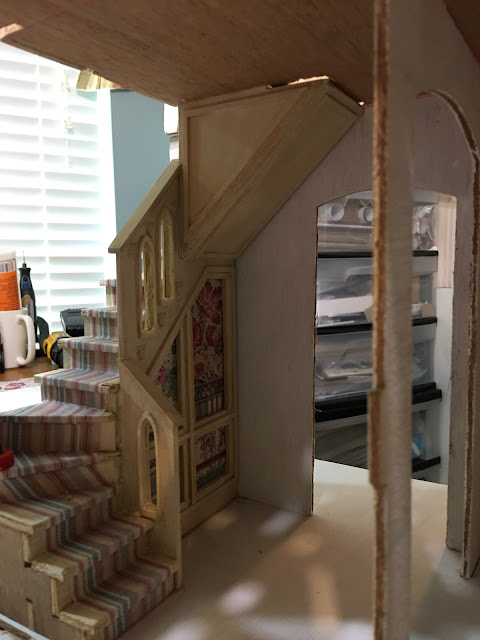
| Angled door walls attached, a coat of paint and trim added between. |
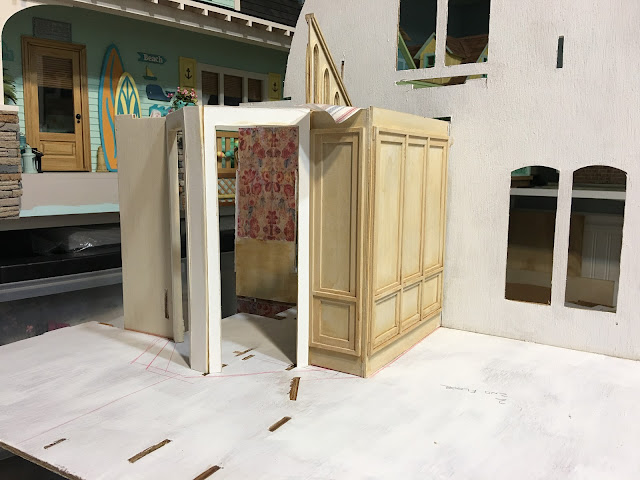 |
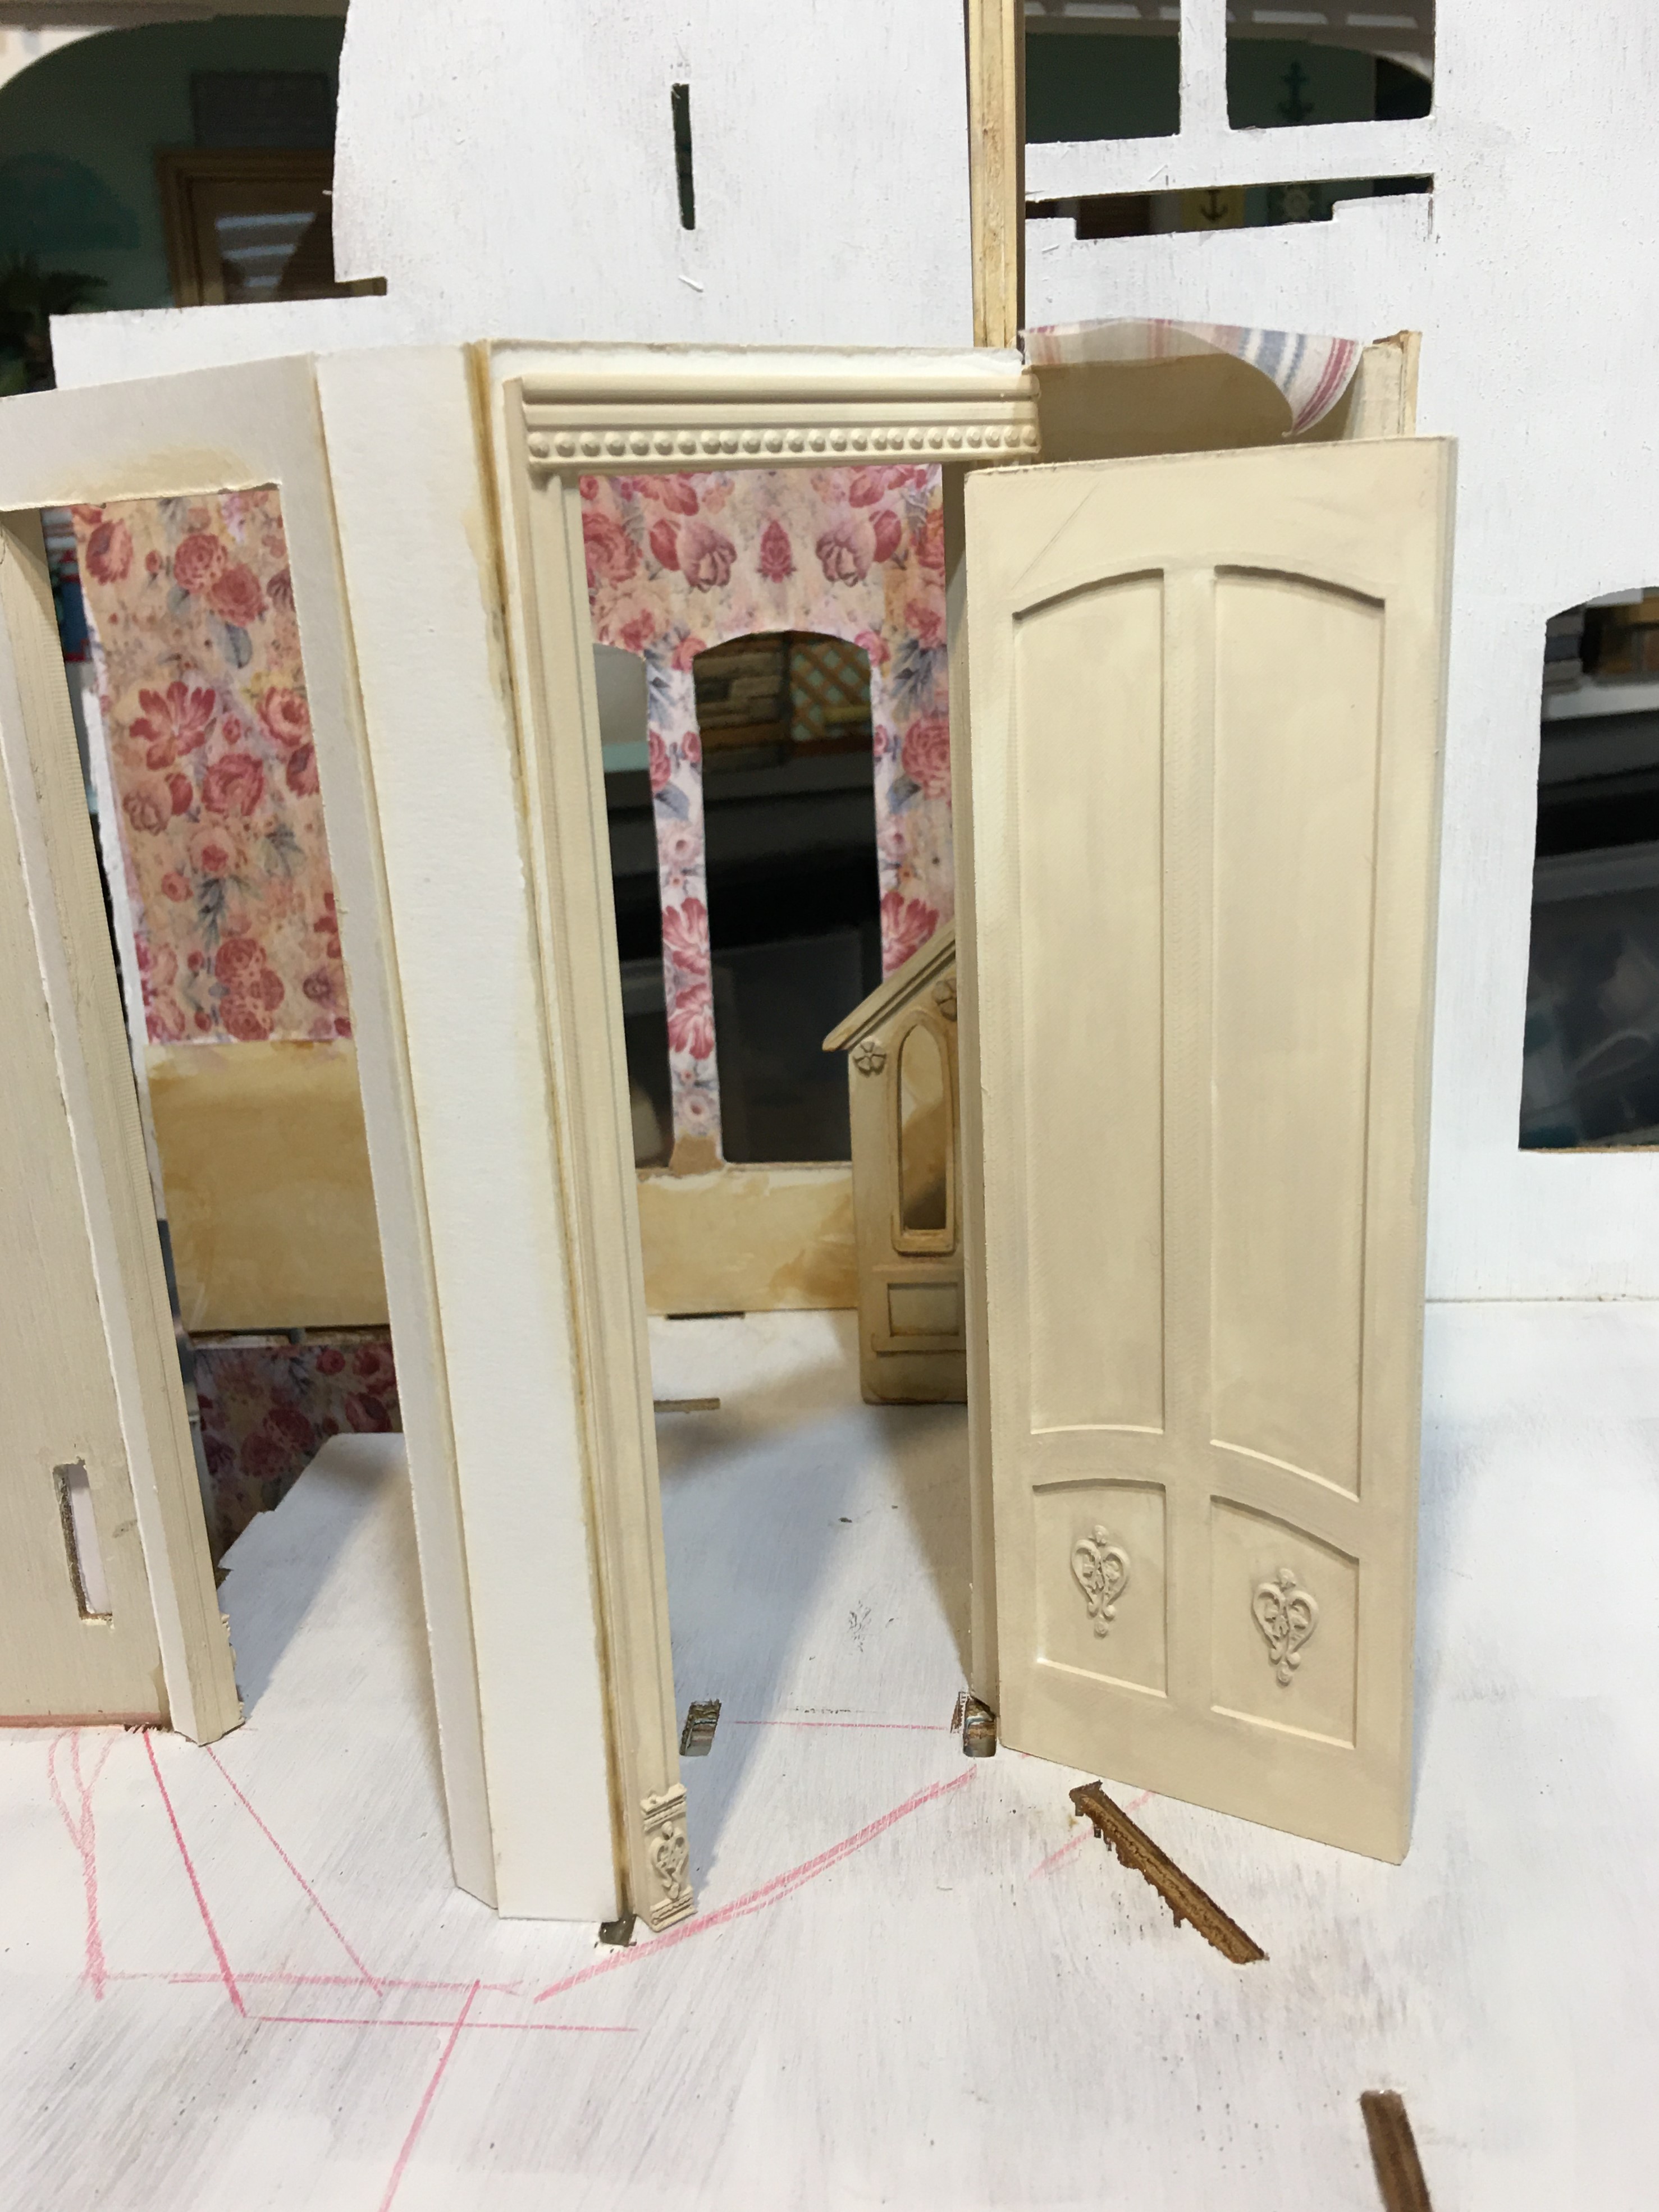
| View of second floor hallway through bedroom door. |
 |
View from both doorways. I won't install dividing wall until I have done the flooring.
More room for hands this way. |
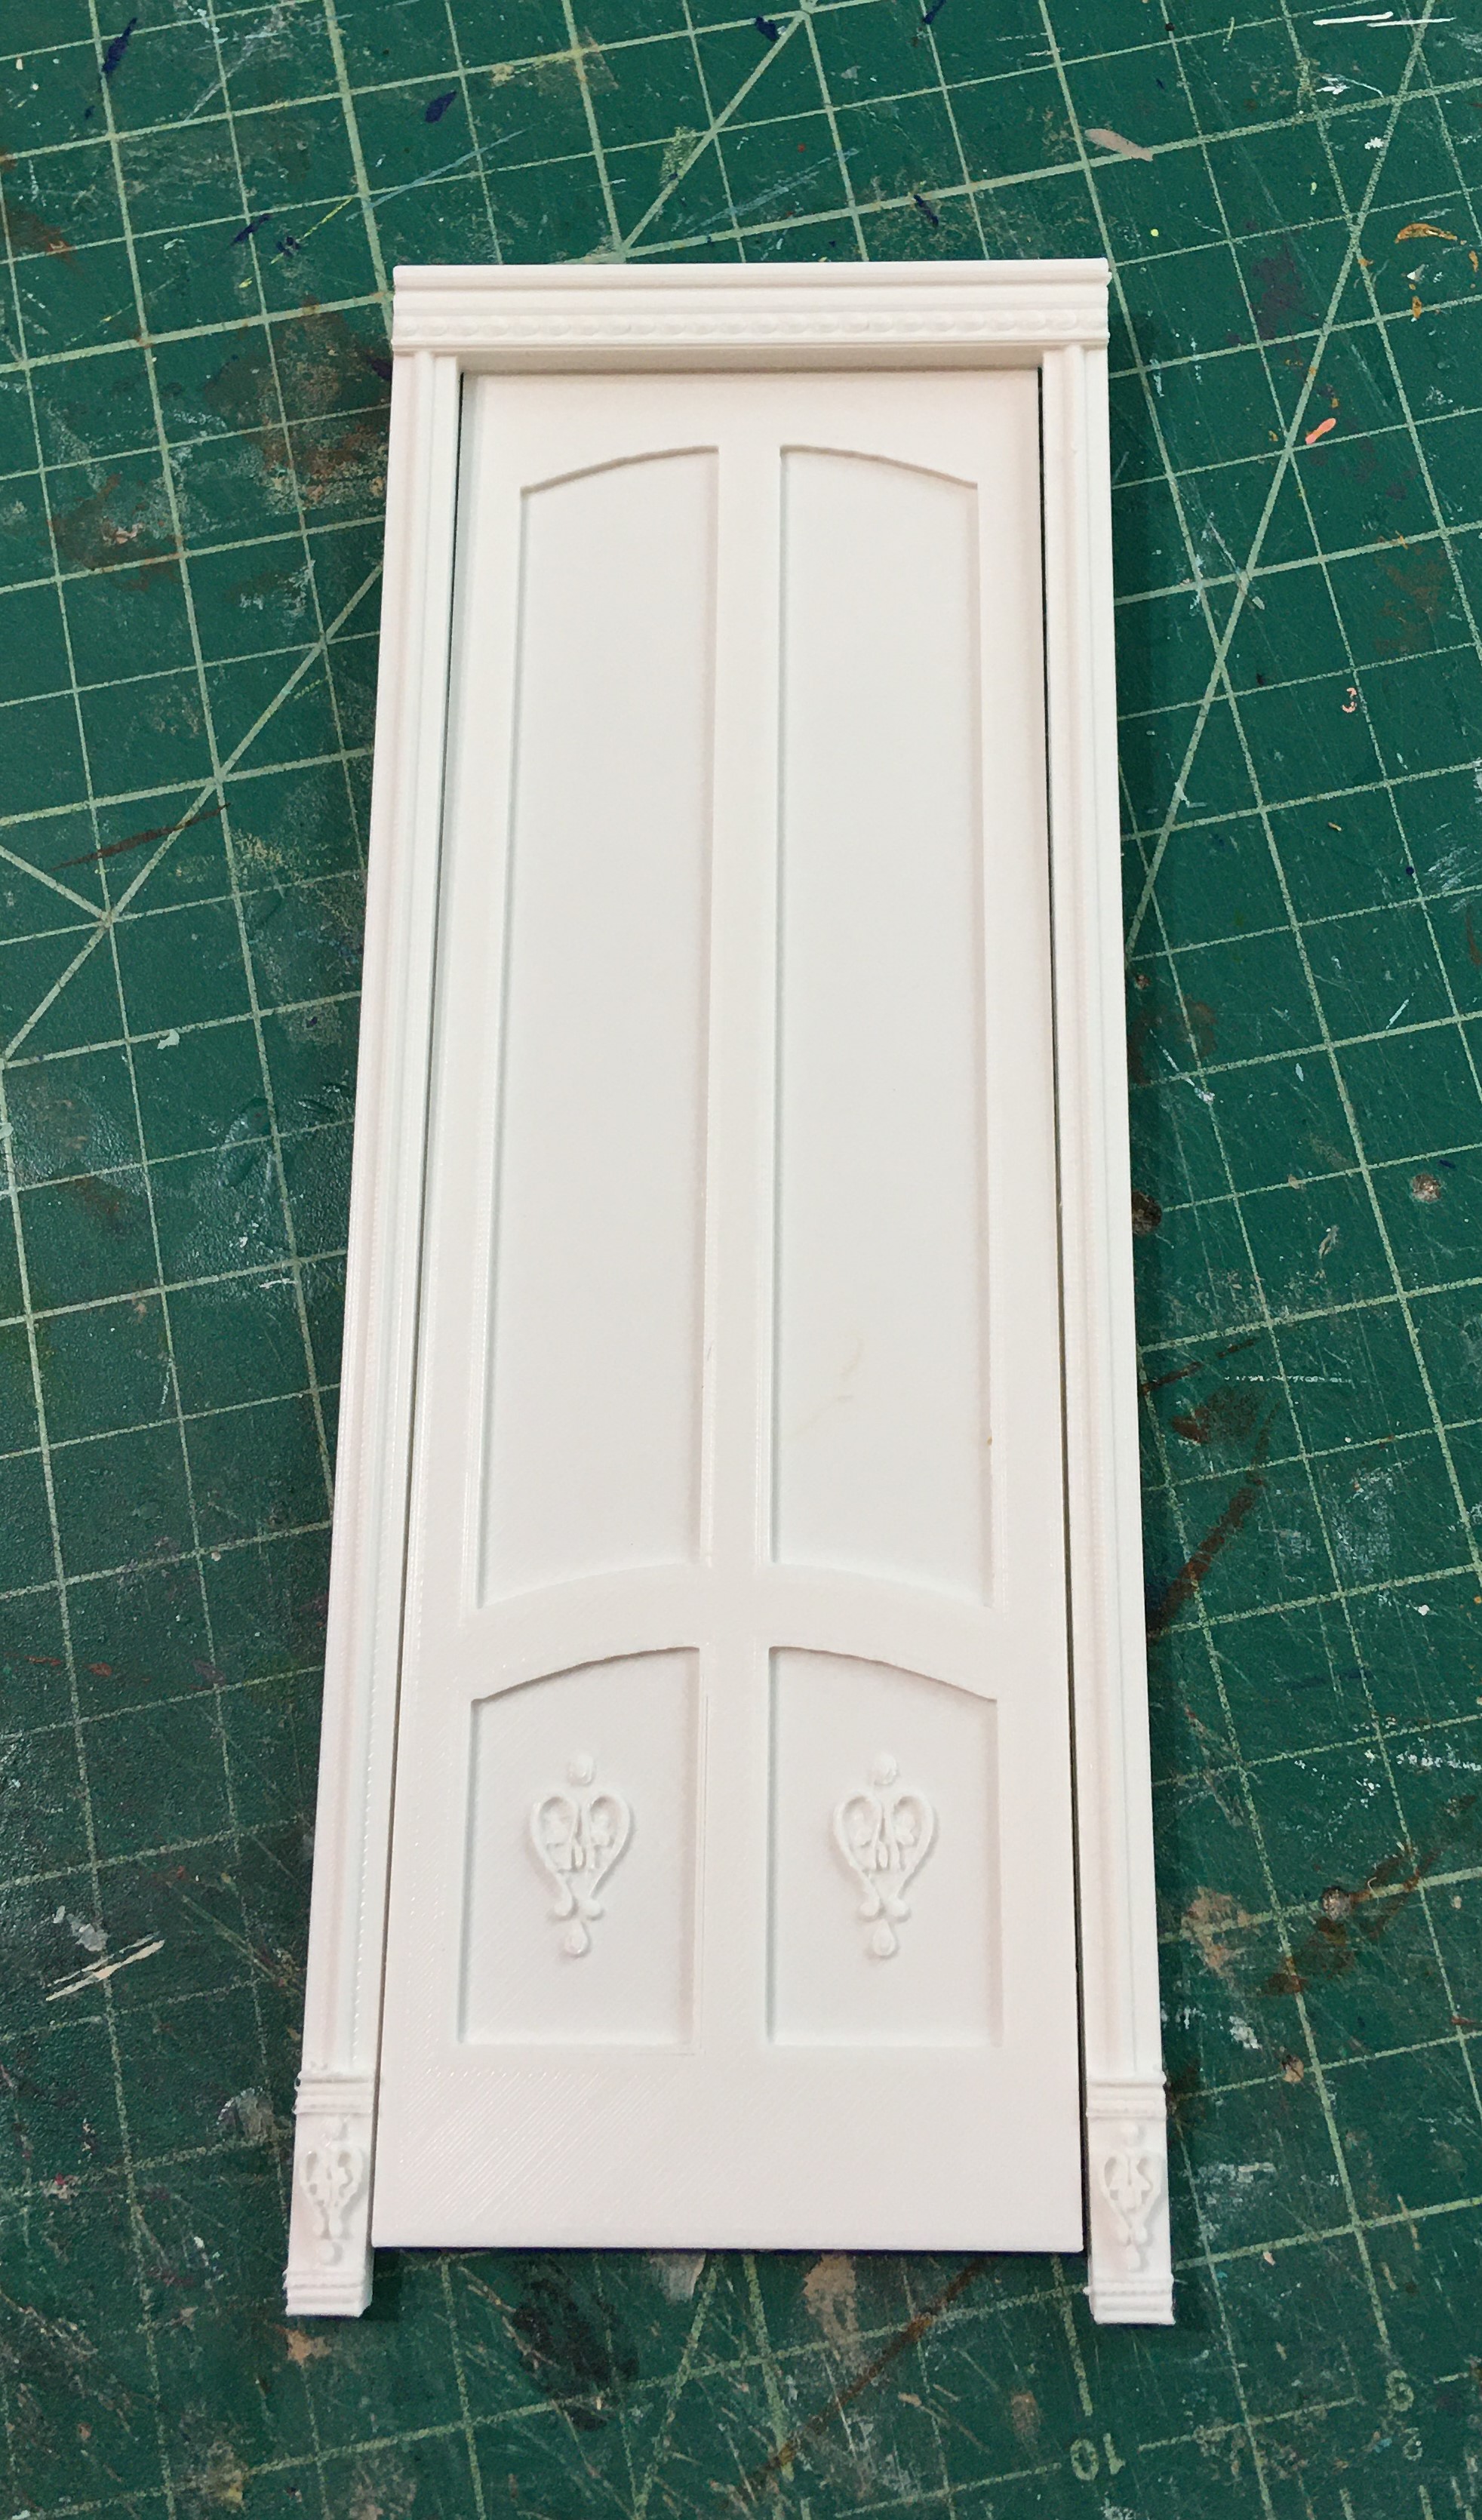
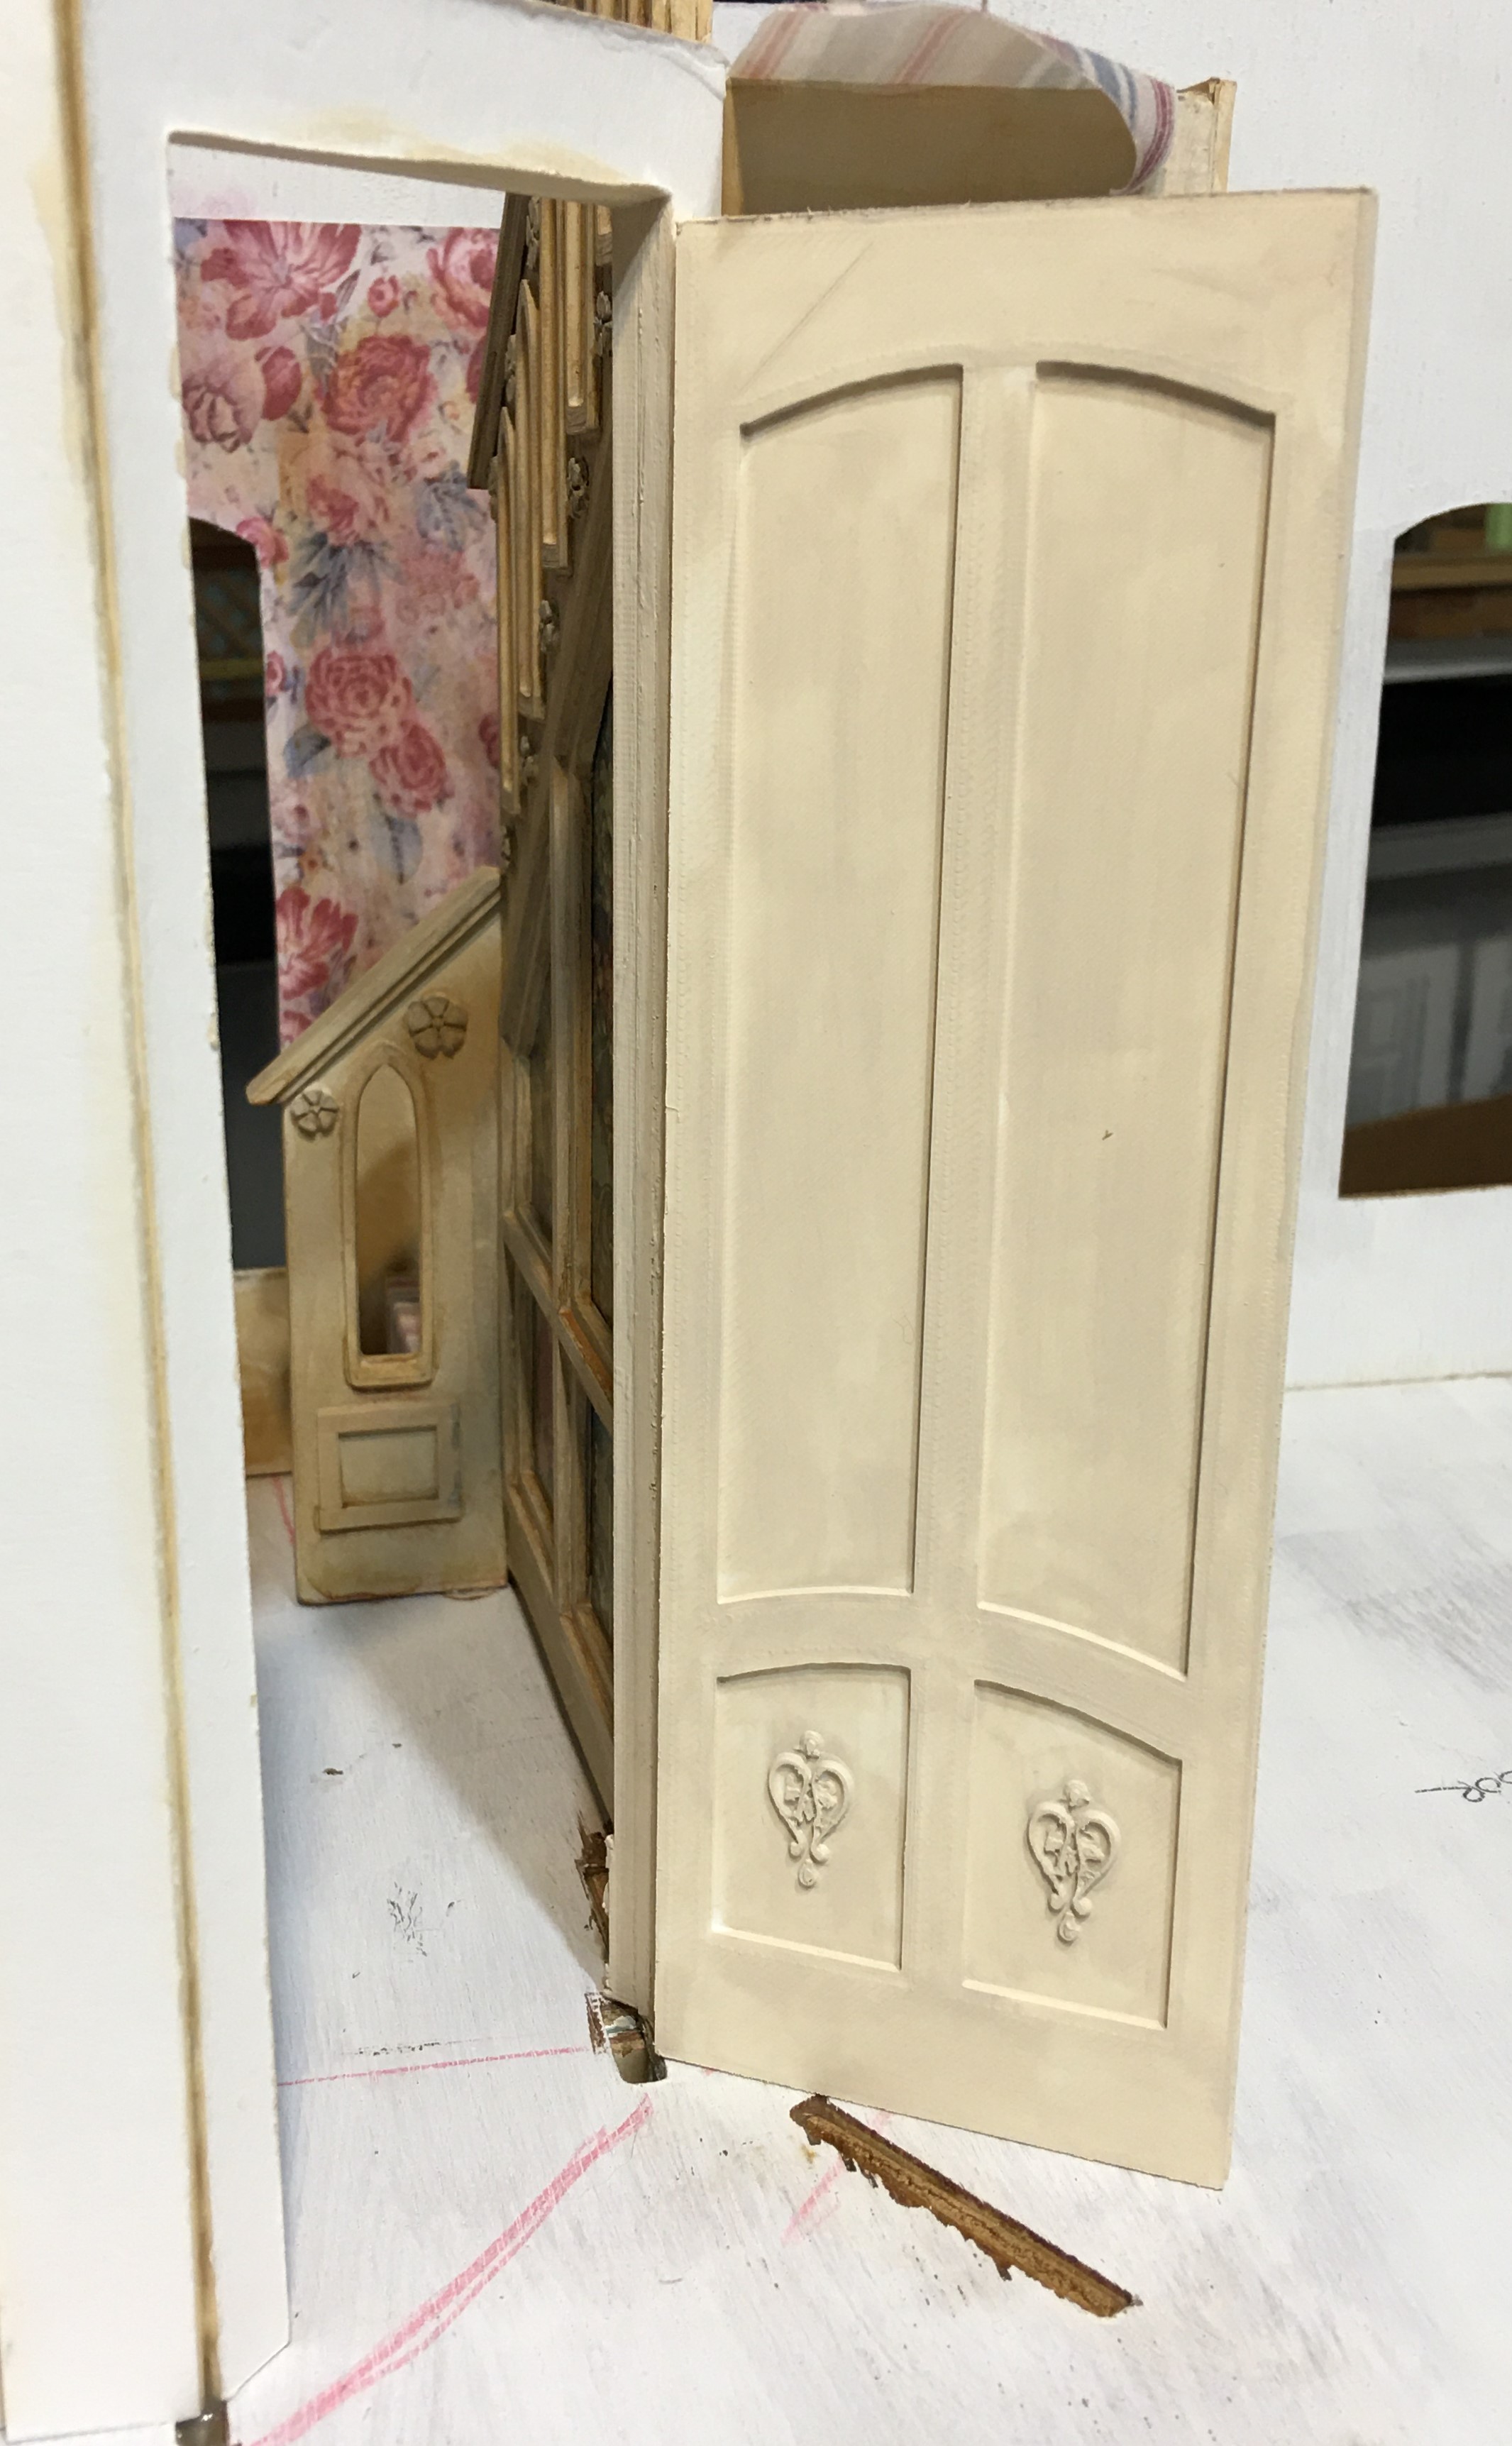
Here is what the doors look like printed and with a coat of paint. To hinge them, I will use pins: the top pin will be recessed into the door and into the wall, covered and secured by the interior door frame. The bottom hinge will be placed in a recess drilled into the floor. But I must complete the flooring first, so it might be a few steps down the road.
 |
| Door will swing in this way. |
 |
| Door with doorframe. |
My next steps will likely be to get all the wainscoting and trims installed in the entry and upstairs hall. Once that is finished, I can install the first floor's stairs and it's exterior wall. It's going to be a custom, piece by piece operation, and who knows what I'll remember that I forgot. I did get the entry's flooring, ceiling and ceiling rose installed. With a little luck, it might just be ornate enough for second empire in my next post.
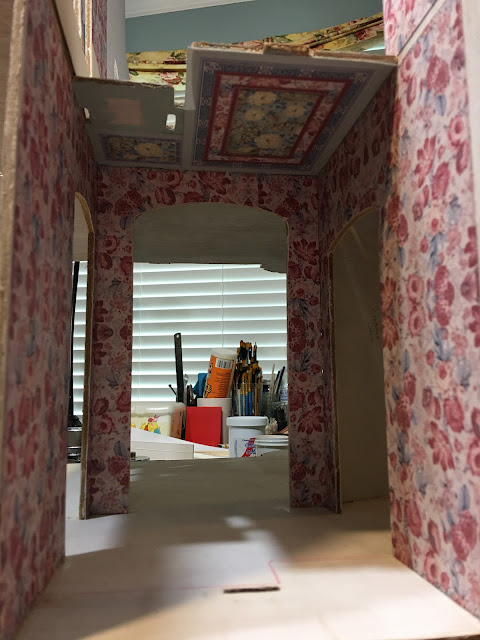 |
| Patterns from the paper pack created the ceiling paper collage. |
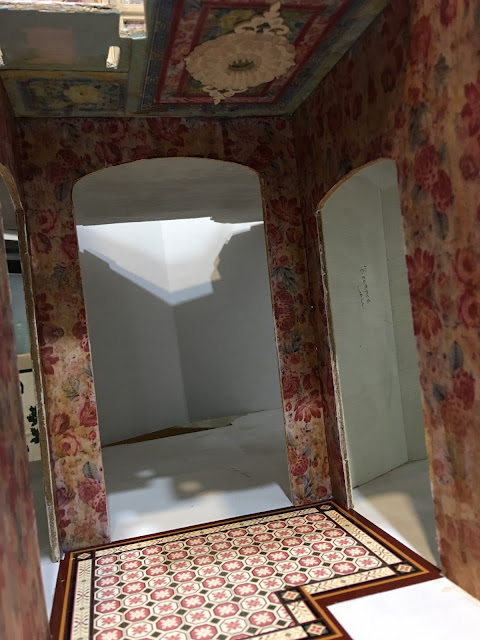 |
3D printed ceiling rose. I don't think this ceiling will ever be seen
once the wall goes up. But we'll know it's there. |
Lighting for this project is going to be another challenge. I will have to not only use up the 12 volt dollhouse lights that I have in my dwindling stash (and try to make them look second empire), but also come up with a few 3D printed fixtures to supplement. Test designs and prints to commence, soon. Looks like more disorganized progress is in my future, but what a fun adventure this is turning out to be!
Tally Ho!
xo xo,
Jodi
P.S. If anyone should need the Willowcrest instructions, just click the link for a .pdf which you can save to your computer.


Oh Jodi, this build is fabulous. I covet the Willowcrest, so I am happily enjoying your post. Bravo!
ReplyDeleteThanks Carrie! It makes me so happy to have you on this adventure with me! And I hope you're finding inspiration for your "one day" Willowcrest!
DeleteTo begin, sharing the instructions to the Willowcrest is a wonderful gift because there will be someone out there looking for them. Chaos must be the child of Genius (or is it the other way around), for what you are accomplishing is nothing short of genius. I get so exasperated with my printer because I can't always figure out how to modify the scale, so I love the idea of taking a print too large and scaling it down fit a project. I've seen some scrapbook paper packs hat I'ld love to use, but the prints are far out of scale. I also must remember that I can scan most anything that I like and print on them on fabric. I guess it knew that, but needed to be reminded. The Willowcrest will be a beautiful house full of surprises along the way.
ReplyDeleteThanks Ann! I'm so happy that you like where we are heading! I'm glad that the post reminded you about scanning/printing papers we love, too! There are so many inspirational paper packs out there, and they would be so lovely in a dollhouse! We have to find a way! My printer is not a high quality model, but I'll keep experimenting and do the best I can!
DeleteIt is SENSATIONAL! I absolutely LOVE the staircase and the installed striped rug and those custom 2nd floor doors- WOW! They're "My Fair Lady" Elegant, and by placing the them at slight angles to each other, you'll get the required space for their sweep without them intruding too much into the rooms. AND on top of that, you've also achieved 2 enviable views into the hall as well- Truly an EXCELLENT floor plan Jodi and I am totally fascinated!
ReplyDeleteThanks Elizabeth! I am so happy that you like the staircase and the new doors/wall arrangement! I can't tell you how much fun I am having customizing this kit! None of this is going to matter much if I don't get the lighting just right, so I'm in for more big challenges. I hope the answers will keep revealing themselves as I venture further in! 🙏🤞😊
DeleteHow much progress! The staircase is amazing and so special. Wallpaper, floor and ceiling are perfect in this context.
ReplyDeleteThanks Faby! It's such a challenge to look at something so much and still be able to :see it! I hope I remember to keep adding enough detail to truly capture the Willowcrest's grandeur!
DeleteWooo Jodi, me he quedado impresionada , eres increíble ......... decoradora, arquitecto, etc. todo junto. Me ha encanto tu escalera y como siempre una entrada de lujo, con todas las explicaciones; tu blog es un blog de cabecera. Besos
ReplyDelete¡Gracias Rosa María! ¡Es tan especial que en este pasatiempo hay tantas manualidades y habilidades para probar! A veces, las cosas terminan como sus sueños y, a veces, sus sueños cambian a la voluntad del proyecto. Pero en todos los casos es muy divertido, sobre todo poder compartir e inspirar a otros que nacen con la misma pasión. ¡Me encanta que estés aquí conmigo en esta aventura!
DeleteIt’s looking great Jodi! I love those colours together; the papers are really pretty. I think having that detail in there will add so much interest when peering through an open door or the hall windows. It will also be great to have those halls done and will be much easier to move on with the rest of the construction and decorating.
ReplyDeleteThanks Shannon! I normally avoid red and blue because they are the most challenging colors for me to "see" and therefore match up. But this paper pack made me give them another opportunity. I hope I can rely on the papers to lead the way! These hall areas are such a challenge to solve your way through, but the layering of view and depth in the end is what makes this kit magical! I hope they come out fun to peer into, and I hope I can get the lighting right in them!
DeleteOh, Jodi, This is looking So Delicious!!! Yes, the Willowcrest is one of those agonizing kits where "stuff" has to be done in a certain order if you want to be able to finish, that is! The electrical wiring is another of those areas that require tons of premeditation! I almost forgot the front porch lights... before gluing the second floor walls in place (I needed to gouge a channel for the wires across the second floor hall in order to get them to the back wall to then take them down to the cellar by the kitchen hearth wall..!) And then there is the Mansard roof in the attic where the eaves support has to twist and lock into place in a very challenging way.... (read the instructions again and again!) And I did forget to run some wires for lights in the attic.... I am still trying to figure that out! LOL! But your changes are proving to be a wonderful improvement on the original design!!! Perhaps you can try to position a mirror in the hallway that will add a glimpse of the unseen parts! I know... like my Moon Maidens, we just have to "know they are there"! You are as usual, working at lightning speed! And the decorative touches you are adding with your "machinery" are just magnificent! You are setting a whole new level of kit bashing with your expertise! Well Done! and I can't wait to see what comes next!!! :):):)
ReplyDeleteThanks Betsy! A good prerequisite for this kit would be to have experience as a construction project manager, lol! You really do have to plan 10 steps ahead and have all the supplies and materials at the ready! I barely do, but am hoping I don't forget something too integral! I can totally see how easy it would be to forget a step, like with the lights, and then have to draw on your most clever abilities to solve the conundrum! When it comes to sconces, I might be okay because I am going to save the exterior for last, allowing me to run wires through the exterior walls with reckless abandon. The ceiling lights, however, are another matter entirely! And for lamps, deciding what era this house is in. Then, what kind of lights? All gas or mixed with some electric (if the home is older which I "think" is my plan) and where it's at: US or abroad? I test printed some French gas button wall switches, so I'm thinking it's in France someplace, but we'll see... That attic and having to twist the pieces is already making me anxious! I am so glad that you like where it kit is leading me and I love the idea of having a mirror in the halls to help the viewer see the normally unseen view! Oh, those incredible moon maidens! I think they need to be painted onto a big canvas to be hung where the viewer can see what they might be missing! - it's just too marvelous a stairway not to be appreciated! Flooring, wainscoting/trim and lighting are next, and if I am going to have a mirror, a table or a vase of flowers now is the time, too. I've got a lot to do and little figured out so my pace is sure to slow...
DeleteThe stairway is stunning! Doors too! I love the wallpapers which match perfectly. The runner on the stairs is just fabulous. it's really awesome how much has been accomplished in such a short time. Brilliant work!
ReplyDeleteHugs, Drora
Thanks Drora! It feels as though everything is taking a long time to me, but I guess that's normal when you're in the midst of it every day. I am so happy to know you like the way the elements are coming together - that let's me know I am moving in a good direction! Hugs!
DeleteI've been lurking here for a while watching your projects. You absolutely AMAZE me!!
ReplyDeleteThanks ilovelucy! Lurkers are welcome but I am glad you popped up to say hello! I'm so glad to know you are coming along on the Willowcrest adventure with me! 💗
DeleteHello Jodi,
ReplyDeleteTo quote you from the top of this post last weeks progress was "chaotic, scattered, disorganized, interrupted and uncharacteristically unsystematic"...
If I am honest I do not see that coming back in the rest of the post. all the different elements you worked on rather looks to me like structured and organised. Everything you have done has to be done. And the order in which you have done these tasks may have been done in another order as well, but that does not stike me as uncharacteristically unsystematic.
However, the message could be lost to me since I am Dutch. :-)
Whatever it may be, I lóve the colours and patterns you have chosen for this project! This building does indeed deserve rich and colourful patterns and decorations. I love to see the next step.
Huibrecht
Thanks Huibrecht! I am so happy you like the colors and patterns! And I am glad the post made it seem as though there was a method to all the madness! It may be that the majority of the chaos is going on in my own head, lol! It has been wonderful to study many incredible examples of the second empire style and I come away so inspired! I just hope I can capture a bit of that in this wonderful dollhouse!
DeleteThe stairway is a work of art. Reading this post I kept thinking, forget the rest of the house this is beautiful from every angle – the shapes, colors and finishes. I can only hope that once I get settled in my new place I’ll be clear headed enough to use all my tools and technology to achieve what is in my head like you do.
ReplyDeleteThanks Sherrill! I'm so glad you like where the house is leading me! This is most certainly a project with multiple opportunities to test ideas with the 3D printer and the Maker. I am enjoying it so much! Before you know it you'll be settled into your new workshop/studio and all your ideas can come to life! I hope you're writing them all down!!!
DeleteWow, what a lot of work, it's looking fabulous. I love the colours, the carpet and the patterned wallpaper really compliment each other.
ReplyDeleteThanks Polly! There is so much to do but I'm really enjoying doing it! I'm glad you like the colors and papers, too!
DeleteQue cantidad de cambios maravillosos estás haciendo al kit, es algo muy enriquecedor para que la casa sea realmente más hermosa y sobre todo muy personal! Me encanta hacia donde te diriges, la escalera y la lujosa entrada con ese toque un poco decadente ha quedado preciosa para mi gusto!!
ReplyDeleteMe gustará que me sorprendas con nuevos cambios, ideas, explicaciones...te espero en tu próximo post!
Besos.
¡Gracias Pilar! ¡Realmente estoy disfrutando el desafío de hacer que este gran kit sea aún más maravilloso! ¡Me alegra saber que usted también está disfrutando de las mejoras! Me encanta la elegancia saturada de la decoración del segundo imperio, y espero poder capturar algo de eso en este proyecto. Es nuevo para mí, ¡así que será un desafío no perder ninguna oportunidad!
DeleteOh, what a wonderful post! ;O) But I'm questioning my limited English now... Hmmm, there must be another meaning of "disorganized progress" which is unknown to me... *LOL* To me it looked like very organized progress as you really watch your steps, always keeping in mind what needs to be done first because there will be no more chance to do it afterwards.
ReplyDeleteYour progress is breathtaking and I truly admire the stairs with their striped carpets, the embelishments but most of all the vases showing up in the panels, this is gorgeous. I really enjoy following your so-called "disorganized progress", it's fun to see you building another masterpiece. And as always it's amazing to see you changing a kit into a stunning, awesome ooak build. Have fun with whatever you're going to do next... as always with a little help from your friends... aka your trusted machine park and your amazing creativity which knows no limits!
Hugs
Birgit
Thanks Birgit! I'm so happy to know that you like the stairs and where the house is leading us! I am really enjoying the work when I can get to it. There is so much going on here over the last week (i.e. Russ home, kids here helping with a fence/retaining wall project, visit from old friend, dog sitting and all the domestic chores that chaos brings with it etc.) that my progress is nearly nil. And I experienced my first major clog in the new 3D printer's nozzle, which means a total take apart of the head/nozzle (which takes time and concentration that I don't have for a few more days). Soon Russ will start working away from home four days a week until fall, so that should allow for a much more immersive dollhouse building experience with time to concentrate and work long hours if I want to. Not cooking meals and making sure Russ gets plenty of sleep is like sending your kid off to college and finding yourself free, lol! I am hoping I can make good progress during that time, and keeping busy helps me not to miss him so much. Hope you are finding time for fun and enjoying the weather and the garden! Hugs!
DeleteLas escalera están genial. El papel que has puesto y envejecido es estupendo
ReplyDelete¡Gracias Isabel! ¡Se siente genial haber respondido esas dos preguntas y resuelto un gran dilema!
DeleteIt is looking simply wonderful Jodi! All the those patterns and details - rich and elaborate. I just love, Love, LOVE how this is taking shape. I can only slightly start to imagine the magic that will continue to unfold in this space.
ReplyDeleteAnna
Thanks Anna! I am so excited to see how all the ideas I have for this kit are going to work. It's so fun to get fancy and imagine ways to capture this second empire opulence! Now to find some time where I can focus and concentrate...
DeleteHi Jodi. Disorganized progress? What I see is HUGE progress, even if I don´t understand half of what you are doing (lol) I really like it and I can see, even now, that this house is going to be as special and gorgeous as all your houses. And for what I see the colors and patterns you are choosing are right my alley!
ReplyDeleteThanks Alex! It feels to me like just as I am getting into working on a piece of this captivating puzzle, I get called off or otherwise interrupted to take care of some important real life task. Stupid responsibilities, lol! Gimme the house to myself and a couple quiet weeks and I'll get somewhere ha ha! I'm so glad you are liking the design choices! So many ideas, so little time...
DeleteIts Sheila (still can't figure out comments but I'm trying to keep up with my blog reading at least.) It's absolutely beautiful! I love the timeworn formal look. Have you thought about putting carpet rods on the stairs? You could do them fairly cheap with some thin brass tubing or wire and some matching jewelry findings.
ReplyDeleteHi Sheila! Thanks! It's been fun to learn more about and then try to emulate this detailed era! No wonder so many of these homes have become decrepit - so much to take care of! Carpet rods are a great idea, and I actually do have a set of brass ones in my stash. I do love the look, but hesitate here only because these stairs will hardly be seen, and they are much less wide than the rods I have. I'll have to ponder it...
DeleteQue rápido va este proyecto.
ReplyDeleteMe encanta poder disfrutar de otra de tus creaciones. Siempre me sorprendes.
Un saludo
¡Gracias Mariana! Me parece que he tenido el kit durante dos meses y apenas he progresado. Pero una de las cosas en las que necesito mejorar es disfrutar el proceso y no tener tanta prisa que pierda oportunidades para aprovechar al máximo la oportunidad. ¡Aprendo lento, pero me alegro de que te guste el progreso!
DeleteFabulous progress - and so beautiful too. I love the wallpapers and the trims you have designed and printed raise this interior to a whole other level. I absolutely love how this is coming together and am excited to keep reading. Big hugs - Marilyn D.
ReplyDeleteThanks Marilyn! I just loved this paper pack when I saw it and it's nice to have it go off of when thinking about all the colors for the house. It lets me be a bit lazy!
Delete