
Since our last meeting, my work on the Willowcrest has continued with pretty much the same "figure it out as I go" process. Not necessarily always in the "right" order, but when you're not sure what to do next, my modus operandi is just do something... I needed to know where to make the stairwell opening in the third floor, but had to see how the kit's third floor walls were supposed to go together so that my opening did not interfere with it. And, I had to consider my own third floor layout so that the staircase opening would not create any other unforeseen problems there, as well. It was as good a place as any to start.
There was some prep work to do to the floor both before and after I cut the stairwell opening. The original layout of the kit has the third floor stair opening toward the back opening of the house. They leave the die stamped opening piece in the floor so that if you should decide not to have a staircase to the third floor, you can leave it in and put flooring over it. The plywood was very dry and brittle, and the piece had started to delaminate, so I added wood glue in all of the seams to secure and strengthen it. Then I cut the new stairwell opening with the jig saw.
 |
| Third floor dry fit with new stairwell opening. The masking tape marks the kit's original stairwell opening. |
 |
| I made the stairwell opening wider to allow light to penetrate, to add viewing interest and to help it feel roomier. |
 |
| Where you see the slots are where the kit's mansard walls will go, reducing the usable floor space a bit. |
 |
| Red walls are the kit's, green walls are what I'll add and the yellow is the front window. |
With the opening cut, I was able to do a dry fit to see if it all looked good. The dry fit allowed me to mark the ceiling so I could design and install the ceiling paper for the hallway.
 |
| View with the ceiling. |
 |
| Marking angled walls onto the ceiling. |
To make the ceiling template, I measured the key points I had marked on the ceiling during the dry fit and then transferred the measurements to graph paper.

Then I recreated it in my graphics program. I cropped, cut and pasted sections from the Grand Hotel paper pack I'd scanned into my PC until I liked the design, then printed it onto matte photo paper. This time I sealed it with matte spray sealer instead of Mod Podge. It was a much better choice and didn't smear the ink at all.
 |
| The transferred template is overlaid onto the ceiling paper design, though it's really tough to see here. |
 |
| Template and design printed then cut out. |
 |
| Test fit looks good. Just needs trim, a ceiling rose and a fixture, someday... |
I also had to make a template of the second floor hallway's odd shaped floor. It was a tricky one with all of the angles and stair parts to go around. It's great to be able to cut a removable floor template so I can lay the flooring outside of the house. So much easier on the eyes and back!
 |
| Using kraft card scraps to make the template. |
I transferred the template onto nice kraft card.
 |
| Floor template and walnut and cherry strip wood. |
For the flooring in the second floor hallway, I decided to use up some of the leftover 1/16" x 1/4" walnut and cherry I had from doing the herringbone floor in Natasha's Kitchen. This time, though, I wanted to do a simple parquet pattern. Some label this "mosaic" and some "standard block". Really, it is just three alternating boards going one direction, then the opposite three turned 90 degrees. Each board length should be multiplied by the measurement of all three widths, in my case, 3 x 1/4" = 3/4". I laid my floor diagonally.

There was a lot going on in that hallway, so dry fitting and adjusting was a must. I floored over the openings for the railing and the attic stair banister so I could mark the exact position/depth in dry fit. It was a real custom job!
 |
| Does it fit with the first floor staircase in place? Not quite. Mark and trim a little. |
 |
| How about now? Still not there. Mark and trim a little more... |
 |
| One last time... |
 |
| Looking really good! Did I mention I'd installed the window frame? |
In fact, to get 'er done, it required a little remodeling. The bathroom wall was cut at the floor with a hack saw, and the right bedroom/left bathroom door frames were carefully loosened from the floor to allow them to move out of the way...
 |
| The bathroom wall was cut at the floor. |
 |
| And scooted out of the way for fitting/installation. Shhhh. Don't tell! When I'm finished with the house the new owners will never know! |
Once the fittings were done and the floor a perfect fit, I could sand, sand, sand, stain, wait, clearcoat, wait, sand, clearcoat, wait, sand, clearcoat, wait, install. I know! The floor is supposed to look like it belongs in a 150 year old house, but I can't help myself. We'll just pretend that the floor has been refinished at some point.
 |
| After stain application. |
 |
| After several coats of satin polycrylic, sanding between. |
Here I have installed it and am beginning to fill in gaps with wood glue. I'll get "completed" photos after I finish installing all the trim.

Before/after/in-between all of the above, I painted and aged the window and door frames for the first and second floor entry/hall. Most of these had to be installed before I could trim out the wainscoting. I used about four base coats of beige and then applied dirty water washes to bring out the detail and add a century of grease/smoke/furniture polish.
 |
| Entry-kitchen arch trim, bedroom and bathroom door/frame, entry/living room arch frame, front door interior frame and stairwell window frame. |
The first floor staircase got its stringer, trim, "carving" and grime.

I got the entry doorway frames installed, as well as some crown molding and wainscot trim. The chandelier is installed, too, though I may add more "hidden" supplemental lighting soon.
 |
| I had to carve the arch into my crown molding in order to fit because the living room arch is so tall. |
 |
| I went over the brass light fixture with gold paint pen to give it age and tone it down. |
 |
| I made cornice blocks for the corners because the entry has limited places to reach your hands in, let alone see very well. |

With the entry light on. It is only run by a 9 volt battery to test it, so it will be a little brighter when connected to the transformer. I will likely add a lamp on a table to the room later on.
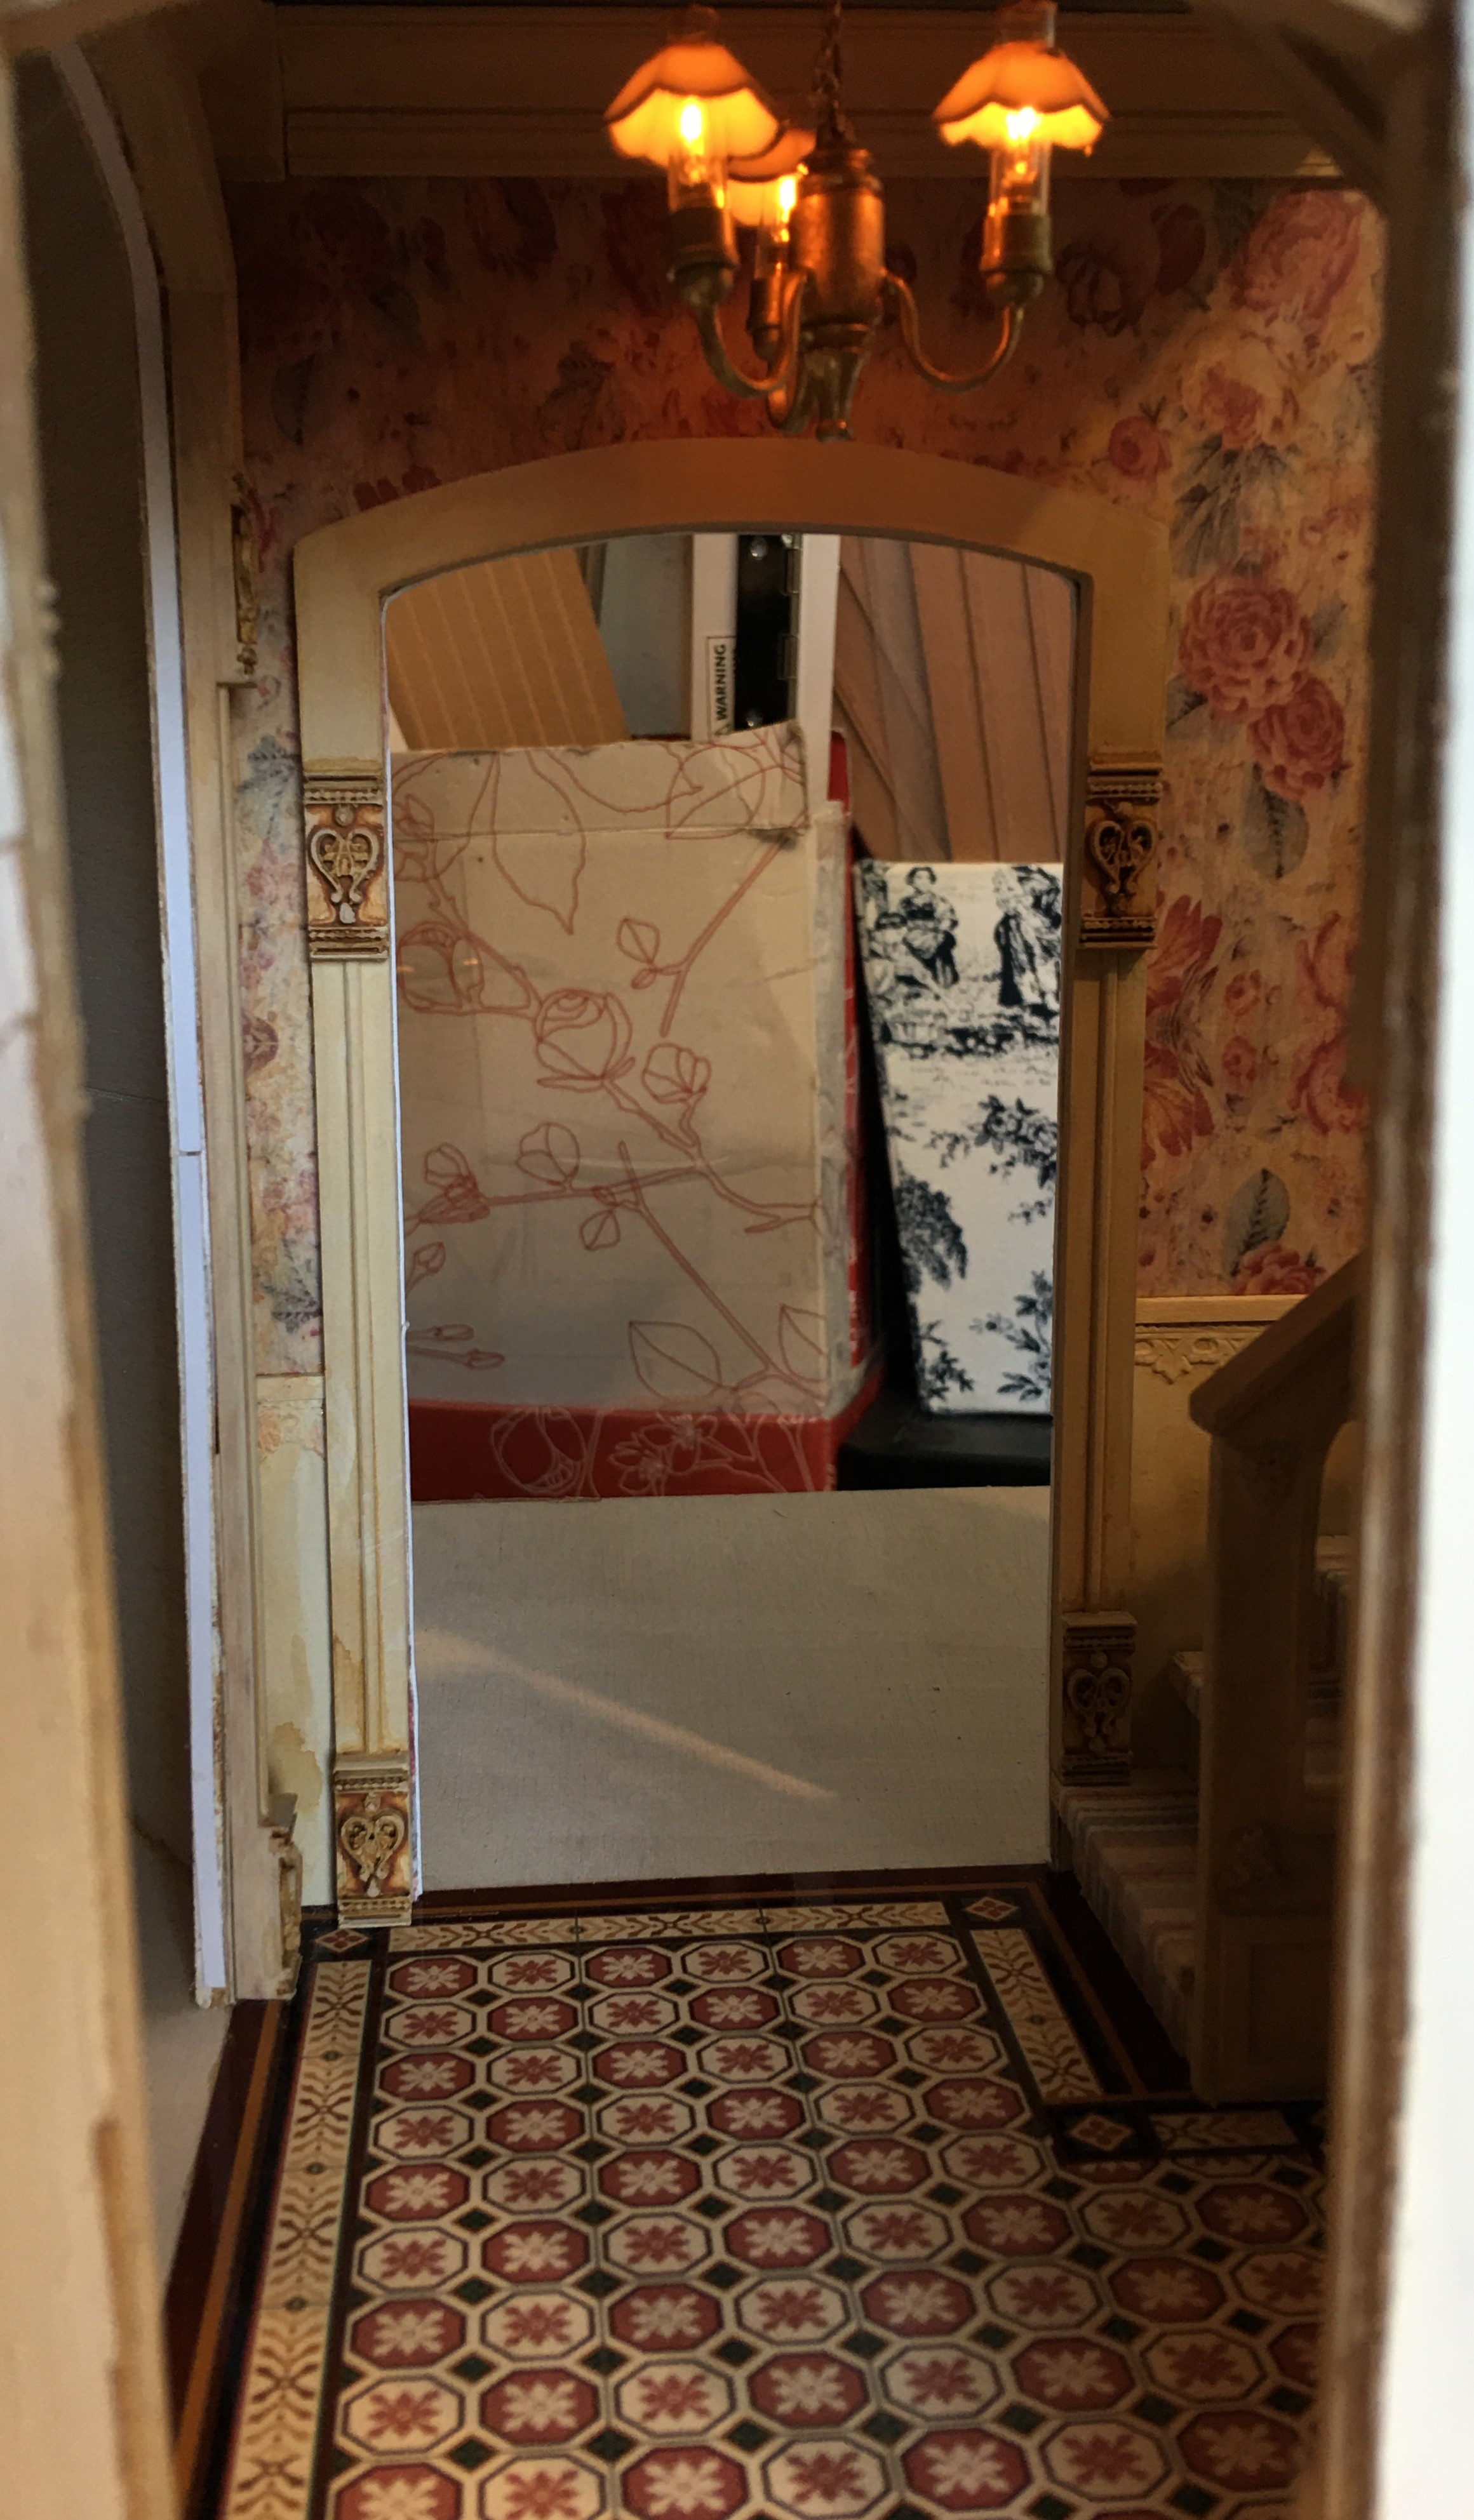 |
| Looking in from the front door. |
 |
| View from kitchen door. |
There is still more trim work to do, too, after the staircase is installed. For now, I check the fit again and again from every angle... Fixing what I see...


 |
| View from living room. |

Slow and cautious with many "think breaks" is the name of this Willowcrest game. If I forget just one thing, I will make a great deal of trouble for myself. Though the repetition gets a little tedious, at times, I'll keep checking and fixing with each new step. Hopefully, in next week's post, the entry and second floor hallway will be officially completed and I can begin planning which room is next!
xo xo,
Jodi
You are the “Pro”. We always learn from you. I love how you cut the perfect paper for the ceiling. You always take us to a new level. All the little details, the planning, and the perfection show us thst we can do it too. ❤️
ReplyDeleteThanks for the kind encouragement, Ann! That is the amazing thing about minis - we CAN all do it, at any level we are at! I am definitely not a pro, but being able to utilize the skills gained from past experience is very helpful. When I read mini blogs, see videos or see what others are working on it inspires my imagination and encourages me to try my ideas. I truly hope by sharing my mini joy I am contributing to that source of inspiration for other miniaturists!
DeleteHow does that saying go 'measure twice - cut once'? One can never be too cautious when it comes to double checking and it is certainly paying off, Jodi - it is looking fabulous. There is so much detail and the richness of the textures and patterns is just so scrumptious. I know the hall and stairwell rooms will 'only' be viewed in glimpses through doors and windows once the house is complete, but oh what glimpses they will be!
ReplyDeleteBTW I think your rich, polished floor is perfect - just because it is old and worn it doesn't have to be tatty, does it?
Not having much mini time or energy of my own at the moment, following your marvel is so much fun.
Anna x
That is so right, Anna! And some days things are just bound to go wrong so extra caution and triple checking is essential! I am never surprised to realize I have overlooked something and call it a good day when there's a way to fix it. My biggest regrets are when I have not siezed an opportunity to add delightful details, and that seems to happen when I try to get things done too quickly. Learning to slow down and take my time will be rewarding. I am so happy that you like the floor and what I've done, so far! I hope you find your inspiration along with some time to work on it! XO
DeleteThe floor is very beautiful! It suits your 150-year-old house very well. Old doesn't necessarily translate into wear and tear - the quality of floors and much everything else was a lot better at that time compared to today. By the way, I also think you are very much a pro!
ReplyDeleteThanks Millimari! So happy you like the floor! I enjoy doing these floors so much and hope more of them, as well as many other quality customizations, are in the cards for this house! As for being a pro, I'm truly not deserving of that kind of title, but I appreciate your belief and faith in me!
DeleteAnd the willowcrest has grown a little more. I love the wooden floor you have made for the landing. As all of your wooden floors are. This new pattern fits great in the small space of the landing with its impossible amount of angles.
ReplyDeleteAnd which room will be next? Don't keep us in suspense too long.
Huibrecht
Thanks Huibrecht! I'm glad you like the landing floor! I really enjoy working with these beautiful woods and laying the patterns. I hope to get better at them as I try new patterns and learn more about them. As for which rooms are next, I think staying on the right side of the house makes sense, so first floor kitchen and second floor bathroom are the logical next steps. Some modifications have to be made to accommodate my ideas, so again, the task is full of opportunities for challenge, learning and fun!
DeleteThanks so much for showing your process, I always learn a helpful technique. I do have to say, though, building the stairway is making my head spin 😬.
ReplyDeleteHa ha! Me too, Sherrill! The amount of things that had to be done in these tiny spaces is staggering, and I kept it simple, relatively speaking. 😁 I am still trying to puzzle out how to fit and fix certain areas, though I know they will never be noticed. I am so glad to know that sharing the project is helpful to you in some way!
DeleteChecking site lines from various angles using your camera AND your naked eye, is invaluable as it immediately and objectively, puts you at eye level AND inside your project, which gives clarity, direction and storyline.
ReplyDeleteTotally LOVING what I see, Jodi!
Thanks Elizabeth! Oh such good advice! I trust my photos to show me things my eyes never see but that my little inhabitants (and readers) surely will. It can be a little disappointing to think I have finished, only to see the photos and spot missed opportunities. But being willing to "keep working" until the space is truly finished is something I want and need to get better at. I am so glad to know you like how the house is coming along!
Delete*swoon*
ReplyDeleteThanks Carrie! 😊
DeleteDear Jodi, you are very wise in checking . Better to check and avoid trouble later on. The floor is beautiful and very much in style with this house. you have made a good progress, I loved reading your post. Thank you for sharing and explaining your work as you go.
ReplyDeleteHugs, Drora
Thanks Drora! I'm glad you like the floor! It was a lot of fun to do and I am looking forward to doing more of the flooring for this house!
DeleteDear Jodi, I am so glad you have this kit to embellish and adorn and design! It is becoming a gorgeous elegant mansion in your hands!!! The steps you are doing over and over show what a pro you are... you know it matters! The beautiful flooring you made... on the diagonal no less!... is stunning and even though it will only be glimpsed through windows and doors... it adds a rich detail to that amazing hallway! And the stairs in their new position are pure brilliance! I am enjoying every step of watching you wrangle this complex kit into a sumptuous Victorian "jewel box" of a house! If my kit were not so near to completion.... I would be having serious second thoughts about my own choices! LOL! But I do know my house is a "Witchy" house and so it needs to be really old and dark and twisty and full of mystery... so I am happy with my choices! :) And as I watch you steam ahead at lightning speed... (I started my kit in 2014...!!!!) I am convinced I need to get on with my own build! LOL! You are going to finish yours first at this rate! :):):) As always, I can't wait to see more! :):):)
ReplyDeleteThanks Betsy! I am so happy that you like the floor! I am finding myself second guessing and worrying that I am not getting detailed enough. Should I have paneled the entry walls? I guess that is just part of this wonderful hobby, especially when we see the amazing ideas done by our mini heroes. You are among my favorites, and I love your witchy Willowcrest! I am always inspired by your imagination, but know my own limitations - I could never pull it off as magically as you do! I think if time were kinder we should all get to do at least three versions of every kit. Maybe then we'd feel like we included everything we wanted to! As for my speed, I am trying to take advantage of Russ working out of town again this summer! I am keeping crazy hours because I am having so much fun!
DeleteRealmente unos ajustes muy complicados, con los que hay que tener mucha precisión y paciencia pero ¡ han quedado perfectos! El suelo y los diseños de paredes, techos y puertas son preciosos.
ReplyDelete¡Gracias Isabel! ¡Realmente estoy disfrutando los desafíos que ofrece este kit! ¡Solo espero que al final sienta que lo llevé tan lejos como pude!
DeleteEs maravilloso ver el progreso de tus trabajos.
ReplyDeleteNos haces participar de cada detalle de investigación y composición.
Felicidades.
Un saludo
¡Gracias Mariana! Ojalá estuviéramos todos juntos en un club para poder compartir nuestros tesoros y trabajar en persona, ¡pero es muy agradable verte al menos cada vez que publico y recibo tus comentarios!
DeleteBeautiful staircase, what a job to get it the way you want, the door posts and floor also very nice.
ReplyDeleteThanks Gonda! I'm glad you like the way things are coming along! The stairs are one of those things where it is better if it surprises you. If you knew ahead of time all you'd have to do to finish them you'd fret a lot more, lol!
DeleteOh, what a wonderful post! ;O) I've enjoyed it to the fullest. And once more I'm not only admiring all the gorgeous results of all your well planned and organized planning, trying, testing and just doing but I'm also in total awe of your working speed. You are faster than the speed of light... which always reminds me how slow I am myself. *LOL*
ReplyDeleteYou've done a great job with the mosaic floor and there's no need to apologize for making it so very neat and lovely. Remember that even old houses need some renovation every now and then and who knows if the floor has been renewed only a few years ago.
As always I can't wait to see more... and whatever room will be next I know already that you will come up with more amazing work and inspiration. Oh, and before I leave for today I still need to mention how good your photos are. They allow us to spot the details of your stunning work. However, it's amazing how great the rooms appear to be at these photos... while when it comes to bringing the furniture and decoration in there's never enough space for all the ideas.
Hugs
Birgit
Thanks Birgit! I am glad you enjoyed the progress and the photos! I like to blow them up as large as possible to help my poor eyes see all the things I have missed and need to fix. There is always something, lol! In the stairwell, it is hilarious to try and figure out how to get hands and tools into windows, doorways and up staircases to fix things, and sometimes it is literally impossible!!! If you see something, please let me know and we can put it on the blooper reel, lol!
DeleteI am glad to have your vote to have the floors be as nice as possible - I just can't ruin or rough up a nice wood floor, especially if it is a lot of work and pride to get it nice in the first place, lol! But making walls dingy? No problem!
I am really having fun and feel like I am finally making some progress! It is much easier to get completely engrossed when Russ is working away from home four days a week! My hours are mine to do with what I please, and I am totally good with eating cold cereal for dinner! :O)
As incredibly beautiful as it is masterful. You are, indeed, a Maestro of the highest order! - Marilyn D.
ReplyDeleteJust flying by the seat of my pants over here, don't deserve this kind of praise but I very much appreciate the encouragement! 💗
DeleteI'm speechless. I really like the floors. Everything goes smoothly with your ingenious solutions.
ReplyDeleteThanks Faby! I really enjoy doing these kinds of floors and I'm looking forward to doing more of them in the project!
DeleteJodi the staircase is fabulous. I love it so much. Adding the the over frame looks so stylish. This house is going to be one of your best ones. Thank you for sharing.
ReplyDeleteThanks Stephanie! I love how these Greenleaf kits can look just adorable as they are, but are also are so open to going as detailed as you can imagine! I am happy to know you like where it is heading!
Delete