
One of the most challenging rooms in the Willowcrest kit is its kitchen. It's a long, skinny room with little wall space and two doorways to work around. Though it's typical of older homes where kitchens were compact and not well laid out, I think it's actually part of the kit's charm. I've seen some super successful and adorable versions where the builder made the most of the original layout, I've seen radical remodels and I've admired versions from true pioneers who completely relocated the room. Having so many wildly different ideas to look at is inspiring, and the opportunity to make even mass produced kits into our own unique versions is exciting! I decided on a happy medium for my kitchen. It won't be big or fancy, but it'll have everything a little cook needs to produce delicious home cooking. And hopefully, it might be my version of adorable, too!
 |
| This sweet kitchen has been left as the kit intends. Photo courtesy of Judy Evans, Pinterest |
 |
| In Elaine's version, she not only extended the bay, she changed the back left corner of the kit, removing the jog in the wall to create more floor space. Photo courtesy of Simply Curious |
 |
| Elizabeth (Studio E) swapped her living room with the kitchen, then created a hallway with a door at the end which leads to a patio behind the kitchen. So genius! Photo courtesy of Elizabeth. |
 |
| Elizabeth's Astonishing Finished Kitchen - Incredible! Photo courtesy of Elizabeth. |
It seemed to me the most efficient way to gain some needed square inch-age was to simply expand the bay. I extended mine by a measly 2 inches, but it's just enough to add a run of counters with a sink under the windows. That leaves the long wall with room for a small stove with counters on either side. A good cook needs to spread out a little! No matter what I tried, all I could come up with for the fridge is to park it across the room between the two doorways. Maybe I can find a way to turn that into an advantage, somehow. We'll see!
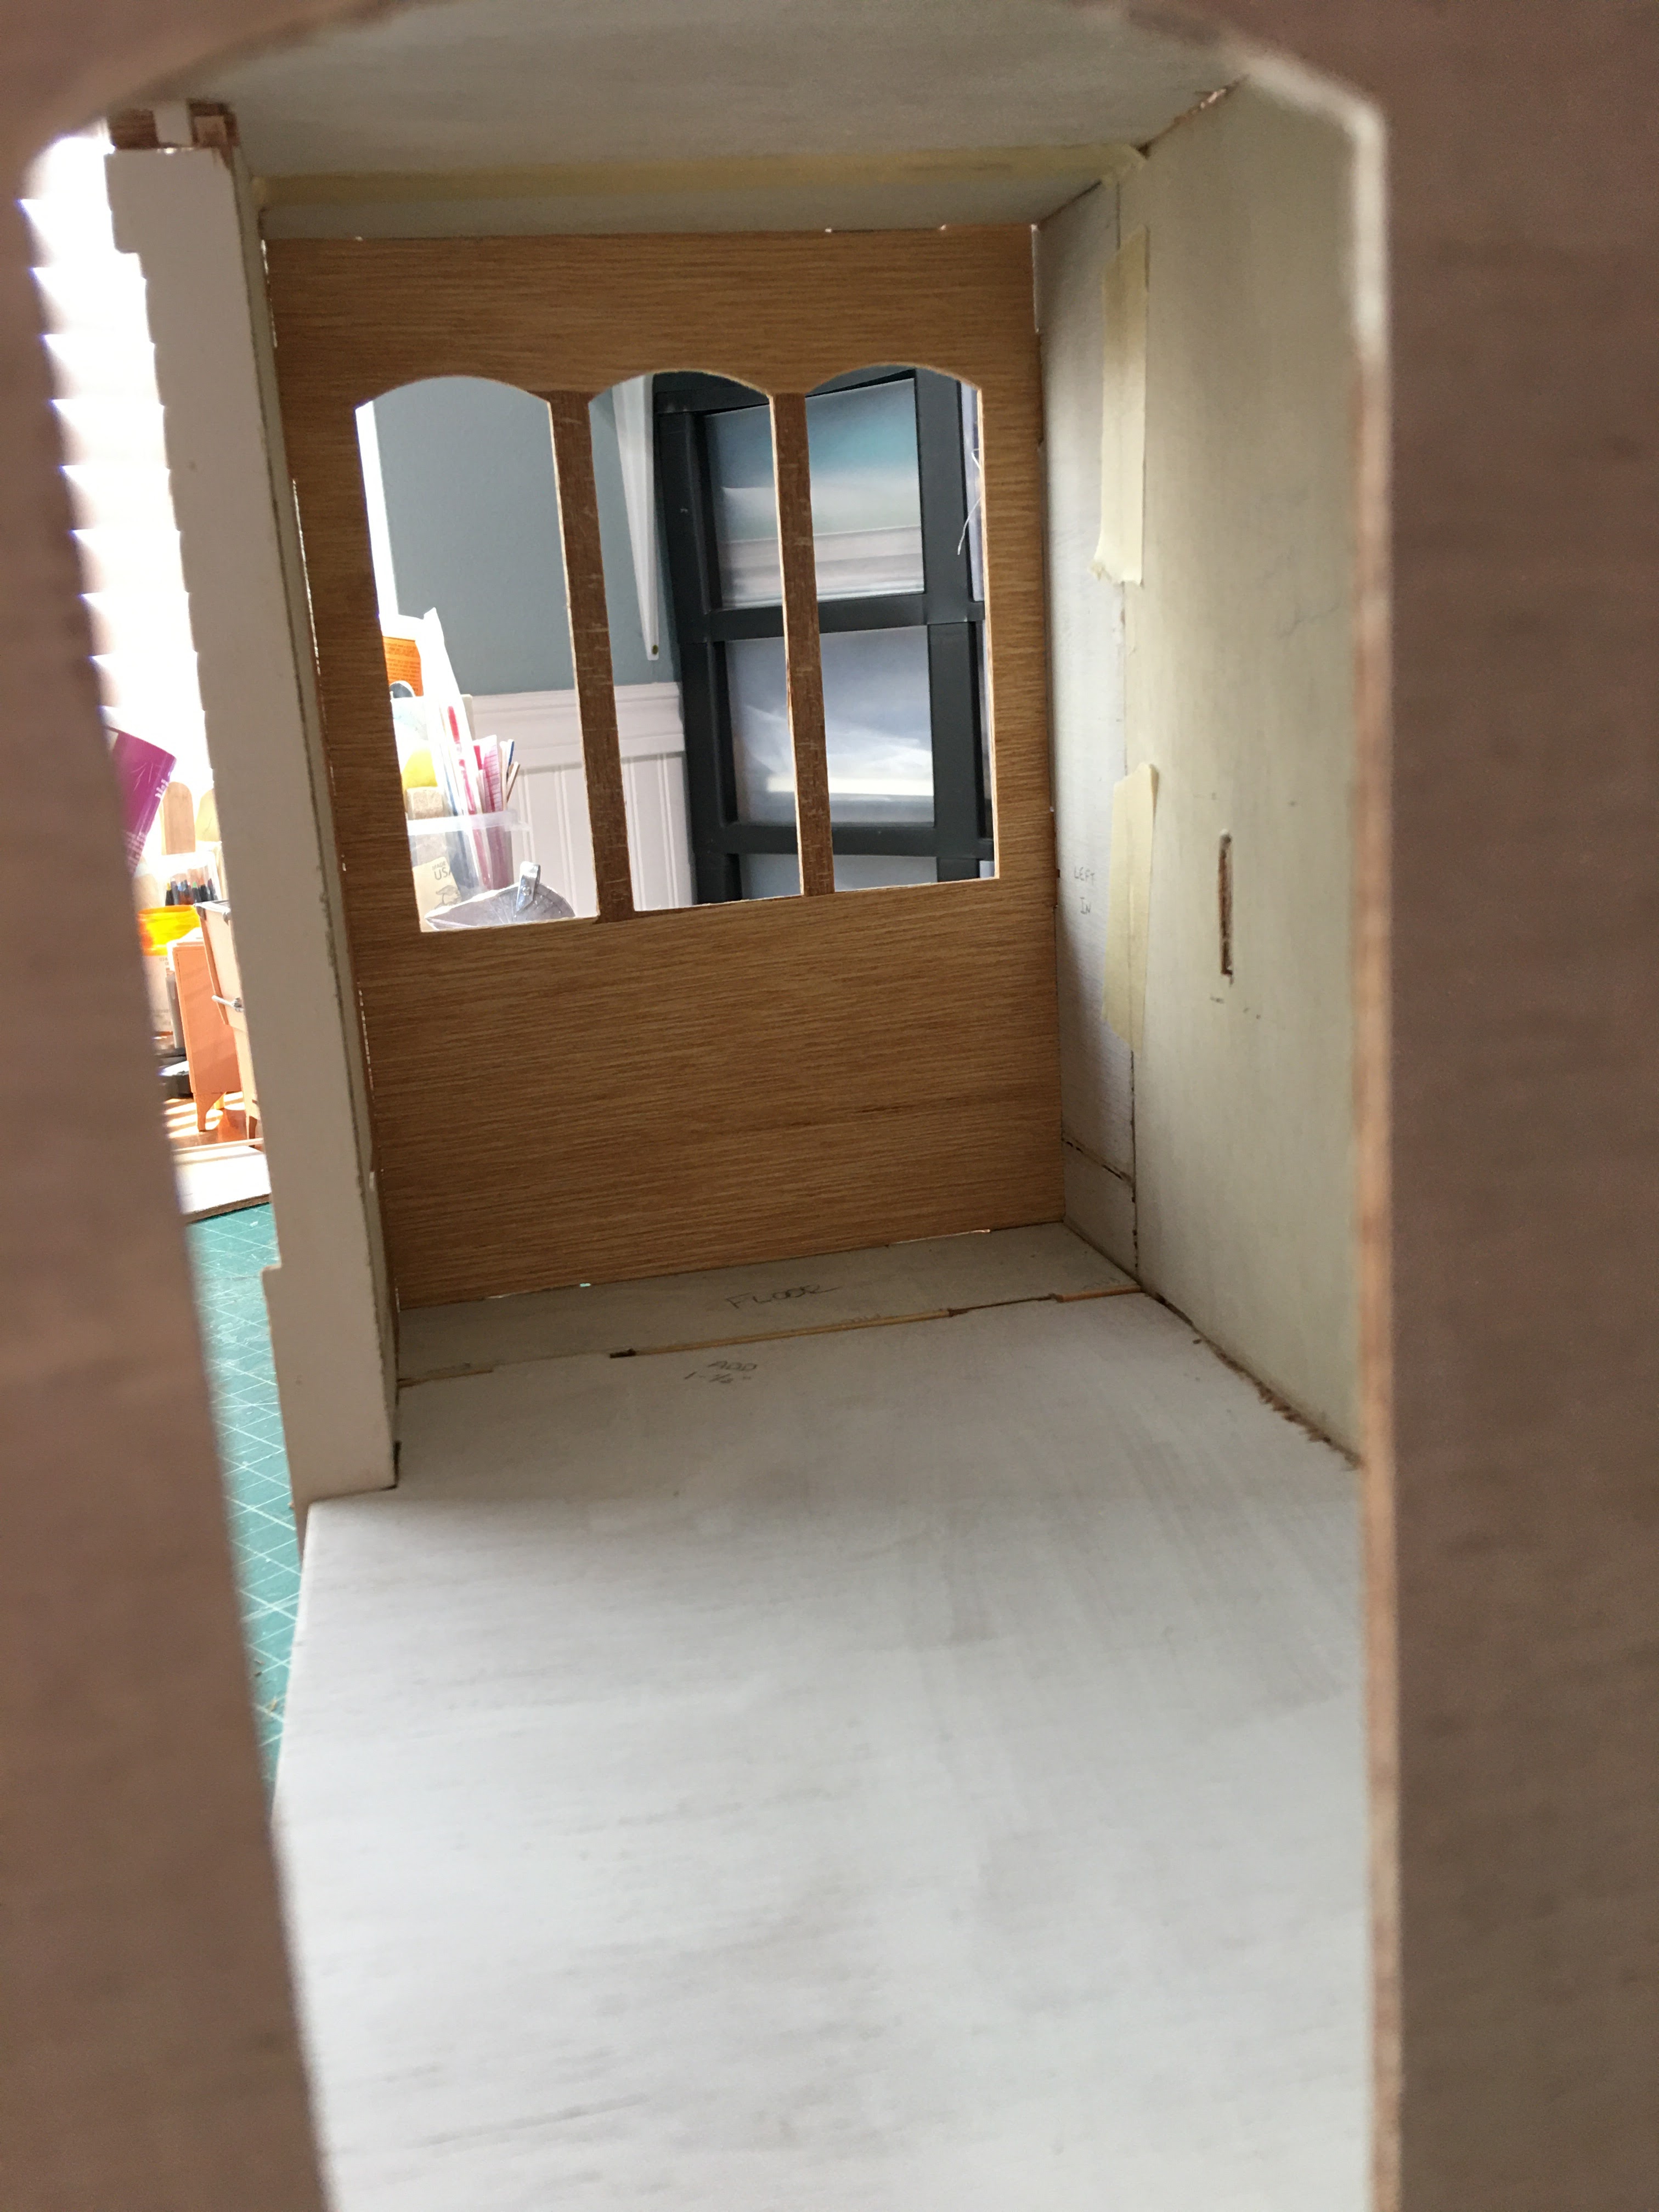 |
| Looking in from the dining room. |
 |
| You can see my "expansion joints". |

 |
| My grandma cooked delicious meals for a family of nine for many years in an impossibly tiny kitchen. This space should do our mini folks nicely! |
 |
| I like to use wood glue as caulking in all my cracks and crevices. The tape keeps the glue from oozing out as it dries. |
I was able to cut the plywood pieces I needed from the unused bedroom/bathroom wall. I cut 2" strips from the piece, then cut those to the lengths I needed. I laminated them with wood glue to the kit's original bay window pieces, adding slots and tabs to make things fit together squarely. I did not want to extend the footprint of the kit by too much for fear of making the facade look weird.
 |
| Kit's original kitchen bay pieces laminated onto strips I cut from the unused bedroom/bathroom wall piece. |
 |
| Future bathroom bathtub alcove will sit on top of the extended kitchen bay. |
 |
| Stairwell wall is still in dry fit here. |
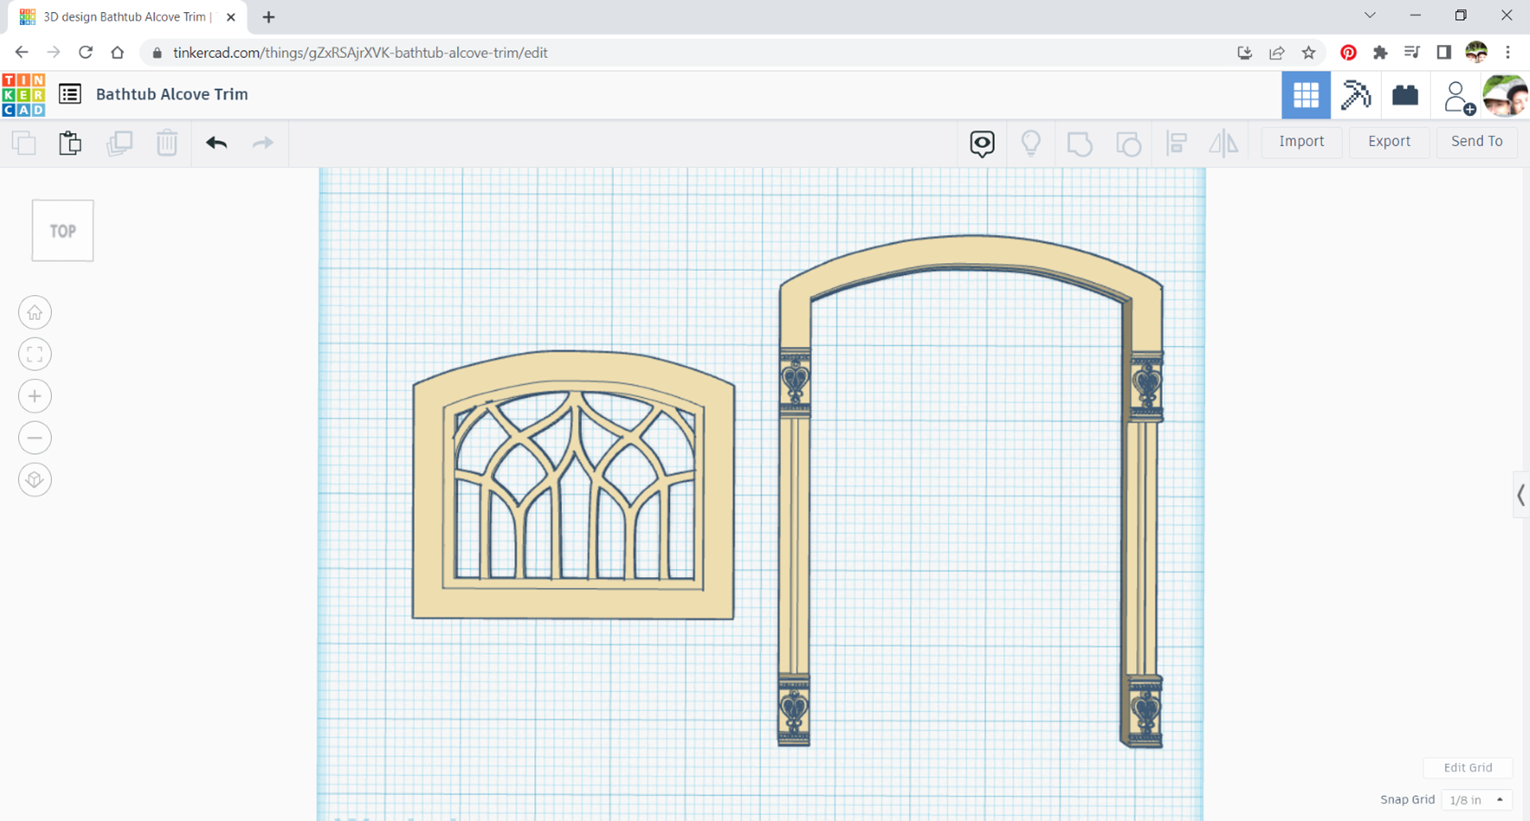
For the interior kitchen window, I replaced the kit's wood frame the same way as the others: scan, turn into an svg then bring in to Tinkercad.


And speaking of windows, I was able to get the stairwell wall window installed, and the wall attached to the house. So much of what I did to the entry, stairs and hallway is impossible to see now, but it feels great to know it's there!

 |
| Thank heavens for abundant clamps! |
I put a couple sconces in the stairwell. It'll have a ceiling fixture, too, once the third floor gets installed. Hopefully, they will be enough to provide a nice ambiance in there. Before I install the third floor permanently, I'll test to see if I need to add hidden supplemental LEDs. I don't want it too bright, just enough to be able to see the peek-a-boo views of it's features.


And here is about all you'll ever see of the hallway from the bedroom doorway...

 |
| This view will disappear once the third floor goes in. |
And the entry with the stairs and wall attached as seen from the living room doorway. Once the side wall for the living room goes in, it will be difficult to get this view again....

You may have noticed that there's an archway cut into part of the stairwell wall. This is the bathroom's original exterior wall, but I took advantage of the extended kitchen bay to add a little arched tub alcove to the bathroom.

Here's what the bathroom space feels like with the alcove extension...
 |
| View without the bathroom/bedroom wall in place. |
 |
| Just the bathroom's floorspace. |
With the bathroom/bedroom wall in place...
 |
| "Efficient" but functional. |
The tub alcove arch's frame will match the rest of the window and door frames in the house. With the exterior window, I am hoping to experiment with a stained glass or leadlight window using 3D printed leading. We'll see how it goes...
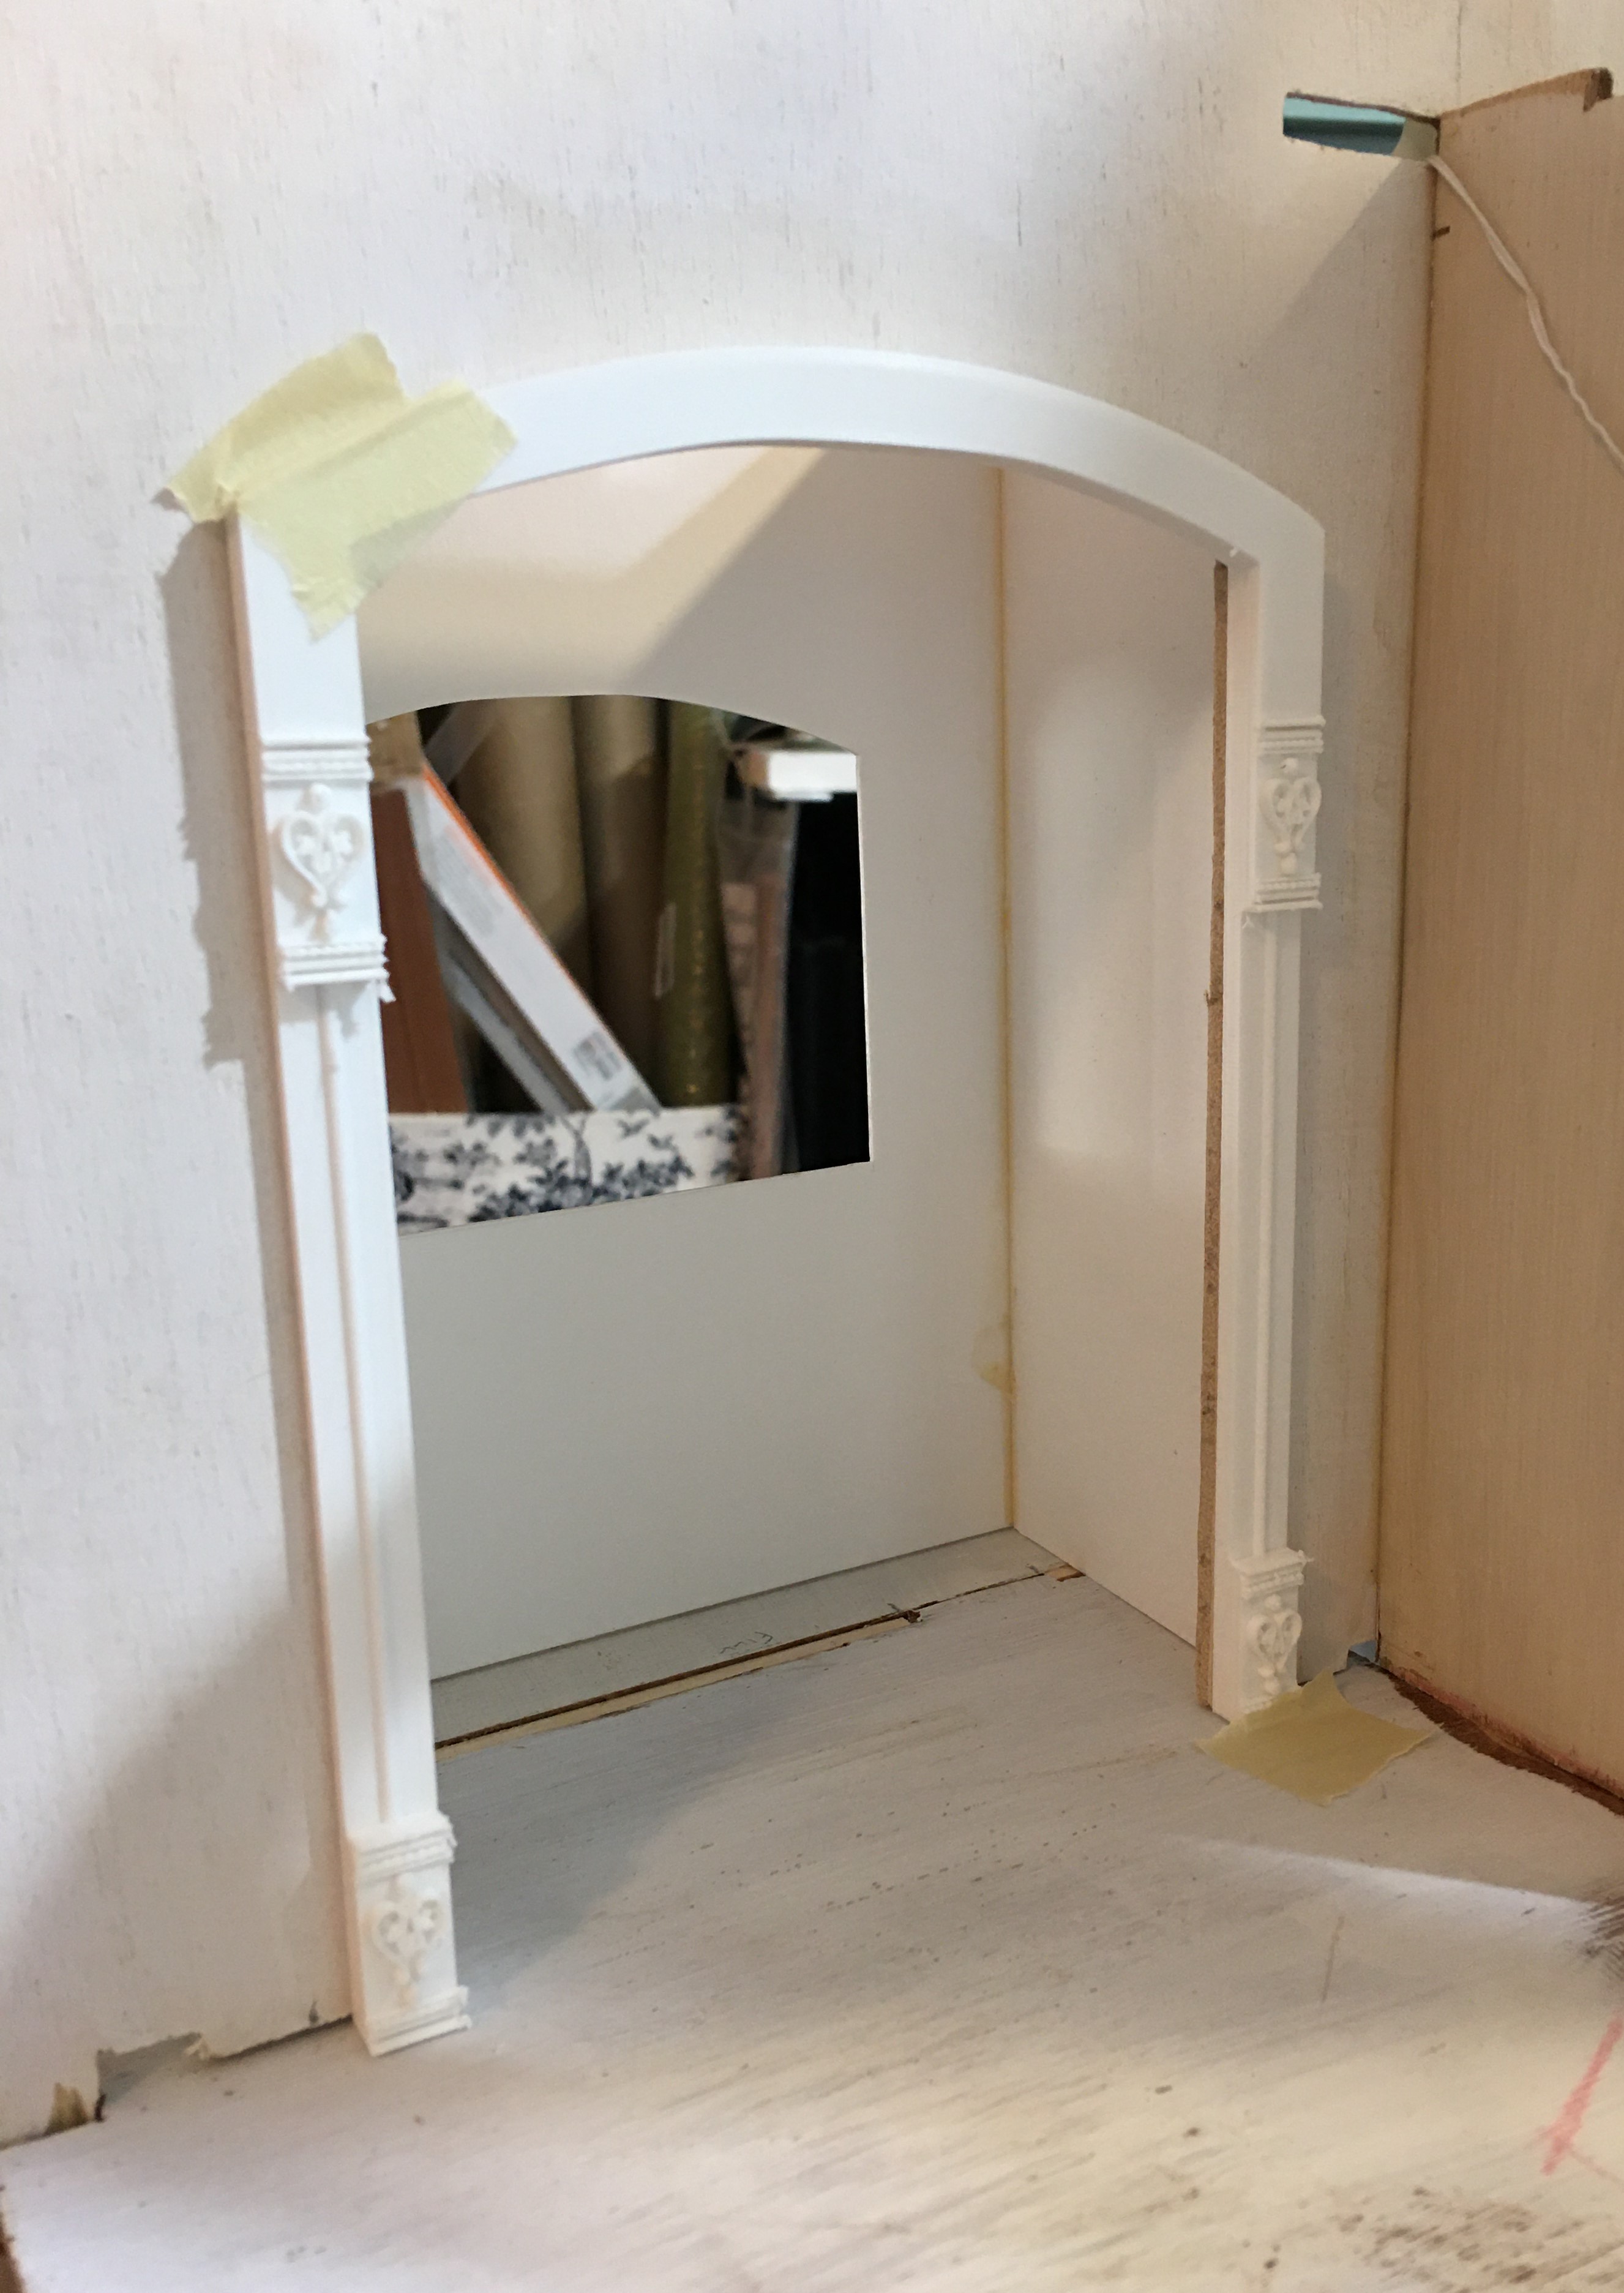 |
| It should be large enough to fit a Chrysnbon sized bathtub. |
 |
| If the leadlight works out, it will provide a little privacy for the bathers. |
 |
| Toilet and sink placement are still being mulled over. |
And here is a glimpse of what the exterior facade is shaping up to look like with the bay extension and the alcove...

 |
| I don't think it feels too obtrusive, but what do you think? |
Next on the To-Do list is to make wall, floor and ceiling templates for the kitchen and bath. Would you believe I still have not settled on colors/papers/tiles/era or overall style yet? It's been so stinkin' hot here, though, I may just lie down in front of the fan and think about it until cooler weather returns!

I hope all my northern hemisphere readers are finding ways to stay cool! And that everyone is making project progress in spite of all the challenges they are facing. No matter what is going on in real life, doing minis just makes you feel good!
xo xo,
Jodi
Well, I had --misplaced all of my handles for kitchen cabinets, which has stalled the kitchen completion. Found them! But too many other things to do at the moment. Anyway. I am always amazed at how you redesign, add, and switch your houses--things that even if I could imagine them, I could not execute as you do. The 3-d windows add so much detail and interest, creating a truly one of a kind house. We grew up in an old farmhouse with a tiny kitchen and bathroom. Dad said that at one time builders made bathrooms as small as they could--but it beat the path outside. I lived in a little house without an indoor bathroom, too, when I was probably 4. So better to have tiny than none. As for staying cool, we missed the violent storm that passed through last night north of us, getting much needed rain, instead and today relief from the heat. Cloudy and damp. Looking forward to seeing your progress.
ReplyDeleteI'm glad you found the handles, Ann! Now they'll be ready when you are and hopefully it'll be cooler, too, when it's time! My grandparents lived in the same house from 1958 until grandpa passed in 2008. It still astonishes me how all of them lived together in that tiny place - especially all the people we fit in there for holidays throughout the years! I guess love is all you really need and we had a surplus of that! Sure miss those days!
DeleteMuy buena opción la ampliación de la cocina , aunque sea poco. Además con esa ventanas va a dar sensación de más amplitud.
ReplyDeleteEspero que estas sucesivas olas de calor acaben pronto y nos dejan pensar y podernos mover un poco.
Looking fabulous! I know exactly what you mean - My mantra has been, "the more out of control my 1:1 life gets the more I love my 1:12 life!" Miniatures are so satisfying and good therapy :)
ReplyDeleteThanks Michelle! Minis really do "take you away" and there are times I am so grateful for it! Busy is good, especially when you're making progress on your tiny dreams!
DeleteJodi, you are incredibly creative! Your ideas transform the dollhouse in remarkable ways. Can't wait to see the rest of your adventure ! Thank you for sharing :)
ReplyDeleteThanks John! I really appreciate the encouragement! It's always so much fun to see what you can come up with to customize these kits!
DeleteIt looks very good
ReplyDeleteThanks so much! 💗
DeleteThe alcove does not look obtrusive at all. I can hardly wait to see the bathroom all gussied up. It's always a favourite room to do up - so many details possible in such a tiny space. I can hardly wait for the next post! - Marilyn D.
ReplyDeleteThanks Marilyn! I am hoping I can tie them in in a good way! There's an inspiration house I saved off to help me find my footing once I start on the exterior. I am going to make an attempt to 3D print the bathroom pieces, if I fail epically, I can order a Chrysnbon kit, lol!
DeleteThose two added inches to the bathroom are a brilliant idea and already look as part of the house.
ReplyDeleteBy the way, dear Jodi, your first comment on my latest post didn't get lost. It appears in another window, at the left side bar of my blog which by pure chance I just discovered. Thank you so much for all your kind and supporting comments.
Hugs, Drora
Thanks Drora! I'm glad to have your encouragement!
DeleteOh weird! I'll have to go see what you mean. My comments seem to randomly disappear every so often from many blogs, even after I confirm them. I thought maybe it was a cache issue with me or some such. Thanks so much for letting me know!
I do admire all the tweaking anyone is doing to their doll's house. Maybe I should start doing it, too, as I do not the enjoy the build as much as interior design.
ReplyDeleteYes you should try! You never know what talent might be lurking right under a false belief that you aren't that kind of miniaturist. Try everything! It's only wood and paper!
DeleteThis project goes fast with your ideas that come true.
ReplyDeleteIt's so true, Faby! Once you know what you want to do and have an idea how to do it, you just roll up your sleeves and get to work!
DeleteThe hallway looks great Jodi, and the extra depth on the kitchen bay won’t look weird I don’t think. The bath nook adds weight above the kitchen bay, and the step back will help too.
ReplyDeleteThanks Shannon! I've seen some inspirational second empire bays, so hopefully, I'll be able to get the trims right so they turn out to be a feature rather than a distraction!
DeleteWhat you are doing with this house is STUPENDOUS! I totally agree with your alterations because it suits the style of this project therefore, enlarging the kitchen bay was Exactly the right thing to do- AND it looks like it SHOULD be that way!
ReplyDeleteBumping out the bathroom and stepping it back a bit enhances the structure of the house and makes it more interesting. Love the arched bathing recess AND the New bathroom window - plenty of the WOW-factor there and the stained glass sounds Fantastic!
As always, I am BLOWN AWAY by the speed at which you're working at Jodi, but always with such EXCELLENT results!
p.s. Up here in Greater Vancouver, it is sweltering!
Thanks Elizabeth! How many times have we just wished for just a couple more inches in our mini homes!!! It makes all the difference in functionality so it's so worth the trouble. And, if you're only going to get ONE full bath in a fancy older home, it better be a GOOD one! :O) I'm really hoping I have enough patience and alternate ideas to make that leadlight a GO!
DeleteWith Russ working out if town, my mini time multiplies exponentially! It's amazing what you can do in just a couple hours if you are able to concentrate, lol!
Ugh this heat!!! Our AC needs to be replaced - I was hoping to get more than 13 summers out of it but, apparently, the Freon for it is now illegal. The retrofit kit is pricy (and backordered 3 months) and dicey (HVAC guy says it's full of "Bugs" and he's see us a lot), and the new unit will be over $4000. If we stay another 14 years, okay. But if we decide to relocate in the next couple, I will just suffer the heat. Maybe we will acclimate?
What a difference a couple inches makes. I predict it will look like it was intended to be that way all along. And speaking of looking like it was intended – your window and door trims look perfect on that house.
ReplyDeleteThanks Sherrill! A little really does go a long way in minis! It's so much fun to analyze what you love about a particular building style and then see what you can do with the tools available to you to replicate it! What a challenge, but I'm loving it!!!
DeleteI love how it looks so far. I seriously think you could have a nice little 'retirement' business making and selling all the amazing trims and railings. The windows are gorgeous and I can't wait to see how the bathroom turns out.
ReplyDeleteThanks Sheila! I appreciate your encouragement! Though I love the idea of earning some guilt free mini money, and I love to take on special requests from fellow enthusiasts, I never want my J~O~Y to become a J~O~B! I might at some point make up a few things and offer them when the mood comes over me. I'm just not sure if anyone would be interested?
DeleteHi Jodi, you are forging ahead with great plans and fearless kit bashing creativity!!! I Love the kitchen extension and bathroom tub alcove! Yes, the kitchen is a decorators nightmare in terms of how little wall space there is! Well, it is a Victorian house in the original model! Refrigeration had not been invented yet! (Think root cellar, spring house and "ice box"! I remember we called our refrigerator an "icebox" until I was an adult....!) The sink was the marvel of plumbing and the stove was the necessary requirement for cooking! Everything else was "extra"! I think your bump-out looks very realistic in terms of floor plans and hey, it gives you a couple inches more for landscaping! :):) (Kitchen herb garden???) I can't wait to see your next astonishing feat of design courage! I hope you get a break from the heat... we cooled down for a couple of days but are going right back to too darn hot. The fan and dreaming sounds about right! :):):)
ReplyDeleteThanks Betsy! I am glad to have your approval on the extension! It would have been so hard to fit more modern conveniences in without it!
DeleteI've been mulling over what era I wanted to have us be visiting this house in, and therefore attempting to educate myself on how kitchens evolved over the decades since second empire homes were built. It is so fascinating to learn that kitchens were an amalgamation of loose furniture pieces until we started building in cabinets in the 1920's! And at the same time, began to worry about germs, So began the outfitting of tightly installed tiles and solid surface materials to make them more sanitary. I am so loving all the learning that comes along with the making of a mini home, and I am so thankful to be living in the time of refrigeration, microwaves and Door Dash, lol!
An herb garden right in the nook between the bay and the porch sounds like so much fun! It's been too long since I got to make an outdoor scene!
I hope you'll like the era I chose for the kitchen and the design scheme! It surprised me what I'd settled on, but I am really loving it!
As always I've enjoyed this new post of yours to the fullest. The extension was a brilliant idea and to me it doesn't look obtrusive at all. And this extra space gives you so much more options... and even the wonderful idea to place a bathtub in this space under this stunning window. The window frame is already beautiful in itself and with colored "glass" it will become a dream place.
ReplyDeleteIt's so much fun to see what you're making out of this kit and as usual I can't wait to see more. Let's hope it won't be too hot in your area allowing you to make more progress. Around here we're facing the next hot days... but although this is for sure not my type of weather I have no right to complain. My home state's temperatures are more moderate than the rest of Germany who are dealing with many more days with temperatures of more than 30° C than us.
Hugs
Birgit
Thanks Birgit! I am so happy that you like the "improvements" so far and that you are eager to see more! I hope I do not disappoint! Yesterday was 10 degrees cooler, and today is starting off overcast and very cool - a good sign! It's supposed to start climbing up there a bit in temperature by Saturday, but hopefully, it won't stay hot for as long!
DeleteI am happy to know you are in the cooler north part of the country like we are! I am a wimp when it comes to temps over 80 (26 C), so I can't imagine how folks in the south cope. Last week we had 39% humidity, so even 5 minutes away from moving air and I was sweaty and exhausted! I love blue skies and sunshine, but not when they come with heat, lol!
Thanks Susanna!
ReplyDeleteYour kitchen recipe is cooking up nicely. It looks delicious.
ReplyDeleteThanks Sherrill! Glad that you like it!
DeleteQue gran trabajo estás haciendo con esa casa,desde luego cuando termines no parecerá el mismo kit!!
ReplyDeleteLa idea del espacio adicional en la cocina y la bañera en la alcoba suena muy interesante,tengo ganas de ver la vidriera de colores en el baño!!!
Besos
¡Es muy divertido encontrar formas de (a mi manera) maximizar el potencial y el espacio utilizable en este kit! No veo la hora de empezar a experimentar con el vitral. ¡Espero aprender cosas nuevas y emocionantes!
Delete