
Yes, it truly has been five years and a couple of months since I started on these sister flower shops! But all good things come in due time. I have learned to trust that there is a plan beyond my understanding, and when I let things happen naturally, everything turns out for the best. This is very comforting since I have several unfinished projects waiting their turn, especially since I'm prone to chastising myself from time to time about them. Eventually, inspiration will come again and each dream will enjoy it's time in the sun. Now, if I can only remember my own advice! What follows is a long post, so grab a snack, lol!

Each shop had it's storefront wall yet to be finished, and so, needed windows and awnings. Like with the windows in Pound Cake, the bakery (yet another unfinished project), I employed my Cricut to make vinyl window clings displaying each shop's name and address numbers. The numbers represent mine and Bonnie's birth month and day.

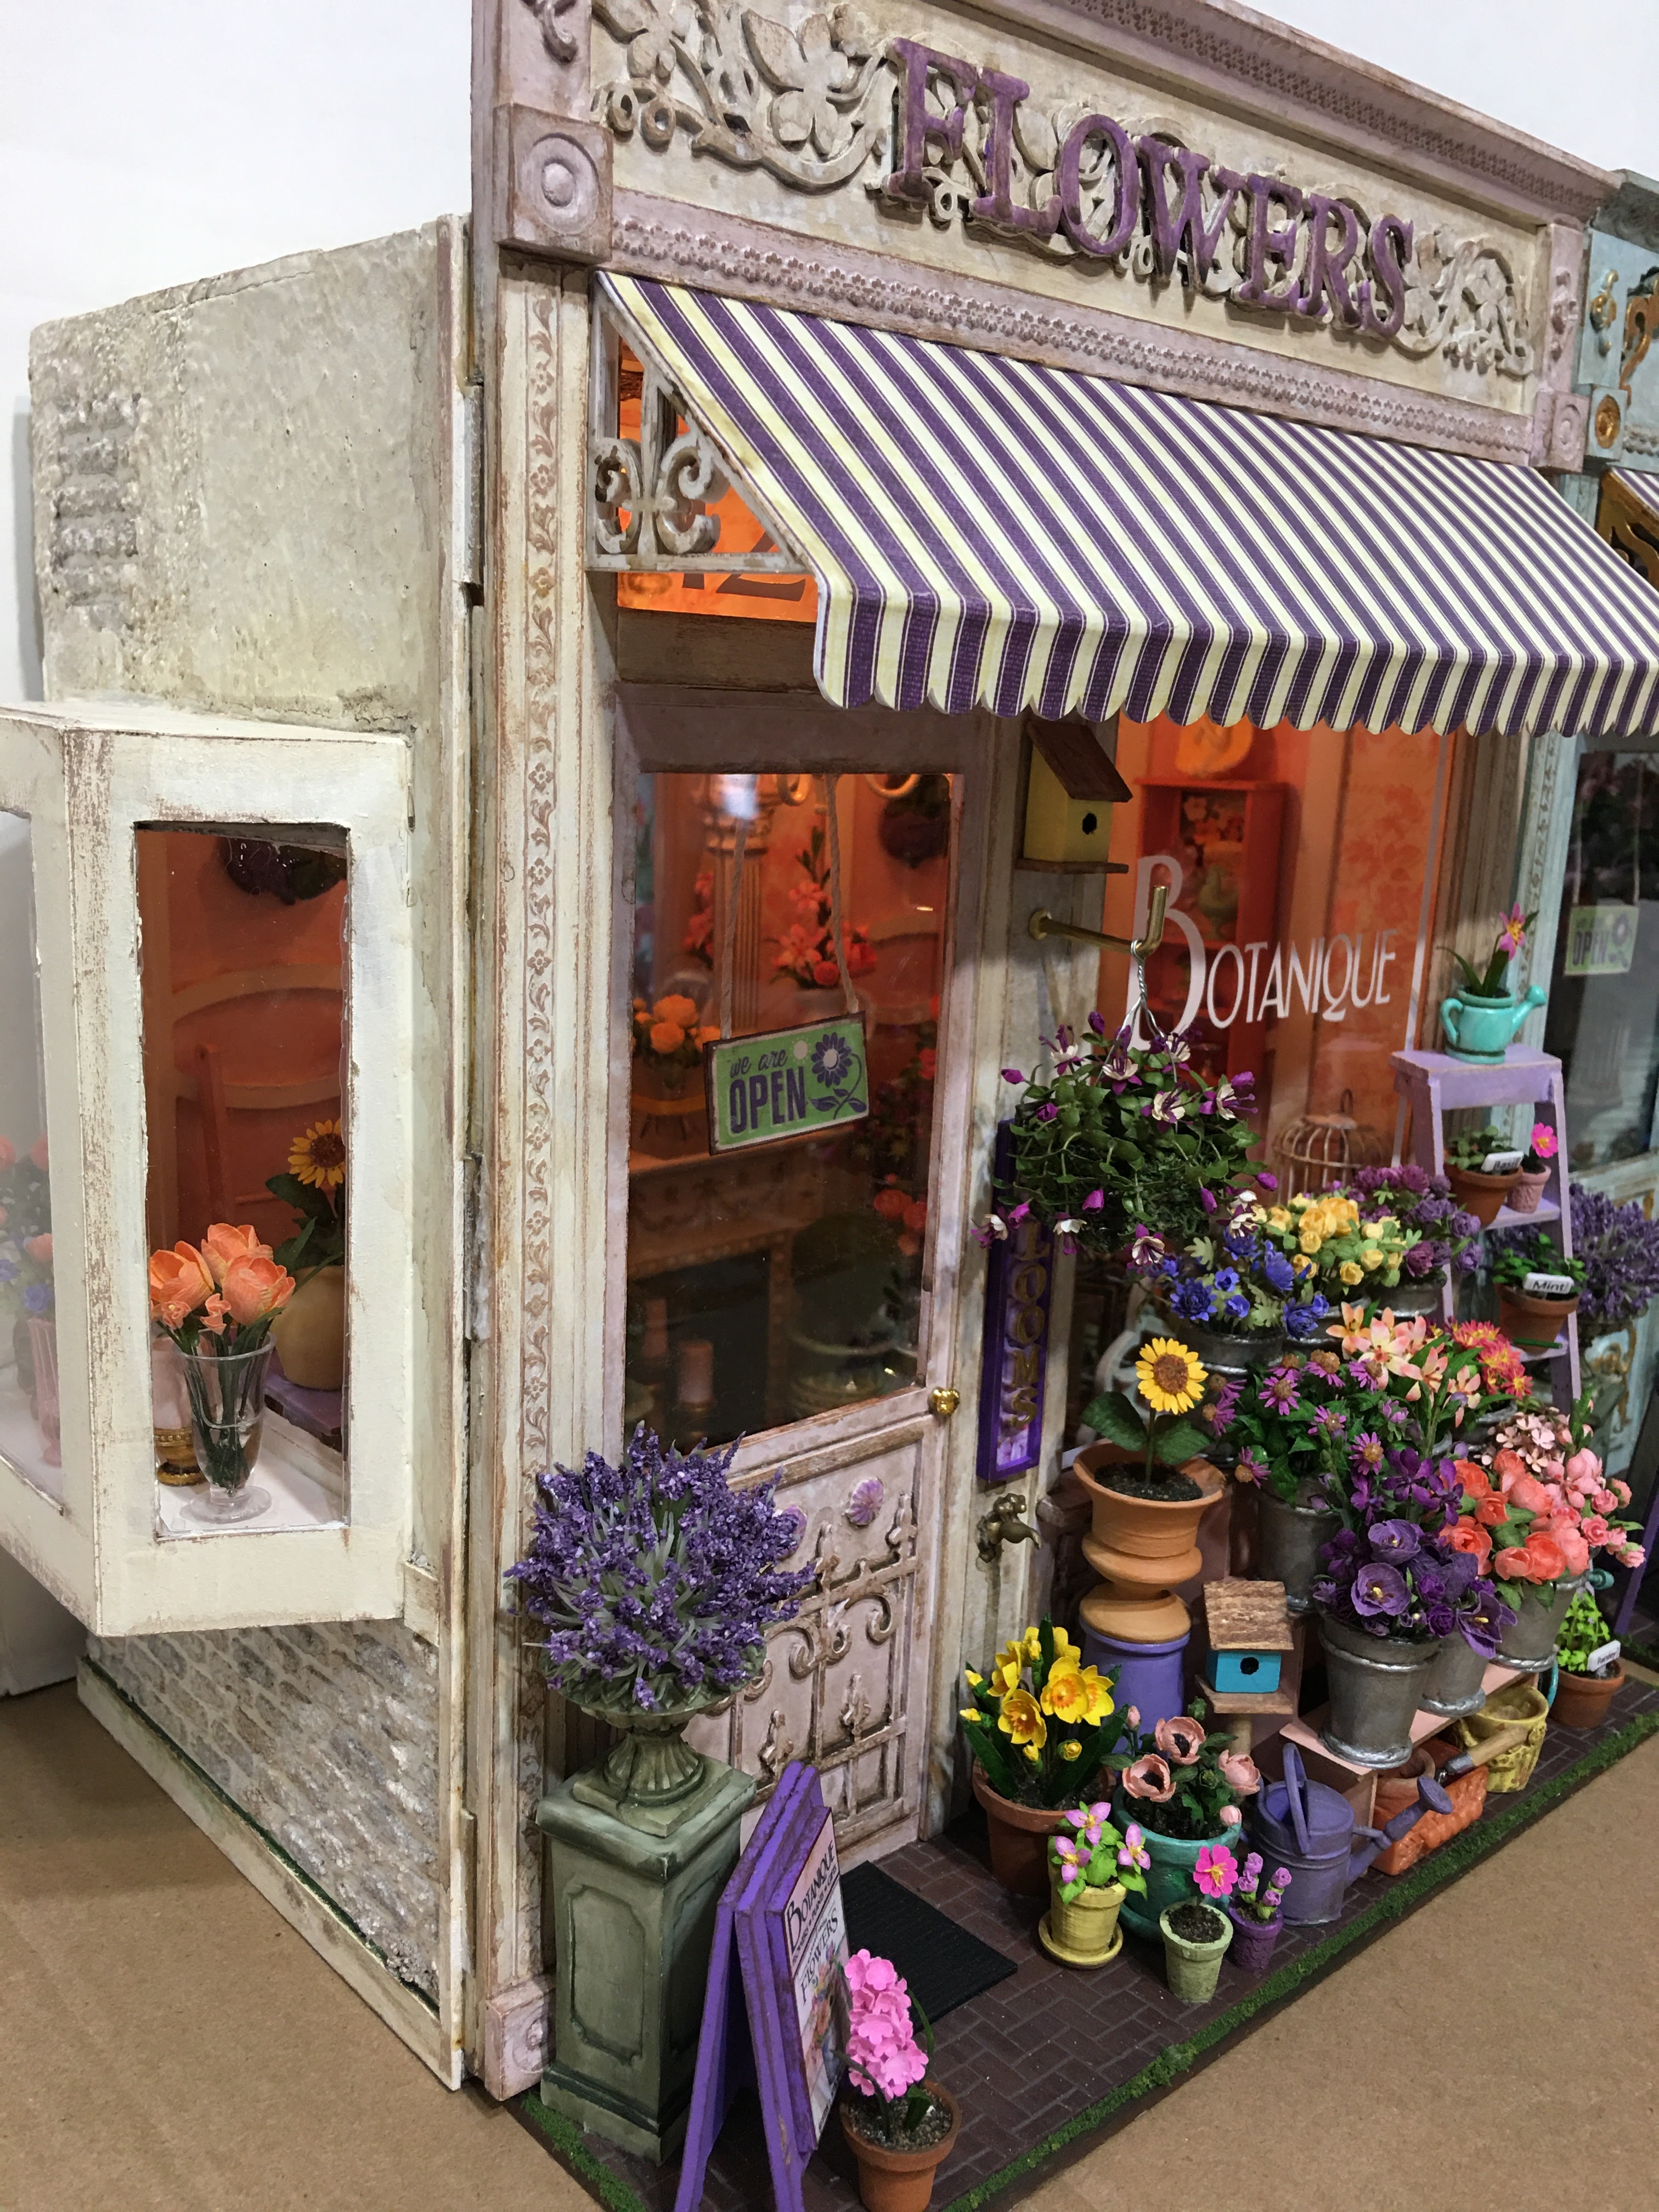
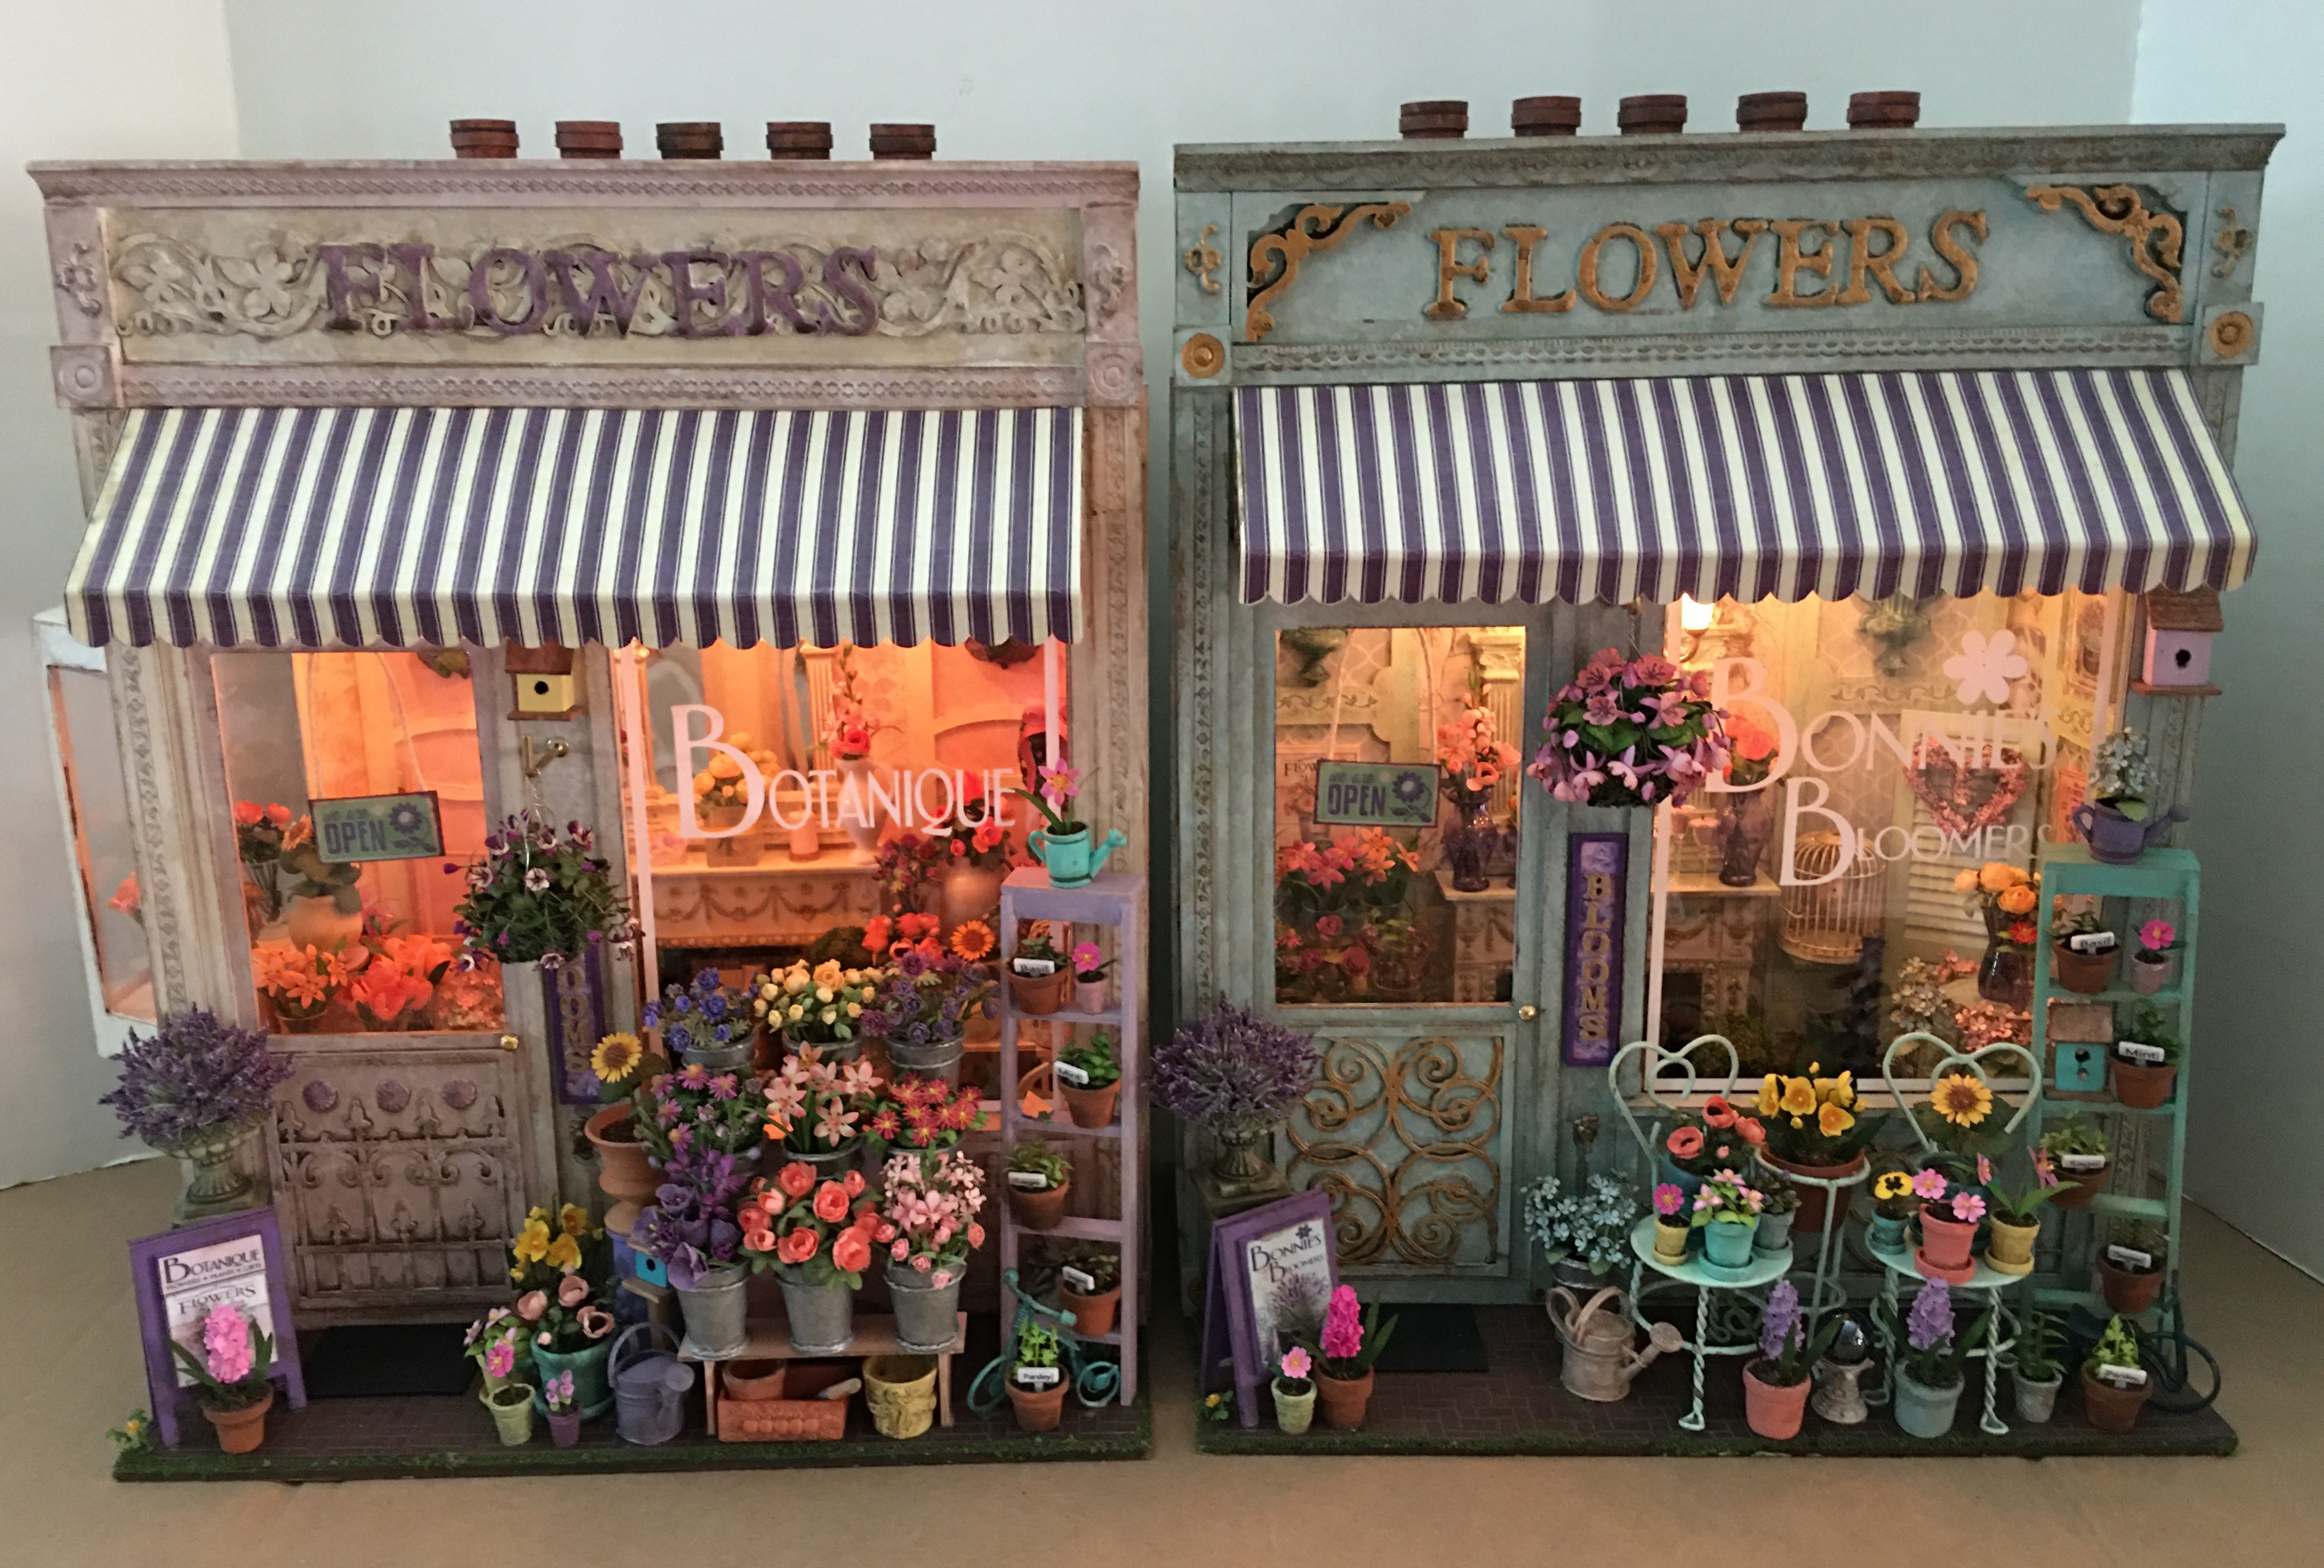
And here they are on the windows. I wish in hindsight that I'd had gold vinyl for Bonnie's shop name, but I only had a very limited choice of colors on hand.


The windows are 1/16th Lexan - the same as I always use because it is inexpensive, strong and I have great success in cutting it. The inside walls are not very pretty, but making it so would be a waste of material and effort. I hope they won't be a distraction if seen from the mirror above the fireplaces! Quick Grab Tacky Glue works very well to adhere the Lexan.


For the shopfront awnings, I used my Cricut again. I cut a layer from thick craft card in white, and then a top and bottom layer for each shop in a striped scrapbook paper. I then sandwiched the card in between the scrapbook paper using Paper Mod Podge as the adhesive. Because they tend to want to curl, I placed them under waxed paper and a pile of heavy books overnight.


To attach the awnings, I used a metal ruler and ran a bone folder along a 1/4" strip to create a gluing edge at the back of the awning. This made a 90 degree gluing tab. I also folded the front scallop over about 1/2", also using the ruler and bone folder. Here are both shopfronts side by side. Can you believe that just seven weeks ago I didn't know which drawer I'd put the front pieces in?

On Autumn's Pantry, I did not have to use braces because the awnings were so small. Here, because the awnings had to span such a long width, I wanted the extra surety of braces. I created the braces in two ways. For Bonnie's shop, I had a couple Alessio decorative braces left over, By removing some of the protruding parts and adding a piece of strip wood, they became the perfect fit and angle.


For my shop, I did not have any suitable braces on hand, so I decided to make them. I took measurements of the angle I wanted for my awning and created a triangle in Tinkercad. I removed the center, then overlaid a fleur de lis into the opening. When I started to prepare the 3D printer to print them, I realized, because of the red filament that was loaded, that the last time I used it was at Christmas to design and print fishing floaters for my dad! Boy time flies! The kids even got me the Qidi X Max 3D printer for my birthday, and I have not even had the time to take it out of the box yet! I am going to have to rectify that situation as soon as these flower shops are completed!
Uh hummm... Back to the braces... Here's the rendering in Tinkercad.

And here they are printed. They measure 1-3/8" x 1-11/16" x 2-3/16". The height or thickness is 1/8".

These braces worked great but they were a little too clean. Another use for the dirty water wash!


Using the paint/glaze/water/sponge method, I made the top look like stone. I used mortar mixed with paint for the lower part to look like stucco wall. After a few dirty washes and some moss treatment, they looked as old as the shop itself!

For the chimney pots, I had the Cricut cut strips of paper in 1/4" and 1/8" thicknesses, then used those to wrap the dowels in various places. I painted them and dirtied them up, as well.

And here are the chimney pots on top of the shops. I think this turned out to be the perfect solution! They will just lift off to allow access to the switch.


Now, it was finally time to attach the shopfronts to the room boxes! I wanted the possibility to "break in" in the future if need be to reaffix any loose items, but I also wanted the wall to stay put. So I used Tacky glue in strategic places, knowing I could easily loosen the "spot welds" in the future with a blow dryer. Once they'd had the chance to be clamped overnight, I finally got to enjoy the cherry on top of these shops - installing the sidewalk displays!

Bonnie's Bloomers... My gift to Bonnie will be her first mini anything ever, but I hope it won't be her last! She has enjoyed too many real life renovations to her homes over the years, and she has had her fill. Maybe this will inspire her to take on her first mini house project! Here are a few photos from different angles.


What is this?!? These little dandelions will sprout up anywhere!!!

And Botanique... A combination of botany, bouquet, antique and boutique. A dream that was many years in the making, but finally realized! I think this one is going to live in grandma's hutch. I know she would be tickled by it, especially because it has a rooster and a hen inside - something I make sure to include in every project because that's what she collected throughout her life. It's just a little way to honor her and let her know I will always be a better person because of her love.


Hey look! There's a sister dandelion at the sister flower shop, too!

And now, after five long years with many distractions, I can call these flower shops a finished dream!


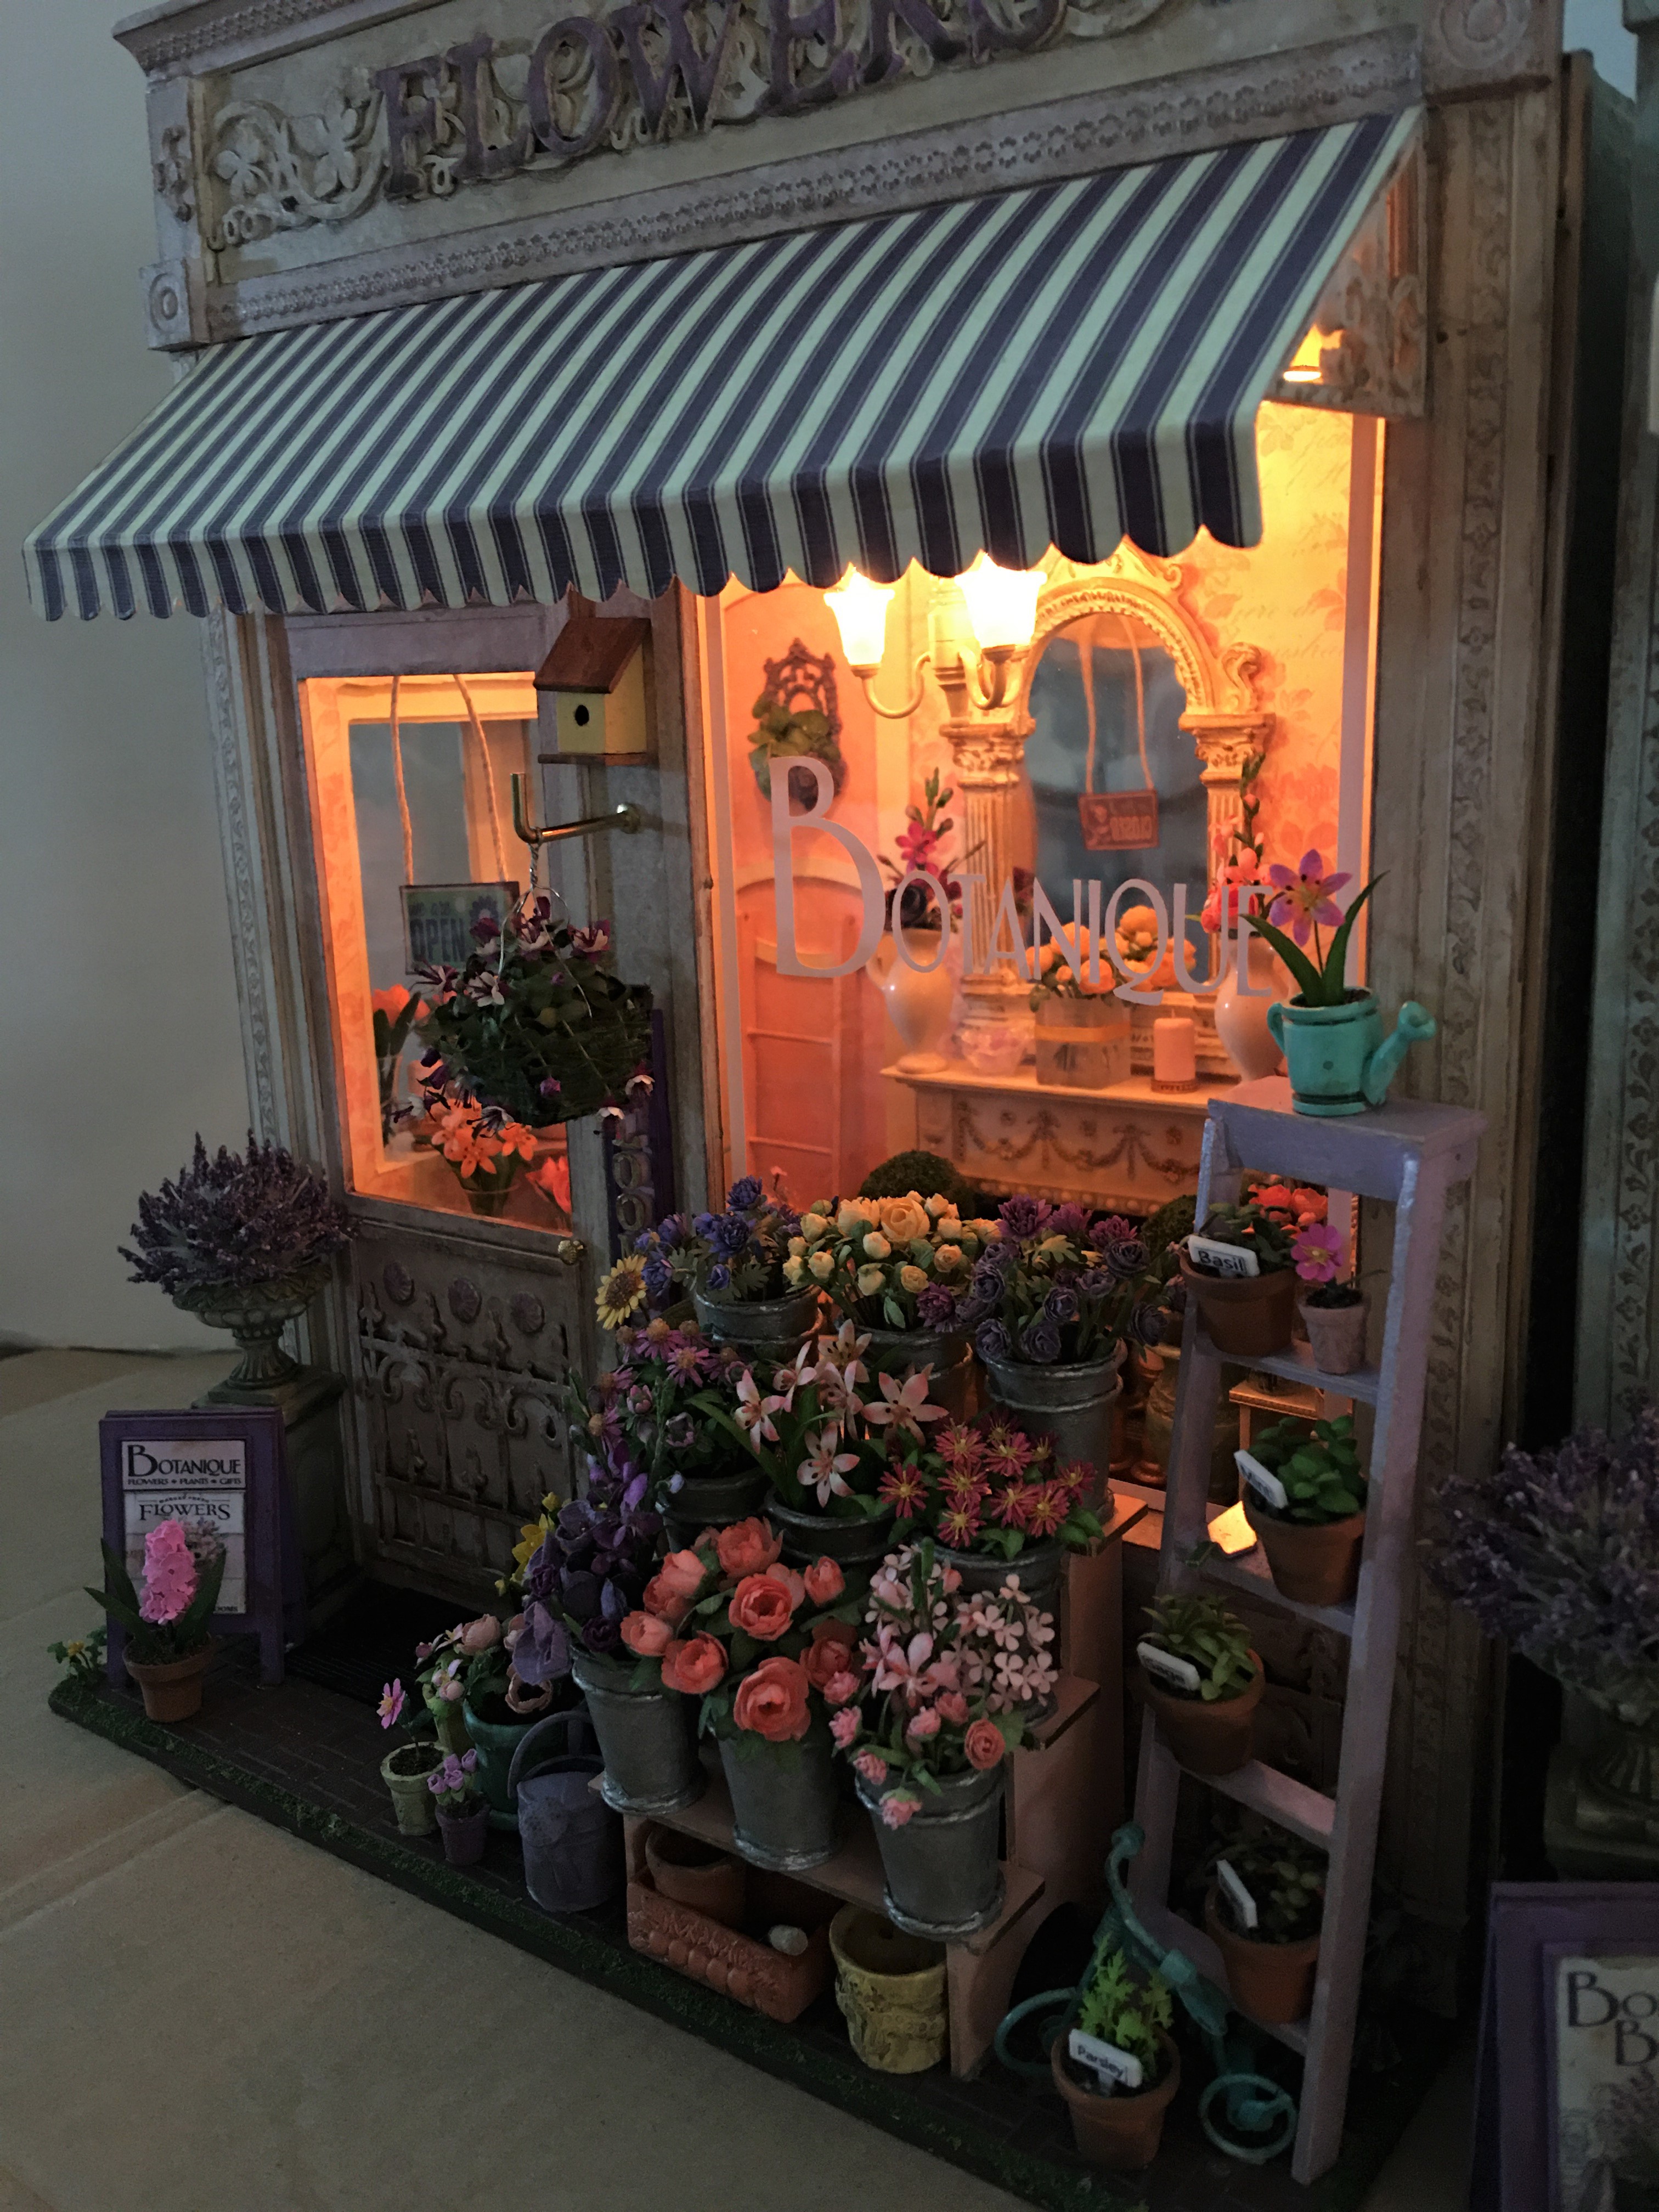
A few twilight photos to leave you with...


Thanks so much for your continued patience, and for coming along on another journey with me! Next post, you can help me decide what's next!
xo xo,
Jodi
Como no podía ser de otra manera, los exteriores y el conjunto de las dos floristerías son realmente impresionantes!! Con esa luz que invita a soñar la primavera al introducirse en un mundo de magia y flores, la combinación de colores de las fachadas y el caleidoscopio de tonos las hacen dos pequeñas joyas!!
ReplyDeleteTus proyectos inacabados encontrarán la manera de llegar a ti cuando vuelva la inspiración de cada uno.
Bravo Jodi!!
Besos.
¡Gracias Pilar! Es realmente genial ver finalmente estos proyectos completados y tener un poco más de confianza en que todos estos sueños inconclusos que me rodean algún día se harán realidad.
DeleteFantásticas las dos , te han quedado espectaculares .He disfrutado cada rincón, detalle por detalle . Gracias por mostrarlo, así que estaré en espera de los próximos proyecto que tienes parados; así que ánimo que seguro cuando lo tengas entre manos harás otro maravilla. Besos
ReplyDelete¡Gracias Rosa María! ¡Estoy tan feliz de que te guste cómo quedaron las tiendas! Estoy aprendiendo a seguir mi inspiración y no mi cerebro. Esto hace que el resultado sea mucho más feliz y satisfactorio, ¡jajaja!
DeleteOh they look so pretty! I love the sidewalk displays. And the chimney stacks are genius.
ReplyDeleteThe five year delay seems fortuitous, look how good you've gotten at flowers in that time!
Thanks Sheila! At the time I began these shops, I definitely did not enjoy making flowers as much as I do now! The delay was just perfect to allow my inspiration for the ideas to come back to me. Minis should be fun, not work, and I will try to keep that in mind as I pick the next project to work on!
DeleteEvery detail is stunning, and totally love all the flowers. Your awning remind me of many on the street my family's store was. Back when every shop had an awning and bay windows and displays. Loved this! Sandi
ReplyDeleteThanks Sandi! I knew from the moment I saw the plain chipboard storefronts on Alpha Stamps that thy needed to have layer upon layer of detail to fulfill their true potential. I love a good awning, especially a striped one. It just says "The party Is In Here", lol! So glad you like how the shops turned out!
DeleteThe stunning exteriors certainly befits the gorgeous interiors. The five years delay, were probably necessary for perfecting your flower creations. I can't decide which of the two shops is more beautiful. Somehow, maybe because of your touching words about your grandma, Botanique became my favorite.
ReplyDeleteHugs, Drora
Thanks Drora! I am so happy that you like how the shops turned out! I like to think there will be miniatures in heaven, but I KNOW there are flowers there and that gram is enjoying them.
DeleteYour finishing details really complete these projects. Thanks for sharing your ideas on storefront window signage and brackets from supplies on hand. I also like that your battery cover lifts off, so easy to get to. They are both so charming.
ReplyDeleteThanks Sherrill! It is so great to have the Cricut and the 3D printer to enable adding these fun little details, but often, good old craftiness alone will achieve my needs. Russ was asking the other day why I don't use my 3D printers more often, and I told him because to my purposes, they are just additional tools for my miniature hobby and not my hobby itself. He totally got it then. :O)
DeleteEspectaculares como ya me las esperaba.
ReplyDeleteNo sabría decir cual de las dos erigiría porque cada una en sus tonalidades es cautivadora.
Me encantan todos los detalles que has ido incorporando y no falta nada, esta todo bien pensado.
Y ahora esperando a ver cual de tus otros proyectos reanudas.
Un saludo
Delete¡Gracias Mariana! ¡Estoy tan contenta de que te gusten los dos! ¡Fue genial para mí hacer dos para poder usar a menudo las dos ideas que me inspiraron! ¡Antes de que realmente comience con el siguiente, mi sala de trabajo necesita un poco de limpieza y reorganización!
wish to own one of these shops!!! loving them to the core!
ReplyDeleteThanks Papitha! I would take a commission for another flower shop! I am a little sad that I am finished. :O)
DeleteCon lo que me gustan las flores, esto es un a delicia para la vista. Las dos fachadas están espectaculares. No le sobra ni le falta nada. El colorido es increíble. ¡Lastima que no pueda percibir el olor...!
ReplyDelete¡Gracias Isabel! ¡Estoy tan feliz de que te gusten! ¡Oh sí! ¡Infundir la fragancia de las flores hubiera sido increíble! Tendré que pensar en una manera para la próxima vez!
DeleteThese 2 shops are Bloomin'MANIFIQUE!💐💐❤️ Congratulations Jodi on 2 major small jobs both BEAUTIFULLY DONE- inside AND out!
ReplyDeleteThanks Elizabeth! It makes me so happy that you like these bite sized little shops!
DeleteStunning and beautiful, wow!
ReplyDeleteThanks Sylvie! I'm glad you like they way they came out!
DeleteOh, what a wonderful post! ;O) We have a very common saying in German which would be translated to English "If it takes long enough, it will be all right in the end" - and this came into my mind while enjoying your beautiful photos and following your explanations. Without doubt you would also have created something awesome five years ago - but in the meantime you have the experience of five more years of creating and not to forget a growing machine park you can count on to help you. For example you would not have been able to create your own French lily brackets back then, would you? ;O)
ReplyDeleteThe shops turned out awesome and Bonnie will be over the moon, fingers crossed that this might be a teaser for her to start miniature making herself. Let's hope it doesn't make her afraid owning something made by an outstanding miniature artist. *teehee* I really love the name you've chosen for hers and the idea with the personal touch by the house numbers is so lovely. The way you've hidden the batteries is brilliant!
And now I have a confession to make... you got me with the sister dandelions. *smile* Such a beautiful and funny detail... I think it will make everybody smile. But let's not forget the message behind this - dandelions are survivors and able to bloom at places which seem impossible... and they have the power to make wishes come true. I'm curious to see which miniature wish of yours is going to become true next...
Hugs
Birgit
Thank you my dear Birgit for your thoughtful, heartfelt and lovely observations! Your words and this world are full of good reminders that let us know that all will be well in the end. Each one of us, like the dandelions, are survivors with a deeper appreciation for every joy. As for wishes coming true, I am working very hard every day to see each new dawn as a dream come true and another chance to share love. There, too, you are a wonderful example! 💗💗💗
DeleteDear Jodi, this "two-fer" is such a Wonderful way to have your "cake"... er "Roses" and smell them too! If you get my drift! The one to give away and the one to keep... made together so they will always have that "bond" of memory and friendship tieing them together no matter how far apart they are! And your skills are more than adequate... you excel at all the technical parts to make them look so real and beautiful and perfectly composed! That takes an artful eye as well as skill with the tools! The results are simply stunning! I am sure there will be endless moments of peeking in those windows just to glimpse the treasures within! Well done and congratulations for getting them done in time!!! (Ten...no twelve years and counting on my castle....!) *Sigh* :):)
ReplyDeleteThanks Betsy! It is a great feeling to look up at my shop and know that Bonnie has hers to remind us of one another when the miles are between us. I am convinced that I have helper angels that kept me on track to make the deadline - if we hadn't gotten together this weekend, we'd have had to wait until the end of June!!! As for the castle's timeline, well, it truly is a masterpiece, and every inch is a piece of handcrafted artistry. If it takes 1000 years to call it "completed", it will be worth every one!
DeleteWonderful shops! I really like everything. The details are superb and the long work paid off.
ReplyDeleteThanks for the nice comments, Faby! I am happy you like the shops!
DeleteI am just going to say that they both are a piece of art, a gem 😍😍😍
ReplyDeleteThanks Alex! I'm glad you like how they turned out!
Delete