I know the feeling, Bugs! My mini time took a bit of a wrong turn this week on the Fairytale Treehouse project. It started off so well - I felt confident in the next steps. Then, just as the first task was finished, I realized that I didn't like it AT ALL!!!
Let me explain... I love the purple cubby, I love the traditional Tudor wall vibe, but not TOGETHER!!! Uh oh!
Let's talk first about how I got lost. Remember last post when I shared my idea for Alice's second floor bedroom wall? I had doodled on the wall in pencil?
Well, I liked the idea of timbers and thought it would be a wonderful look in a fairytale treehouse. I cut 1/8" x 3/8" basswood strips and made the timber framing. So far, so good...
Then, I painted the timbers in a lovely shade of brown. That was the first sign of the problem, only I didn't know it yet.
The fun part came next. In between the timbers, I got to brush on a little wood glue, then squish in Creative Paperclay. To give it some texture, I pounced it with a stiffly bristled paintbrush. I was diggin' it!
The Paperclay dried overnight, and then I aged it with brown water washes. Khaki/brown for the walls and more brown/brown for the timbers. I loved this too.
Just not together with the purple! Rather than compliment one another, they compete for all the attention. I need cohesion.
I was experiencing cognitive dissonance.
I didn't feel too lost. I just backtracked to where I went wrong and made a hard left. It was easy enough to neutralize the "stucco" and "timbers" with off white water washes. I mixed up a lilac shade instead to apply to the timbers. Definitely more in line with the look I wanted for the girls' bedroom!
The new color on the timbers nicely complements the bed cubby's purple wallpaper patterns. I love it! It will look more in keeping with forest living, too, once I add some aging washes to bring down the newness.
 |
| Very cohesive. |
Phew! Crisis averted! Now I could move on to the next task! My goal this week was to get this wall as far along as possible while I could still lay it down to work. I needed to cut another opening in the wall and that is so much easier with a flat surface.
The third floor/attic space will make the perfect loft space for another forest dweller, but he has requested his own private entry. I turned to my trusty Design Space program to help me with his door.
The doorframe is a wee 3" high with the actual door being 2-1/2" high x 1-1/2" wide. The assembly was cut using the Cricut Maker and is comprised of both chipboard and kraft board layers.
 |
| Chipboard is brown and Kraft Board is taupe. |
I used the door piece as my pattern to trace the hole onto the Linfield kit's wall panel, then cut the door opening with the scroll saw.
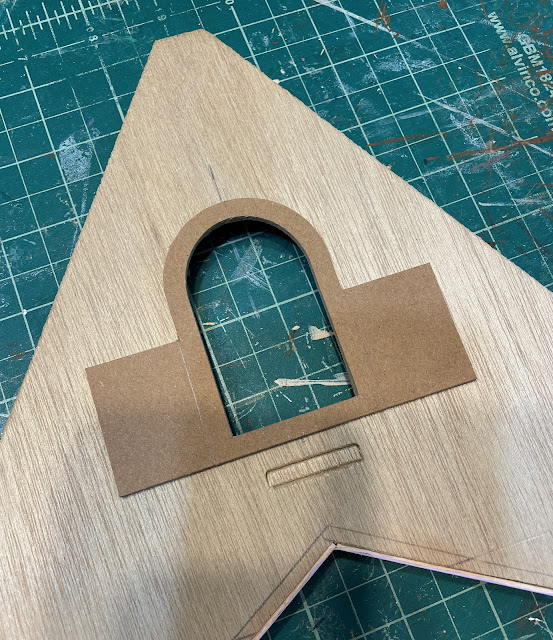 |
| Entry surround. |
Next, I added paperclay "rocks" to the door frame surrounds and "carved stones" to the frame overlays. This was my first time doing this kind of rockery (I have used egg cartons and Magic Masonry in the past), and it was so fun! There are many applications for Creative Paperclay that I want to experiment with in the treehouse. I am sure I will figure out some kind of technique for it by the time I am finished with this treehouse, and when I do, I'll share some tips.
Once the masonry was dry I applied an overall gray color wash, then added selective color washes to each individual stone using the colors from the color board in this project. Once I was happy with the look I sealed the rocks and exposed chipboard with Mod Podge. I will likely add grout and moss, but not until I am treating the entire wall as a whole. I think it will look more consistent that way.
I painted the chipboard and Kraft Board layers of the doors, then glued the layers together. I added Dresden and nail head details, and "plates" and doorknobs, then gave it all an aging wash. Here is how the door surrounds and doors look together.
 |
| Interior and exterior door frame surrounds and door. |
There is so much more to be done to make the door functional. I will sandwich both the window glass and a fabric hinge in between the interior doors/wall as I install it. And our occupant will need a porch of some sort. I am still thinking through which tasks are better done before or after the wall has been attached to the treehouse structure.
You'll get to meet the new occupant soon - he is relocating to the Pacific Northwest from New York State! I hope he likes the rain, the gloom and the damp, and that he doesn't mind his temporary housing with Vera and Virgil. More to come...
All in all it was a great mini week in spite of a minor wrong turn. Luckily, I realized it before I ended up in a cave in Pismo Beach!
xo xo,
Jodi


