Search My Blog!

Use the Search box below to find keywords that you're looking for quickly and easily!

Search Feature

Thursday, April 6, 2023

One Person's Ceiling Is Another Person's Floor

Yep! You guessed it! This week was all about ceilings and floors. And, in keeping with this entire fairytale treehouse project, the process was a bit out of the ordinary.


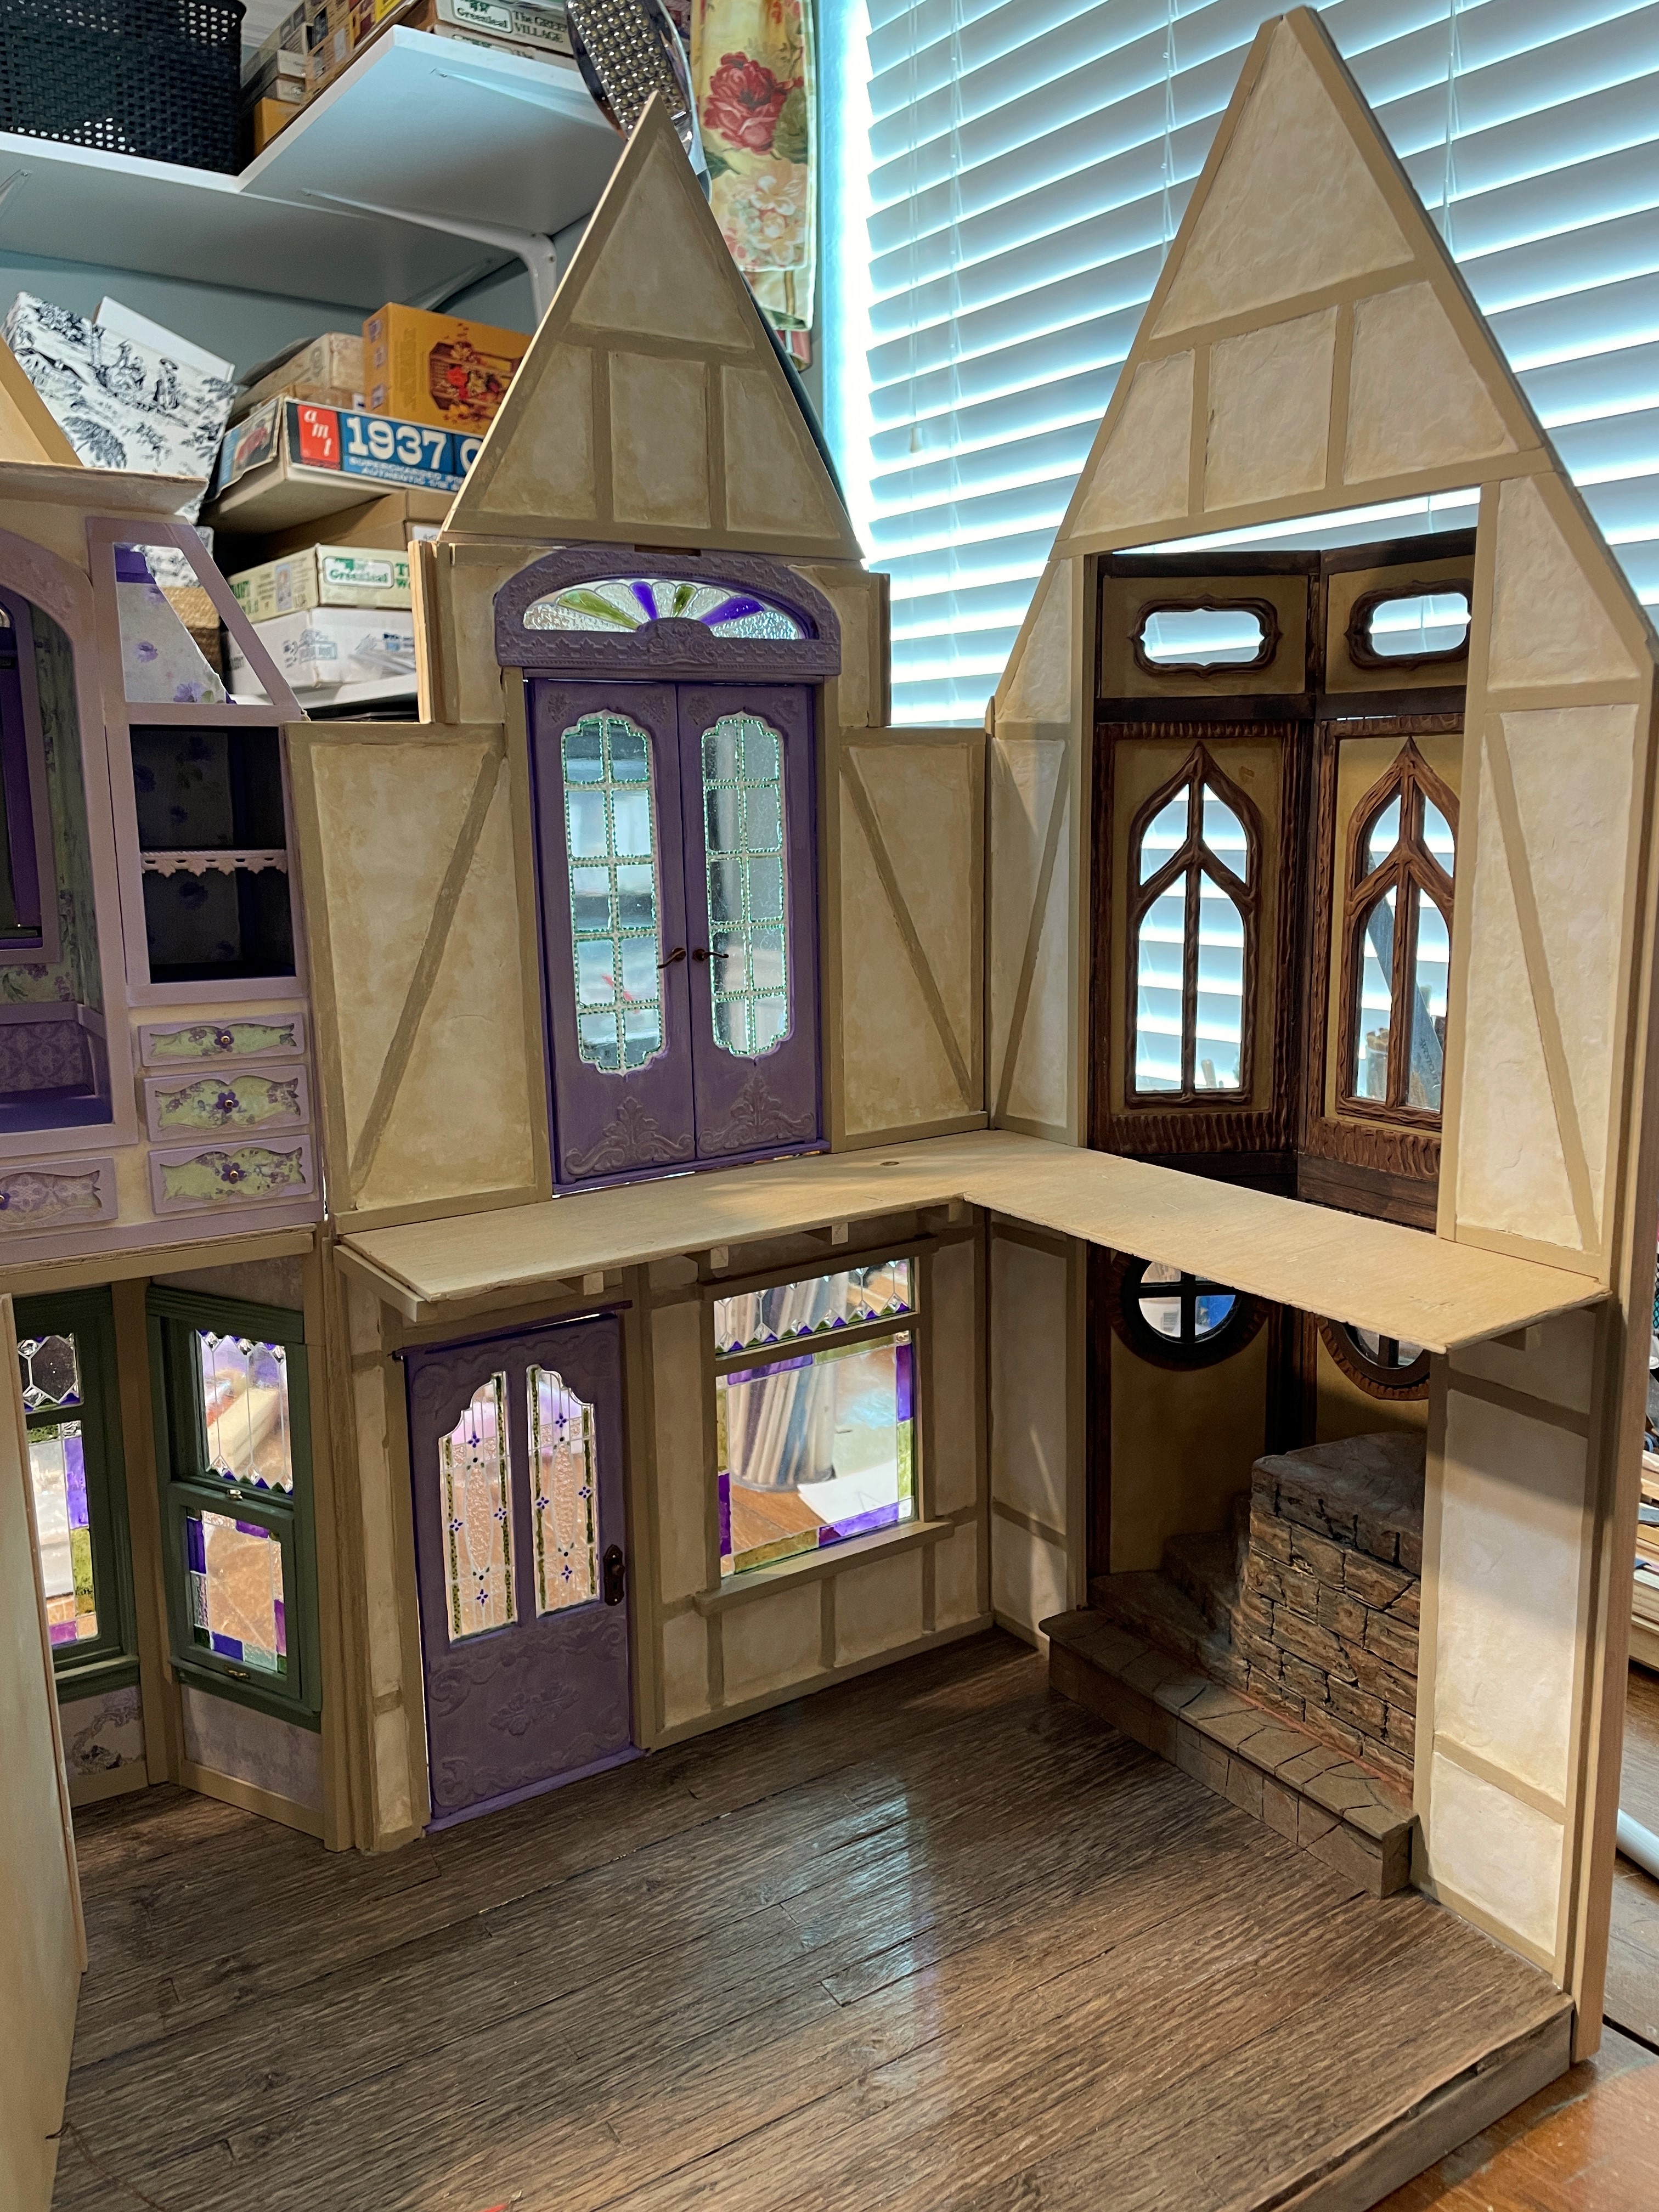
Remember a few weeks ago I had mentioned that the treehouse's living room would be a "Great Room"? Well, to me, "Great" means grand or tall. Or perhaps three stories tall? To achieve this, I was going to need to cut some of the second and third floor away. After taking some measurements of the amount of walking width the girls would need to skirt around this chasm, I cut the opening from the kit's second and third floor pieces. On the second floor, this left only a balcony which runs along two walls in the room. On the third floor, with the gables and roof angles, it left only a catwalk. 

The masking taped area is acting as bracing to prevent the kit's die cut staircase opening from popping out during the cutting process. Since I relocated the stairs, I don't need the treads or decorative piece, so I just glued them in.


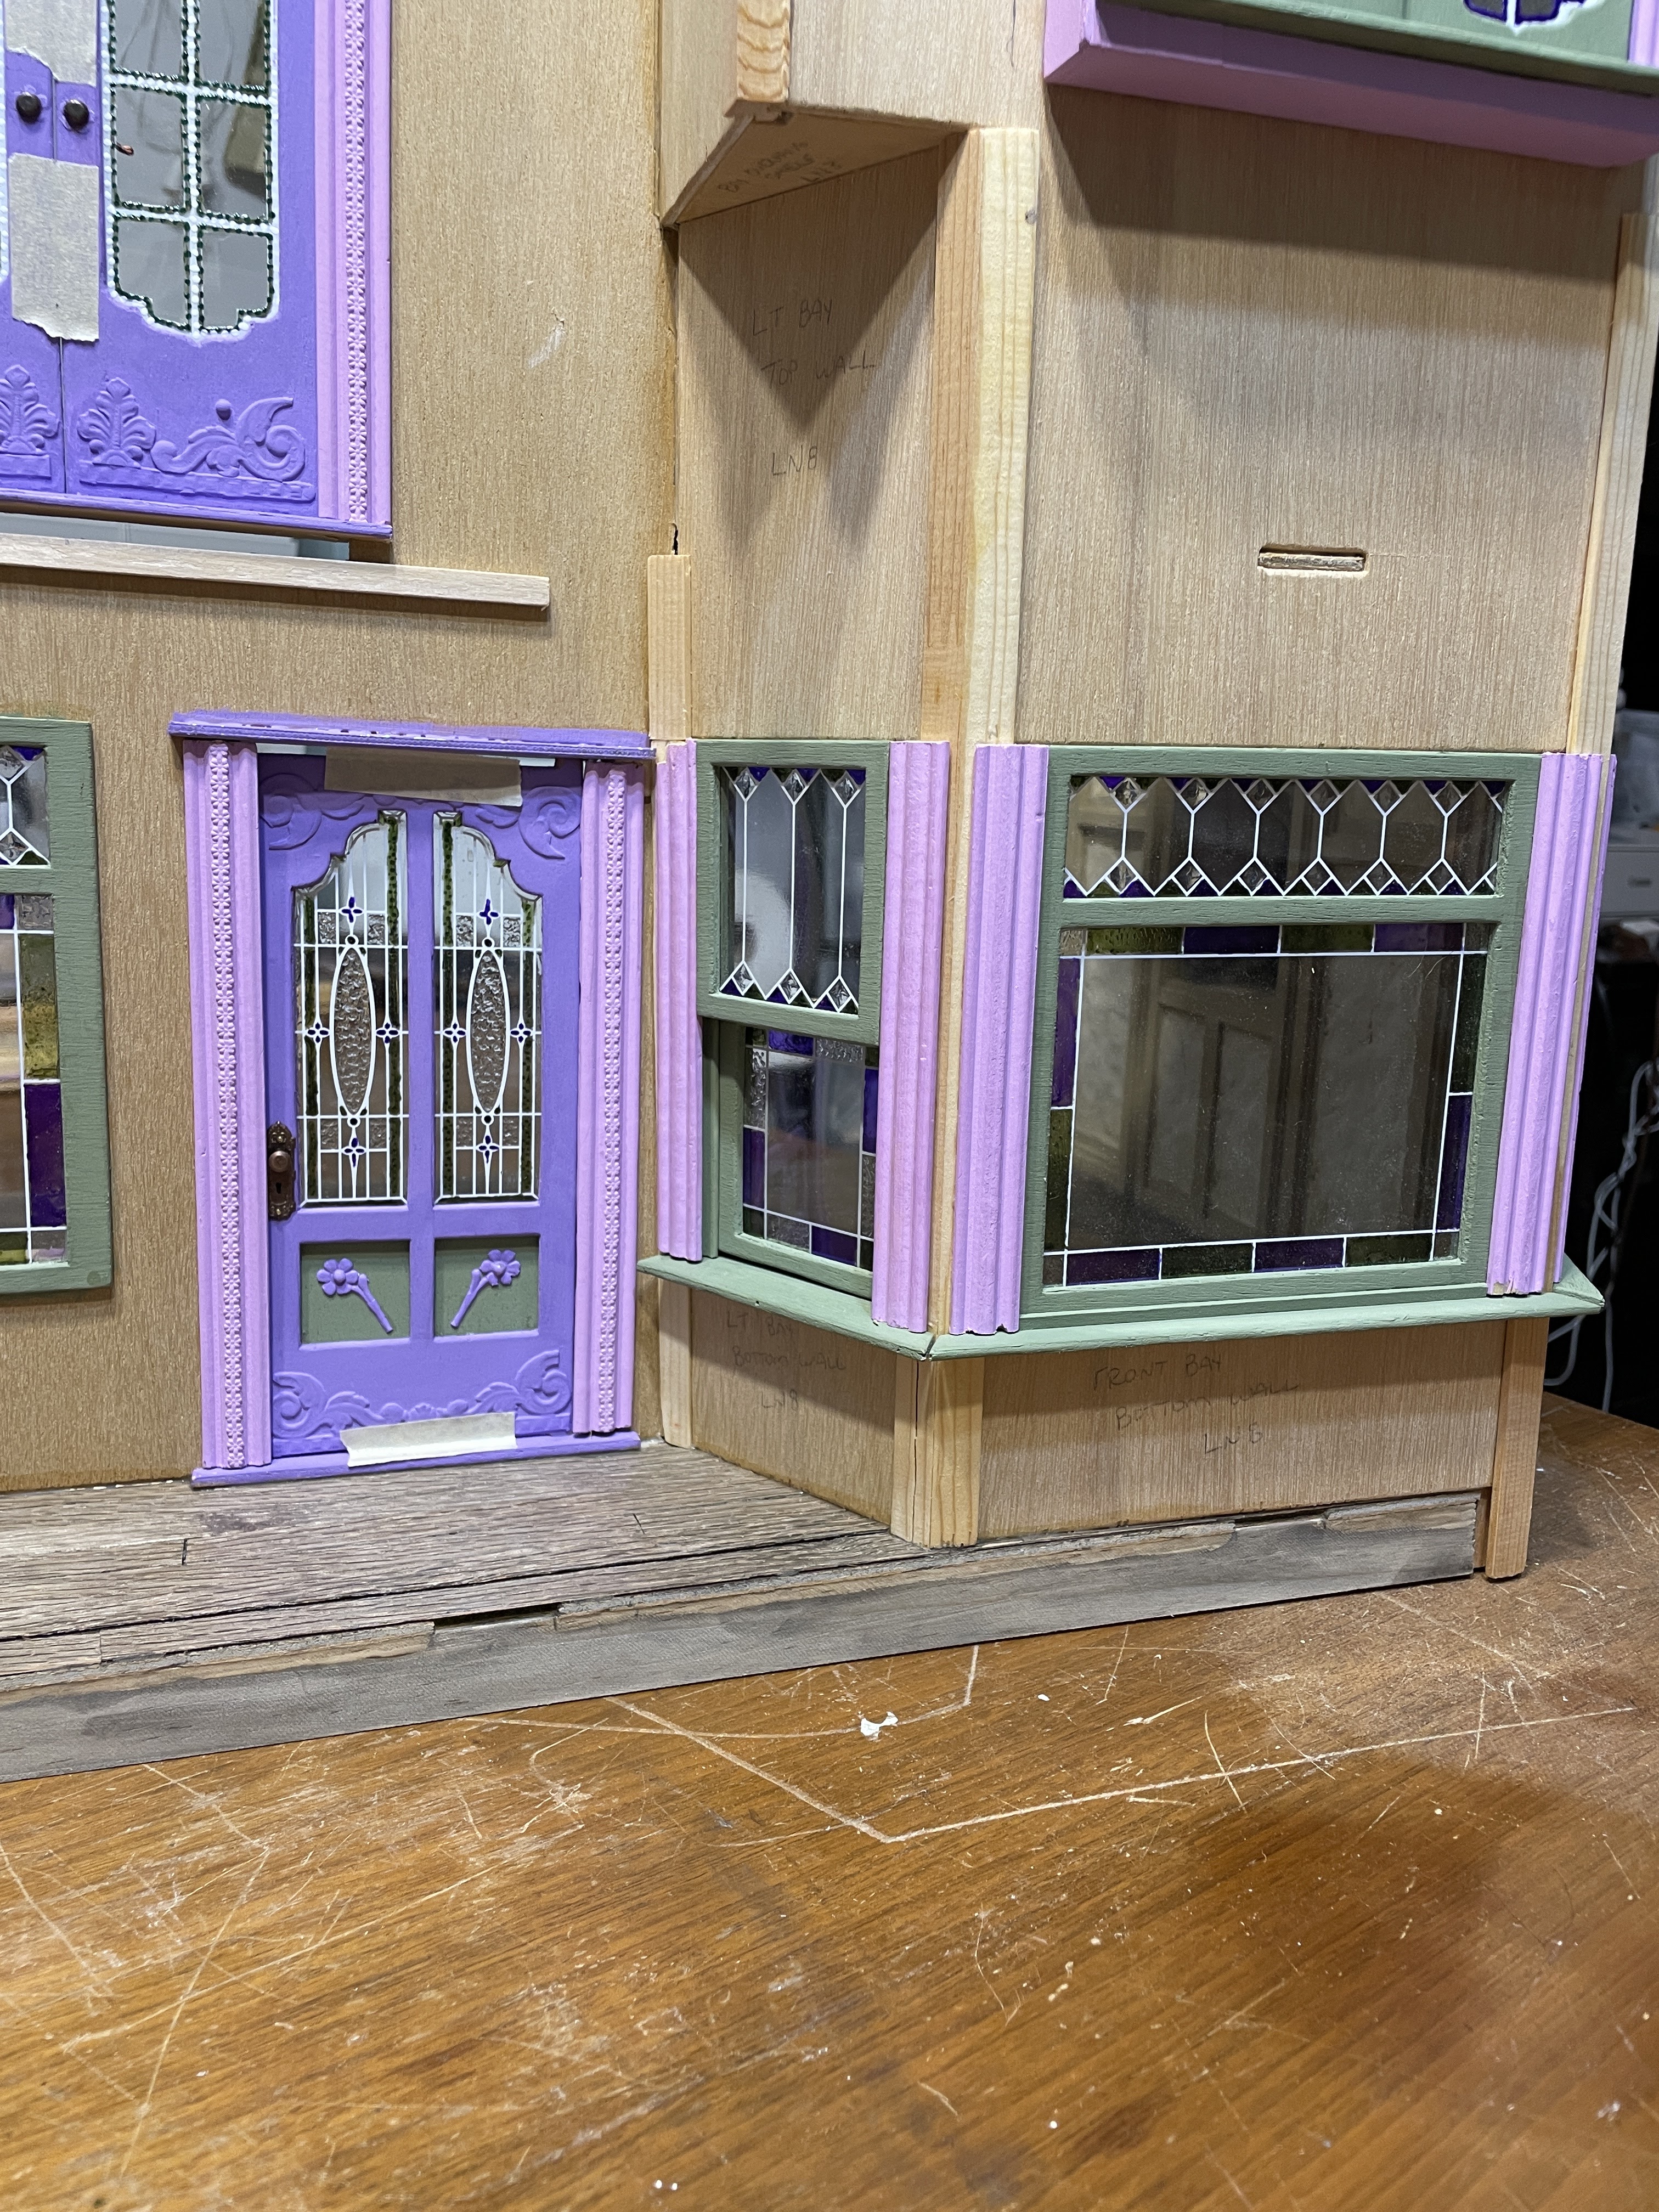
Here is another example of the potential adjustments that must be made if you decide to construct a dollhouse kit in your own fashion rather than following the instructions. My floor would no longer just simply slot into the tabs because of my "pre-fab" walls. No problem - now my floor slides in in two pieces: the bedroom section and the great room's balcony for the second floor, and Wayne's apartment floor and the catwalk for the third floor.


Once the floor design was settled upon, I had to think about the flip side: the ceiling. Naturally, a treehouse would be perfectly comfortable with an open beam ceiling. To emulate the floorboards, gaps were scribed into the floor in a horizontal direction, then "beams" were installed vertically. The floorboards were treated to a brown wash and the beams painted khaki in keeping with the other timbers in the house. Simple but effective. The discolored area is where the staircase opening would have been. I secured the die cut pieces with wood glue. This area will be hidden by the stove's chimney.


It is always fun to get an idea what the room will feel like to the little folks living here. This room has the potential to feel like a cave. That's why keeping the walls and timbers and masonry light was essential.


As a human looking in, you might only get a small glimpse of the balcony ceiling, but the girls and their friends will see it all the time. It's important to consider these small details for the inhabitants.


Another important factor is safety.😊  That's why I needed to think carefully about how to protect the girls from falling off the balcony. A railing was essential, and there were so many styles and options to consider. For structure, I went with framing that would tie all three floors together. For aesthetics, I kept the design cohesive with the staircase's fairytale style window frames. I was able to make a couple adjustments in Design Space to the window frame and create the balcony railing's openings.


The staircase opening needed a bit of railing next to where the ladder/stair will go. It's important to have things look nice, too, even if you are only peering through the windows.


The third floor catwalk will be a nice place to hide away with a good book on rainy days. To access the space, there will be a ladder and a sort of attic opening.


The ceiling in the girl's bedroom is a little less "treehouse" and a little more "fairytale" with its lilac beams and whitewashed floorboards.


As tempting as it was to keep the floor progress going, before installing the wood floors, I had to stop myself so that I could come up with a more solidified lighting plan. Some of the ceilings will have lighting fixtures with wires that need to be concealed under the flooring. And nearly every fixture will have to be made and/or painted. I also have several fireplaces to create and they need walls to rest against. And the fires will have wires that need to be directed and concealed. Oh boy! I better take a breath and think about things. 😵


While I'm thinking, for a little fun this week, here's a test for your memory. Do you notice anything different about Wayne? See if you can figure it out without looking at older posts.


Let me know in the comments. 💗

xo xo,

Jodi

Thursday, March 30, 2023

Enigmatologist?

Enigmatologist? Dissectologist? Puzzler? What do these strange words mean? They essentially mean someone who creates and really likes to solve puzzles. Apparently, I like solving them so much that I create them for myself whenever I build a dollhouse! 😜 Most people read and follow directions, erect the walls and then adorn them. But that's not challenging enough, no. I need to finish and decorate walls before I erect them and then solve the many problems I create for myself when trying to fit them together. But the satisfaction I get when I make it all work leaves me giddy! All joking aside, though, why do I like to finish the walls before I erect them? Because I can see much better working flat and I like my results more this way. 


When I last left off, I shared how I'd been able to avoid the kit's fourth wall and all its complications for a long time. Finally, out of excuses, it was time. I started by concentrating on the second floor section of the three floor wall - Goldie's bed cubby. Since her window wasn't large enough to be a pop out cubby like Alice's bed cubby, I'd have to create a built in. I glued the exterior walls and floor in so that I could get accurate measurements of the oddly shaped space. 


I created a very rough sketch, determined how the space would be segmented, and then added papers from the same Alice pack as Alice's cubby. At the same time, I began to, piece by piece, create and cut the structure pieces using the Cricut.


Segmented wall.


I continued papering, painting and adding trim piece by piece. I papered and glued in Wayne's third story floor, which was also Goldie's bed cubby ceiling. Now it was starting to look like the idea in my mind! I should say here that the kit has these floor sections as separate pieces. Because of the way I am building the kit, I will have to join them up with the main floor pieces later on. Oh goodie! More puzzles!

Bed cubby flanked by shelves and drawer openings.


Finally, it was time to add the front wall, the trim, Dresden, paper covered drawers and knobs. The lighting fixtures will come later, after all the walls and floors have been installed. I also installed Goldie's window to the wall, but forgot to take a stand alone photo once it was attached. You'll see it in later photos


Goldie's window.

The girls and Wayne wanted to give you a size perspective.


With the final wall as ready to go as possible, it was time to start the process of attaching all four walls to the foundation. Russ brought me a couple carpenter's squares so that I could make sure my gluing angles were at a perfect 90 degrees. Staying true to my rebellion against instructions, I started with wall three.

My glue cup and primer jars assisted with the outside.

Russ' squares assisted on the inside.


Next was wall one, and when that was secure and dry, wall two. These photos are after they are attached. While waiting for various walls to attach and dry, I did more aging on the front door and French doors and added hardware. I am getting closer to my vision for them.

Wall two and wall one.

Wall three.

I also got to finishing the kitchen's bay windows. These go in the fourth wall, first floor. I had some window locks and handles in my stash which were perfect for this kind of working sash window.


When it finally came time to install the fourth wall, I naturally discovered that I'd need to make a few adjustments. The most glaring was that on the second wall, where it connected with the fourth wall, I had created and attached the wrong type of trim assembly. There was nothing for it but to remove it.

Removed trim. The glue works almost too good!

Once removed, new, correct trim could be added.

The correct trim at the correct angle to receive the bay window trim.

Where the fourth wall met the second and third walls I lost a little edge trim, but this was perfectly fine. You can also see Goldie's window installed looking through her bed cubby. If Rapunzel lived here, this would be the perfect window to let down her hair so that the prince could climb it and rescue her!


Once it looked like everything lined up properly, I added lots of clamps to keep it in place while the glue dried.


Whew! The individual wall method was successful and mostly trouble free! I am so happy to have these walls up! Here's a look from the outside...


And from the inside. For some reason, it reminds me of the set in a play.


A final look at the bay windows with all their trim. And the fourth wall that had me so fearsome for weeks!


I'll need to remember this triumph as I begin the puzzle of floors and roof. *gulp*

Thanks for being here with me on this adventure! Your encouragement and enthusiasm keep me going! 💗

xo xo,
Jodi

Thursday, March 23, 2023

Fits and Fittings

This week's mini time was spent continuing on with wall prep for the fairytale treehouse. First, I needed to finish the staircase on the first wall by adding a bottom step. You can see the wall diagram in my last post. I wanted the bottom step to run the length of the stairway so that the girls had a place to sit and take off their mud boots.


I thought it best that the step be made of similar looking rocks as the rest of the staircase. And I thought it might be fun to try carving them from balsa strip wood. I constructed a simple box (from scraps) to fit between the walls, then made a separate top so that it had a slight overhang. I used a pencil to draw the grout lines that defined the rock shapes, then used an Xacto blade and a small ball stylus to carve them into the balsa. 


After a test fit, I painted a base layer of gray, then tried to remember the colors and process I used to paint the staircase steps. It always leads to trouble when I paint different parts of the project so far apart, especially when I don't chronicle the process of how I did it! I'll share the finished step later in the post. It turned out pretty close!


Next, it was time to timber and stucco the the stairwell wall. I kept the design consistent with the second wall in relation to the first and second floors i.e. square frames for the first floor, angled framing for the second floor and a wainscoting style layout for the attic. I cut and glued the timbers, 1/8" x 1/4" basswood, then painted them with the same khaki color I used on most of the timbers.


I filled in between the timbers with Paperclay, then base painted and aged the edges the same as I'd done with the other walls, After I attached the first step to the stairwell wall, it was time for an exciting moment - the first dry fit of the first two walls! This is always a special moment - I finally get to see if what is making sense in my mind actually makes sense in the real world! 

I love how the walls seamlessly flow into one another, but the glaring issue I saw was the unfinished floor! I really needed to make a decision on the wood floor's finish and get it done. 


I decided to try using a product that I've had in my stash for a very long time. I last used it when I did a rain chain/barrel tutorial during the Three Pigs project. It's called Fred's Wood Weathering Stuff and is really great! I applied three coats to achieve the color/depth I liked, and then sealed it with satin varnish. This is exactly the treehouse floor look I had in mind!

Now it was time for another dry fit, but this time, with all the walls! Here are some views from the inside...


And here is the exterior...


You may have noticed that I also finished the timbers and stucco on the second and fourth walls' third floor wall sections. These will be seen in Wayne's third story apartment/workshop. He gets all the gables. Lucky for him he's short so the danger of him banging his head will be minimal!


Somehow, I managed to avoid doing most of the fourth wall's tasks again this week. That means I also avoided a good deal of its dizzying trim calculations! But now, out of excuses and other work, I'll have to face the music (did you know that one, Birgit?). The most challenging aspect will now be what do I affix when and in what order so that I still have great access to the wall but at the same time don't create an unforeseen issue in fitting this puzzle together. 🤪 Hopefully, next week, I'll have a fourth wall with good progress and most of my hair in tact!

Speaking of fittings... The girls received a very special package all the way from Spain! Believe it or not, it arrived in less time from across the world than my other package did from Florida! Squealing the whole time, the girls stripped off their temporary garments, helped each other put on their dresses and were ready for photos in seconds! Now, they're fit for a tea party!


The dresses are incredibly well made, so wonderfully detailed and go on and off with ease! And they aren't swimming in extra bulk and material. They fasten in the back with a crochet loop that hooks over pearl buttons. Getting their arms through the sleeves was a pleasant experience. The best part of my purchase was that I got to connect with Celia. She is the owner of the Etsy shop ChMiniatures and is an incredibly talented mini seamstress and micro crochetier! Go see her amazing needlework and drool! It also turns out that she has followed my blog for years!

And so you don't think he's gotten lost in the forest, here is Wayne! He's still as naked as the day he was born, but surprisingly, not embarrassed at all! It must be great to have that kind of confidence!


Hope you're all finding time to enjoy the things that make you happy, like the first week of spring! To my "down under" friends who are dreading fall, remember, time flies!

xo xo,

Jodi