

When I last left off, I shared how I'd been able to avoid the kit's fourth wall and all its complications for a long time. Finally, out of excuses, it was time. I started by concentrating on the second floor section of the three floor wall - Goldie's bed cubby. Since her window wasn't large enough to be a pop out cubby like Alice's bed cubby, I'd have to create a built in. I glued the exterior walls and floor in so that I could get accurate measurements of the oddly shaped space.

I created a very rough sketch, determined how the space would be segmented, and then added papers from the same Alice pack as Alice's cubby. At the same time, I began to, piece by piece, create and cut the structure pieces using the Cricut.

 |
| Segmented wall. |
I continued papering, painting and adding trim piece by piece. I papered and glued in Wayne's third story floor, which was also Goldie's bed cubby ceiling. Now it was starting to look like the idea in my mind! I should say here that the kit has these floor sections as separate pieces. Because of the way I am building the kit, I will have to join them up with the main floor pieces later on. Oh goodie! More puzzles!
 |
| Bed cubby flanked by shelves and drawer openings. |

Finally, it was time to add the front wall, the trim, Dresden, paper covered drawers and knobs. The lighting fixtures will come later, after all the walls and floors have been installed. I also installed Goldie's window to the wall, but forgot to take a stand alone photo once it was attached. You'll see it in later photos


 |
| Goldie's window. |
 |
| The girls and Wayne wanted to give you a size perspective. |
With the final wall as ready to go as possible, it was time to start the process of attaching all four walls to the foundation. Russ brought me a couple carpenter's squares so that I could make sure my gluing angles were at a perfect 90 degrees. Staying true to my rebellion against instructions, I started with wall three.
 |
| My glue cup and primer jars assisted with the outside. |
 |
| Russ' squares assisted on the inside. |
Next was wall one, and when that was secure and dry, wall two. These photos are after they are attached. While waiting for various walls to attach and dry, I did more aging on the front door and French doors and added hardware. I am getting closer to my vision for them.
 |
| Wall two and wall one. |
 |
| Wall three. |
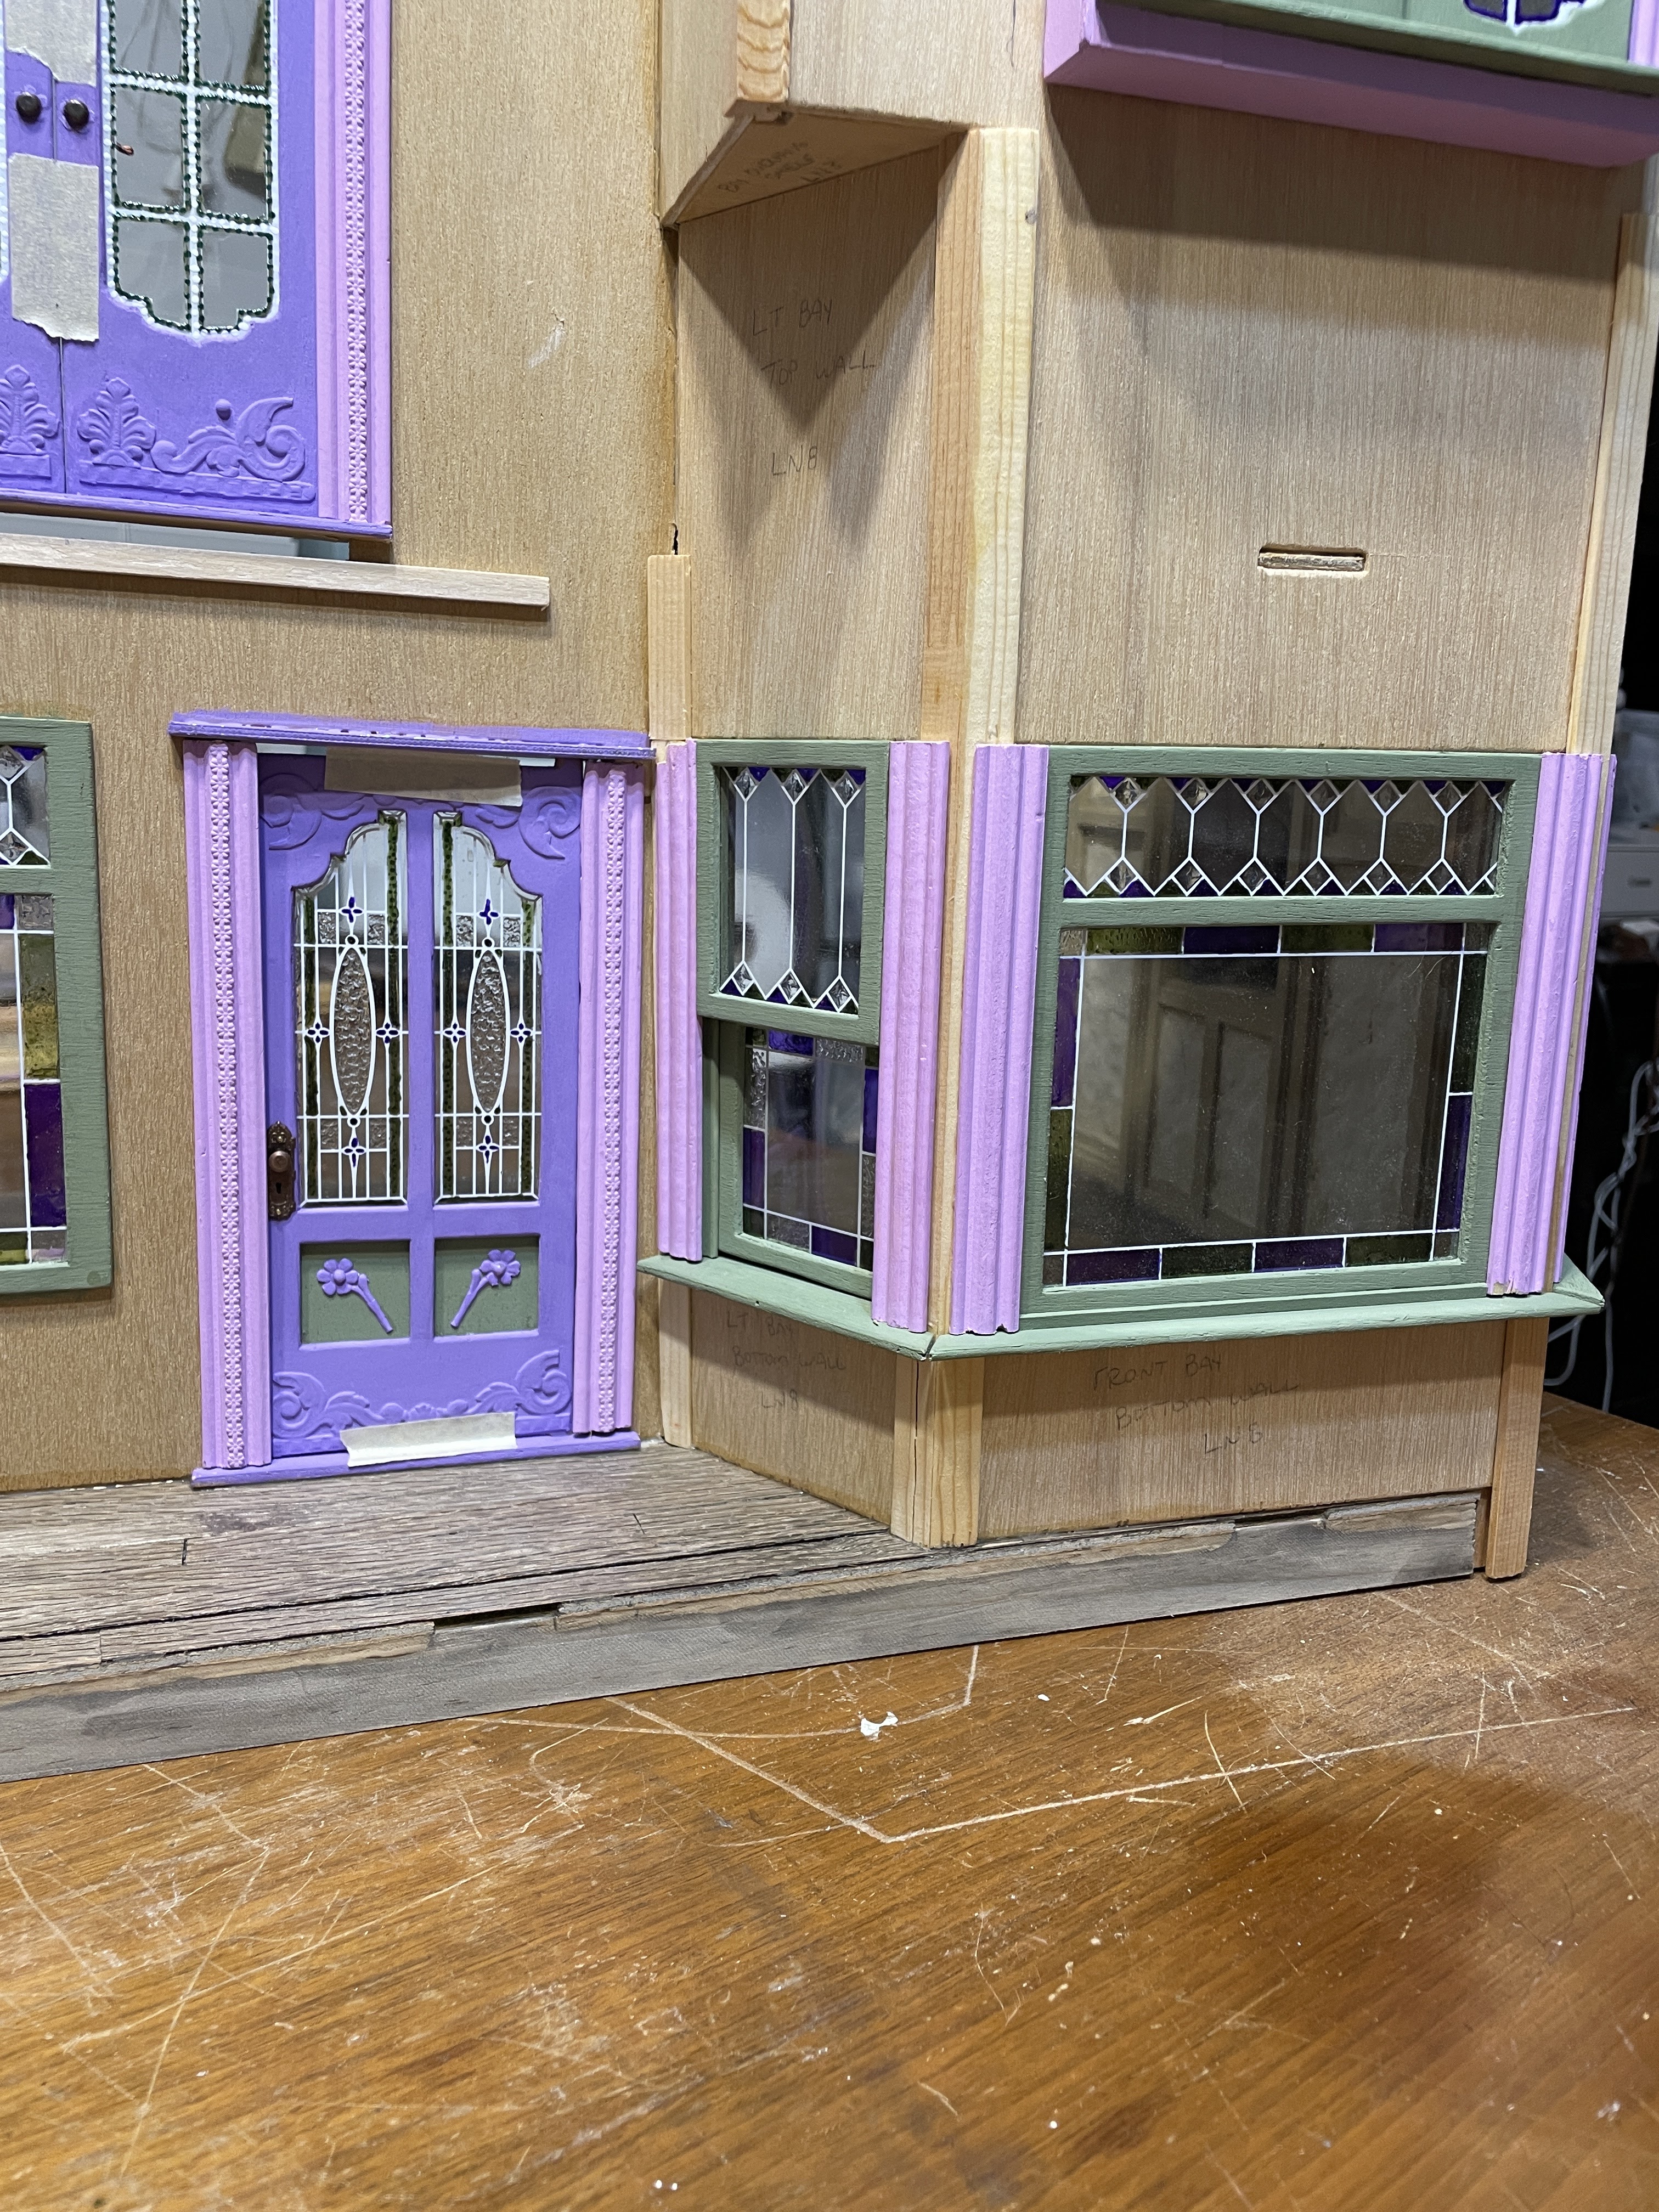
I also got to finishing the kitchen's bay windows. These go in the fourth wall, first floor. I had some window locks and handles in my stash which were perfect for this kind of working sash window.

When it finally came time to install the fourth wall, I naturally discovered that I'd need to make a few adjustments. The most glaring was that on the second wall, where it connected with the fourth wall, I had created and attached the wrong type of trim assembly. There was nothing for it but to remove it.
 |
| Removed trim. The glue works almost too good! |
 |
| Once removed, new, correct trim could be added. |
 |
| The correct trim at the correct angle to receive the bay window trim. |
Where the fourth wall met the second and third walls I lost a little edge trim, but this was perfectly fine. You can also see Goldie's window installed looking through her bed cubby. If Rapunzel lived here, this would be the perfect window to let down her hair so that the prince could climb it and rescue her!

 |
Once it looked like everything lined up properly, I added lots of clamps to keep it in place while the glue dried.


Whew! The individual wall method was successful and mostly trouble free! I am so happy to have these walls up! Here's a look from the outside...


And from the inside. For some reason, it reminds me of the set in a play.


A final look at the bay windows with all their trim. And the fourth wall that had me so fearsome for weeks!


I'll need to remember this triumph as I begin the puzzle of floors and roof. *gulp*
Thanks for being here with me on this adventure! Your encouragement and enthusiasm keep me going! 💗
xo xo,
Jodi
You post a very good questions about decorating walls before assembly; certainly makes it easier to work on a flat surface rather once the walls are up and often obscured or difficult to access, such as the half scale Fairfield or when doing the intricate work that you do so well. I can't imagine doing it any other way. And yes, I've often compare assembling a mini house much like putting a puzzle together. Your house is adorable and wonderful and magical.
ReplyDeleteThanks Ann! I can only imagine how much harder it would be to reach my clumsy hands into a half scale dollhouse! Yesterday, reaching in to paint a touch up spot, I hit my forehead and remembered another reason I like to do flat walls!
DeleteDear Jodi,
ReplyDeleteHow good it is that you are not like "most people"! Your solutions for the problems, no important who or what caused them, are what makes it so fun and interesting to follow your posts. The wallpaper second floor walls, nooks and drawers are beautiful and in style with the rest of the floors.
Great work!
Hugs, Drora
Thanks Drora! I want to point out that both ways have their challenges so choose whichever seems the most likely to succeed for you. Glad you like Goldie's cubby! Hugs!
DeleteGolly, Jodi, this looks amazing! Alice and Goldie must be absolutely thrilled! The cubby bed is absolutely amazing!
ReplyDeleteI also know that feeling so well about the glue 'working almost too well'! Of course, it never works when I want it to, but when I try to pull off an already-glued piece, it gives quite the struggle!
Also, your windows with the stained glass are marvelous!
The house is absolutely fantastic!
Julia
Dear Jodi,
DeleteI forgot to add how much I agree with you: it really does look like a set for a play or a movie set! With, of course, Alice, Goldie and Wayne as the stars!
Thanks Julia! I think the number one personality improvement that minis have taught me is patience! With too much glue, not enough glue and especially with myself when I make dumb "little" mistakes that need to be undone. Ya just have to giggle and move on. Glad you like the stained glass windows! This was such a great project to try them out in!
DeleteA veces evitamos algunos pasos de la construcción por diversos motivos, aunque casi siempre son miedos a complicaciones que en tu caso has resuelto perfectamente. Imagino que te recuerda a un decorado de teatro porque le faltan las paredes y el suelo, jajaja
ReplyDelete
DeleteGracias Matxalen! ¡Exactamente! Miedo a no encontrar soluciones a los problemas que me creo y luego abandonar el proyecto. Lo que me empuja a superar el miedo es que es solo una casa de muñecas, y me he enfrentado al mismo desafío tantas veces. Y sí, no hay pisos, es por eso que parece un conjunto, ¿verdad? ¡Resulta que estoy trabajando en eso hoy! 😁
Oh I love how that looks! I agree, doing all the work when the walls are flat is much easier. Maybe a cardboard mockup of the second and third floor to fine tune how it'll fit?
DeleteThanks Sheila! Great idea Sheila on the cardboard - that's what smart people would have done, lol! I dove right in and started cutting the kit floors right up. Sink or swim, right, lol!
DeleteMe encanta como va quedando el conjunto de paredes-
ReplyDeleteSe ve tan dulce toda la composición.
Goldie estará encantada con los tonos que elegiste para ella y ese armario es fabuloso,.
Un saludo
¡Gracias Mariana! ¡Me alegro mucho de que te guste cómo se está desarrollando la casa del árbol! Quería que estas niñas se sintieran apreciadas a pesar de la falta de apoyo de sus padres. ¡Ojalá pudiera hacerlo por todas las personitas perdidas del mundo, pequeñas y reales!
DeleteI thought the walls always need to be finished before erecting them unless you are working with a finished house and just want to redecorate it. The interior looks stunning!
ReplyDeleteThanks Millimari! I am glad to have a comrade in arms in the way a dollhouse can/should be finished more easily! My poor eyesight and my reaching stamina just aren't what they used to be, and they never were stellar in the first place, lol! Glad you like how the treehouse's interior is coming along!
DeleteMe encanta como te gusta "complicarte" como no te desanimas ante los retos y resuelves tus propios "rompecabezas" por muchas vueltas que tengas que darles!
ReplyDeleteJodi, el conjunto se ve fabuloso, me gustan tanto los tonos, estoy segura que Goldie no podrá dejar de saltar de alegría al ver su habitación!!!
Estoy de acuerdo contigo en que es mejor trabajar en plano y después de hechas, erigir las paredes.
Ánimo con el segundo piso, deseando verlo!!
Besos.
¡Gracias Pilar! ¡Estoy muy feliz de recibir comentarios positivos sobre los colores y el estilo que se está desarrollando! ¡Es un desafío saber cuánto "cuento de hadas" incluir en la casa del árbol! ¡Abrazos!
DeleteHi Jodi, you are making amazing progress and I agree with you is much better to decorated the walls before you put them together but that has not been my experience. I have mainly bought second hand houses and when I had the opportunity I just wasn't patient enough so I admire your commitment in doing it this way as you are right, the results are much more better as we can see in all your builts. I´m loving this project. I love the colour scheme and the atmosphere you are creating with all the textures, the windows and architectural details. You are so talented dear friend. Big hugs.
ReplyDeleteThanks Alex! I am so happy to know that you like how the treehouse is developing. I think redecorating is the more challenging kind of work, for sure. Not only are you having to remove the old finishes, you have to measure carefully and reach in to install the new. That doesn't leave a lot of margin for error, and I seem to forget where my head is. I bump into the dollhouse, full force, with my head, several times during the operation! Then I have to explain to everyone who sees my bruises that I am not a victim of domestic violence, just mini domicile violence at my own hands, lol! Big hugs!
DeleteHello Jodi! I'm new to your blog and new to dollhouses - and this post has amazed me! What beautiful work, what delightful details! I'm looking forward to following your blog!
ReplyDeleteHi Michelle! Thanks so much for coming by and for leaving such an encouraging comment! I hope you'll enjoy coming along on this fairytale treehouse journey with me, even as you begin your own exciting mini journey! I have had a look at your lovely blog and I admire your creativity and jovial style so much! I am really looking forward to reading more posts and seeing what you love - it all looks so inspiring! As to your mini book shelf, it is a great idea to start with something practical. So many of us are raised with the idea that art and hobbies are frivolous, so we need to put a toe into the bathtub, so to speak. I hope you find the same freedom, immense joy and satisfaction in creating your miniature world that so many of us do. I have added your blog to my blog roll and hope that many others find and are inspired by you!
DeleteJodi, Thank you so much for your encouraging words! I appreciate it so much, and I feel so inspired!
DeleteAmazing progress! Everything is perfect, as always. Alice and Goldie look very happy.
ReplyDeleteThanks Faby! Things are starting to feel tangible! The girls are more anxious than ever to get moved in!
DeleteI love the purple/green combos that you chose. It looks great!
ReplyDeleteThanks Troy! This has been such a fun genre to work with!
DeleteWow, Jodi! I am so amazed at your ability to envision something then overcome every possible obstacle to bring it to life. There are not enough years left for me to develop a skill level like yours so I so appreciate living vicariously through your marvellous posts. Thank you so much. - Marilyn D.
ReplyDeleteThank you, Marilyn! I appreciate your praise but I am nowhere close to singular when it comes to overcoming obstacles in miniature building. In fact, I think that is one of the most attractive aspects we enthusiasts crave: the challenges and rewards of doing things our own way. I have enjoyed many, many of your amazing builds where you've faced tough challenges trying to create the vision or effect you have imagined. I always leave impressed and inspired at your ingenuity and creativity!
DeleteHi Jodi! It's Me! Late Again!!! I can see why you waited til the last to work on the fourth wall! Complex construction! The bed cubby for Goldie that you constructed is just Perfect! What a great way to fit the bed into the bay window with built ins surrounding it! Bravo for the details on that one!!! And it is no surprise that an adjustment had to be made gluing the walls in place... I can only say "only one adjustment???" A miracle! Lol! This fairytale treehouse is so much fun! And I love the view with the girls in the cubby... it does give a good perspective! They must be getting quite excited with all this progress!!! :):):)
ReplyDeleteHi Betsy! Thanks for commenting - you are never, ever late! Funny how you don't suddenly have tons more time once you stop working away from home, right?!? Time is such a trickster!
DeleteYep - that fourth wall made my brain hurt so my solution was to avoid it as long as possible, lol! I am so glad to have it done and so happy with the way it all came together. I am not sure it would qualify as a miracle, but I really do feel like I got away easy. Fluby would say I must have some extra points in the golden book. 😊
We are all excited at the progress of the past couple weeks, but I fear they are going to slow down again - lots of fiddly, time consuming stuff ahead on the To-Dos.
Oh, what a wonderful post - and me being late again to enjoy it! I see a pattern here... or a bad habit taking over. *LOL* But being late can even have some advantages - with Betsy being late too I was able to read your reply to her comment and it made me smile. But not only me... Fluby wants me to tell you that according to his modest opinion (side note - it was to my biggest surprise that he seems to know the word "modest" at all... and even more its meaning *grin*) you'd deserve a trillion of good points in the Golden Book for all the wonderful work you've done. And for a change I can truly agree with my furry fluttery guy. ;O)
ReplyDeleteI enjoyed this post with all its wonderful photos to the fullest. I too had to think about a scene for a play... and the work you've done with Goldie's cubby bed is simply awesome. The way you've added the space you needed for her bed while including additional storage space is brilliant. And the result is gorgeous! It's the most beautiful place for a little girl to fall asleep and have the sweetest dreams - as long as we are able to forget about Alice's beautiful sleeping place. *smile* And all the trims, decorations and pretty papers you've added... stunning. However I pity the lovely shelf sections somehow. The pretty papers covering them will hardly be visible anymore as soon as Goldie is putting some decorations in... and of course books... But I might better say "cooking books" as I foresee some classical editions like "1001 porridge recipes", "Bear approved porridge bowls" and "A porridge a day keeps the doctor away". Well, I can comfort myself by remembering the very wise saying of our dear friend Betsy: At least we will know the pretty paper is there... *wink*
I'm with you about decorating the walls before assembling them, access is so much easier this way. And with all the trim, beams, papers and other decorations I would really suppose that you appreciate easy access very much. And it makes it easier to keep the total vision in mind and to remember things on your to-do-list.
But I'm wondering if there will be a guest room? I fear not... so eventually you will have to deal with another fantasy project building a home for some fairy beary godmother. If we're wishing on a star it might happen, I gave it a try with an arm and it worked somehow so with loads of patience (your part) and even more time this fairytale might get its own fairy. ;O)
Hugs
Birgit
Thank you Birgit! You are always right on time! Please tell Fluby I appreciate all his support and if ever he needs a reference, I will go to bat for him, as well!
DeleteI am so glad to hear that you like how Goldie's cubby came out! It took a while to figure out how to make it work, but I knew there was something pretty and unique waiting to be tapped into for that space!
Your cookbook title suggestions are amazing! Goldie would be smart to consult with you on this as she gets closer to planning. Of course, the shelves will also be stuffed with plenty of fairytales, too. Just think about the added excitement of pulling a book from the shelf and getting a peek at those pretty papers!
I must admit when I got to this part of your comment I literally squealed and then shouted "She's going to do it!!! Oh Russ! Birgit is going to make the girls a fairy beary godmother!!! I'm sooooooo excited!!!". He was giggling at me! Thank you so much for even considering this incredible gesture, Birgit!
In all seriousness, though, I know what it is to live with chronic pain. Please, please don't do this if it is going to cause you any discomfort. I honestly did not know about the arthritis and would never ever want you to suffer.
As to the spare room... I have something very special planned for FBG's apartment. She will have everything she needs to live a wonderful, comfortable and fulfilling life! 💗