Search My Blog!

Use the Search box below to find keywords that you're looking for quickly and easily!

Search Feature

Thursday, February 23, 2023

I Should Have Turned Left At Albuquerque

I know the feeling, Bugs! My mini time took a bit of a wrong turn this week on the Fairytale Treehouse project. It started off so well - I felt confident in the next steps. Then, just as the first task was finished, I realized that I didn't like it AT ALL!!!

Let me explain... I love the purple cubby, I love the traditional Tudor wall vibe, but not TOGETHER!!! Uh oh!


Let's talk first about how I got lost. Remember last post when I shared my idea for Alice's second floor bedroom wall? I had doodled on the wall in pencil?


Well, I liked the idea of timbers and thought it would be a wonderful look in a fairytale treehouse. I cut 1/8" x 3/8" basswood strips and made the timber framing. So far, so good...


Then, I painted the timbers in a lovely shade of brown. That was the first sign of the problem, only I didn't know it yet.


The fun part came next. In between the timbers, I got to brush on a little wood glue, then squish in Creative Paperclay. To give it some texture, I pounced it with a stiffly bristled paintbrush. I was diggin' it!


The Paperclay dried overnight, and then I aged it with brown water washes. Khaki/brown for the walls and more brown/brown for the timbers. I loved this too. 


Just not together with the purple! Rather than compliment one another, they compete for all the attention. I need cohesion.

I was experiencing cognitive dissonance.


I didn't feel too lost. I just backtracked to where I went wrong and made a hard left. It was easy enough to neutralize the "stucco" and "timbers" with off white water washes. I mixed up a lilac shade instead to apply to the timbers. Definitely more in line with the look I wanted for the girls' bedroom!


The new color on the timbers nicely complements the bed cubby's purple wallpaper patterns. I love it! It will look more in keeping with forest living, too, once I add some aging washes to bring down the newness.

Very cohesive.

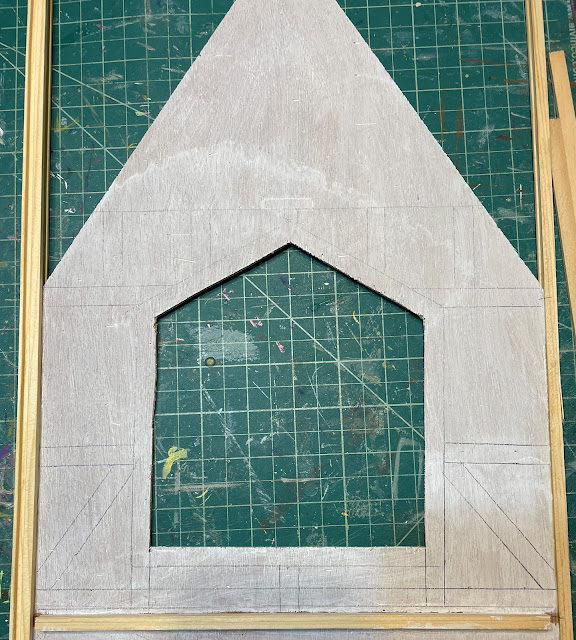
Phew! Crisis averted! Now I could move on to the next task! My goal this week was to get this wall as far along as possible while I could still lay it down to work. I needed to cut another opening in the wall and that is so much easier with a flat surface.

The third floor/attic space will make the perfect loft space for another forest dweller, but he has requested his own private entry. I turned to my trusty Design Space program to help me with his door.


The doorframe is a wee 3" high with the actual door being 2-1/2" high x 1-1/2" wide. The assembly was cut using the Cricut Maker and is comprised of both chipboard and kraft board layers.

Chipboard is brown and Kraft Board is taupe.

I used the door piece as my pattern to trace the hole onto the Linfield kit's wall panel, then cut the door opening with the scroll saw.
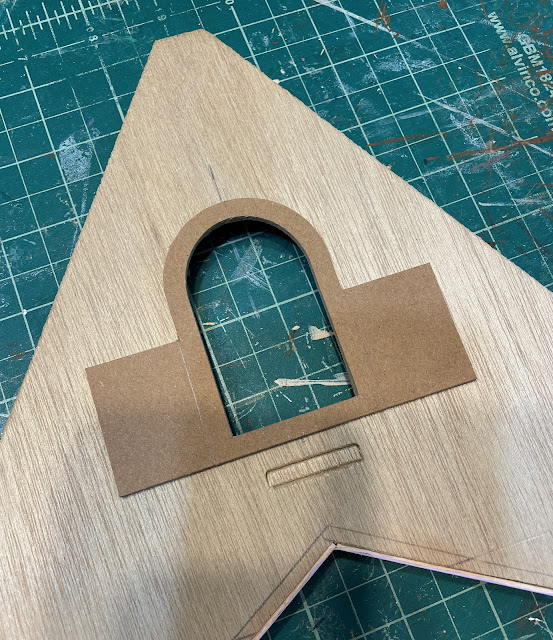


Entry surround.

Next, I added paperclay "rocks" to the door frame surrounds and "carved stones" to the frame overlays. This was my first time doing this kind of rockery (I have used egg cartons and Magic Masonry in the past), and it was so fun! There are many applications for Creative Paperclay that I want to experiment with in the treehouse. I am sure I will figure out some kind of technique for it by the time I am finished with this treehouse, and when I do, I'll share some tips. 


Once the masonry was dry I applied an overall gray color wash, then added selective color washes to each individual stone using the colors from the color board in this project. Once I was happy with the look I sealed the rocks and exposed chipboard with Mod Podge. I will likely add grout and moss, but not until I am treating the entire wall as a whole. I think it will look more consistent that way.

I painted the chipboard and Kraft Board layers of the doors, then glued the layers together. I added Dresden and nail head details, and "plates" and doorknobs, then gave it all an aging wash. Here is how the door surrounds and doors look together.


Interior and exterior door frame surrounds and door.

There is so much more to be done to make the door functional. I will sandwich both the window glass and a fabric hinge in between the interior doors/wall as I install it. And our occupant will need a porch of some sort. I am still thinking through which tasks are better done before or after the wall has been attached to the treehouse structure.


You'll get to meet the new occupant soon - he is relocating to the Pacific Northwest from New York State! I hope he likes the rain, the gloom and the damp, and that he doesn't mind his temporary housing with Vera and Virgil. More to come...

All in all it was a great mini week in spite of a minor wrong turn. Luckily, I realized it before I ended up in a cave in Pismo Beach! 

xo xo,

Jodi

Thursday, February 16, 2023

How In The World Do You Make A Fairytale Treehouse?

Oh, I hope you aren't looking to me for the answer, because I don't even know what I'm doing... yet! I have this idea of the finished look in mind, but I'll be darned if I know what steps to take to get there! And then, to make it even more challenging, my lizard brain keeps trying to set me to task on all the "usual" dollhouse building processes. Like starting to cover every wall in wallpaper. No!!! Completely wallpapered walls is not the kind of fairytale treehouse my heart is dreaming of! And when you top that off by going rogue on the dollhouse kit instructions, then you have really made a job for yourself. My "no plan" plan might be way more trouble than I anticipated...

Alice's Bed Cubby Pop Out

So, I started with the things I DID KNOW that I wanted. The girls' cubbies needed to be very fairytale princess, but unique, per their request. Their color choices were primarily purple and green. Pink, they said, is apparently "So Cinderella", and "So Predictable". Okay, no pink. Too bad. I LOVE pink!

The girls picked this paper pack and asked if I could incorporate lots of it in the treehouse without making it look too much like a dollhouse. Uh, I can try...The hues in the paper pack became the color palette for the pop outs. It's just coincidence that the pad is named Alice...

They did say I could include all the frilly details I could come up with, so I dug through my drawers for things like Dresden appliques, tin flowers and leaves, metal "nail heads", beads and pearls and fretwork metal pieces. I painted all the appliques so the detail would remain a bit more textural and subtle.


The inside of Alice's cubby got a two wallpaper detail with bright trim work. She is very excited thinking about how her bed full of pillows is going to look!


Goldie's pop out has a bit less frill because the kit's window was already nicely detailed. Since I turned it into a pop out from the original flat wall window, I had to create the inside trim. It still needs a little work but I'll wait for ideas to hit me.


These are the papers Goldie picked for her cubby...

Later, when the dirty water washes come along to tone down the brightness, I am pretty sure the look will be more "deep woods princess" than "Little Tyke Princess".

A while back Emily shared her experiment using Sakura Glaze pens for mini stained glass windows. They turned out great and it looked fun to try. I just love the acetate window designs that came with the Linfield kit, and they have great potential for a really pretty stained glass look. To start small and slow, I used the clear glaze pen and with a little practice, the windows could become stunning. I started with the SAKURA Glaze 3D Ink Pen - Jewels pack and am awaiting delivery of the Sakura Glaze 3D Ink Pen - Brights pack. I'll let you know how it goes.


Since the kitchen pop out was not part of the original kit, I had to make the window myself. Luckily, there was a section big enough from the kit's acetate sheet to cut it from. I used the white colored glaze pen to try and mimic the kit's acetate windows. The lines are much thicker, but in this fantasy theme, I am happy enough with the result. Here it is in the painted and detailed pop out window. Getting the "glaze" to go where you want it to go is a bit tricky at first, but soon, you get the hang of it.


And here is the right wall with two of the pop outs ready for installation. First, though, this wall will be getting one more feature - a door opening into the third floor/attic space. It is only going to be big enough for the smallest of tree dwelling forest creatures. More on that later...


And more decisions need to be made about just how to make a fairytale treehouse. Some wall doodling is helpful in visualizing just what might look right...

Can you see the faint pencil lines?

A closer look.

I think I have a direction, and after I prepare the house for a weekend full of gathering family, I'll get to play with it some more! All your creative suggestions will be most welcome and any I think I can achieve, incorporated!

Have a great weekend!

xo xo,

Jodi

Wednesday, February 8, 2023

At Last...

Hi Guys! I know it's been a long while, but I'm back to the craft table! I was beginning to worry I might not ever find my motivation again! First, the onset of holidays, then a bout with the nasty RSV bug, then more holidays and finally Russ being home for the majority of the last three months. It was all so counter to creativity! Finally, I just remembered where I'd left off, what the next step in the fairytale treehouse project was supposed to be, and I got busy. Thinking can be the death of creativity for me, so ignoring the "shoulds" is the only path back to my table...

Before the bug struck, I had been working on stairs for the left wall tower. I didn't have much of a plan but that is the plan for this project. I want to allow my imagination to wonder and figure out solutions as problems arise. That seems like the best way to have the most fun with this fantasy genre. So, without much measuring and only using my eyecrometer, I cut up some 3/16" foam core to create a circular staircase. I carved in some stones, added a base coat of paint and applied some glue veining because I thought it might look neat. Then I sponged and pounced on various paint colors until it looked like a staircase that belonged in a forest fairytale treehouse. And that's all for the staircase until I get a better idea of how its going to function in the treehouse...


I cut the opening for the staircase tower... At Last! The scroll saw noise sent Woodson under the bed! Guess we're going to have to work on his tolerance all over again. Poor guy!


And like usually happens when I just stop thinking and get to work, more progress happened! I took the pop out window from the kit that was meant for the left wall (but got nixed in favor of the stair tower), reconfigured it a bit, made an opening for it in the right wall and it will become a sleeping loft upstairs for one of the girls.

Window seat from kit meant for the left wall.

Traced onto the second floor of the right wall.

Another opening to cut - poor Woodson!

Test fit.

Side view to see the protrusion.

Below the bedroom will be a kitchen for the girls. Goldie is working on a porridge cookbook and will need to test recipes! I thought it might be nice to have a little light coming into the room from outside, so I made a pop out window for above the sink. I repurposed the tall foundation pieces that I omitted from the kit. Woodson doesn't like the noise from the mini table saw any better than he does the scroll saw. You should see him take off when I release the steam on the Instant Pot! Poor Wubby!!!

Simple lean-to type pop out design.

Now this wall is much more interesting!

Profile view.

The last wall to get a bit of a pop out feature is the second floor window of the front wall. It didn't need much, just a little elevation change to add some detail and interest. This was a little more complicated than the other two windows because I had to figure out how to remake the arched window into a pop out, how to create an arched roof and how to keep it from interfering with the gable trim to come.

Here is how the original kit it configured...

Opening window.

And here is the wall with the pop out mock up. I used illustration art board for the arched roof, sliced at intervals to make the curve. It protudes only 5/8" - just enough to add a little charm.


Profile view.

So, it looks like I am back on a roll! Hopefully, I'll be able to keep the momentum going! But first...

Some of you receive my posts in email form. I have used MailChimp's free service for my 1,500 email subscribers since Blogger stopped sending them in 2021. After March 10th, it won't be free any longer. I know $13 - $20 per month ($156 - $240 per year) for their service doesn't sound like too much, but for someone who doesn't make money from her hobby, it's a lot of mini supplies I could be buying each year. I'll be looking for other free alternatives and hopefully, I'll find one and be able to continue sending the emails. More info to come...

Also, I wanted to share the wonderful treasures that Birgit (BiWuBĂ€ren on the Blog) sent for Christmas! In addition to yummy marzipan and chocolates, she sent a 2023 calendar featuring photos she took of her amazing garden. Each photo features her adorable handmade BiWu Bears Flubby and Rosey. It brings such joy each time I look up and see it on my desk! She also included a handy closable storage/lunch box, a kit to make a palm plant (yippee!) and the best gift ever - Bottled Sunshine!!! Boy do I need that!!! These are tiny marvels of the biggest kind!  Thanks to Birgit and all the gang! It is thrilling to receive such love, thoughtfulness and kindness all the way from Germany! đŸ„°đŸ’—đŸ€—


Hope you are all feeling mini motivated and having fun!

xo xo,

Jodi