
This week's mini time was focused on the second wall, referred to by that title because it is the second wall that the instructions have you attach to the foundation. It was a little challenging due to the time and care it took to finish and assemble the front door, a window and a set of French doors.
 |
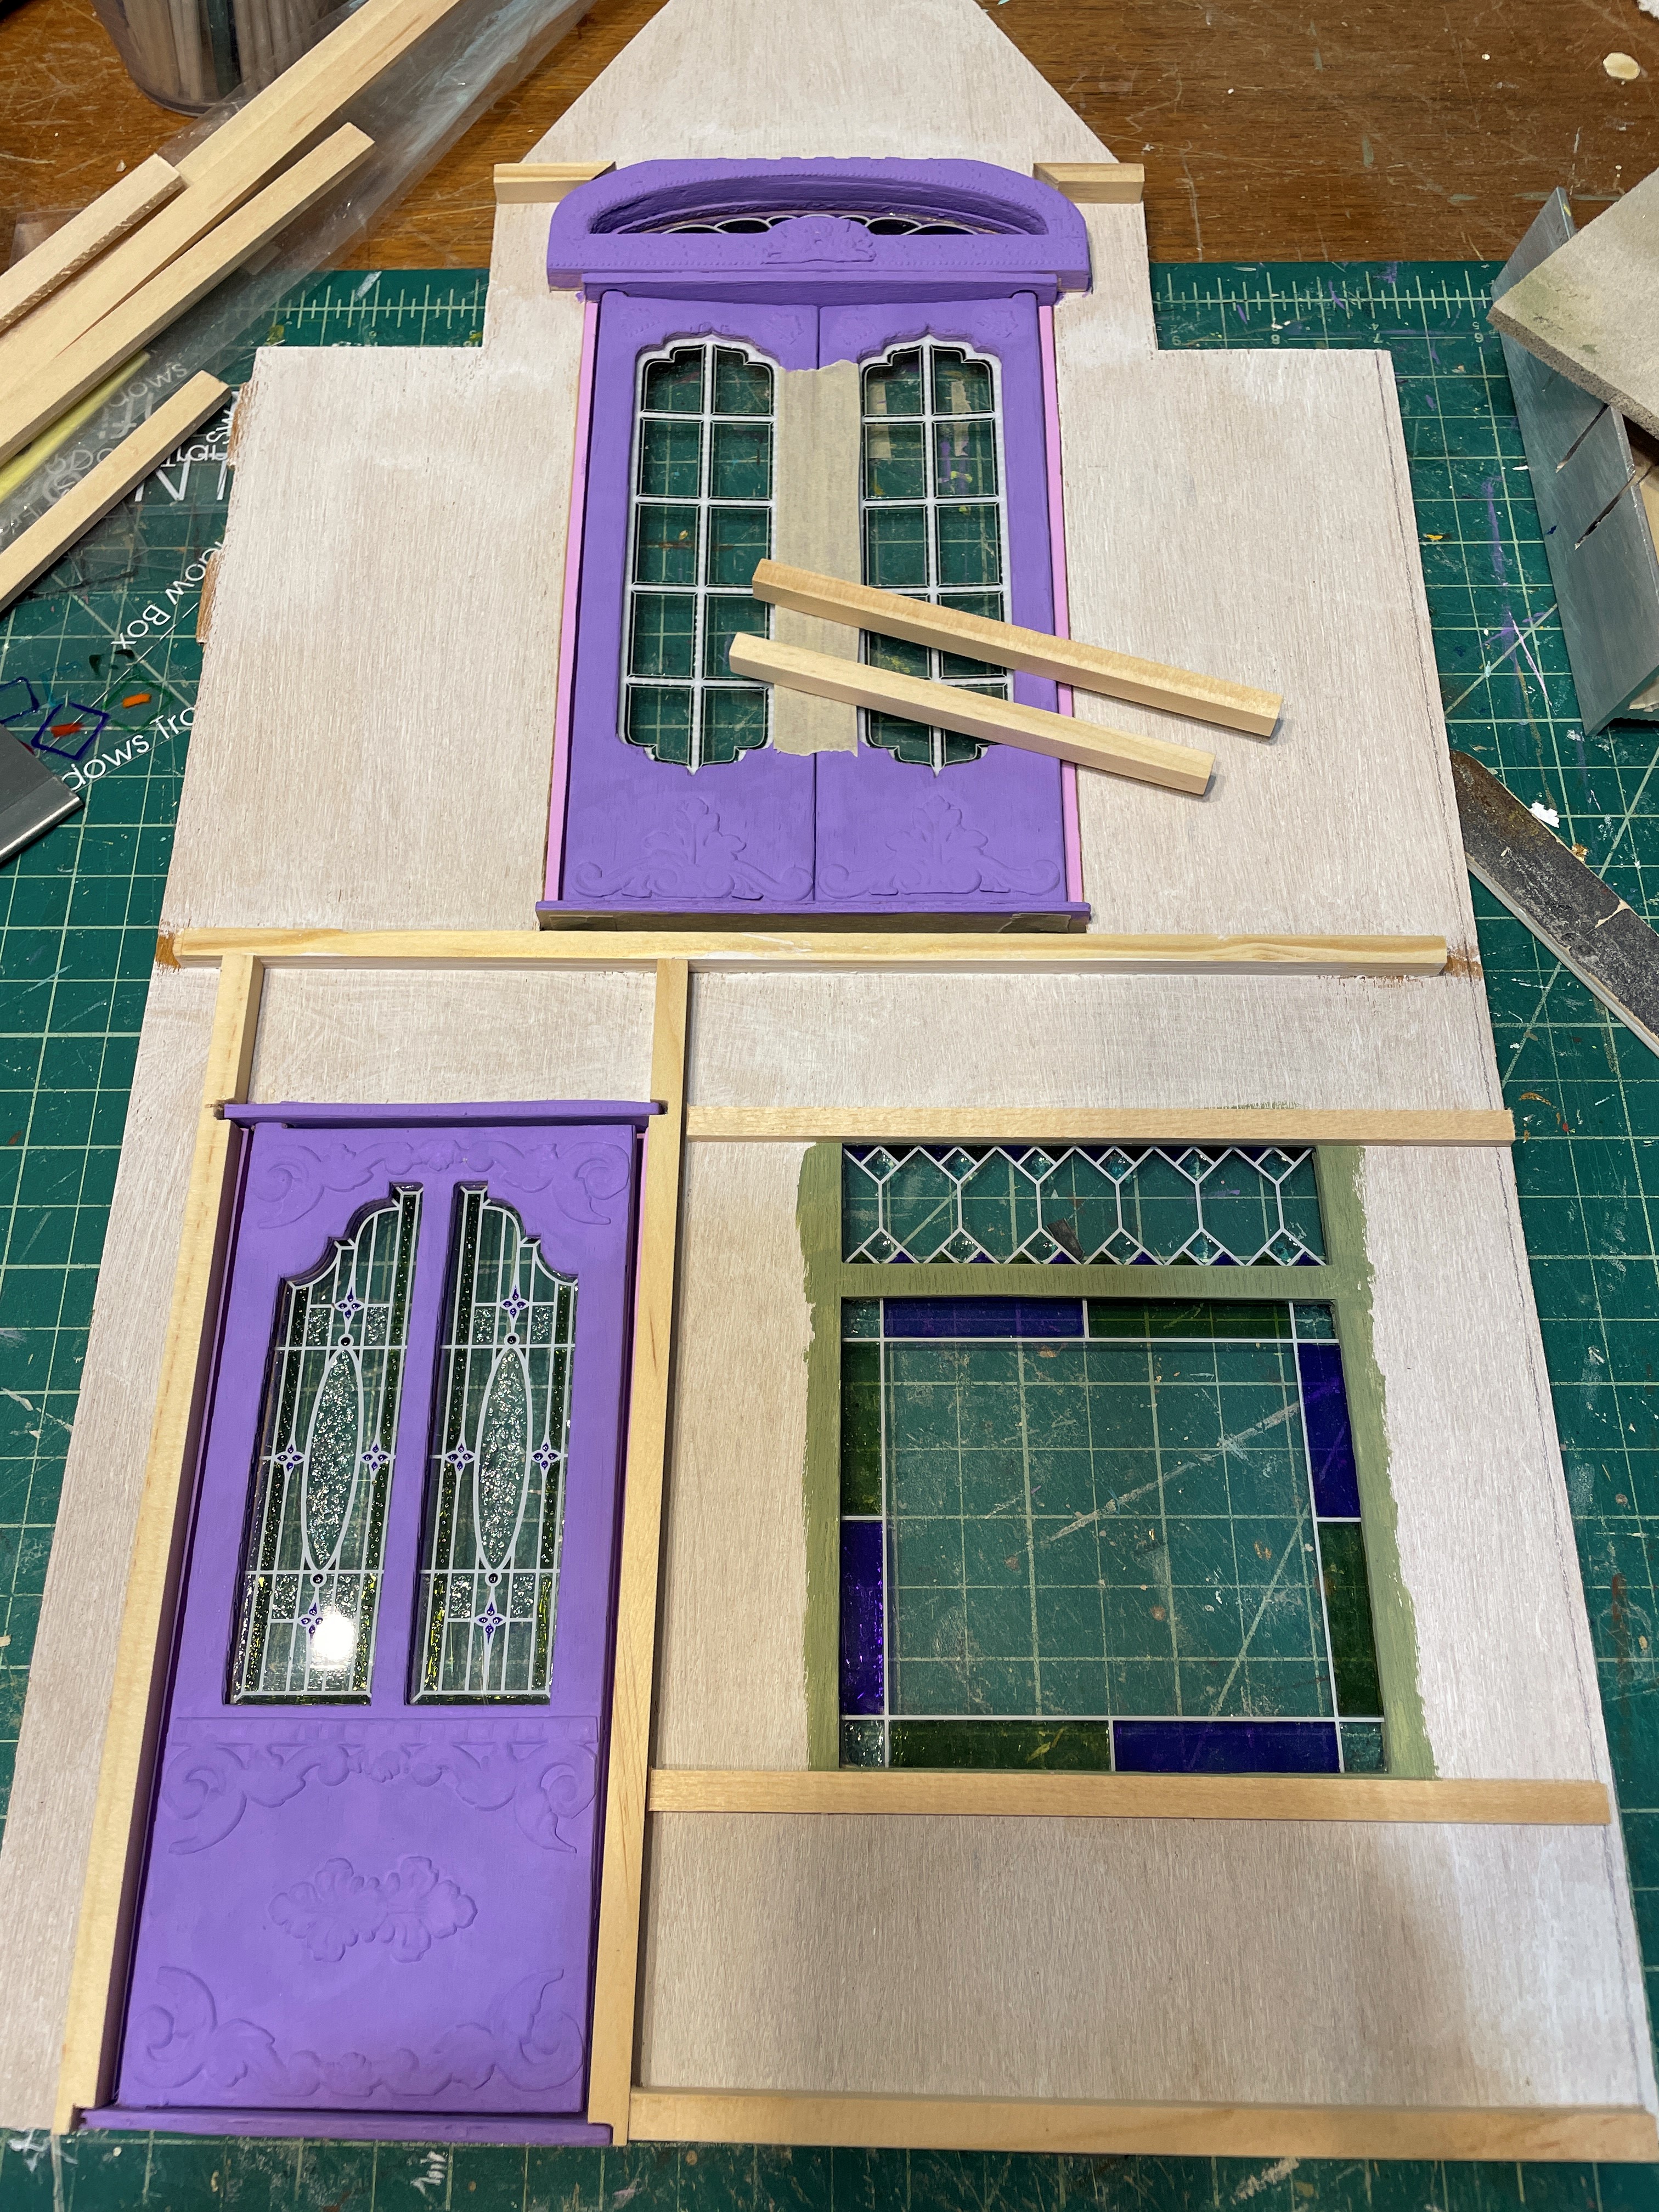
| Second wall with front door and second story French doors. |
So it's not confusing, let's talk about the kit's walls and where they'll go. The first wall in the instructions is the wall that I transformed into the stairwell tower. The third wall houses Alice's pop out bed cubby. These plus the second wall seemed like the "easy" walls. The final or fourth wall consists of Goldie's bed cubby (yet to be built) and the bay windows. It gets built using the pre-assembled bay windows, slip-in wall sections and single molding pieces that need to be glued together with the slots in opposite directions. That is so they can attach to the second and third walls using slots in the molding. The instructions give cut length measurements that are no longer relevant because I reduced the height of the foundation to 7/8". I'll be doing lots of math and triple checking my calculations. I may end the week with less hair than I started with!

Now back to the "easy" second wall. At Goldie and Alice's request, I added many Dresden embellishments to give the doors a frilly, carved appearance. Thank goodness I had Wayne's dexterous raccoon fingers at my disposal - they really helped when my big hands proved too big for the job!
I used the glaze pens again to enhance the kit's acetate windows with stained glass effects. I am getting a little better with practice, and I really love the raised effect you get by applying many tiny polka dots.
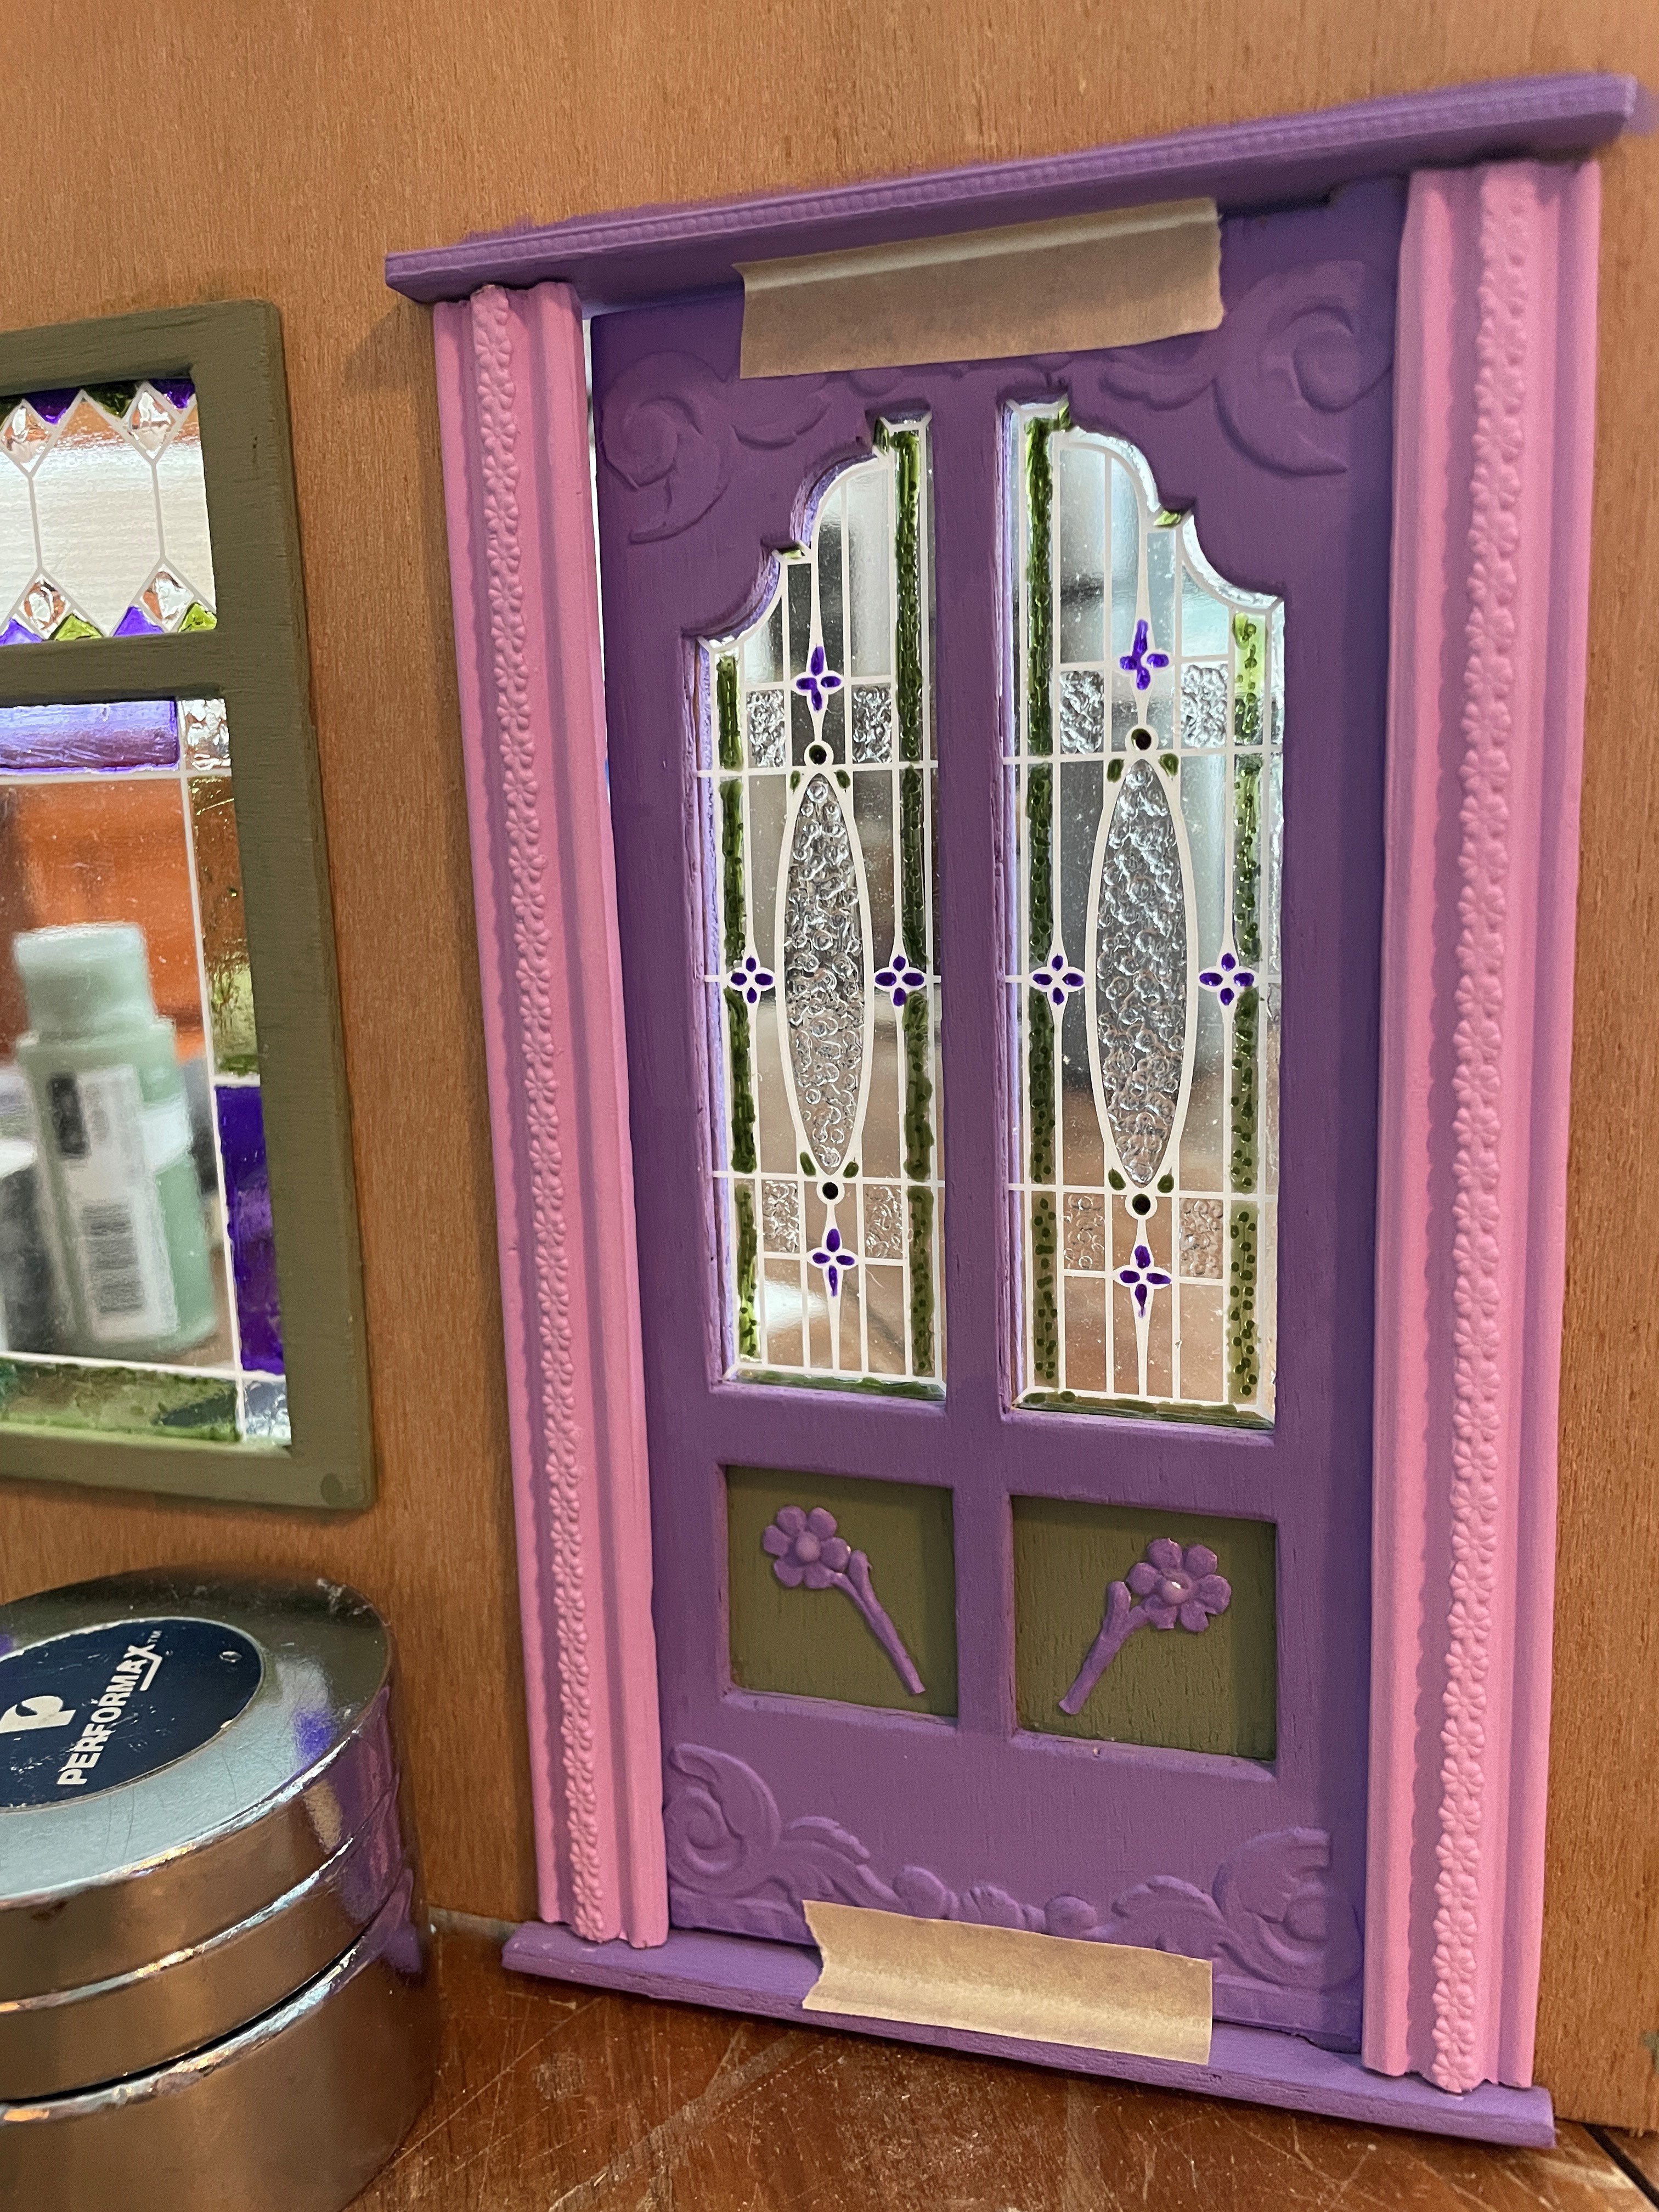


They look very pretty from the inside, too.


With that part done, it was time to work on the interior of the wall. I thought it would be best to continue with the Tudor timber look and leave the colorful details for the furnishings and accessories. I clad the walls in timbers, adding door and window trims as I went. The doors and window framing were spruced up with "carvings" thanks again to Wayne. He likes to keep late hours, so when I woke and saw the work he'd done, I felt a bit like the Shoemaker must have felt when he saw that his work had been done by Elves!

Once the timbers got painted with a coat of khaki, I applied Paperclay in between the timbers as I did with the other walls. I got a bit more cracking this time as it dried. It must be more susceptible with deeper, wetter applications. It was actually fun and easy to repair. The deep cracks got a surface application of more Paperclay and the shallow cracks were smoothed over easily by rubbing them with a wet finger.


I cleaned up timbers that had a bit too much Paperclay build up on them by sanding and scraping it off. Then I applied a coat of diluted khaki paint over the timbers again. I liked the aged and worn look so I fought the instinct to make them look new. I painted the "stucco" in light washes of khaki mixed with white, then treated the corners and edges to some aging with a stronger khaki wash.


I'd like to age the doors and give them some definition with washes, but I am still working on a technique that yields the results I see in my mind's eye. What I've done so far isn't it yet, but I'll keep working at it...

Now for a little Alice and Goldie news... The girls are no longer in their skivvies! I found them each a dress and a set of long underwear that should suffice until their pretty dresses arrive from Spain - hopefully soon! They each got a pair of shoes, too, though I can't swear they'll keep them on long - they seem to have gone a bit feral lately!

It doesn't feel like I accomplished a lot this week, but I know it'll feel that way once all the walls go up. First, I have to timber and stucco the inside of the first wall. Then, I'll tackle that fourth wall - no more procrastinating! I have my work cut out for me, but I'll take it one nibble at a time.
xo xo,
Jodi
Coming along nicely. Really like the purple color. Our real house was a wine shade called Bordeux. You are making great headway even if you feel not cuz you put so much effort and detail into all your projects, which makes them so good. The girls must be happy in their new outfits. Aren't lace and ribbons great?!
ReplyDeleteThanks JCH! I am enjoying the purple more than I expected, too! My real life front door and gable shingles are an eggplant purple. I just love it, too!
DeleteThe details do take longer, but I enjoy doing them so much! It feels like giving a little extra love and gratitude for being able to enjoy this hobby we love! I hope the girls' new dresses will work out great for them - it is so hard to know just by photos and descriptions!
The look of all the stained glass looks amazing! =)
ReplyDeleteThanks Iris! I hope you get a chance to try these Sakura Glaze Pens - they are so creatively satisfying! Also, if you email me privately, I'd like to talk to you about your mini cottage situation. :O)
DeleteIt’s looking great, and to me, it looks like you got lots done. All that detail work is time-consuming, but it’s that detail that sets a house apart.
ReplyDeleteThanks Shannon! I really do enjoy working on all the details, even though they do seem to eat up much of my mini time! Currently, I am carving rocks into balsa and I couldn't be happier, lol! :O)
DeleteSuch amazing detail and workmanship. Love the stained glass windows. The girls will love their home--can't wait to see their new dresses.
ReplyDeleteThanks Ann! I am excited to share them with you! The windows were fun to do - I hope you'll get some of these pens and try them, too!
DeleteOh, what a wonderful post! ;O) But I really need to know now: Where is Wayne??? No need to hide yourself in the shadows, show up on this blog, little guy... you have every right to be proud of yourself and your contribution to this wonderful 2nd wall. Btw I love how the group of Jodi-helpers grows steadily... first your trusted machine park, now the very helpful Wayne... And I would suppose that Goldie is also very supportive supplying you with energy coming out of yummy porridge while you're working on her home. I bet she knows that time which you don't have to spend with cooking in your RL kitchen is time you can use for working on her future home. *smile*
ReplyDeleteI've really enjoyed to watch this wall grow and develop (okay, I always enjoy whatever you're doing... but this latest work of yours is no exception from that rule *tweet*). It looks stunning - and I really admire the effect you can achieve with those pens. Fantastic results! And thanks for adding the 2nd picture to your post about the 2nd wall, to me it was very helpful keeping on track with what your building and how all of this will go together. Btw I'm glad you have to do all the math etc... I would go crazy. *LOL*
Hugs
Birgit
Thanks Birgit! Ha ha! Where is Wayne, indeed! I tried to rouse the little guy for photos, but he is extremely hard to wake up. It must be the late hours he keeps and that he raids the pantry right before he turns in. I'll try to take photos later in the day next time so he'll participate. 😜
DeleteI'd love Goldie to take over all meal making duties for the entire house, as I'd definitely rather be making minis! She doesn't seem interested in my kitchen or anything other than porridge, so far! 😥
I am so glad you liked the diagram of walls - working in such a disjointed way can be confusing for readers trying to put all the pieces together! I hope soon to have all that math behind me and walls erected. Until then, my immortal soul is in peril due to the colorful language I may resort to! 😊 Big squishy hugs! 🥰
The second wall is amazing. I really like the colors and the stained glasses are wonderful. So this is a perfect facade.
ReplyDeleteThanks Faby! I am so happy you like how the fairytale treehouse is coming together! I have lots more fun features in mind!
DeleteI am so awe struck by the beauty and creative side of your talent. Have you ever thought about doing / or have you done a you tube video on how you accomplish that beautiful stained-glass look? I did a bit on my dollhouse, but I used my cutting machine and cut out vinyl to use on each door and window. Gives the idea, but nothing like yours. Teach me please!!!
ReplyDeleteThanks Marti! I would love to share in any way to help my readers, though when I think about doing a video, the phrase "face made for radio" comes into my mind, lol! Once I get a little more confident with the pens I'd be happy to do a tutorial. I'll keep that on my To-Do list!
DeleteOh Jodi,me encanta el contraste de las paredes y vigas de estilo Tudor con las coloridas ventanas y puertas, realmente es cosa de hadas!!
ReplyDeleteLos rotuladores están siendo un descubrimiento notable, tendremos que probar para ver si el resultado es tan satisfactorio como el tuyo y el de Wayne.
Alice y Goldie están preciosas con su bonita ropa interior, los zapatos son preciosos, pero...déjalas comportarse de manera un poco salvaje de vez en cuando! Al fin y al cabo nosotras también lo hacemos y lo disfrutamos.
Besos.
¡Gracias Pilar! ¡Me estoy divirtiendo mucho con este estilo! Estos bolígrafos realmente podrían ser fantásticos con un poco de imaginación y práctica. Espero que también tengas la oportunidad de jugar con ellos. ¡Harían cosas increíbles en tus manos!
Delete¡Estoy tan feliz de que las chicas puedan ser libres y un poco salvajes! A mí también me gusta andar descalza, y sería perfectamente feliz en un mundo sin zapatos ni sostenes, ¡jajaja!
Es impresionante!!!Me encanta el colorido.
ReplyDelete¡Gracias Isabel! ¡No esperaba amar trabajar en la familia púrpura tanto como a mí!
DeleteThe walls are superb! I love the beautiful windows and doors with the delicate painted glass. Both girls look adorable in their new white dresses and shoes.
ReplyDeleteThank you once again for the pleasure of seeing your inspiring work with all the details
Hugs, Drora
Thanks Drora! I am so happy to know you are enjoying this project with me! Hugs!
DeleteMe encanta como la estás dejando y el efecto de las vidrieras es sencillamente precioso.
ReplyDeleteGracias Matxalen! ¡Me estoy divirtiendo mucho con este proyecto! ¡Estoy feliz de que lo estés disfrutando conmigo!
DeleteI am intrigued by the effect you get with those pens, Jodi. The stained glass looks fantastic. I also love how you are aging the doors and other woodwork to tone down the bright colours. It makes them look so much more appropriate for this build. Fabulous, as always.
ReplyDeleteThanks Marilyn! I am really trying to learn how to capture these princess colors and still have them fit in with the aged, foresty feeling. I hope in the end when all of the washes and moss and decay have been applied, it will look at least close to what I have in mind!
DeleteThe queen of embellishment! I love the way you give us so many ideas for adding detail. The fenestration (it’s not just anytime I can use that word, so thanks for that) for this build is stunning!
ReplyDeleteThanks Sherrill! You know how sometimes you ask yourself "too much"? Well, in this build the answer will always be "never"! 😜 Fenestration is a new word for me and I like it! This is such an adorably festooned dollhouse kit, and I am having so much fun taking it to the apogee! 😁
DeleteMe encantan todo ese color tan atrevido.
ReplyDeleteLas vidrieras son preciosas.
Un saludo
¡Gracias Mariana! Me encantan los violetas intensos mucho más de lo que esperaba, aunque quiero atenuarlos un poco con lavados para que armonicen un poco más con la vida en la casa del árbol. 😜
DeleteWow Jodi, your windows look Fabulous!!! That technique with the glaze pens does give great texture too! It makes it sparkle! I am in love with the colors too.... purple is a favorite of mine.... and goes so well with the green accents in the glass! I am glad you gave us the "diagram" of the wall positions too... it helps to know which part will go where! I am really enjoying seeing the interior and exterior walls being built "flat" before they are assembled. I always have a hard time working that way... I sort of need to be able to be "inside" the room to know what will work where. This is such a wonderful Victorian House kit.... I am looking forward to seeing your results "come together"! I have never used paperclay... but have always wanted to give it a try.
ReplyDeleteAs for Goldie's and Alice's new "cover-ups"... they look very cute but a bit swamped! I hope the new clothes will be a great fit when they arrive! As always, I can't wait to see more of your Jodi Magic!!! :)
Thanks Betsy! I really hope you will pick up some of these glaze pens! In your artistic hands, your windows would be magical!!! I am really loving the purple and green theme, too!
DeleteI am so glad you benefited from the wall diagram - I know the way I work out of order and on loose walls can be disorienting! My flat wall method has its benefits but also puts me at risk for major challenges when it comes time to erect them if I haven't thought of and considered all the implications. This is especially true with DuraCraft kits because they are already more complicated and combine more loose parts to assemble than many other kits. Please wish me luck - I am going to need it, and soon!
As for Paperclay, I really believe you will love it! As talented as you are with painting and carving and stitching, and with your incredible imagination and level of detail, it could change your crafting life! Please gift yourself a set of the glaze pens and a package of Paperclay on your next craft store or Amazon shopping excursion!
"Swamped" is such an excellent adjective for the girls' quick cover ups! I find most Heidi Ott doll clothing to be ill fitted. The new dresses from Spain arrived and they look almost tailored! I can't wait to share them! The girls want them now in every fabric and color, lol!
It seems the directions can't keep up with your creative ideas! Maybe they will take a few hints from you! LOL
ReplyDeleteHello Grandmommy! It is so nice to see you! My unorthodox methods will either prove to be very smart or very dumb - only time will tell! Soon, when I begin to glue the walls to the foundation and then attempt to fit the floors in, I may create a few very colorful new words, lol! Please wish me lots of luck! 🤞🤞🤞
DeleteQuite a large building, very beautiful also the windows, great!
ReplyDeleteThanks Gonda! The kit really does have some adorable features. Luckily, it is only 21-1/2" wide and 14-1/2" deep so the footprint is reasonable. There are four good sized rooms on the first and second floors. The third story has a very low ceiling, but it will be perfect for Wayne since he is only 2" tall! 😊
Delete