
As I was starting the Fairytale Treehouse's kitchen, I kept thinking about Goldie and her dream to create a porridge cookbook. I knew she would need ample space to experiment as well as 'top of the line' appliances. That is, top of the line for the era that she is living in! Suddenly, I had the whole room envisioned in my mind, and the impulse to start on her oven. Sometimes, the order I do things isn't logical. But inspiration can be fickle, so I've learned to follow it whenever it comes.
 |
| Goldie's Oven |
Last week I shared a couple photos of how I began - with the first floor's dividing wall. I drew out my dimensions and then began to create the structure pieces for the oven in Design Space. I truly wasn't sure it was going to work on the first try, but the best way for me to learn is to see a thing in three dimensions to understand it. I got really lucky and the first pieces I cut worked just the way I hoped they would!
 |
| Linfield kit's first floor dividing wall. |
 |
| Oven components in Design Space. Purple are the upper portion of the structure, blue the lower portion and black are the base pieces and inner structural pieces that needed to be cut on another sheet of chipboard. |
After I cut the parts from chipboard with the Maker, I assembled and painted them. I attached the base to the Linfield kit's dividing wall, then added 1/4" channel molding to finish off the wall's edges.


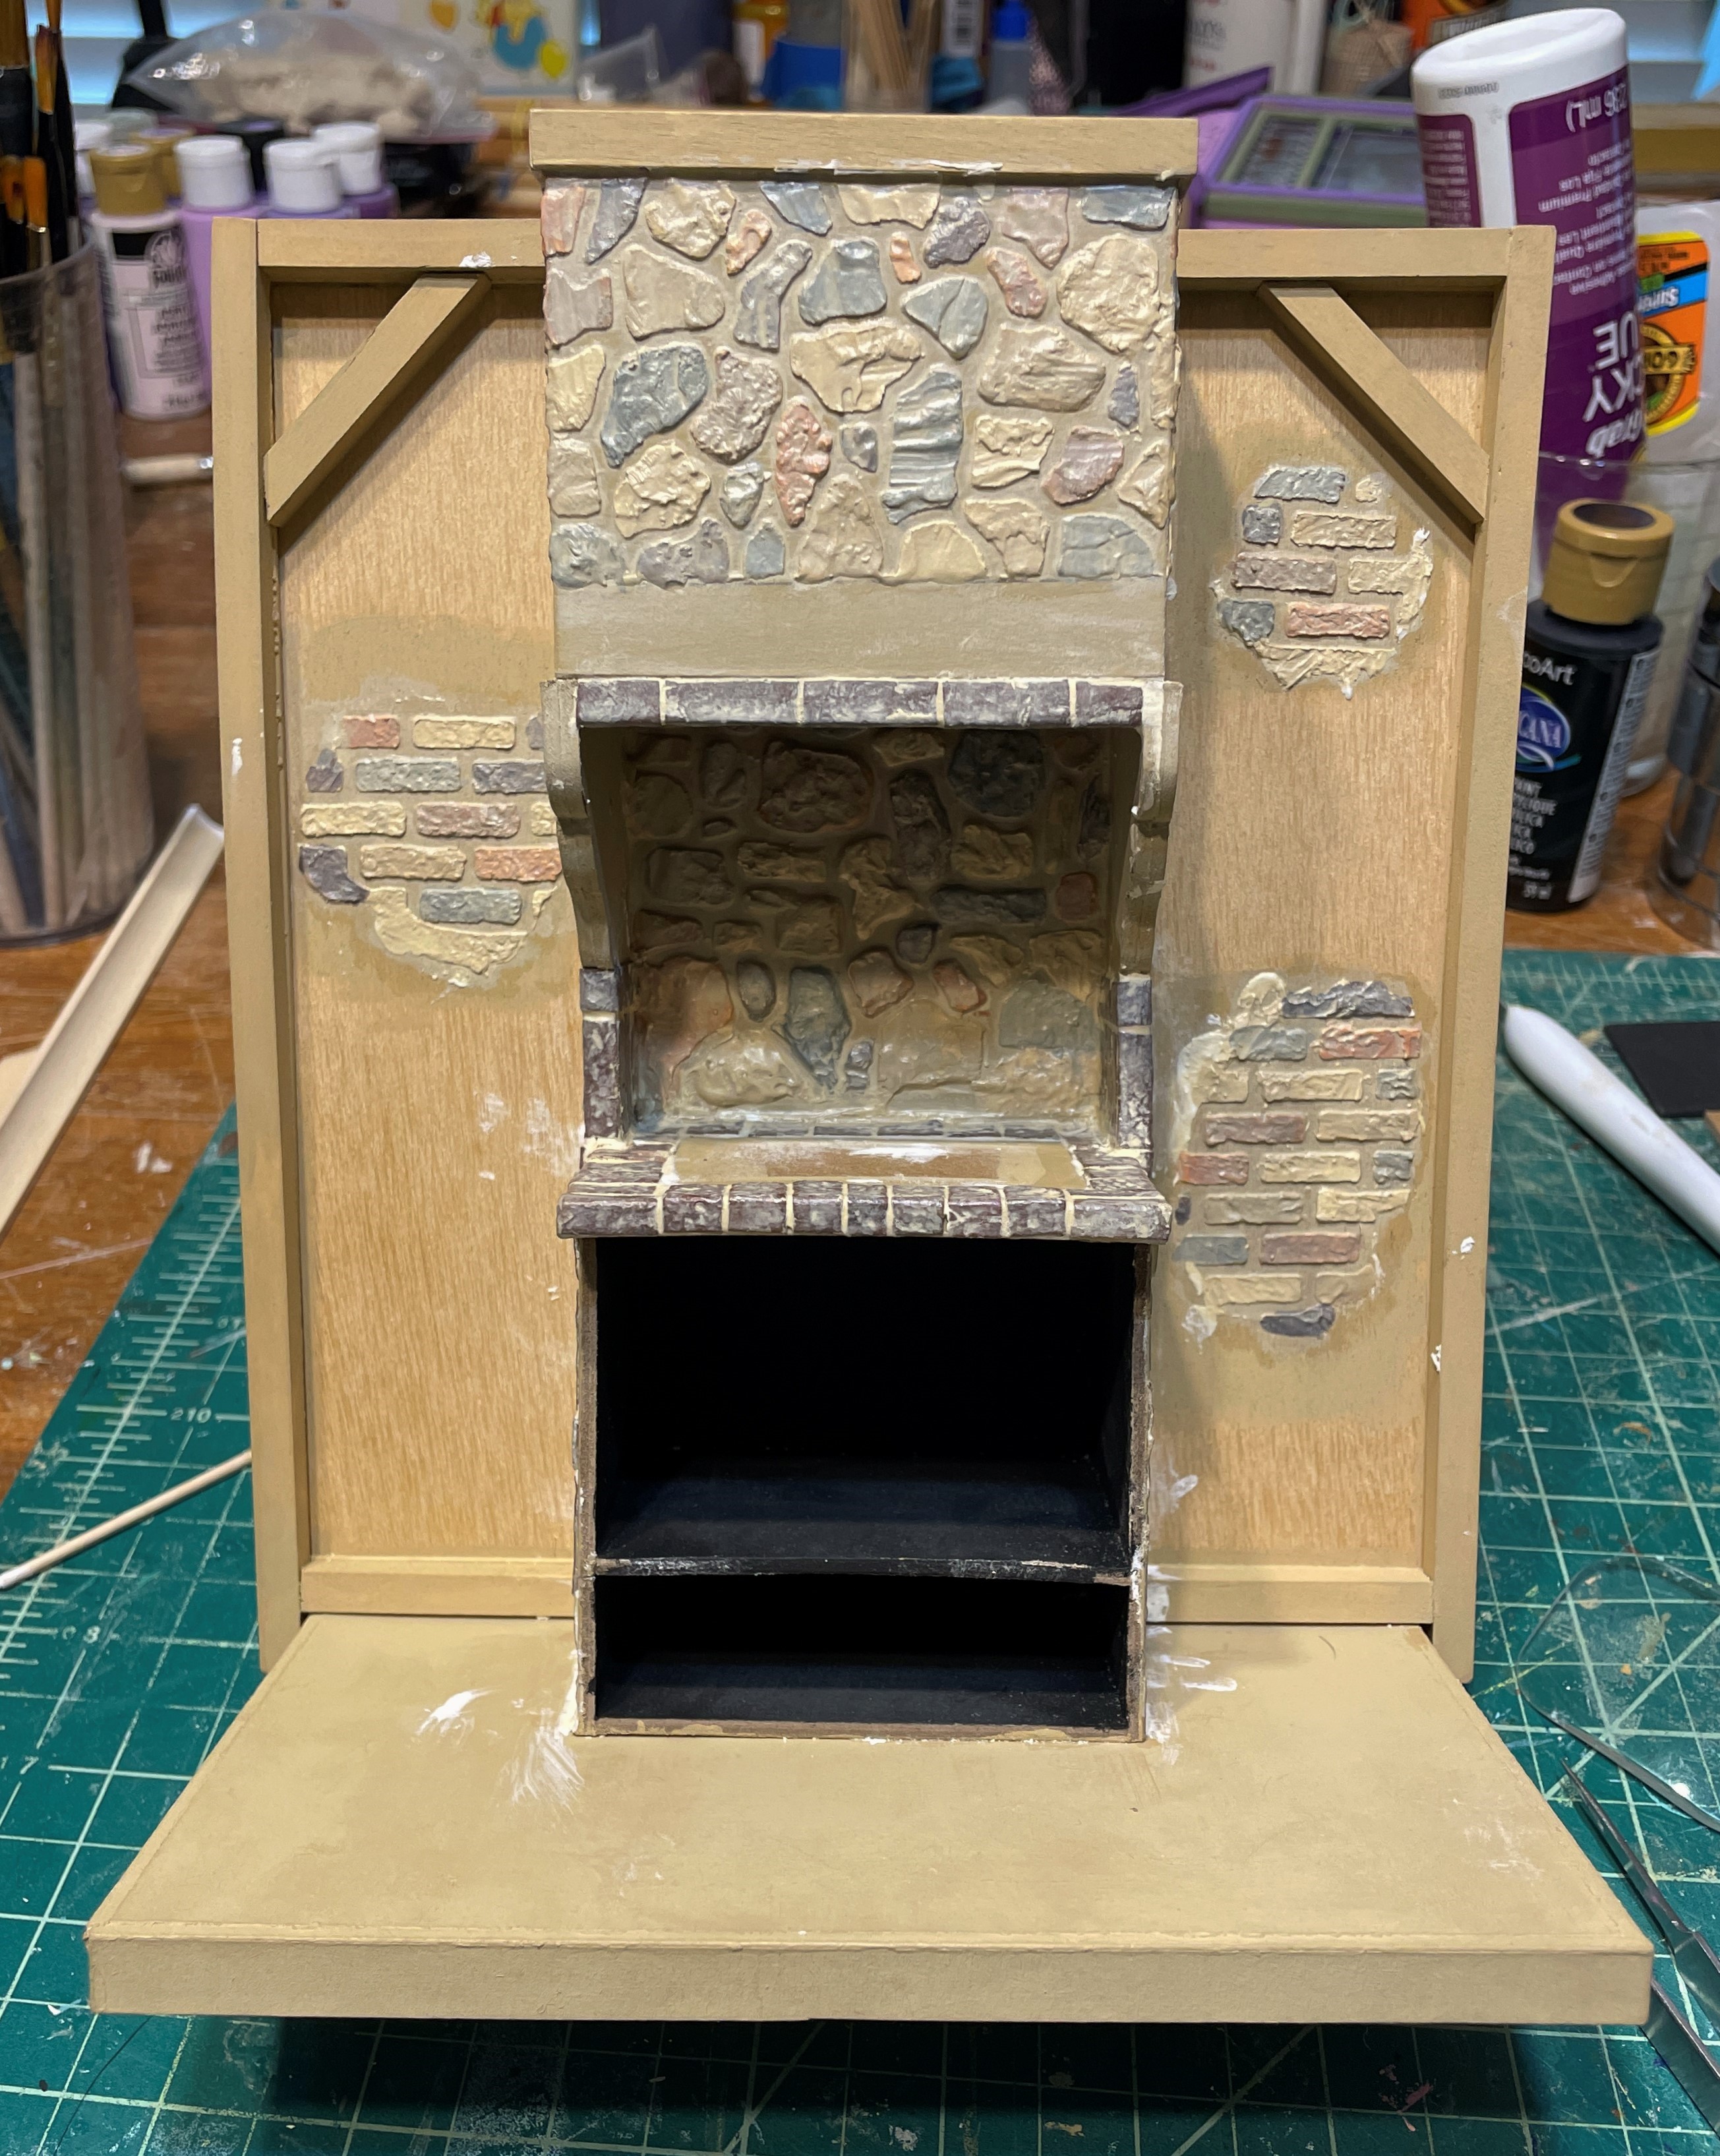
One of the things I have been looking forward to most with this project is the opportunity to use lots of texture - by whatever materials I have available to me or by using any craft supply I can think of trying. For the dividing wall, I'd have bricks showing through Paperclay stucco. I'd clad the oven in a combination of stone and egg carton bricks. The base floor was another fun chance to try Paperclay, this time in the form of river rock.
For the wall's brick and oven's stone cladding, I used Magic Masonry - it's the sticker roll stuff that you apply to the surface, spread stucco (or in my case joint compound) on top and then remove the tape. You are effectively removing the grout lines when you remove the tape, leaving behind the masonry. To add a little texture, I let the joint compound set up for a few minutes to become more firm, then I lightly pounced it with a paper towel.
 |
| Areas of Magic Brick, and the stove top framed in egg carton brick left over from another project. |
 |
| Magic Stone applied to the top of the oven hood, more egg carton bricks applied to various areas. |

In between the assorted masonry applications, I was also working on the oven door. I needed to figure out a way to make it functional, and because it is made of chipboard and not wood, I decided to make paper hinges with a toothpick as the pin.
 |
| Three layers of the door: Frame overlay, oven front with opening and arched double layer door. |
 |
| Frame overlay with egg carton bricks applied. |
 |
| Cardstock paper hinges made by wrapping thicker card several times around a toothpick then securing with Tacky Glue. |
Oven door assembly. Two paper hinges are attached to the door and sandwiched under the smaller inner door arch piece. Two are attached to the oven front and then wrapped around to the inside of the oven front where it is secured with lots of strong glue. Then a toothpick is inserted through all four hinges to allow the door to swing open and shut. Beads have been added to the top and bottom of the toothpick for decoration as well as to keep the toothpick from coming out of the hinges. Dresden appliques have been added to the door, and a silver brad is the door handle.
The black acrylic paint looks really close to cast iron after rubbing it down with your finger. Dulled by dead skin cells, maybe? Eeeewwww!

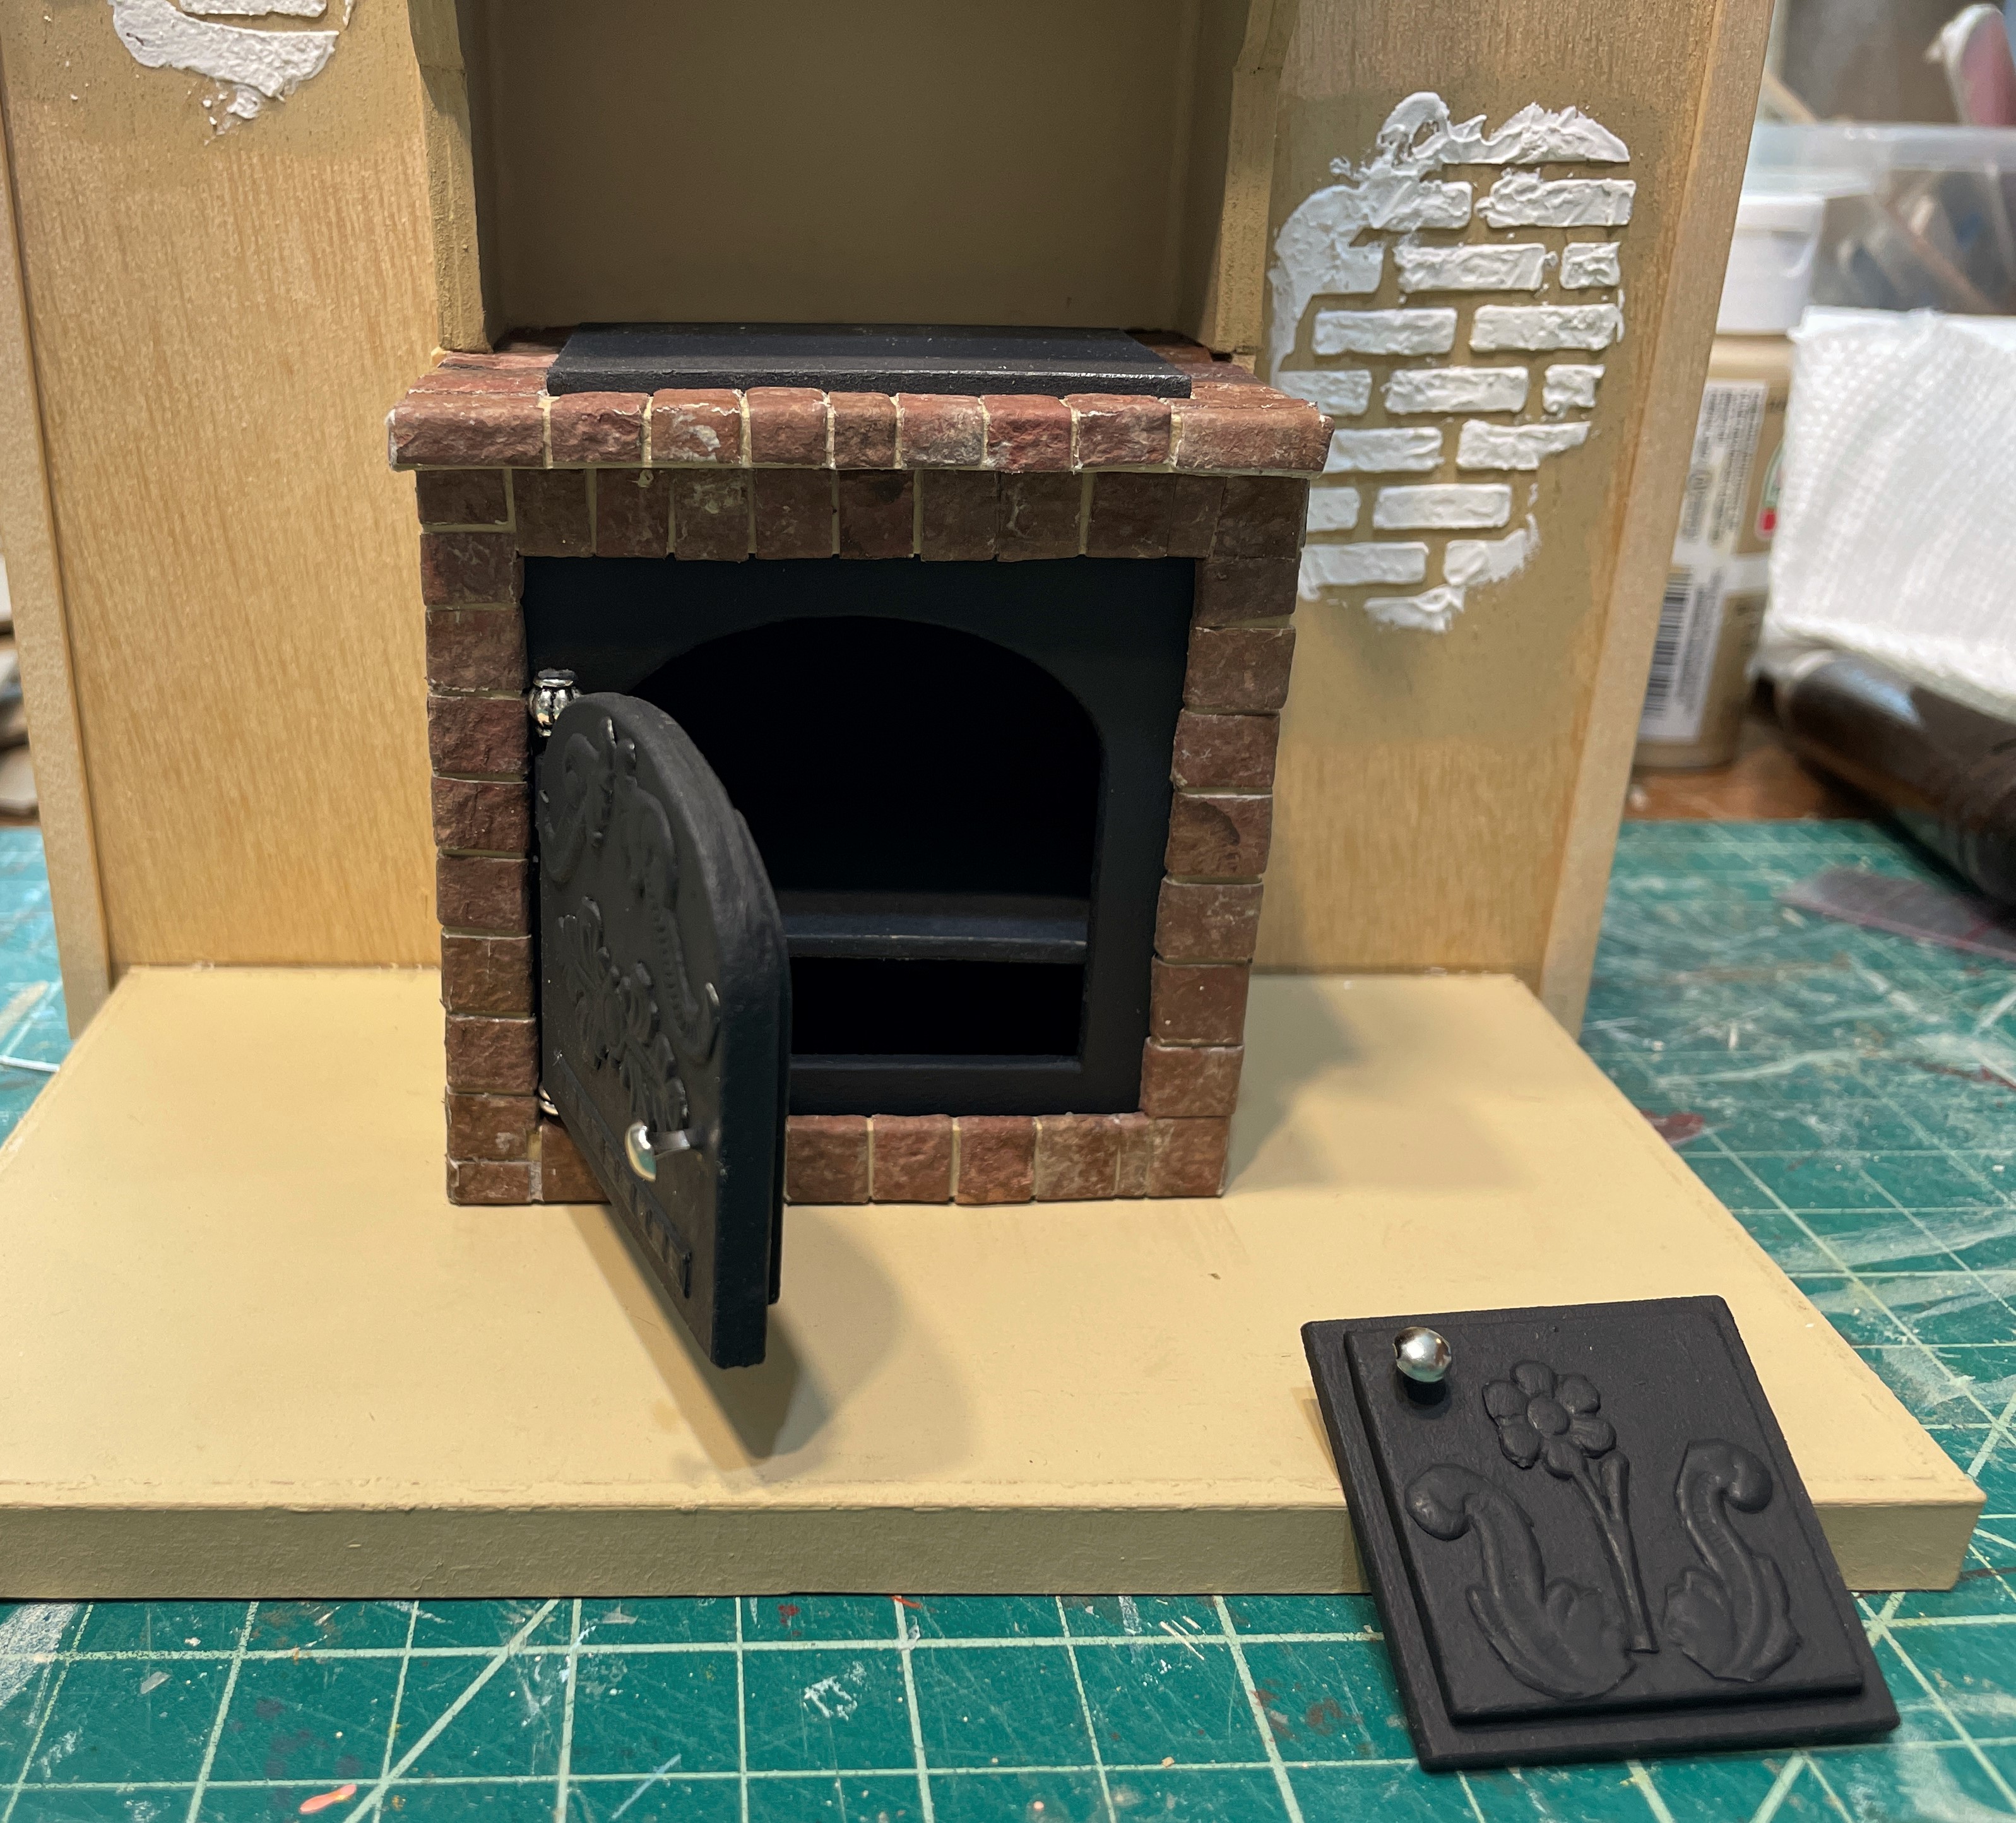 |
| Testing the function - it works! The little door will attach to the side of the oven in order to feed logs into the fire. |
As the finicky glued parts of the oven door were setting, I starting painting the individual bricks and rocks. The look I am after is muted and ethereal, achieved by many whitewashes, but the initial colors are bold. You might notice that I have added 1/4" x 1/4" timbers and brace pieces to the walls to lend to the Tudor illusion.
 |
| Colors taken from the color chart for this project. |
 |
| Wow! Saturday morning cartoon colors! |
 |
| Muted after a bit of whitewashing. |
Time to apply the paperclay stucco! I like my results with the stove wall much more than I do the bedroom and kitchen walls. Practice really does make perfect (or close enough)!

Now it was time to stone the base. I brushed wood glue onto a small area at a time, then rolled up random sized Paperclay balls to squish onto the floor. I found that if the Paperclay cracked while I was forming it around the edge, a little water, rubbed on by my finger, repaired the crack. My stones were a bit thick, so it took overnight for them to dry.
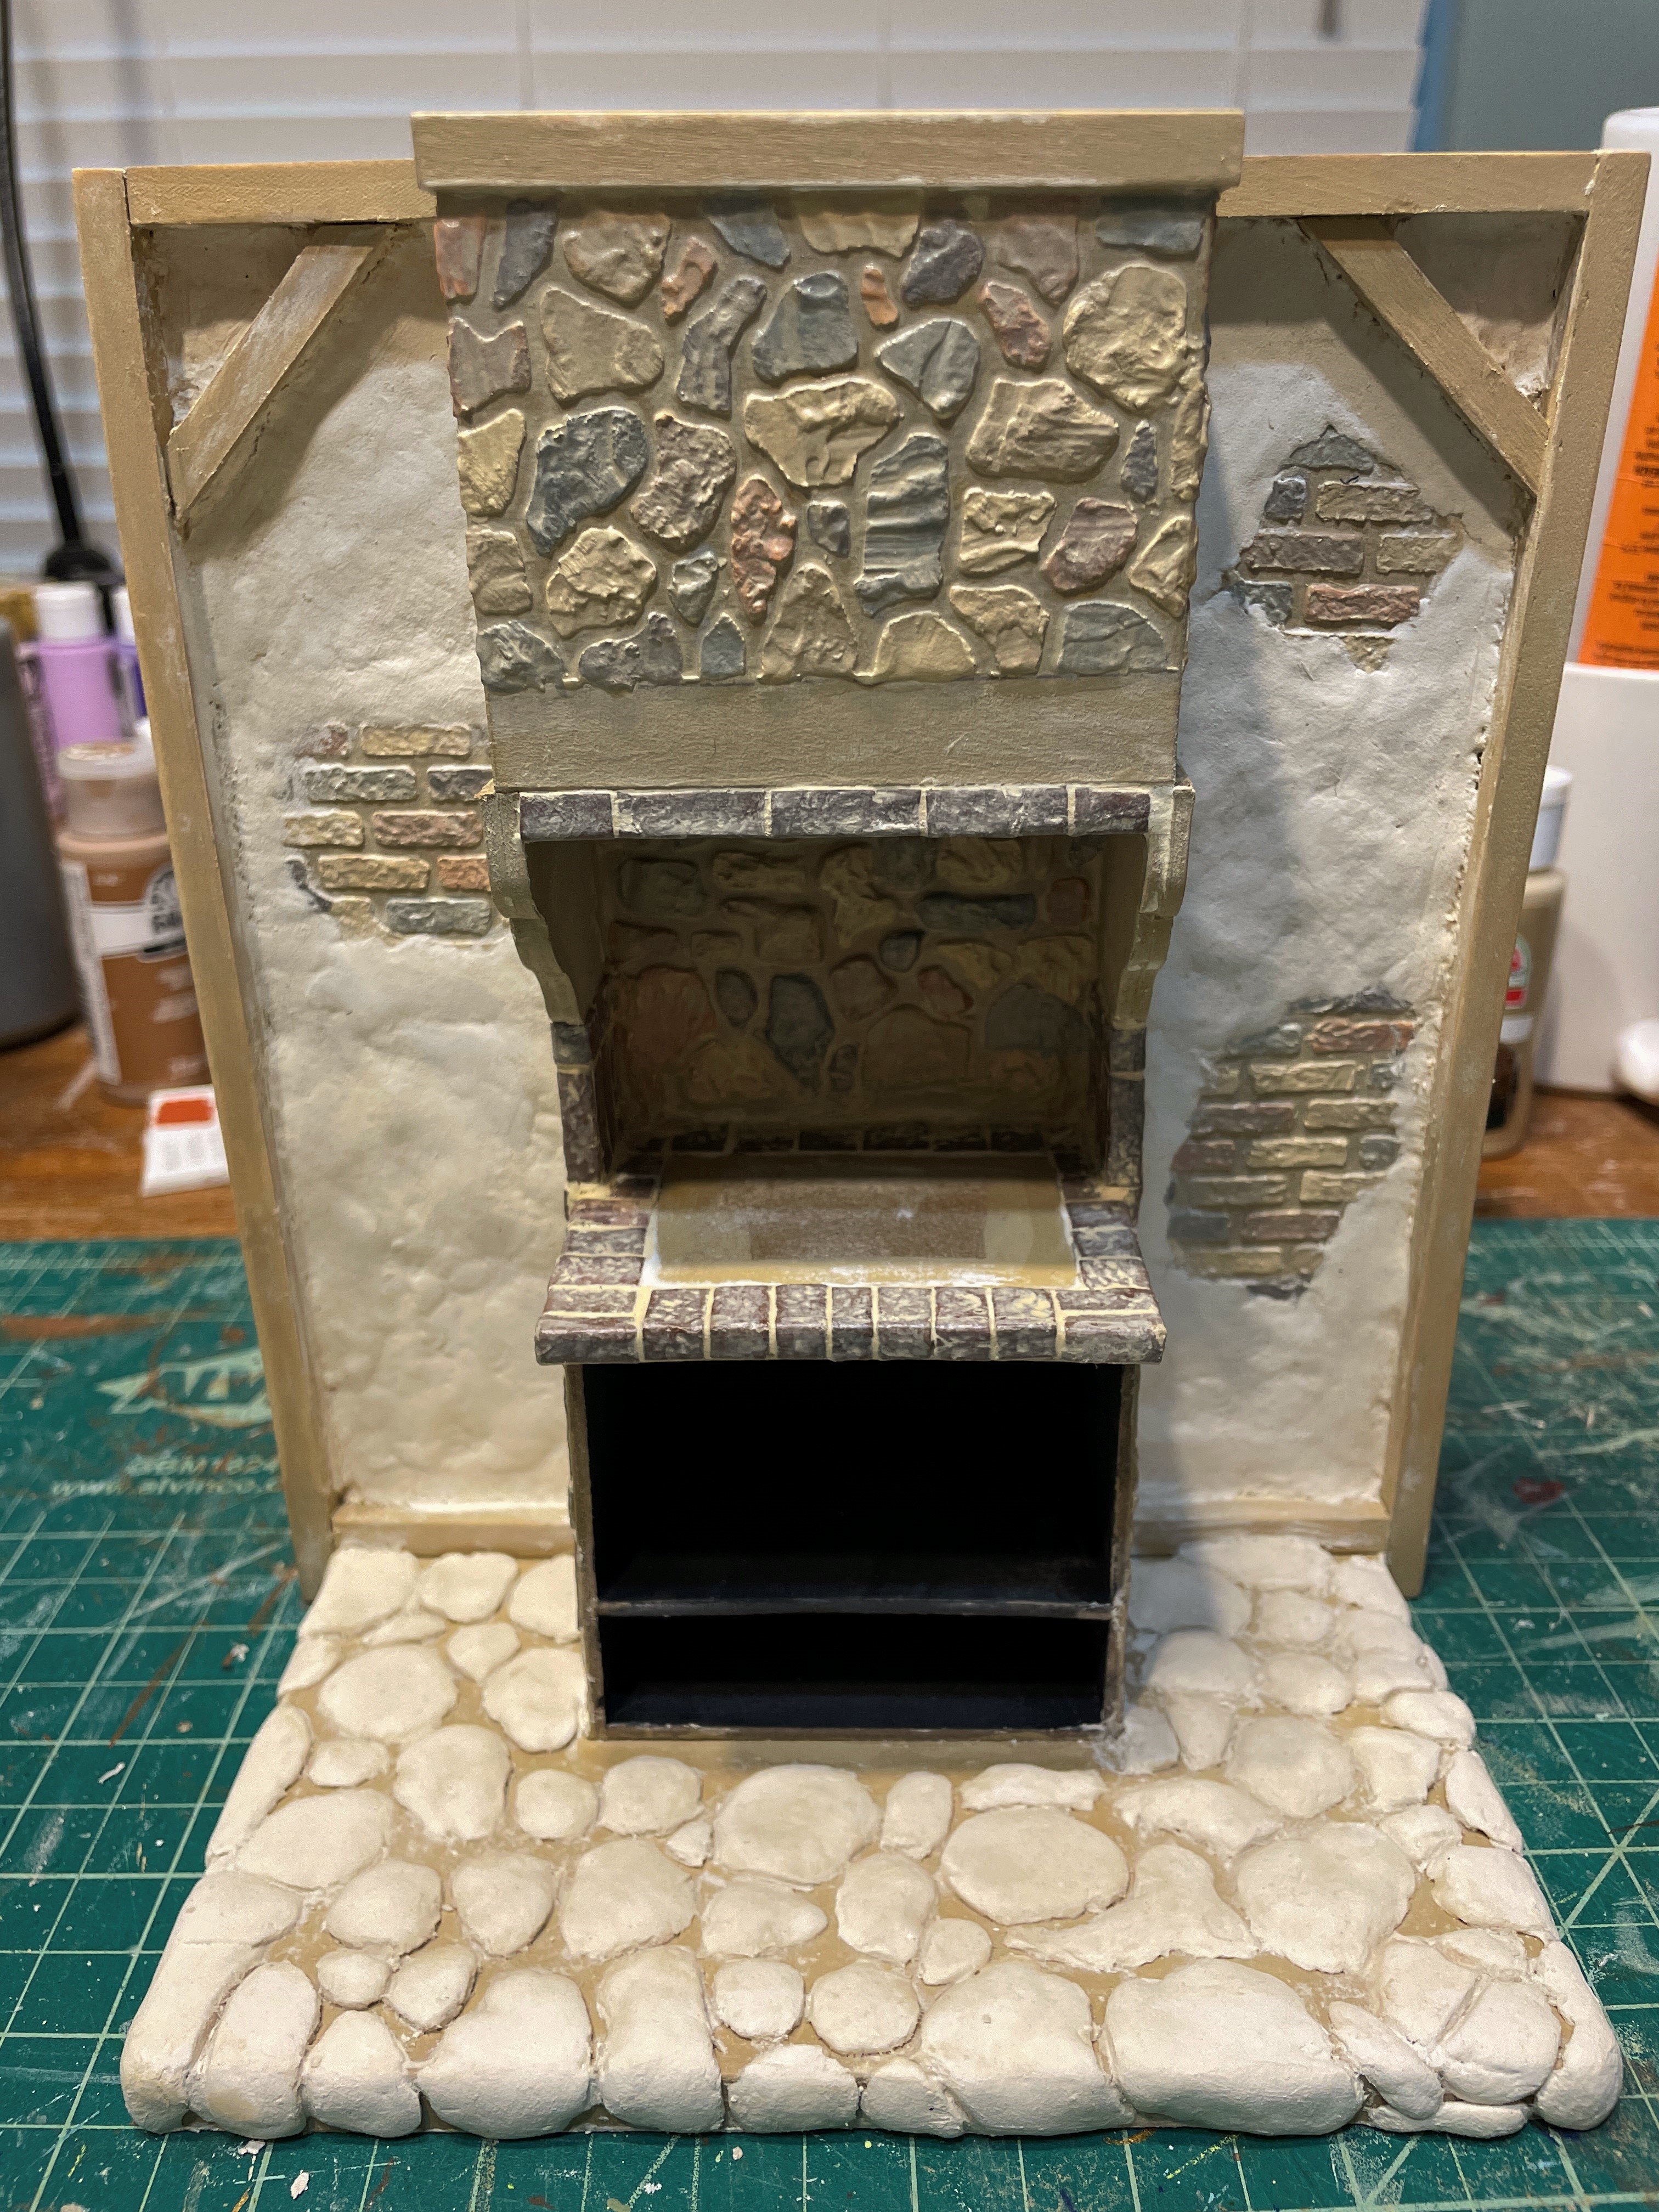
The next morning, I was able to sand the stones to flatten them a bit (more even surface to stand on while cooking) and then paint my individual stones. When they dried, I sealed them with Mod Podge in preparation for the grouting process.

I used my fingers to apply joint compound into the cracks. Because the cracks were so deep, I did a second application once the first had dried. I found it was much easier to remove the joint compound from the stones without damaging them than it is to remove spackle. There must be some added stabilizer in spackle that makes it harder to remove. From now on, I will only use joint compound for grout of all kinds.
You might have noticed that I also added a mantle/shelf thing using cove molding and 1/16" x 1/2" basswood. I can't resist an opportunity to add a surface for displaying minis later on!
 |
| Shelf and joint compound finished. |
 |
| Left profile. |
Time to add years of use to the floor! Hey, I know it's a new treehouse, but patina is charming! I made a slurry of wash with brown, gray and khaki acrylic paint and an abundance of water. I applied about three coats and dabbed up any "overdos" with a paper towel. In between coats, I also aged the stucco and brick around the edges with a khaki wash.

 |
| My LED workroom lights are glaring, but the end photos with ambiance lighting gives the romantic fairytale look I am seeking! |
Finally, it was time to figure out how to make a fire to heat the oven. I have been falling asleep with the intention of coming up with something realistic looking for days. Luckily, my first set of ideas worked like I'd hoped. I love the results!
I made a LED Log Fire With Glowing Embers tutorial and listed it on the Tutorials jump-off page, too.


At last, I could install the oven door and see the completed vision!


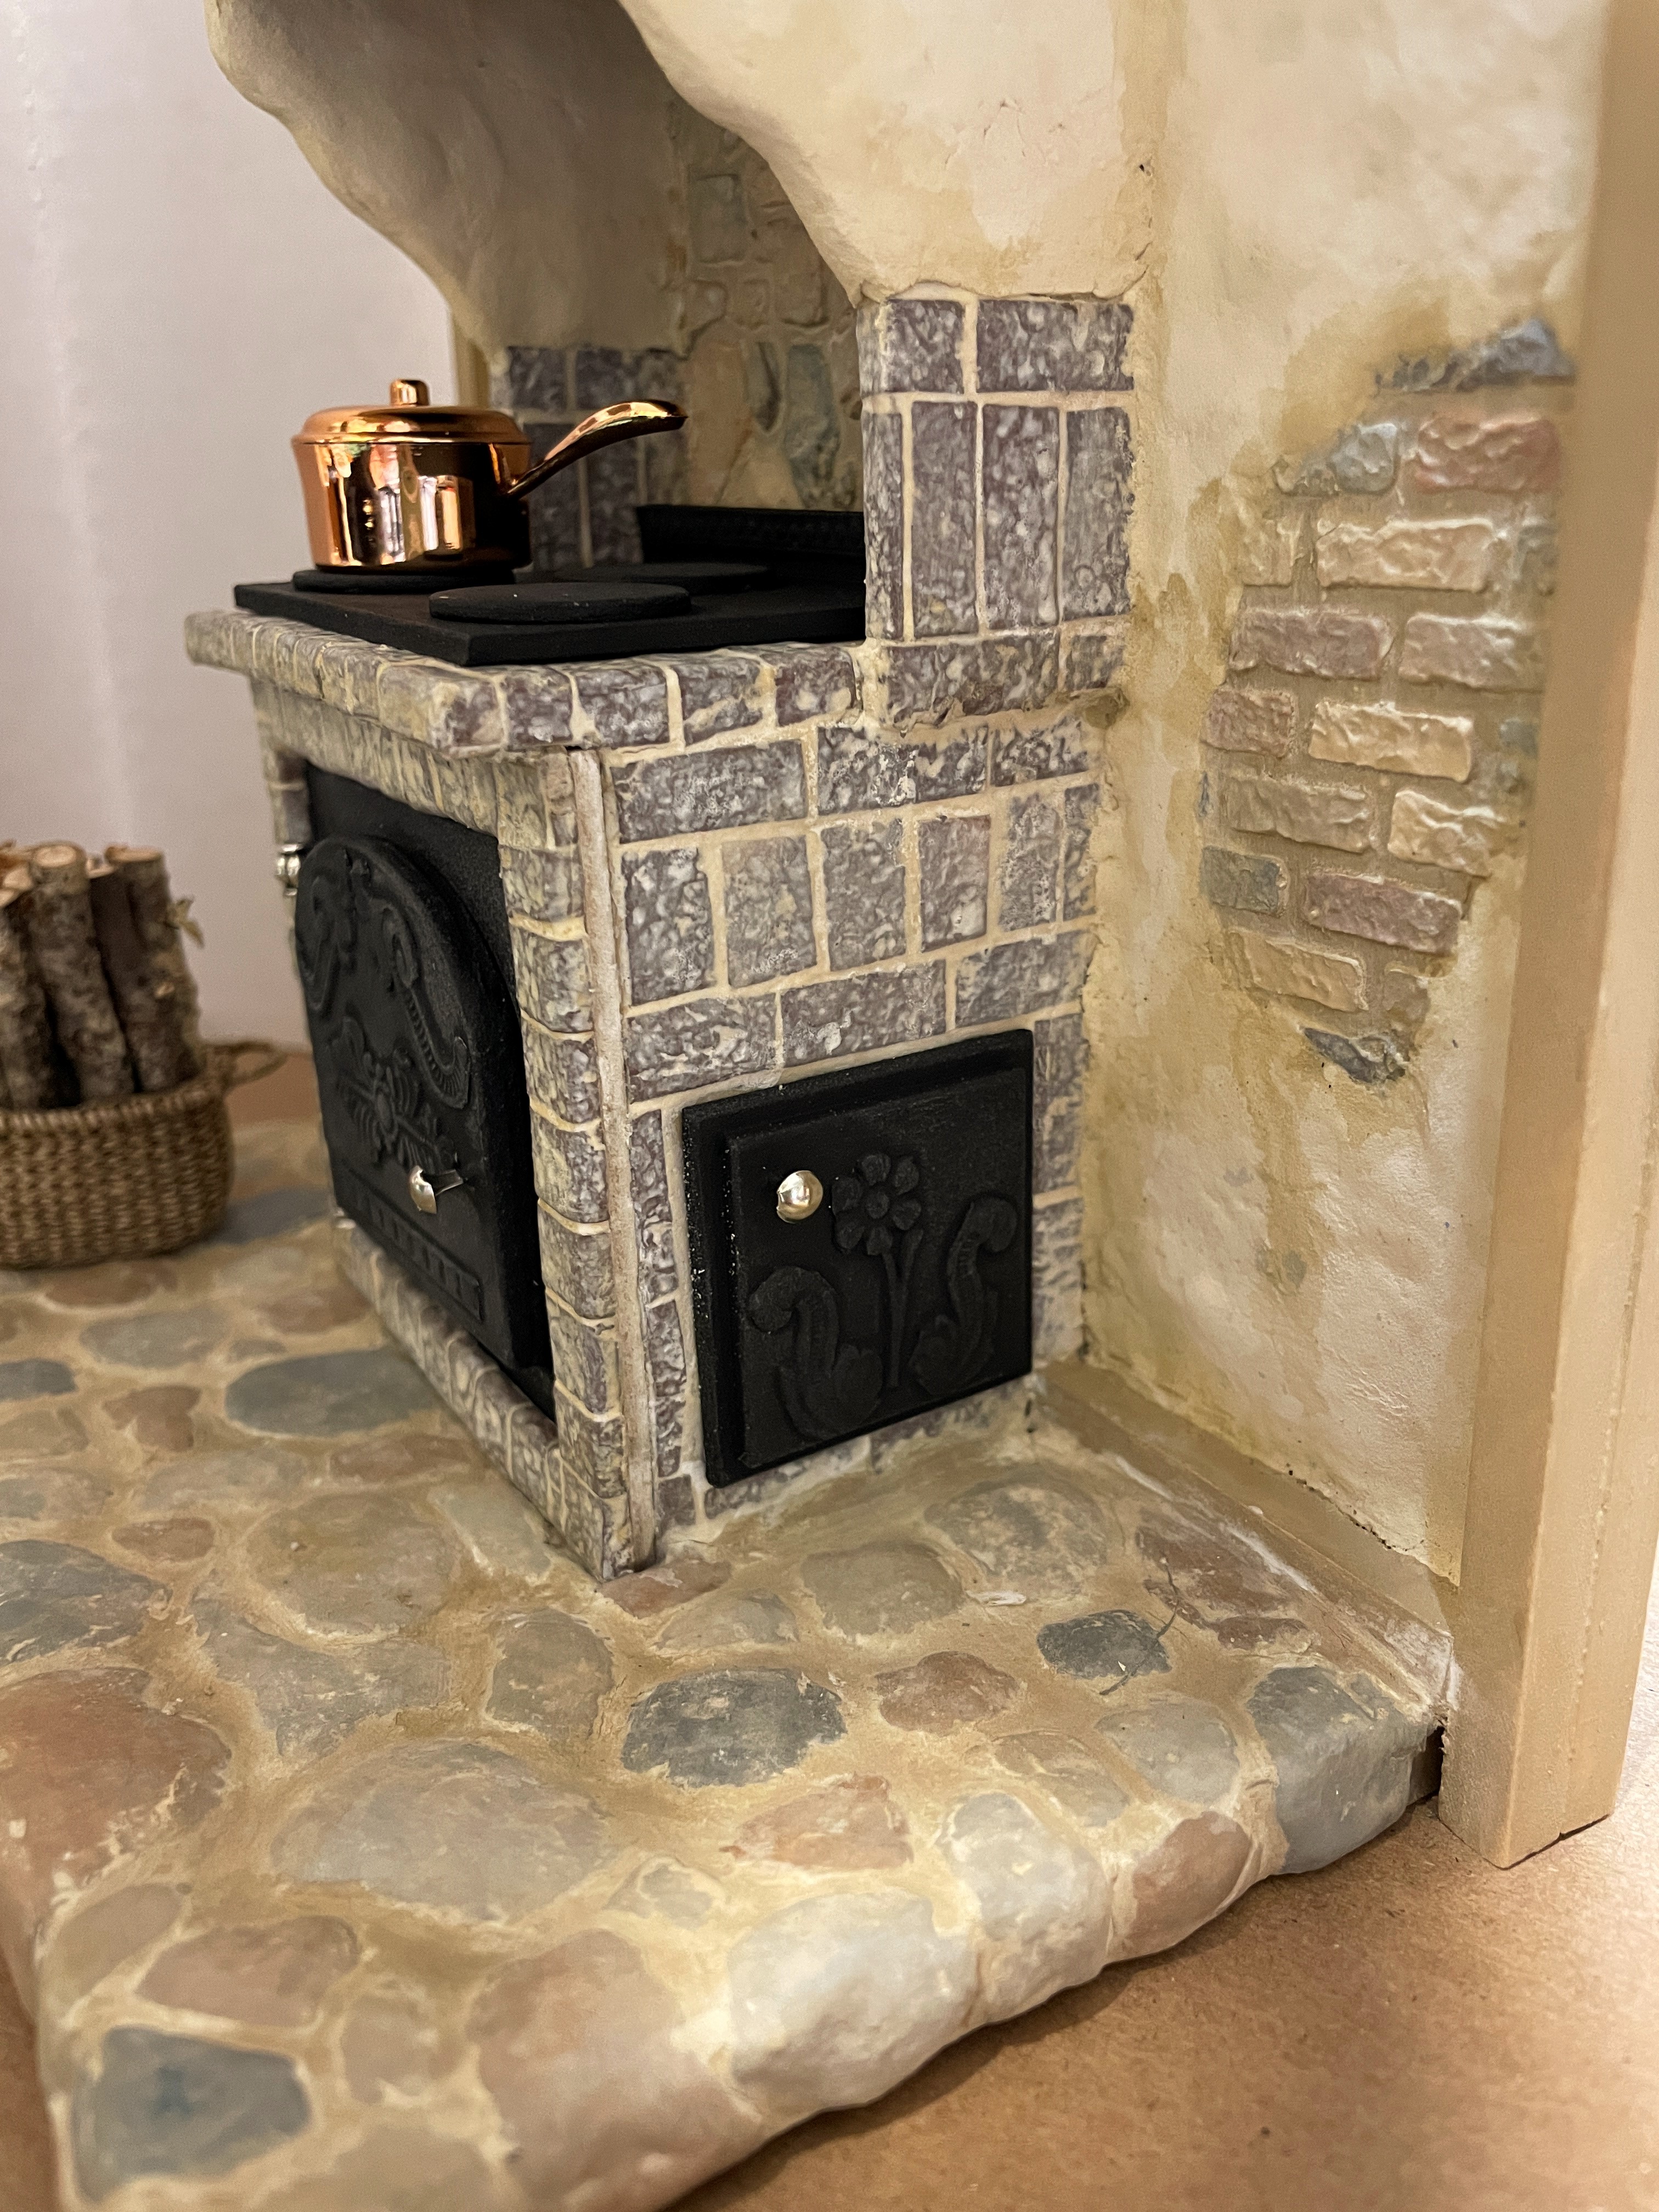

I am so amazed that the oven wall came out so close to how I had envisioned it in my mind, and that it evokes exactly the vibe I am trying to create for this project! Goldie is thrilled to be able to start on her cookbook dream, and I am reminded that it is always best to let inspiration lead you when it comes to miniatures.
Follow your impulses, my friends. You may just discover your untapped creativity!
xo xo,
Jodi
Looks really right, I especially admired the door. Great job!
ReplyDeleteThanks Mummu! It was challenging but really fun to work out!
DeleteUna estructura magnifica. Se ve genial.
ReplyDeleteUn saludo
¡Gracias Mariana!
DeleteGreat job on the textures! The colors and the various masonry types play really well together.
ReplyDeleteThanks Sherrill! It was fun to use all these options together!
DeleteTruly beautiful, what a beauty of a kitchen corner.
ReplyDeleteHow beautiful you made the stones and the oven fire, amazing.
Thanks Gonda! I am so glad you like how the oven and wall area turned out, too!
DeletePrecioso tu rincón de la cocina, y la realización es fantástica. Ha sido genial seguir tus impulsos.
ReplyDelete¡Gracias Rosa María! No es frecuente para mí que mi intento se acerque tanto a la idea. Me encanta tener una visión por la cual trabajar, y cuando me encantan los resultados, ¡es aún mejor!
DeleteLooks great Jodi, I’ve been missing your posts. Looking forward to seeing the progress.
ReplyDeleteThanks Wanda! It is so great to be back to the creative process! I am lost and board when my table is clean, lol!
DeleteDear Jodi, "Impulsive" is only a bad thing when other people think you are moving too fast because they can't keep up! :) I think your "impulses" are your Dreams steering you to exactly what you want! :):):) And they are coming through beautifully! The hearth is truly a Fairytale vision in 3D!! Your methods for the hinges are inspired (even better than impulsive!) and they look fantastic! I will need to take a few notes here! I like the "beads" you chose for the top and bottom of the hinge, they look like the real metal items they are supposed to be! And your log fire is awesome! Wow! Have you ever made progress! And I know exactly what you mean about following the inspiration.... it is the only way to go in my humble opinion! :):) Keep up the fantastic work... even if it is jumping all over the place! Lol!
ReplyDeleteDear Jodi,
ReplyDeleteWow! That first picture was so realistic I thought it was a real-life oven and was your inspiration picture, :D!
I've never thought of making a toothpick hinge - that's a great idea! Your oven turned out amazing!!! I'm sure Goldie and Alice are thrilled!
Julia
Ha ha! Thanks Julia! My son-in-law said the same thing when my daughter showed him the picture! What a nice complement!
DeleteI looked at photos online to see how real iron woodstove doors were made and a lot of them had these type of hinges. I thought it would be more likely to work out gluing paper to paper, rather than trying to use metal tubing. It works like a charm, though if it were something kids were going to play with I'd probably make the components on the 3D printer.
I'm so glad you like the oven and hope you can adopt some of the ideas to help you in your project!
Que espacio tan maravilloso has creado, sin duda tienes que seguir inmediatamente esos impulsos que tienes porque a la vista está que son muy acertados. Me encanta!!!
ReplyDeleteGracias Matxalen! Muchas veces lucho por idear un plan y una dirección a seguir, así que cuando algo se presenta tan claramente en mi mente, ¡he aprendido a saltar hacia él! No siempre tengo tanto éxito en lograr mi visión, así que cuando sale exactamente como tenía en mente, ¡me siento tan bendecida!
DeleteSuch a complete and detailed tutorial. I especially like the learning the products that you use and the links that you provide for more information. I looked at the fireplace tutorial, and I like using the bottle cap because does it not only protect the lights, it also helps to defuse the light. Well done. One question: does the fire have an on/off switch? How do you control it? The entire wall is so perfect.
ReplyDeleteThanks Ann! I am so glad you found useful things in the tutorial! I know we all struggle to find the products, methods and processes to make things that come out realistic, so when something does work, it is great to share with our fellow miniaturists!
DeleteAs far as on/off, in my case the embers will be connected to the rest of the lighting system. It is unlikely that I will go to the trouble of having anything be controlled separately. But you definitely could set it up that way as there are switches and even circuit boards available now to make that happen. Brent, my son-in-law, is an electrical engineer and is always fascinated by my dollhouse lighting. He and I have talked about working on a project together one day where he will teach me how to program my lights with a raspberry pie, a single board computer. I can't wait to learn!
Jodi, dejarse llevar por los impulsos en cuestión de minis, normalmente es un acierto! Y en tu caso además ha sido un impulso perfecto!
ReplyDeleteMe encanta como ha quedado esa cocina con el horno de leña, es absolutamente fabulosa!! La pared, el suelo, las puertas imitando al hierro...todo es fantástico y funciona genial en su conjunto!
Gracias por todas las explicaciones!
Besos.
¡Muchas gracias Pilar! Me alegro que te encante como quedo porque te considero la Reina de la Textura!!! ¡Y no hay lugar más feliz que trabajar mientras estás inspirado! ¡Estoy muy agradecida por ese sentimiento y espero poder experimentarlo muchas, muchas veces más en mi vida!
DeleteOh my, Jodi - I just have no words!!! Well - maybe just a few, like: incredible! stupendous! inspiring! masterful! ingenious! super-creative! super-talented! ...okay, I actually have lots of words that, when taken all together are summed up by - - AMAZING!! - Marilyn D.
ReplyDeleteThanks Marilyn! Things like this oven and this whole project, so far, are the most fun in the world to me! I just can't express enough how blessed I feel to be able to work at something I love and to share it with other creatives like you who totally get it! Your encouragement gives me wings! 💗
DeleteHello Jodi,
ReplyDeleteAs always, you never cease to amaze me with your fantastic, creative ideas.
Your impulsive work resulted in one of the most beautiful kitchen ranges. I love the door. Thank you once more for sharing the details.
Hugs, Drora
Hi Drora! Thank you so much for your kind encouragement! I am so glad you like the oven! I had so much fun trying to figure it all out! Hugs!
DeleteIt looks great Jodi, and some interesting hints and tips in your post. Good to know about the joint compound as grout!
ReplyDeleteThanks Shannon! It was so nice to have the joint compound come away from the stones and bricks so easily! I hope you'll experience the same ease when you get the chance to try it!
DeleteIt looks really great, so realistic, as always! I love the oven door - it's so beautiful (never mind the potential dead skin cells ;-).
ReplyDeleteThanks Millimari! I'm happy that you like the oven and the door! Hopefully you get the opportunity to enjoy making one yourself! Who knew exfoliating on your minis would offer dual benefits? 😜
DeleteReally nice wall and oven. I'm in the stone, grout and hinge part of my project too so your instructions are very helpful. I also have this house kit in line to do. Great minds think alike eh? Lol
ReplyDeleteThanks! It's awesome that we're riding the same creative wavelength and I'm so glad that you found something here to help your ideas gel! The first thing I did to go off the reservation with this kit was to reduce the height of the foundation. Every single component instruction for the walls is based off the foundation being a certain height, so I made a LOT of math for myself, lol! But it's a super cute kit and I bet you'll really enjoy yours when it's number comes up!
DeleteHi Jodi, you have followed your impulses and inspiration, put them to work and it has paid off. I really like your oven, it looks so real. I love all the textures you have added and as a lover of this type of materials and effects I have paid close attention and learnt a lot! I was also amazed by the way you attached the door, so clever. I´ll keep it in mind, it´s genius! I can see that this has been a fun project where you were able to display a lot of creativity and craftiness with marvelous results. I understand why you are pleased, it´s perfect!
ReplyDeleteHi Alex! It is nice to see you here and I appreciate your kind encouragement. I am so happy to know that you found useful things in my post and I hope they will be of help in future mini sessions for you. It is so fulfilling when our experimentation comes out just like we'd hoped!
Delete¡Ha quedado fantástico! La variedad de elementos y de texturas crean un conjunto perfecto. Las puertas de horno han quedado también estupendas y el fuego es la guinda del pastel.
ReplyDelete¡Gracias Isabel! ¡Parece no haber fin a las diversas y alegres oportunidades que ofrece nuestro amado pasatiempo! ¡Realmente estoy disfrutando de esta arquitectura de cuento de hadas!
DeleteOh, what a wonderful post! ;O) And once more I was not able to enjoy its content to the fullest, but also to learn something new... Seems that "impulsive" means the same as "ingenious"... or "impressive". *LOL* And I also learnt that paint can be "Dulled by dead skin cells, maybe?"... although I'm not that sure about this discovery... *tweet*
ReplyDeleteBut without any more joking... this oven turned out absolutely stunning!!! Goldie must be over the moon with such a beautiful space for testing the recipes for "1001 ways to make bearies happy with porridge" book (although one certain beary around here says it should be "strawberries" instead of "porridge"... but you know how it goes with bearsonal tastes... eh... where was I...) The way you've created all those different structures, bringing them to life with paint and aging is amazing... and the fireplace itself with the oven door and the special solution for the hinges (btw - why am I not surprised that Betsy needed to take notes?!) and the log fire... it was so much fun to follow your progress.
Hugs
Birgit
Thanks Birgit! I am so happy that you enjoyed the post and to have helped you discover a few new things! Who knew dead skin cells could actually do more than create dust?!? 😜
DeleteGoldie is so excited to get started testing recipes and appreciates the reminder from Flubby that strawberries would indeed make an excellent companion to porridge, though unlike certain flutterberries, little girls cannot live on strawberries alone! 😜
Speaking of Fairy Bearies... You and I need to chat about these girls needing a Fairy Beary God Mother. She'd be required to grant occasional wishes, keep them out of trouble and enjoy forest dwelling inside the moist environment of a tree trunk apartment. Have you any ideas??? 😜
This oven is amazing. You had a big impulse.
ReplyDeleteThanks Faby! I love it when an strong impulse and an inspired idea carries you away!
Delete