
Just last week I had no idea what I was going to cook up with this kitchen. But once I got out the Grand Hotel paper pack to assign the patterns and colors to each of the remaining rooms in the Willowcrest, my design choices for the kitchen came cascading into my mind. I liked them so much, I began to salivate! This is definitely not the paper I ever thought I'd be using in the kitchen, but sometimes, it's fun to fix something new!

Before I could really get going on anything, I needed to finalize my cabinet and appliance layout. Those would dictate every other thing I did in this compact room. I got out the ruler and graph paper to measure exactly how many inches I had to work with, then took them over to Design Space to design the cabinets. In cooking, it's what you call mise en plase. And I really like it when me is in place! I seem to be making a habit of using chipboard cabinetry in my kitchens, but I enjoy making them so much! Maybe one day, I will have a laser cutter and then I can switch to wood. :O)
 |
| It takes a lot of pieces even for a small kitchen! |
The appliances were an easy choice - I had them leftover from when I did the Storybook Cottage's kitchen. They weren't the right ingredients for that project, so I put them on ice. They seem to have been meant for the Willowcrest! Both Russ and I liked the apricot color, and I thought for a moment about going with a peach themed kitchen. But the pretty rose vine wallpaper convinced me to repaint the appliances.
 |
| Once the plain lower boxes proved a good fit, the upper cabinets could proceed. I used every bit of available wall space. |
The wallpaper provided me with all the accent colors, and the appliances provided me with the era. Now we were cooking! With those ingredients sorted, our recipe was developing. It turns out that our second empire home will be stuck for all time in the early 1940's. Our brave homeowner finds herself unexpectedly alone and needing to find ways to be self reliant. When your man is away fighting evil in the war, you gotta do what you gotta do to keep the home fires burning. Our lovely home will become somewhat of a boarding house, with the entire attic space "to let".
 |
| The accent colors came from the wallpaper using the closest acrylic paints I had on hand. |
In this concoction, the kitchen has been recently updated. It has the feel of both 30's and 40's kitchens with design elements such as raised panel cabinets and a "porcelain enameled" sink. Luckily, in the 21st century, we can rustle up tiny "porcelain enameled" sinks with our 3D printers!
The cabinet hardware, cabinet feet and the appliances are painted Barn Red to match the darkest rose buds in the wallpaper. I can almost hear the music from that era playing on the kitchen radio, and almost smell the home cookin'.
 |
| The cabinets have their doors, pulls and feet installed. |
 |
| For now, the upper cabinet rests on top of the stove rack. It'll be hung up higher on the wall. |
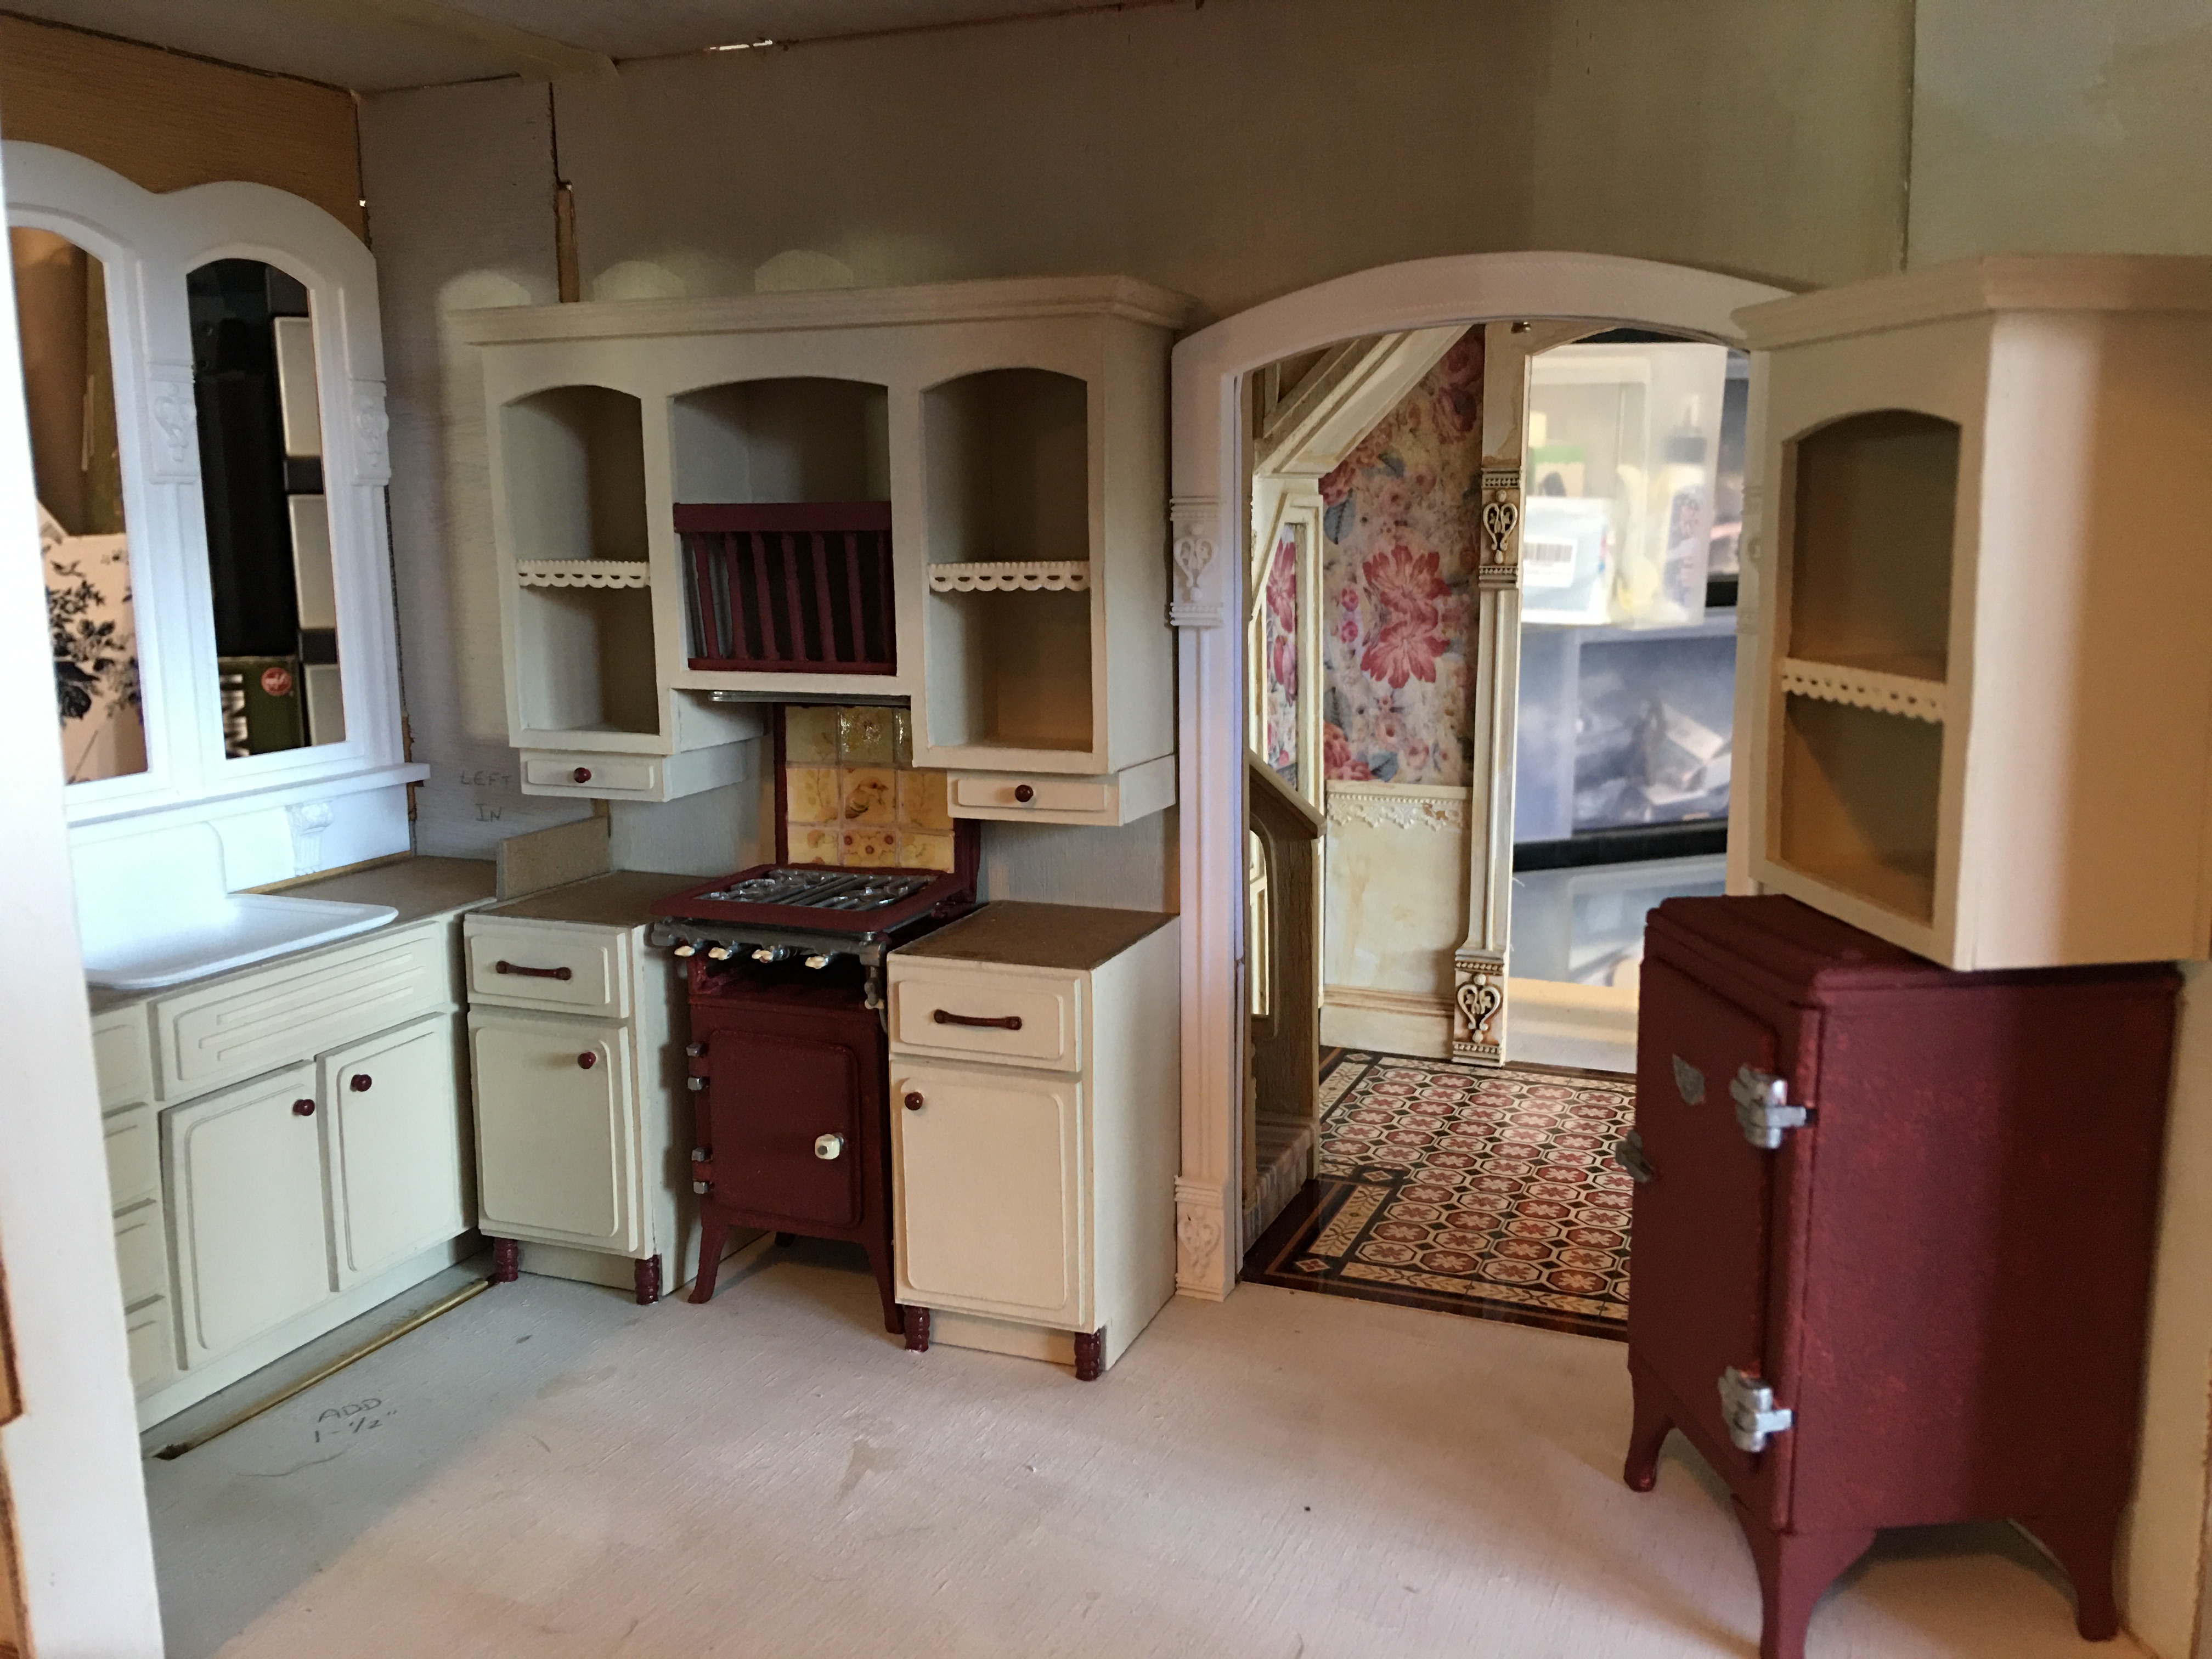
 |
| Once I added the above fridge cabinet to the recipe, it made the fridge seem perfectly at home between the two doorways. Kitchens from this era were not as "fit out" as they are today. |
 |
| Once you add details like crown molding, lace shelf edging, painted handles and feet, the chipboard cabinets really come alive! |
The sink really has the right flavor profile for this kitchen. Here's a look after lots of sanding and glossy finish applied. If you were really determined, you could spend a long time sanding to make PLA look like real porcelain. The holes have been drilled for the taps and faucet, but the drain is part of the 3D printing process.


To make the faucet, I used a screw-base cup holder in "brass" as the spout, then a "brass" earring back as the aerator/nozzle. Gem Tac works great for gluing these tiny metal parts. It's a strong hold, plus you can clean it up after it has dried because it is like rubber cement (but with no odor). Sometimes your junk drawers have just the right ingredients.


This photo is taken with everything in dry fit to make sure it all works together. Each piece is just set in and on, so you have to ignore the crooked and just notice the "feel". It's only a taste test.
 |
| Countertops and backsplash are just set on for now. Sink is not fully seated into it's holes in the counter or countertop. |


For 1940's era countertops, I had my choice of tile, marble or Formica. I used illustration art board as the base, then made various shades of Moss Green to create a look that can be either marble or Formica. Just a dash of this and a dash of that and viola! Soup! I gave it metal edging in a color that matches the faucets, because 40's kitchens craved their metal edging.

It was imperative to have all of the cabinets in place so that I could make an accurate template for the tile floor. I painted more illustration art board in green and beige, then cut 3/4" square tiles. I am laying them on the diagonal, alternating colors in the field. For the border, I will use Barn Red tiles in some way.

This project just gets BETTER AND BETTER!
ReplyDeleteI'm already IN LOVE with your vintage kitchen appliances and the color you've re-painted them is PERFECT!
The cupboard fittings and especially THE SINK leave me Speechless!
Honestly Jodi, there aren't enough adjectives I can think of that can express my sincere Admiration for the QUALITY and the INGENUITY you produce for each of your mini projects- this kitchen is going to be A STUNNER and all I can think to say is WOW!
Thanks Elizabeth! Your enthusiastic encouragement mean the world to me! I am so happy that you like the kitchen and its ingredients!
DeleteGood progress Jodi! I love the idea of the house being set in the 1940s. It allows for all the grandeur of the house’s construction era with the freedom to add any accessories or furniture right up to the early 1950s if you wanted (or later). I hope the floor was a breeze and look forward to seeing it.
ReplyDeleteThanks Shannon! I love the idea of living in a grand house but in a way less formal time. And in the United States, as a country, we were never more united together than the time during WWII. Supporting and relying on one another is what made us great for a time, and I surely wish, absent a war, we could fine a way back to that state of being again.
DeleteI love the palette you've chosen for this kitchen, Jodi. I have a heavy metal white monitor-top fridge in my stash along with a large heavy sink with drain board incorporated. I would like to do a 30s or 40s kitchen room box at some point - I'm never ready to tackle a whole dollhouse! Were your appliances metal and, if so, did you use a special paint on them or just ordinary craft paint? I'm thinking of doing mine in a pastel pink when the time comes. *smile* - Marilyn D.
ReplyDeleteA room box of that era would be just awesome, Marilyn! Especially with your genius ideas! I, for one, would be enthusiastically hooked to follow! I get the hesitation of doing an entire house!!!
DeleteThe appliances are pot metal kits made by Phoenix Models. These were my first attempt at them when I was working on the Storybook Cottage. I apparently got a bad can of spray paint because it came out with the orange peel finish (which I didn't mind), and it was the wrong color. The replacement pair were done in pink (spray paint) and I adore them! A girl is lucky indeed if she gets pink appliances! I did paint these over with craft acrylic (3-4 coats because of the red) with no issues. I brushed on the satin varnish, as well.
Aside from your absolutely amazing workmanship, the authenticity of your work for the period is perfect. I was born in '46, so it gives me a glimpse. I loved the appliances in the Storybook, and in this house they are perfect, too. It's great to give them a second chance. I've always used wood for my cabinets, but your chipboard work is so clean and perfect. I love watching you create. I think that paperbacks are the way to go for wallpaper, too. I've relied on scrapbook paper and downloaded printed paper for the Manchester, and finding the right papers individually has been a challenge, but using a paper pack a coordinated selection, solves some problems. Bravo.
ReplyDeleteThanks Ann! I'm so glad you like the kitchen's direction! The 40's were a magical time to be American, in spite of the war. You were lucky to have been a kid in the 50's!
DeleteAs a kid in the 70's, I was pretty sloppy and constantly getting yelled at to take better care of my toys. So everyone in the family is shocked that I came out so "type A", lol! I just love the process of making minis so much that I become hyper focused on whatever it is I'm doing. Maybe it's ADD or some other such diagnosable "affliction", but I use it to my advantage, lol! :O)
Paper packs really do help you pick the theme and color scheme for a project, and just looking at all the beautiful choices is inspiring! Behind every paper there is an artist who dreamed it up, and now we get to take that dream and make it our own. I just love that!
Una cocina muy bien ambientada. Me encanta como has hecho los grifos.
ReplyDelete¡Gracias Isabel! ¡Es una era tan divertida para trabajar!
DeleteFantástico Jodi, cada elemento que pones encaja a la perfección, el desagüe perfecto y los grifos me encanta como has ensamblado esas piezas cotidianas que tenemos casi todas. Una cocina de ensueño. Te deseo feliz fin de semana, besos
ReplyDelete¡Gracias Rosa María! ¡Me encanta trabajar en cocinas que son de antaño porque parece que agregar encanto es muy fácil! Descubro que cuando escucho mi instinto, ¡nunca me desvía del camino!
DeleteDear Jodi,
ReplyDeleteThese vintage kitchen pieces are fantastic. The little icebox almost made me shed tears. I was married in 1949. Israel's independence war was still on. Electrical appliances were rare and we desperately needed an icebox which was extremely difficult to find. At my parents home they had one. Each morning it was necessary to empty the water from the melting ice which accumulated in a drawer beneath the box. I never thought I'd miss it but when I had to keep one huge block of ice in a barrel, covered with blankets so the ice will cool our food for at least until the ice wagon appears next day, believe me I did.
Thank you for a wonderful post.
Hugs, Drora
Thanks Drora! And thank you so much for sharing this lovely memory from your early married life! We really do take our modern conveniences for granted, but starting life having to "rough it" makes us appreciate all we have now so much more!
DeleteThe times that seemed so hard when we were young really do become more precious to us as we get older. Russ and I started our married life in a bunk house (usually inhabited by farm workers) where daylight could be seen through the paper thin walls. But that was such a time of tremendous love and dreams for our future. I would happily go back and live my life all over again just to feel that love and relive those times. But it was a challenge cooking on a stove where only two burners worked, lol!
It looks amazing so far! I think your homeowner will love cooking in this kitchen.
ReplyDeleteThanks Sheila! Hopefully she loves cooking a lot more than I do, lol! It's going to be fun when the time comes to start making accessories for this era kitchen!
DeleteThe kitchen looks lovely and the strainer for the drain gives a really great final touch to the sink. Love it!
ReplyDeleteThanks Millimari! It's so much fun to see how small yet detailed that 3D printer can get!
DeleteDear Jodi, I just Love the direction you are taking this kitchen!!! Those appliances in the dark red are Stunning! The wallpaper looked at first like an "odd" choice for a kitchen, but then when put in the context of the era, it is spot on! (And anyway, there is not much wall space visible! ) I think your sink is going to be perfect and the window being higher always made sense to me... I have lived in kitchens like this one! They were just discovering the world of "built-in" cabinets for kitchens in this era. I have lived in old houses all my life and most of them did not come with much built in cabinetry! The Oldest one (early 1800's farmhouse) really had none of the original kitchen because it was a large open hearth back then! LOL! The most "Victorian" one had several pantries to house all the parts and services. The early 20th century ones have had varying arrangements of some built in cabinets, but usually "renovations" from the middle of the century. (I love old houses!) I just Love the vibe of the "forties kitchen" in this old Victorian house!!! Keep up the great, fearless, creative genius work! :):):)
ReplyDeleteThanks Betsy! Me too! I am having so much fun getting to explore this entire 150 year span of eras with the Willowcrest! I know what you mean about the wallpaper being odd for the kitchen. When I first looked through the paper pack I had it pegged for the bathroom, lol! But when I allowed myself to think of a time when the paper would have been seen in a kitchen, that 30's-40's era felt like the meant to be thing to do. I'm so happy I didn't immediately "pooh-pooh" the idea! The lack of wall space, especially after I hang the upper cabinets, is a wee bit sad. Maybe I can incorporate the pattern into the upholstery and fabrics for the room, somehow. I'm happy you like the sink/window area!
DeletePart of the charm of an old house for me is to come up with creative ways to make the modern conveniences functional while still leaving the quirky, original charm as it was meant to be. Russ and I rented many an odd, old house and had to make them functional. It was always fun and challenging! I really hope I can find ways to do that in this project!
One of the things I have enjoyed most about this project is diving in and learning about how kitchens have evolved, and the reasons behind those evolutions. I bet living on the east coast allows you to see examples from earlier periods than we have on our historic home tours here on the west coast. Mid to late 1800's homes are getting rarer as they tear them down to build multi-unit housing.
Thanks for your encouragement! Every project is a journey, and I always end up learning just as many things about myself as I do building and history! :O)
Your kitchen recipe is cooking up nicely. It looks delicious.
ReplyDeleteThanks Sherrill! 💗
ReplyDeleteI see dinner's on its way... ;O) Today's post menue is for sure very yummy eye food and I've enjoyed to learn about this special recipe. Incredible that is was this rose paper giving you the direction not only for the kitchen but also the theme, area and story for the whole project. I really like this story... and what you're making out of it. The makeover of the appliances looks great and as always it's amazing what you and your trusted machine park can achieve. Once more it's a miracle how cardboard turns into solid kitchen furniture as soon as everything's in place including the details like knobs and handles. I already love the floor tiles and can't wait to see them in total... and not to forget the stunning sink and how well it fits under the window.
ReplyDeleteAs always - amazing work and big joy to see your next steps. Or in other words: Oh, what a wonderful post! ;O)
Hugs
Birgit
Thanks Birgit! I'm so happy to know you like the kitchen, the elements making it up and the story behind it! That lets me know I'm heading in a good direction! As for the tile floor, it has been the most challenging aspect, so far. But I'm glad to say progress is being made!
Delete