
Last week we began our Willowcrest journey by starting on the first/second floor stairwell. I wanted to make that area more viewer friendly by adding a much larger window using the kit's French Door Window as the model. But how could I replicate the fancy, multi-layer and double arched frames and trim? I'm not a woodworker, but I do have lots of technology at my fingertips, so I decided to see what I could do with it.
 |
| 3D Printed Staircase Interior Window Frame |
After some tinkering, I found that I could scan the frames into my PC, open them in Inkscape, separate the layers then save the best one as an svg file. I imported the svg file into Tinkercad, made adjustments, if necessary, added details and then prepared them for 3D printing. It's a pretty complicated process at first, but once I did a little troubleshooting, I ended up with some amazing replacement kit pieces!
 |
| Scanned French Door frames into my PC |
 |
| Imported into Inkscape and converted into an svg |
 |
| Imported into Tinkercad. There were mysterious "holes" that needed patching up. |
Not only can I combine each of the layers into one frame, to further enhance the kit's components, I can add architectural details created by myself or by others on Thingiverse, Has your mind just exploded like mine did? Oh the possibilities!
The kit has you stack four layers of die cut plywood to achieve the look of fancy molding. Here's what the kit's French Door Window looks like assembled. It's super charming but the plywood needs so much TLC...
 |
| French Door Window exterior frame layers. |
And here is the Small Window's wooden parts, exterior and interior.
 |
| Small Window exterior frame layers. |
 |
| Small Window interior frame. |
Not every piece of plywood in the kit was in great shape. You see, while all the sheets looked to be in good shape at first glance, upon further inspection, while popping out pieces, a couple sheets weren't so good at all. It was as though the top and bottom layers of plywood were nearly petrified and so hard to cut through, even with a sharp Xacto blade. By extreme contrast, the center layers of plywood had disintegrated, leaving a crumbled chasm. This made the pieces very unstable, so tricky to safely remove from the sheets and some had weirdly expanded in thickness. I probably could have restored them with a lot of wood glue, filler, sanding and copious patience, but 3D printing them seems like much more fun. Not only is this method an exciting way to replicate the kit's windows and other trim elements to improve them, it's a way to replace them altogether, when necessary.
 |
| French door frame from sheet 4. |
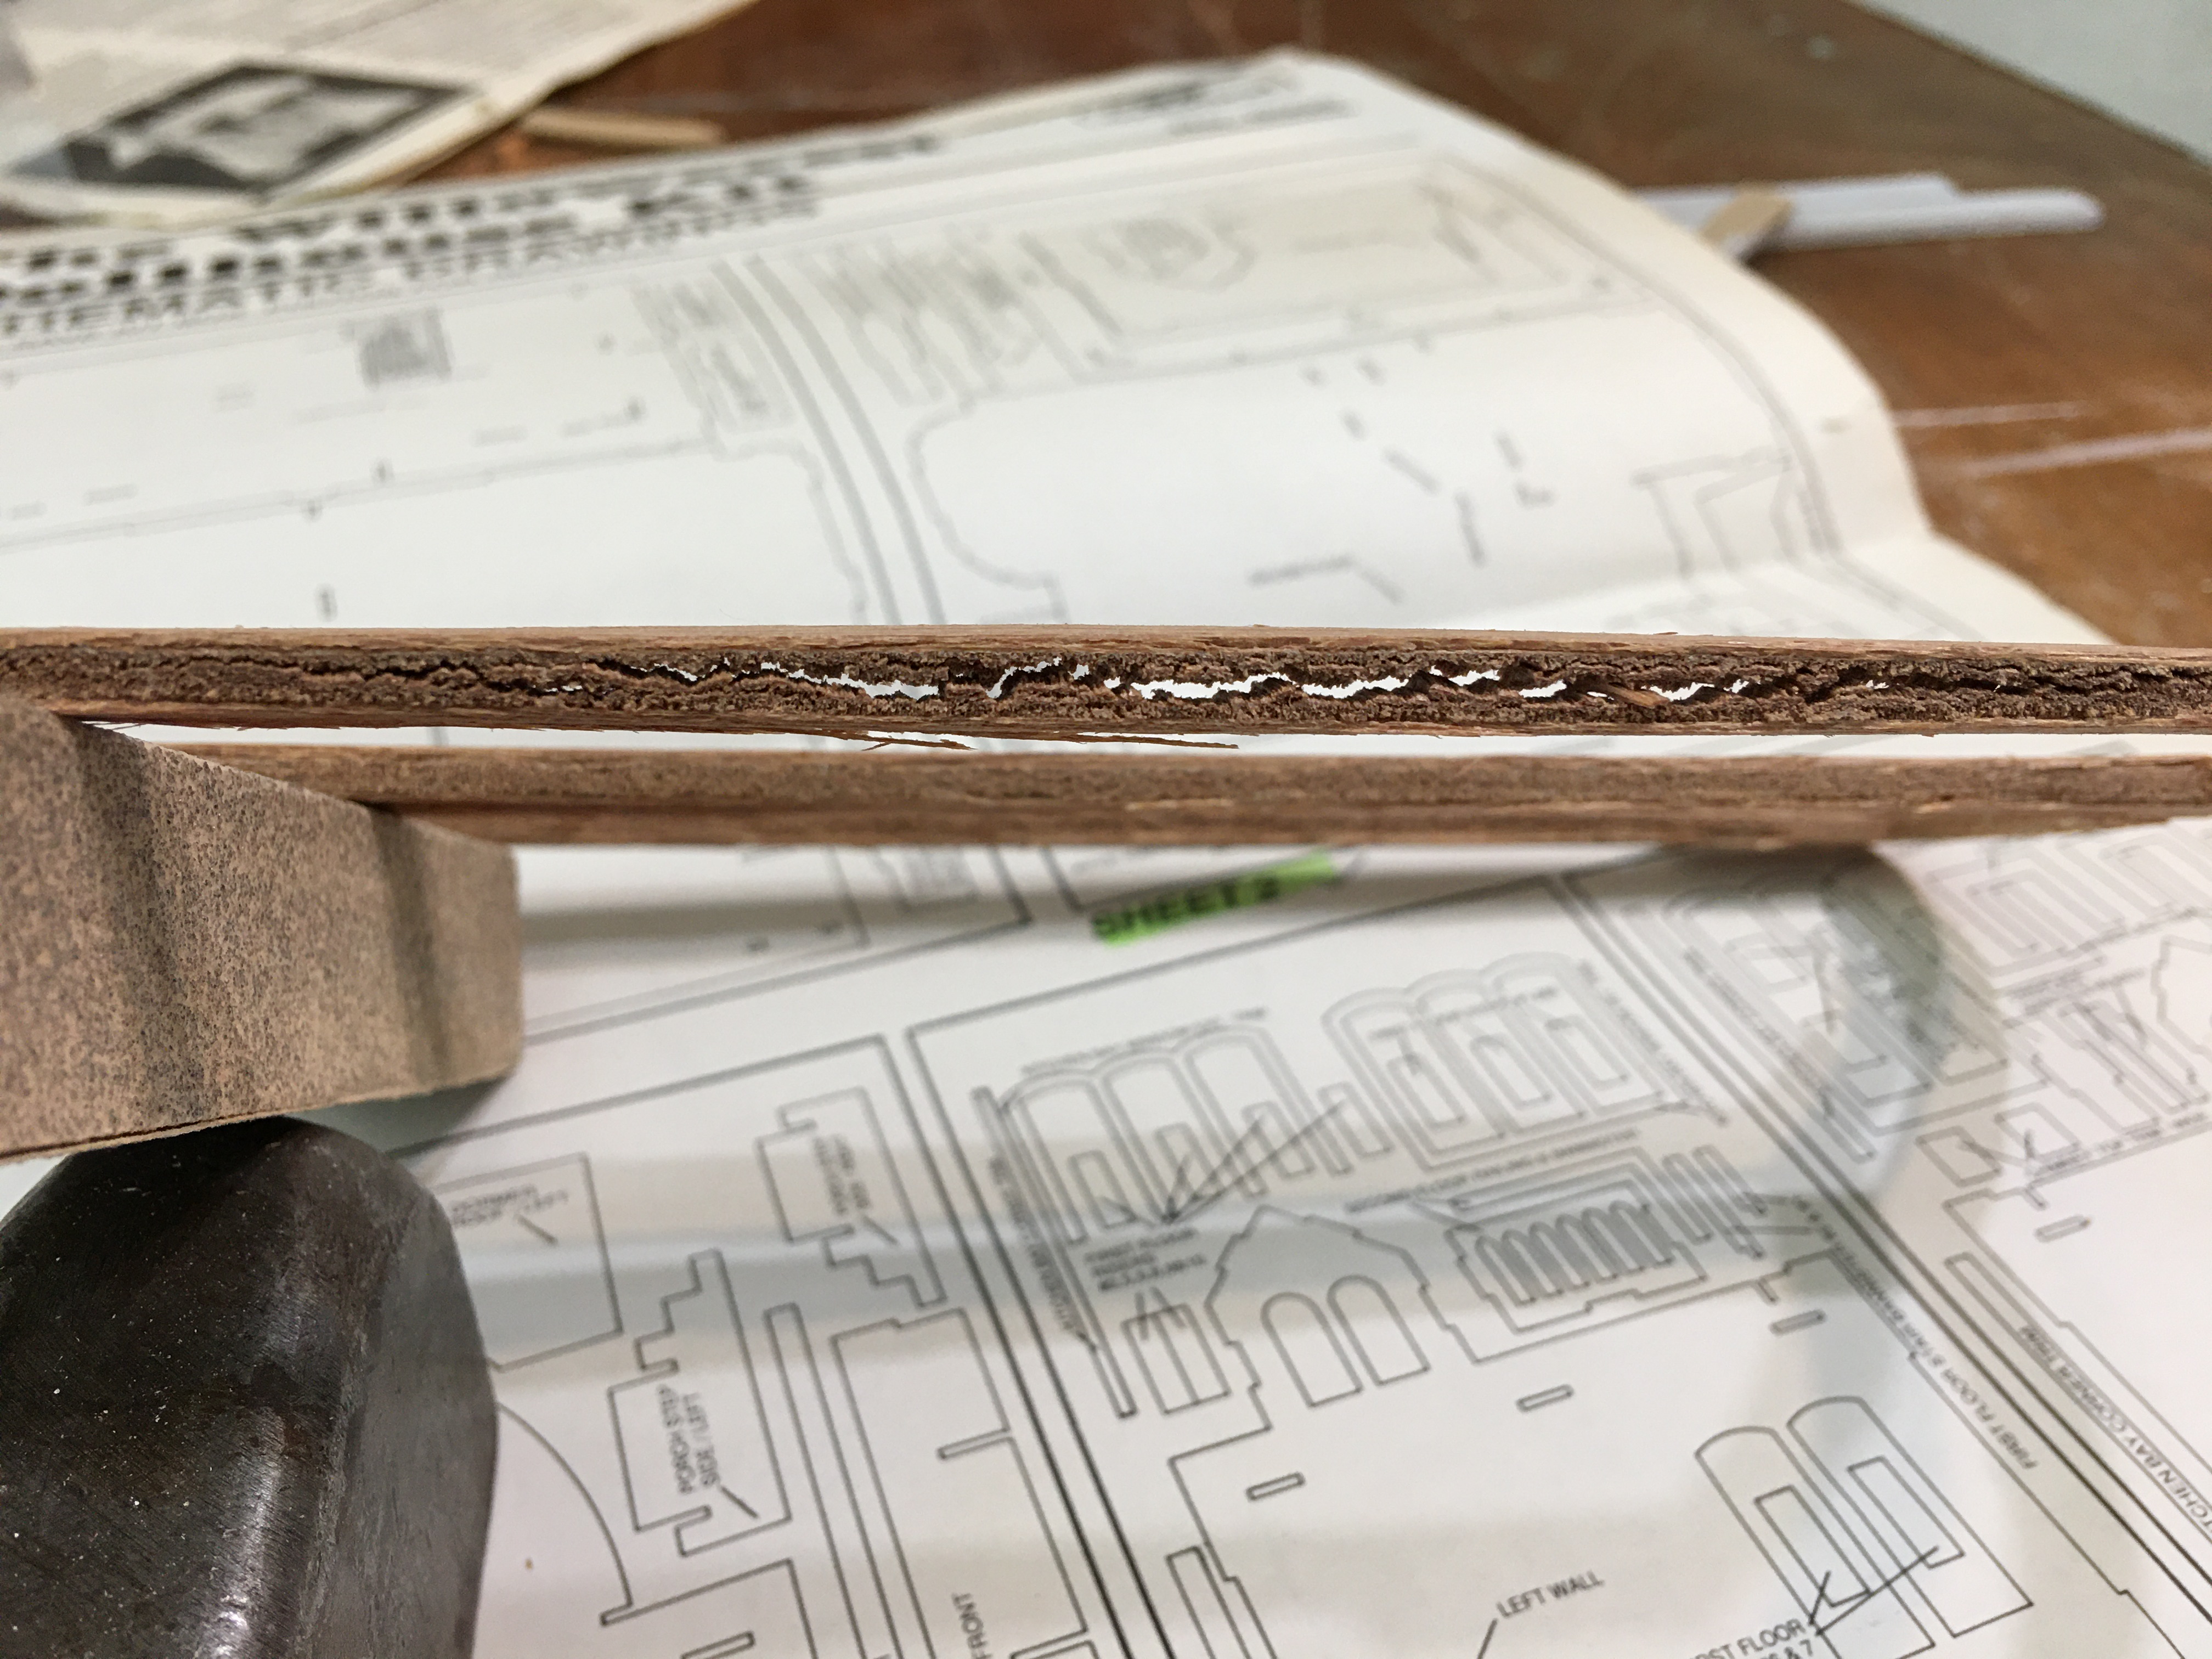 |
| French door frame from sheet 7 |
Here, each layer of the Small Window's exterior frame has been scanned, saved as an svg and imported into Tinkercad.
 |
| The kit has you stack four layers to achieve the look of fancy molding. |

A close up view of the 3D rendering which shows the corbel detail better.

For the Stairwell's exterior window, I added a shelf to the bottom shaped to mimic the window's curves. It's supported with detailed corbels. The same top corbel will be used wherever possible to unify the exterior style.

 |
| Shelf Detail |
 |
| The French Door Window to the left of the front door. |

But aren't I getting WAY ahead of myself with all these windows? Yes, but recreating them is so much fun! My goal was to get the entryway/stairwell completed first. The exterior window frames won't be needed until much, much later. All I need right now are the interior stairwell window frame and a small interior window frame for the second floor landing. I went a little crazy with the details on the stairwell frame as you can see. The entry/stairwell is the first room guests see, so traditionally in homes of that era, they were meant to make an impression.
 |
| Stairwell window frame. |
 |
| Side detail. |
The interior frames for the rest of the house will likely be a lot more subdued.
 |
| Small Window Interior Frame |
 |
| Side detail. |
Here I must digress a little...
Some of you may remember that last fall I worked on a commission to design and print 3D windows and doors for a Breakfast At Tiffany's themed dollhouse. For the 9" door surround, I had to print it in five pieces because of the 5.5" size limitation of my 3D printer's print bed.
 |
| Rendering pieces, left. Printed and assembled door, center. Original BAT door, right. |
My supportive husband, believing in my ability to create great things if I have the right tools, conspired with my kids to join forces and buy me a much larger 3D printer for my birthday last December. Now, I am able to print things over twice that large, making it possible for me to print the 7.91" interior stairwell window frame in one piece. Have I ever mentioned how wonderful Russ and my kids are to me? 💗 Using the scan/svg/3D printing method, I can replicate almost any piece I need to, as long as I can fit it onto the X-Max's 300 x 250 x 300 mm (11.81" x 9.84"x11.81") bed. I can even have another small job going at the same time because I still have my trusty old X-one2!
 |
| Welcome to the family, X-Max! |
Back to windows... Now it was time for the real test. How would the frames look printed? I started with the staircase wall's interior frame. This was pretty complicated, so I figured if this one was successful, I was home free. I think it came out amazingly good, and surprisingly, even with the more capable printer, it took over nine hours to print. I am sure there are settings I can adjust to speed things up, but I still have A LOT to learn! I am trying to eat this elephant one bite at a time.


It looks perfect against the pattern I traced on the wall, so I guess it's safe to cut the hole. Scroll saw here we come! But first...

In my excitement about the windows, I'd nearly forgotten that I also needed to have the front door ready. The kit's door is a double opening model which seems to be a common feature for second empire homes. I thought that re-designing mine to look like a double door but actually opening as one solid door was a better idea - less hinge engineering and less operating parts that could break. Here's the rendering of what the door and frame looks like together.

 |
| Kit's Double Door |

 |
| Recess for "glass" |
And here are the interior/exterior doors printed. I am super happy with how they came out! Each side took over 10 hours.

Test Fit...
 |
| From the front porch |
 |
| From the kitchen doorway. I left 1/32" allowance on each side for paint and swing space. |
 |
| From the stairs |
And the interior Small Window frame straight off the printer. Simple but elegant, I think.

I did the entry arches for the kitchen and living room, too, but haven't printed them yet. First I have to decide on the flooring. The height of the arches will have to be adjusted accordingly for it. And I think it might be time to actually glue the foundation, front wall and center walls in place. Scary and exciting!

My recreation system is not quite as sophisticated as The Replicator in the Star Trek series, but it works well enough for me! And it goes to show that with a little technology and a will to try, any challenge can become an opportunity for even better minis!
Dear Jodi, your new windows and doors are not just replacements of the damaged kit pieces but glorious improvements. I cannot believe the amount of detail you have managed to get into each one. This 3D printing thing is just amazing.
ReplyDeleteI can only begin to slightly imagine how magnificent this project is going to be.
Anna X
Thanks Anna! I'm so happy to be working on this kit and with the 3D printer and the Cricut - it feels like the sky is the limit! I just hope my imagination and creativity are up for all the possibilities!
DeleteQué magnífico trabajo has hecho, me da envidia tu maquinaria y tu capacidad para diseñar. Sin duda la casa que vas a crear no se va a parecer en nada a la original
ReplyDelete¡Muchas gracias, Jesús! Sé que seguramente olvidaré algunos detalles, ¡pero espero que la casa se sienta tan especial como lo es para mí!
DeleteDear Jodi, What a good thing that you had to replace the original windows and doors. Your 3D ones are magnificent. No wonder your loving family saw the potential and gifted you a new larger printer and you can make the two work at the same time whenever you need. A Happy belated Happy Birthday! This project started on the right foot.
ReplyDeleteHugs, Drora
Thanks Drora! I suppose if we are willing to look there is opportunity in everything! I have really enjoyed becoming obsessed with scanning these parts to improve them - it is so much fun! It is the biggest gift in life to be loved and known so beautifully by your family! They have provided me with an amazing world of creative exploration! I am so grateful for their love!
DeleteMagnificas puertas , las has enriquecido y te han quedado geniales . Tu familia sabe perfectamente tus necesidades y en tus manos haces con ellas maravillas.
ReplyDeleteBuen fin de semana
¡Gracias por la confianza en mí, Rosa María! Siempre parece que me gusta cómo sale algo, pero luego, un par de días después, ¡pensé en un nuevo detalle que olvidé! Si cedo a todas las ideas tardías, nunca llegaré a ninguna parte, pero si no lo hago, ¡me lamentaré sobre "qué pasaría si"! ¡Ay ay ay!
DeleteLooking good Jodi! You’ve made some really spectacular components there, and they will make this house very special.
ReplyDeleteThanks Shannon! Each time I think I am satisfied and print a component, I see a new detail or improvement I could have made! If I don't control myself, this could turn into a two year project and I could go through a lot of plastic, lol! I am having so much fun!
DeleteGo Jodi Go!!! I can only say how wonderful it turns out to be that you only got this kit when you had the equipment and the know-how to do it justice!!! Think of how much more trouble the wood would have been all those years ago? (I had to splice many of my window and trim pieces, and wood filler occasionally came in handy too!) And you might not have had the courage to make such fantastic alterations in the design! The windows you are making are just gorgeous!!! I am so looking forward to seeing this kit blossom in your hands!!! And your supportive children and husband are The Best!!! :):)
ReplyDeleteThanks Betsy! I think the lesson here is that all things come at the perfect time! Before the 3D printer and the Cricut, I would have lovingly restored the wood (I do enjoy that, too), but the embellishments would have been more like wood scraps and stickers! 😉 You did an excellent job with your kit wood! It is so much fun to see what can be using new ways and having to learn new things along the way! My family is so good to me, even though they still don't have much interest in minis. They glaze over when I show them, lol! I have mentioned how amazing it would be to have a CNC cutter in the family, but that might be a few years down the road until affordable models are common. 🤞 Can you imagine making our own kit pieces?!? I'm so happy you like the new window/door designs!
DeleteSo impressed. The end results are fabulous and totally repay the brain work and the waiting time patience. Bodes well for a fabulous new mini world in a building. Marilyn
ReplyDeleteThanks Marilyn! It is challenging to figure out ways to make the machines and software work with one another, but it really is part of the fun! And the feeling of taking a thing, running it through 7 process to transform it, and having an improved thing at the other end is very exciting!
DeleteStar Trek? Maybe even Twilight Zone. Your work is always amazing. Those old plywood kits are a real nightmare. I've said this before, the 3-D printing has given you such freedom to really create whatever you want. The added details are wonderful.
ReplyDeleteThanks Ann! The 3D printer is almost like having your own mini shop at your disposal! You just have to work a little bit rather than hand over the cash, lol! But you find exactly what you need in the right size every time and there's no tax or waiting on shipping! 😁😁😁
DeleteWow, fantastic, you have a skill set (and tool set) I wish I had. I am so envious. It’s starting to look fabulous already.
ReplyDeleteHi Wanda! It's just the tools, trust me! The Cricut and the 3D printer open up a whole new level of access to the ideas we already have, and you have some amazing ones! I hope you'll take the plunge and wow us all some more with your incredible minis!
DeleteJodi, es increíble todo lo que puedes idear y luego llevar a cabo con tus fantásticas herramientas!! Todo un desafío mental que se ve recompensado, estás haciendo maravillas con tu antigua y nueva impresora 3D,es normal que tu marido e hijos se confabularan en regalarte una más grande, le sacas tantísimo provecho!!
ReplyDeleteGenial querida Jodi, sigue deleitándonos con tus maravillas!
Besos.
¡Gracias Pilar! La impresora 3D realmente hace posibles muchas ideas que nunca antes habían existido, ¡y es maravilloso que mi familia me anime tanto! Espero que me sigan llegando ideas para este proyecto y poder hacer justicia a esta casa de muñecas.
DeleteYou never cease to amaze! This build is going to be just exquisite with your special mix of technical know how and that fancy new X-Max. Love the results so far.
ReplyDeleteThanks Sherrill! It feels so amazing to turn a challenge into an even better solution. I hope I keep finding ways to work them out, as I am sure there will be many ahead!
DeleteWith the 3D printer you have a customized miniature production. The new doors and windows are perfect for this wonderful house.
ReplyDeleteThanks Faby! Yes - I hope I can use all the resources available to me to do this wonderful dollhouse justice! It seems as though each step takes me down another rabbit hole and forces me to think and take my time.
DeleteAh, a new family member!!! How great is that??? Welcome to the machine park, X-MAX!!! You couldn't have found a better home - not only because your owner Jodi is as lovely as she is creative but also because the human members of the family are true angels knowing exactly what's the best way to spoil their wife/Mom... and to make her happy... and to keep her occupied. *LOL*
ReplyDeleteIt's so exciting that your possibilities to create your own pieces are no longer limited to smaller sizes. And just in time for your new kit and for creating the most beautiful, detailed windows... and avoiding hurting fingers and (at least I suppose so regarding my own experiences) a few curses on the way. It's not surprising that it took you some time in the beginning when "tinkering" (I love that verb... although I doubt that I would find that in the dictionary... *grin*). But you've learnt valuable lessons figuring this out and you will be much better to create the pieces you want the next time. The results are stunning!!!
Hugs
Birgit
Thanks Birgit! The X-Max has certainly become a relied upon member of the family, especially lately! It is amazing how the timing of these things always seems to have some divine aspect to it. I would not have even thought of attempting to do all these new pieces for the Willowcrest with my old 3D printer. I am so happy that you like the embellished pieces - I have had so much fun with the challenges that come with trying to recreate them!
DeleteEl trabajo que has hecho es impresionante. Es estupendo lo bien que se te da el manejo de las impresoras 3D..
ReplyDelete¡Gracias Isabel! Si hay una forma de motivarme para aprender cosas nuevas, ¡tenerlas al servicio de una casa de muñecas es sin duda la clave! ¡Dios conoce mi corazón como ningún otro! 💗
DeleteGorgeous! You are so talented and I love reading your blog posts. I can't wait to see the finished dollhouse.
ReplyDeleteMarilyn
Thanks Marilyn! I'm so glad you're here with me on the Willowcrest! I hope it turns out good!
DeleteBeing able to add all of that GORGEOUS ornamentation to the windows and the doors throughout this kit is going to take it to the next level- actually Jodi, to the HIGHEST LEVEL there is! Keep it coming! ❤️
ReplyDeleteThanks Elizabeth! I am so glad to know you like the added details on the door and window trims! I hope to keep it coming, not get lazy or give up too soon! I am currently working on a solution for period correct looking light fixtures, but making them in scale and functional is quite challenging! Send more angels!!! 💗🙏😊
DeleteFor once, you've left me speechless. I have just one word - WOW!! - Marilyn D.
ReplyDeleteThanks Marilyn! 💗
Delete