
Before my parents' visit, I had been working on the Beachside Bungalow's bathroom. You see, I was in the Chicken/Egg dilemma. I needed to know where the upstairs dividing walls were going to go before I could mark the walls in dry fit. This was so that I would know which wallpapers would go where and where precisely they would begin and end. If you've followed my previous builds, you know I like to apply the wallpapers whenever possible when the walls are flat and separate - especially when using thin scrapbooking papers for wallpaper. They tend to crease, tear and wrinkle more easily when reaching in and applying to a vertical surface. Plus, as my eyes are getting older, I get a much better result with bright lighting and a closer view. What about the joins, you ask? Corner molding or quarter round work great, if necessary, and where two patterns meet a trim piece makes for a nice transition.
By marking where to start and stop, I could take the kit out of dry fit, apply all the papers, then assemble the kit with glue.


In the case of the bathroom, I was making a built in shower which would be fitted to the back of the bathroom where the steep angle of the kit's ceiling leaves a lot of unusable space. By having the shower enclosure pre-built, I would have exact measurements for my bathroom's width, layout, sconce placement and wallpaper placement.
I started with some 1/16" basswood, making a floor, back, sides and a top. I also added a cubby shelf for shower necessities. This sink is just a place holder. Even in a dollhouse, a pedestal sink is just impractical in a main bathroom unless you have a massive linen closet! I had to make the shower deep enough so that the height would accommodate a six foot dollhouse person. Any taller than that and you'll just have to duck or bathe in the ocean, lol!


For the tiles, I took the same scrapbook stack that I am utilizing for the whole project and created tiles from the patterns. I used wallpaper gel to adhere the paper to mat board, then cut the tiles from that. I attempted to use my Cricut to cut the tiles for me, but could not find the right combination of blade, material, pressure and passes to cut the tiles through cleanly. After a fair amount of invested time, I decided the job would be easier accomplished by hand. I actually enjoyed it! At first, my tiles weren't perfectly consistent, but like with any job, I got better with practice. I used tacky glue to adhere the tiles to the primed wood and applied them by eyeballing it.


By the time I got to the shower's ceiling, I was pretty happy with the tiles and tiling job. I thought about starting over with some of the pieces to get a better result, but I just didn't have the heart (or the time!). I still liked the results, they are just more whimsical in style. We'll just say that the homeowner enjoys DIY!
Once they were applied, I sprayed them with several layers of Krylon Triple Thick Gloss. Then I applied lightweight spackle for the grout. Once they were dry and cleaned up, I glued the shower pieces together.


I wanted to have functioning glass sliding doors, so I needed to come up with a frame to hold them in. I went with 1/4" channel molding and 1/16" Lexan. The channel itself is 1/8" wide, and with two pieces of 1/16" Lexan, it was the perfect width. I cut the corners at an angle, glued the bottom and sides to the shower frame, measured the opening, divided the space for two doors with a slight overlap and then tested the fit. Perfect!
For the handles and the shower head, I had some chrome pieces from Elf Miniatures in my stash. I drilled holes in the Lexan big enough for tiny brads to seat into, then glued the chrome handle and towel bar through them. For the taps, I made them from spacer beads, corsage pins and earring backs. There is really nothing more fun to me than creating home spun minis with things from my stash!


At this point I had to put everything away and clean the whole house for my parents' visit. It was so hard to be on a roll and have to put the project on hold for chores!!! But knowing I was going to get to hug my folks again, after not seeing them for sixteen months and through a pandemic, was uplifting! I had the whole house ready for them even before they began their drive up from Arizona!
So... Since I had a little time, I couldn't start on a big undertaking, but I could work on a small project - the vanity! You know how I love making vanities!
I started with a House Of Miniatures Lowboy kit and decided it would be great fun to remodel it a little. I put the cabriole legs away - they were too short since a vanity should be between 36" and 42" in real life (around 3" in mini), and instead made my own bottom. I wanted something beachy with storage baskets so this was the perfect solution.

I had more of the Elf Miniatures handles in a smaller size that were perfect for the drawers. Looking at my stash, I also realized that I had an MBS plastic sink and could cut a hole into the HOM kit's top. Things were starting to come together!


I found this inspiration photo when trying to decide on a top material, color and finish.

Using the technique that I discovered while playing around with the Storybook Cottage's kitchen counters, I went with the pouncy/sponge/marbling effect using paint and glazing medium.


I made little baskets using Julie Warren's great method of wood lined with fabric then covered in hemp. For my material, I scanned one of the striped patterns from the scrapbook paper stack and then printed it on fabric paper.


Here is the vanity with the top set on.

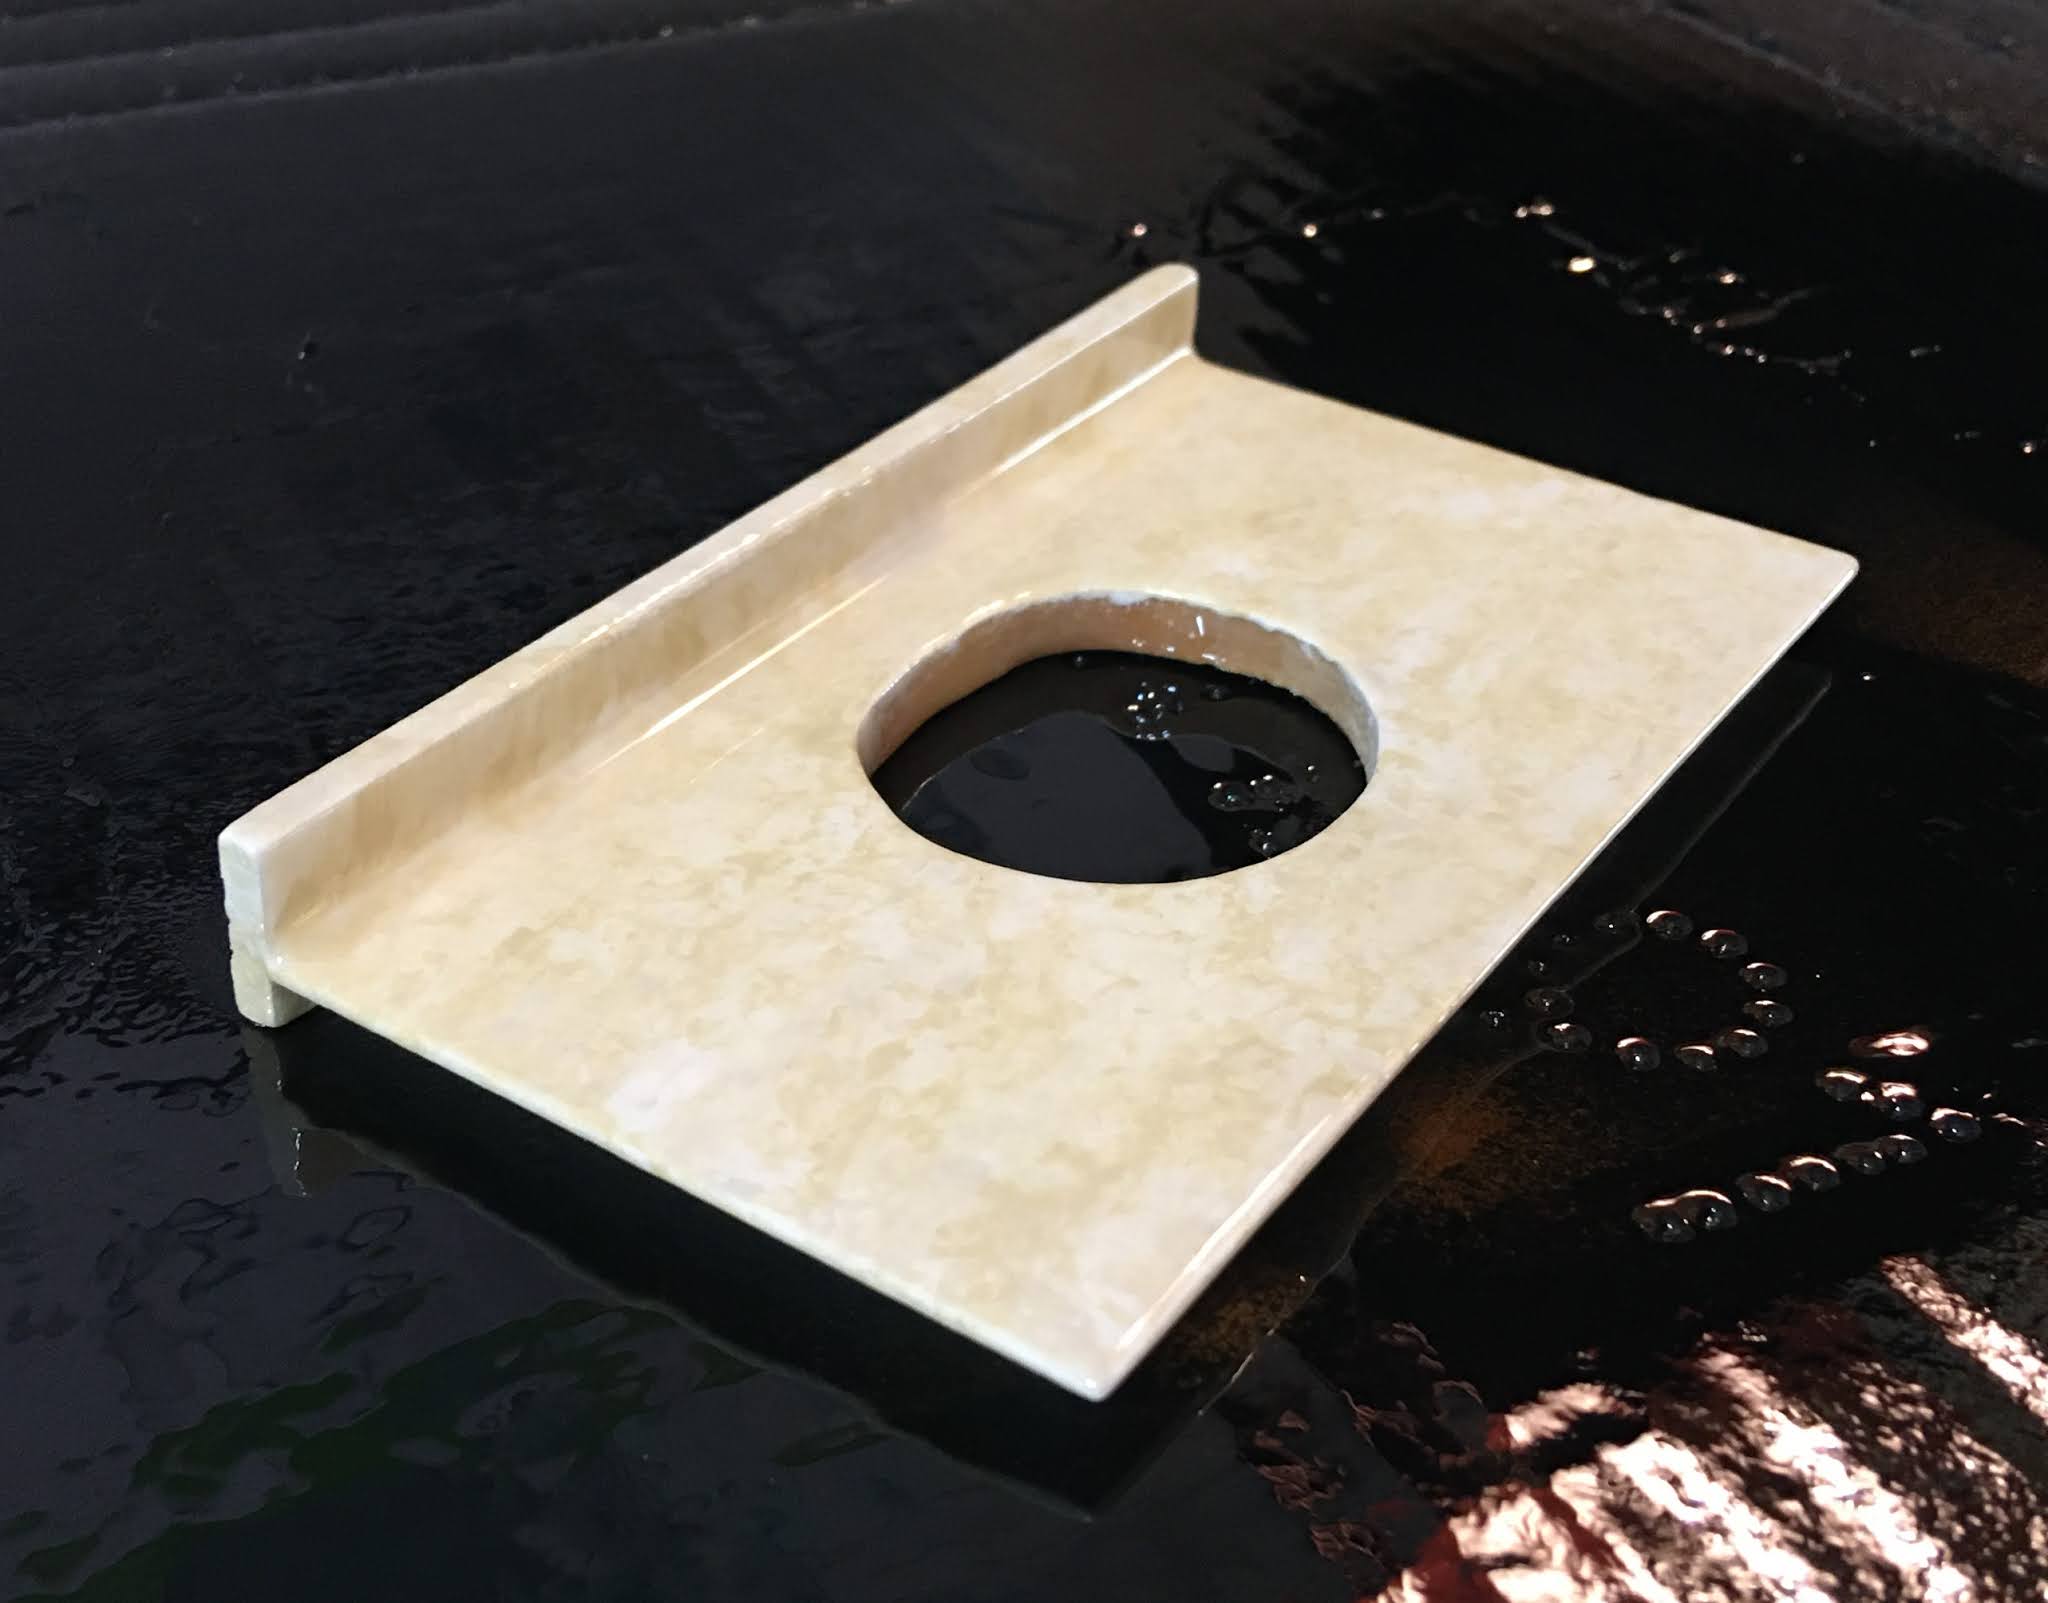
And here is the sink from the painted back side and the top side. To prevent the paint from rubbing off with time, after the paint has dried I apply a thin coat of watered down tacky glue over the paint as a protective layer.


Vanity with the sink installed...

And with the drain and taps installed...


And with pretty matching scrapbook paper as drawer liner...

And a few shots in the bathroom...

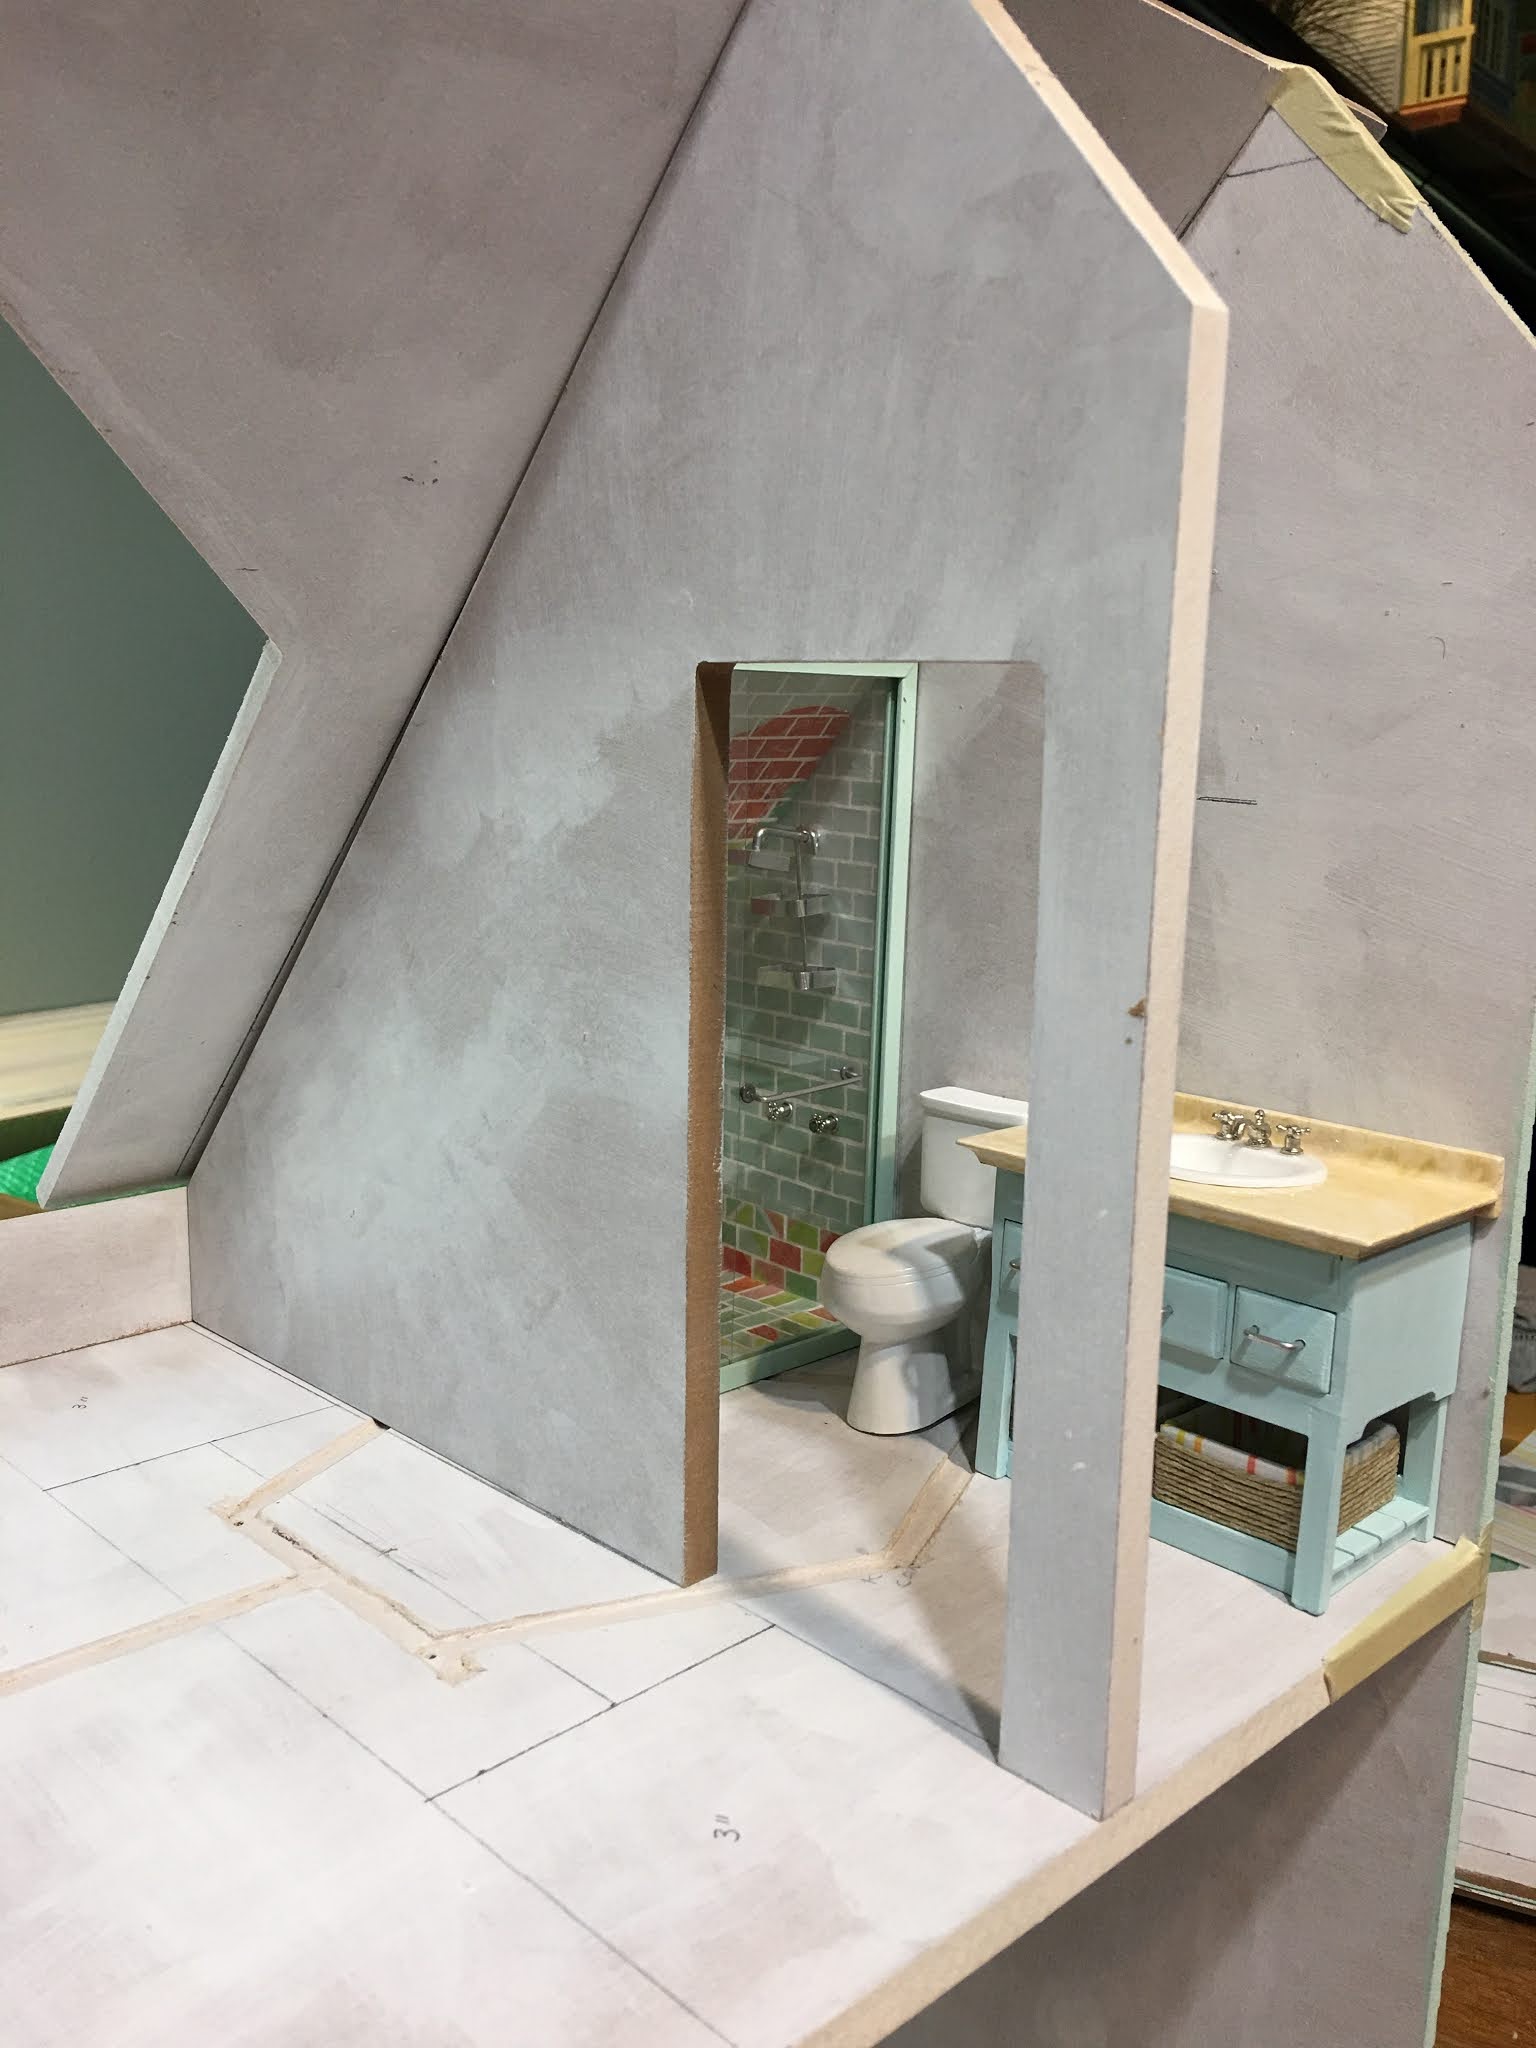


I think a real estate listing would call it "cozy" or "efficient", but it works!
Notice the channel in the MDF floor? Next time, I'll share about wallpaper, lighting and The Best Tool I have discovered in a very long time!
Until then, stay cool in the ever hotter and globally warmed Northern Hemisphere, and warm in the Southern!
xo xo,
Jodi
P.S. For those wondering about my parents' visit, it was wonderful! We got all the local family together several times, visited, hugged, talked, toured and planned for more future visits. I only wish the drive was not so long for them, but they just don't do airplanes. Next time, we'll go to them! 💗
The bathroom tiling is perfect!It's as if it were a real-life sized bathroom!
ReplyDeleteThank you! I wish my real life showers had fun tiles like these! If only real life tiling were so easy, lol!
DeleteDo you realize how many problems you have solved in this post for creating the best shower?! I struggled so with the shower for the Bellingham Farmhouse. I was on the right track, but just did not know which materials to use, like the 1/4 inch channel moulding. Brilliant. I love your tiles. They look so much more defined than the flat paper that I have been considering. I can see that your pattern would be impossible to cut out on the Maker, but a white subway tile would be so easy. Using triple thick to get the 3-D look makes that project so simple. I can do that! Finally the counter top! You don't know how much I admired the counter top you built in Tasha's kitchen, but it was just a bit intimidating. The last items for the Manchester are the counter tops; now I know how to build them. You certainly inspire us to up our game. I am so thankful for your talent. We are headed to Texas tomorrow for a bit of R&R then I'll be come home refreshed and ready to work on the Manchester again, so I am very excited to see your lessons on lighting. We've read about the heat wave in the NW; here it is cool, oddly so. Your shower is amazing.
ReplyDeleteThanks Ann! It makes me so happy to know that I have helped you by giving you ideas and solutions! Enjoy your trip, and I can't wait to see your Manchester progress when you return!
DeleteYour bathroom looks so cheerful and modern, Jodi, and I so love how the tiles turned out, but I wonder where in Europe one could buy Krylon Triple Thick Gloss..?? Because it seems to me a lovely medium to experiment with.
ReplyDeleteThe shower frame with the sliding doors is wonderfully made, I'm sure the residents will love taking a shower in this cheerful shower cabine. And I wish I had this one in real life ;).
Your modern styled vanity has become a true gem, I like the technique of marbling you did, and together with the added baskets thw whole is beautifully done.I have never heard of the sinks of MBS, but this one turned out as a very realistic onw, chapeau! Thanks for the tip of putting a protective layer of Tacky Glue after it's painted.
You makes us curious because of the mistery channel in the bathroom floor, but as always: I'll wait patiently for your next blog post ;O).
How lovely it must have been to see back again your parents after so many time and after the longlasting pandemic, Jodi, and good to read you all enjoyed their visit!
Hugs, Ilona
Thanks Ilona! Krylon Triple Thick is a very high gloss spray varnish so I imagine there is a European equivalent that you are already familiar with. Here is a link to the Amazon listing to give you a better idea about what is in the product. Hopefully it helps you find something like it!
Deletehttps://www.amazon.com/Krylon-I00500A00-12-Ounce-Triple-Aerosol/dp/B001144TJC
I am so glad you like the bathroom fixtures - I would love to have a cheerful bathroom like this in real life, too!
MBS is short for Model Builders Supply and they make a great variety of mini things in a lot of scales. Here is the link to their web site which is a lot of fun to explore:
https://modelbuilderssupply.com/
They sell to other mini shops, too, so you might be able to find some of their products in your favorite store.
Thanks so much for your thoughtful and lovely comments! 💗
It's sooo very kind of you to add these links in your answer to my questions, Jodi, thank you sooo much! I'll go and visit and see!
DeleteHave a lovely weekend!
Hugs, Ilona
OMG Your shower looks so cool! I love the glossy tiles and the design you chose. So pretty and beachy!
ReplyDeleteAnd the vanity is wonderful. I especially love the color coordinated basket liners.
I'm jealous of your mini bathroom.
Thanks Sheila! It would be so much fun to have a fun and funky bathroom like this in real life! Thank goodness we can make a variety of ideas for bathrooms in miniature!
DeleteQue baño tan maravilloso, me encanta el revestimiento, ha quedado precioso.
ReplyDeleteTambien me encanta la hornacina, siempre me han gustado en cualquier ambiente.
El mueble del lavabo está genial, en fín, que está como todo lo que haces fantástico.
Es estupendo que hayas podido reunirte con la familia, poco a poco esto acabará y olvidaremos las restricciones.
¡Gracias Eloisa! ¡Estoy muy contento de que te gusten los accesorios del baño y espero que tengas la oportunidad de probar estas ideas por ti mismo! ¡No hay nada más satisfactorio que hacer minis!
DeleteLa ducha ha quedado genial. El diseño que has realizado con los azulejos es muy alegre y me encanta el brillo. Perfectas las puertas.
ReplyDeleteTengo que intentar un día hacer mármol y que me quede tan bonito como el tuyo.
¡Qué ganas tenemos todos de poder reunirnos tranquilamente con la familia y poder viajar libremente!
¡Gracias Isabel! El azulejo y la canica son muy divertidos, ¡espero que tengas la oportunidad de jugar con las ideas! ¡Es una sensación tan maravillosa estar de nuevo con la familia y poder estar en público sin preocupaciones! Creo que todos tenemos un reconocimiento renovado por la libertad que perdimos durante Covid, ¡y aprovecharemos al máximo el tiempo en familia para siempre!
DeleteUna maravilla poder disfrutar con tus padres esos días, esperemos que todo esto termine y se normalice nuestras vidas. Tu cuarto de baño espectacular, sencillo y a la vez cálido y acogedor, me encanta. Buen fin de semana
ReplyDelete¡Gracias Rosa Maria! Soy culpable de haber pensado en las reuniones familiares como obligaciones antes de la pandemia. Es una bendición haber pasado por esto y haber salido a salvo con una nueva apreciación sobre el regalo que es tener salud y familia. A veces se necesita una crisis para volver a pensar en lo correcto.
Delete¡Estoy tan contenta de que te guste el baño! ¡Realmente estoy disfrutando este proyecto!
Impressive! What you accomplish while awaiting house guests is amazing. I love the vanity with all the updates you added and it looks lovely with the shower you created from scratch. I also have had visitors from Arizona whom I have not seen since fall of 2019 My, how my grandkids kids have grown!
ReplyDeleteThanks Sherrill! I always seem to get the strongest urges to make minis when I have the least amount of time, lol!
DeleteI am so glad you got to see the family! Kids grow way too fast and it's almost shocking when they are suddenly taller than you! I bet they were looking forward to cooler temperatures like my parents and were a little disappointed by our heat wave!
Your bathroom is stunning! Fantastic job.
ReplyDeleteThanks Janice! I am having a lot of fun with this project and it is nice to try a whole new style!
DeleteBoth the shower and vanity are wonderful! And you make it sound so easy, but I know there is lots of skill and experience involved. Thanks for sharing your techniques. I'm so glad you were able to have a great family reunion. It's so great things are opening up again.
ReplyDeleteThanks emjay! The complications in making miniatures is only soothed by the level of satisfaction you get when you like the finished piece. Those who never try will never understand the difficulty in getting things level, straight and put where you intend them. But that is why we appreciate them and each other's work so much! Thanks for you kind words and continued support! 💗
DeleteYour tile technique is perfection. I cant wait to try it out. Thanks for supplying me with so much inspiration. I am so glad you got to visit with your family.
ReplyDeleteThanks Carrie! I know you will really enjoy the process and hope you'll share what you make! The visit was so good for the soul!
DeleteEl baño es espectacular Jodi!! Me encanta el mueble en esos tonos, la distribución es perfecta para ese pequeño espacio, pero la ducha es increíble!!! Que bonita, moderna, alegre, me encanta!! Gran trabajo!!!
ReplyDeleteBesos.
¡Gracias Pilar! ¡Fue tan divertido hacer las piezas para el baño que casi me entristece que esté hecho! ¡Me alegro que también te gusten!
DeleteGosh Jodi, that shower is just so fantastic! My guess is that the real estate listing would call it 'imaginative & dreamy'.
ReplyDeleteI love your revamp of the lowboy kit into a stylish vanity - one day I will have to try that funky marbling.
Great to hear you had a nice time catching up with family. I cannot wait for the day I am able to head back to Europe and hug mine.
Thanks Anna! I think you'd make a great real estate listing writer!
DeleteI hope you'll try the marbling! It is so much fun to experiment with and the results almost seem to want to look fantastic without any help!
Getting to Europe must be super expensive and complicated right now, but I hope a way is made for you soon! Everything is sooooo expensive right now, but hopefully things will even out once life gets back to a little more normal rhythm. My parents had to pay around $200 per night for so-so hotels on their drives up and back. Plane tickets would have been so much less expensive but they don't like to fly. :O(
Jodi, I am so glad I discovered your website. I am floored by your creativity and talent. The shower is wonderful. I have collected miniatures for years and made a few basic room boxes, but am finally getting ready to start my first dollhouse. I am learning so much from you. Thank you.
ReplyDeleteHi Aina! I am so glad you are here, too, and so happy to know that what I'm making is helping you! Your first dollhouse?!? What an incredibly exciting time this is! The planning and anticipation keeps you in the clouds! Take lots of pictures and make notes of how you do things - this will come in very handy as you progress through your mini adventures!
DeleteBrilliant! Love your use of colour Jodi! I love someone who doesn’t shy away from using colour. The shower looks amazing, and the vanity looks amazing too - bold whilst not competing with the shower. And so great to here your parents could visit! Our vaccine rollout is a shemozzle, but so glad that the US is doing well with theirs, so everyone can start to live normally again.
ReplyDeleteThanks Shannon! I really enjoy being open to color and new ideas as it seems there is always something to learn about myself. I hope you guys get your vax program up and running and that the people in Australia aren't in fear about them as some here in the US still are.
DeleteDang girl this bathroom is amazing. What is going to be the flooring? I have gotten so many ideas from you. I want to tackle a house, but think 🤔 I should start with a room??
ReplyDeleteThank for letting us follow you. Happy 4th!🇱🇷
🏝🌞💜
Thanks Stephanie! A room is an excellent place to start and so exciting to think about a theme! Not sure about the flooring in any of the rooms yet but definitely want to do something other than hardwoods. Tiles would be fun!
DeleteIt's a fantastic bathroom. The shower is very original and vanity is perfect.
ReplyDeleteThanks Faby! 💗
DeleteDear Jodi, WOW WOW WOW!!! That shower is Awesome!!!!! I can't get over how real it looks! The hardware and the clear doors (that open!) are just the icing on the cake of that awesome beachy artistic and wonderful shower! And then you topped it off with a "quick" makeover of the sink..... Wow all over again! It might be small, but it packs a punch and is more than "functional"!
ReplyDeleteI am so glad your trip with your folks went well! There is life after the Pandemic after all!!! :):):)
Thanks Betsy! This project has a certain confidence in itself and is not shy about telling me what it wants to become - I just love being it's facilitator!
DeleteThere is life after the pandemic, if you're able to overcome your fears about the vaccine. If not, I am afraid there are still folks playing the death lottery. I just hope they come through okay.
Hola Jodi, me encanta el diseño de los azulejos.
ReplyDeleteHas conseguido una ducha maravillosa llena de color y con diseño único.
Estoy deseando ver todos los detalles de este baño ya que el lavabo ha quedado precioso también.
Un saludo
¡Gracias Marian! ¡Ha sido un verdadero placer trabajar con esta pila de papel para álbumes de recortes y es generosa con la impartición de ideas!
DeleteWhat a wonderful post! I've enjoyed every single bit of it and now I really must say: That shower is AWESOME in every way! Absolutely stunning!!! I can't take my eyes away from it; but it also reminded me of the advantages of our hobby. I think many people would love to have such a piece in real life - but don't dare to because this kind of coloured designer tiles would be extra expensive and we all would ask ourselves if this splash of colour could be a bit too much and if we would regret our choice after some time. But in miniature anything goes and talented people like you can create with simple ingredients the most amazing designer piece. Btw - if some day a basketball player comes to stay over night be sure to have a shower stool... With this even the tall folks can enjoy your shower and it will also be of good use as the inhabitants get older... *LOL*
ReplyDeleteBut without any more joking - next to the shower I've also enjoyed so much to see how you made the vanity and sink. It's hard to believe that this amazing, modern and stylish piece was made with the help of this kit. What a transformation! And now with the sink, the baskets and the marble top it is another unique piece and absolutely worthy to go into your stunning beach house. My, as always I can't wait to see what you will come along with next. ;O)
What fun to hear that you've had the most wonderful time when meeting your family after all this time. I think this is for sure one of the things the pandemic taught us - to be thankful for the wonderful people in our lives and to appreciate having them near.
Hugs
Birgit
Thanks Birgit!
DeleteI think a part of all of us admire boldness in the decisions of others but are often not quite brave enough to commit to that kind of thing for ourselves. That is one of the blessings about miniatures, especially when you are able to indulge in many projects because you feel the freedom to explore and make potential mistakes. Regrets? Oh well! Just do something different next time!
I love your idea about the stool in the shower, and it might even be a good idea to add in a bar for support if the need ever arises!
The pandemic certainly has reminded us to count our blessings, and to feel privileged at every opportunity to do things for others from love. It was great to have my parents here to shower with love!
The bathroom is spectacular! I wish I could have the shower tiles in my RL home.
ReplyDeleteGlad that you had a good visit with your parents.
Thanks Megan! Me too! A brightly tiled bathroom like those you see in Mexico would make every morning start out happy!
DeleteThe visit was wonderful and I miss them again already!
Oh Jodi - what an incredible miniaturist you are! I want that shower in my real life!! It is incredibly beautiful, as is the revamped vanity you built. I thank God every day that there are people like you who are not only so inspiring to the rest of us struggling with our own projects, but also so very generous with your time and advice. Thank you so much for both. - Marilyn D.
ReplyDeleteYou are too kind, Marilyn! Thank you!
DeleteI would love to be able to recreate the things I try in miniature in my real house, too! Too bad it's not as affordable or as easy! It is truly my honor and pleasure to be able to share this passion with you, and knowing that it inspires ideas and excitement for you is wonderful! Thanks so much for telling me so!
Wow Jodi! I just finished reading this post for the 3rd time and am so impressed. Like everybody else, I wish my own real size bathroom was like your mini one. I love the bold colored bricks. The sliding "glass" doors are brilliant work and the hand bars installed, so the mini residents won't slip in the shower make it even more realistic.
ReplyDeleteThe vanity table too is simply awesome. Thank you again for giving me pleasure to see your detailed work. (I wish I could have commented in Hebrew, in which I'm more fluent but when I saw the google translation, I gave-up.)
Hugs, Drora
Thank you so much Drora! Your English is beautiful, and I am so grateful that you take the effort to share your encouragement to me and others in our world! You make our community what it is! 💗
DeleteJodi, you are amazing!!! I’m going to try to make this shower for my beachside bungalow
ReplyDeleteThank you 😊 👏🏼👏🏼👏🏼😊😊😊🤩🤩🤩
Thanks Cindy! That's awesome! Let me know how it comes out!!! 💗
Delete