
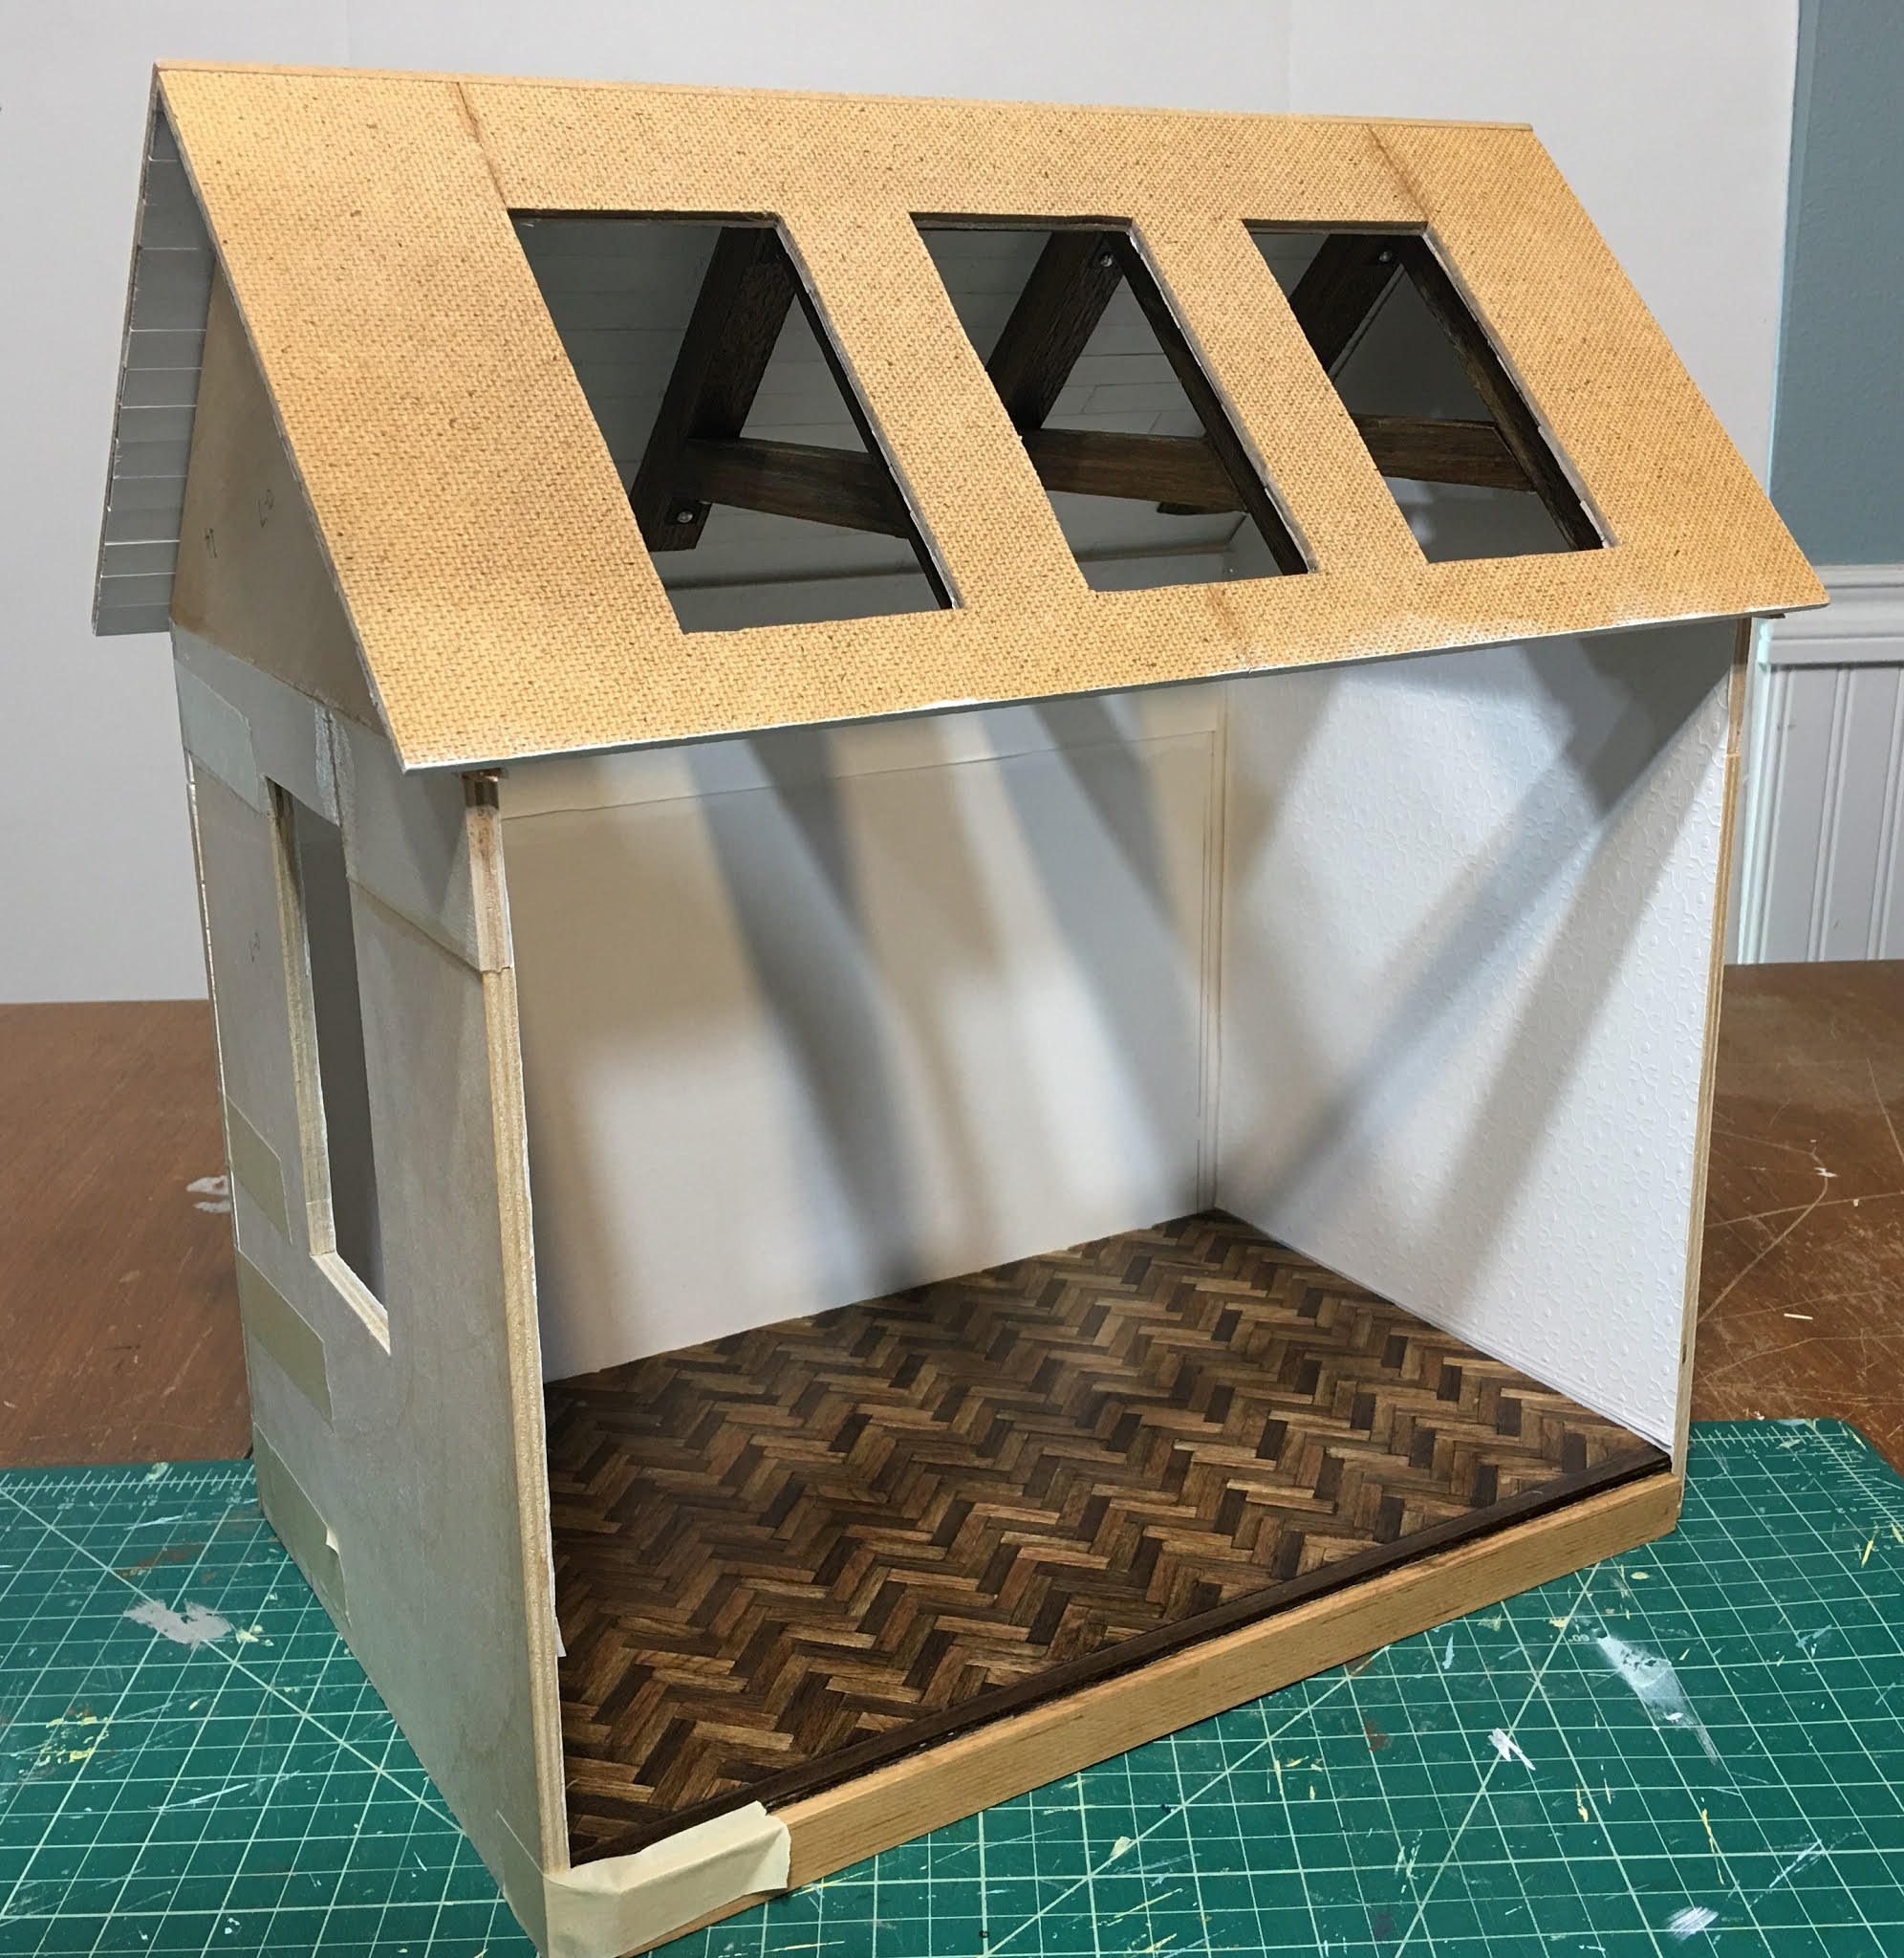
In the post before last I'd shown you that I added extensions to the walls to make them about an inch and a half higher. Once that portion of the build was done it was time to move on to the roof/ceiling.
See the groove in the floor at the front of the room box? That is to hold a piece of plexiglass to protect the things displayed inside from dirt and dust. Originally, I had intended to make the front half of the roof hinge open so that the plexiglass panel could be lifted up and removed. But in a "Senior Moment" that I'll explain later, that was no longer an option. I'll share the new plan for removing the plexiglass in a later post on the main structure. For this post, in the interest of not hogging all your blog reading time, we'll stick to the ceiling/roof.

Although I knew I would be installing lighting in this project, I thought it would also be nice to bring more natural light inside, too. So I cut holes in the front half of the roof for skylights.


While I had the scroll saw out and was already making a sawdust mess, I thought I better just cut the sink window opening, as well. More on that in the next post.


For the inside of the ceiling, I planned on leaving it vaulted with exposed cladding and roof trusses. As if the kitchen were in an old house that had been updated, but also embraced the home's history and the workmanship of an era gone by. Both Tasha and I appreciate Time's Patina, and when played off of more modern fixtures, magic happens. I am no expert on aging miniatures, but I gave it my best shot on the ceiling.
I painted a rough coat of 3 parts water to 1 part brown paint onto 1/16" x 1/2" basswood (both sides to prevent curling). Once that was dry I applied a light coat of white to one side. This is the same method I successfully applied for the shiplap boards in the Display Shop project.

Once dry, I lightly sanded until some of the white paint chipped and revealed some brown paint beneath. This was the look I was going for.

To begin laying the cladding onto the ceiling, I first needed to join the ceiling with the 5/8" square beam that came in the kit. This is where I forgot that I needed the front roof panel to remain free so that I could attach a piano hinge. Instead, I plowed ahead and glued both roof pieces to the beam. I only realized my mistake after I'd already applied several of the cladding strips, too late to be undone.
Not to worry! "Senior Moments" don't have to be followed by "Charmin Moments". I calmly thought through the problem and contemplated ways I could still have a sliding plexiglass panel. In my next post I'll show you the solution I figured out that will still allow the plexiglass panel to be removed.

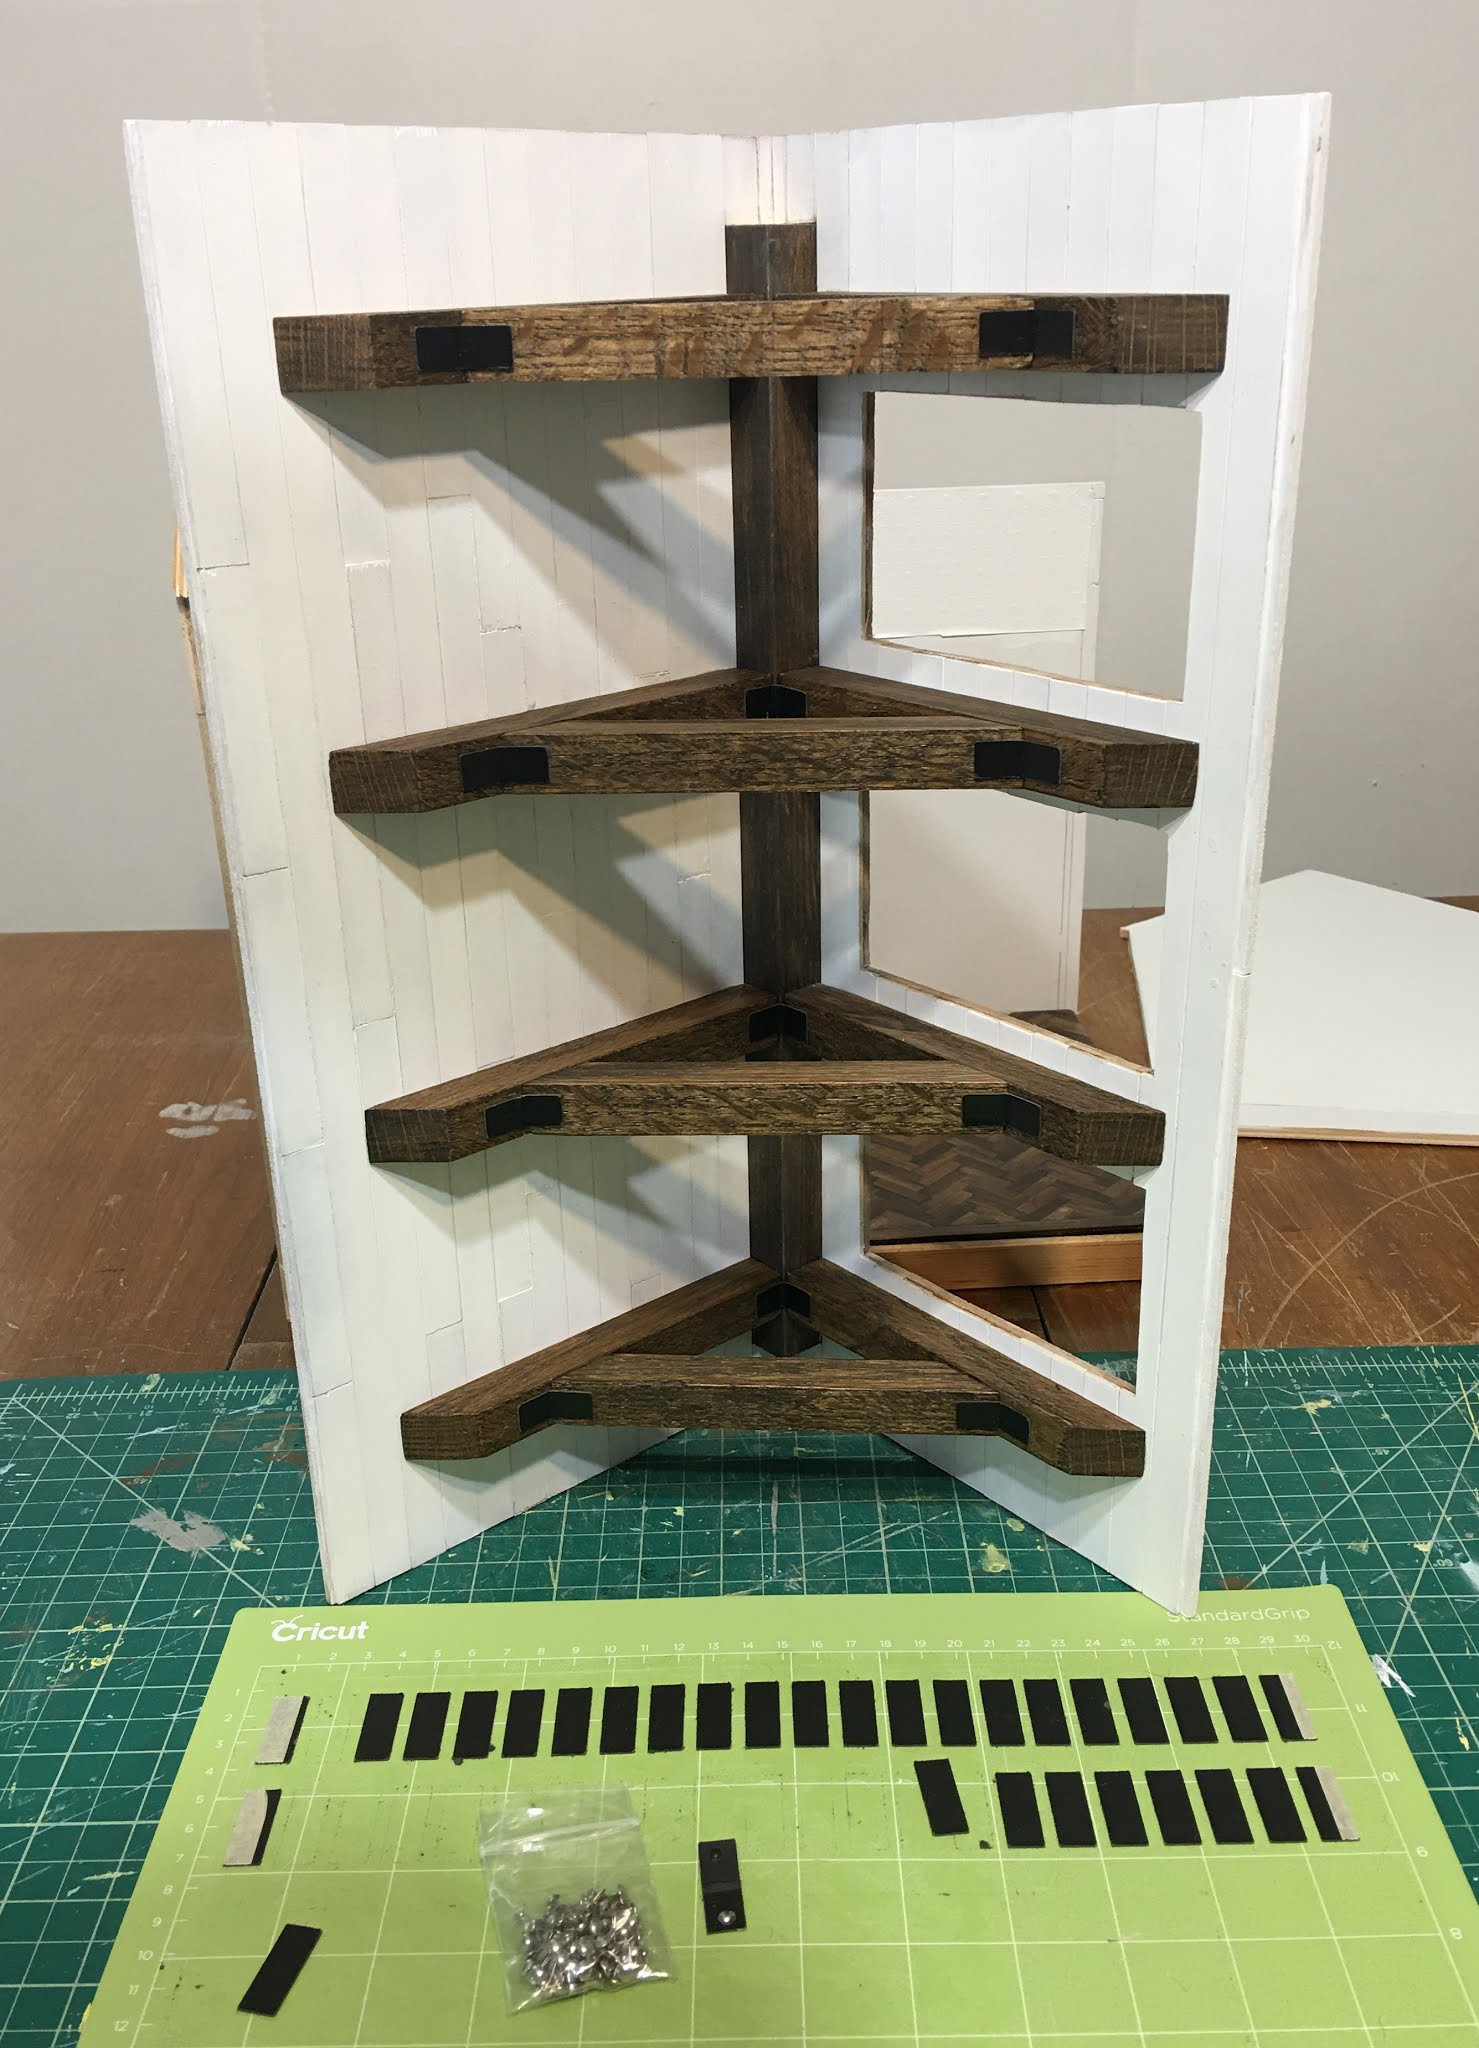
Once I had all of the cladding applied, I needed to come up with material to make the roof trusses. I had ordered some material in anticipation of the task, but it was not meant to be. The company is new to ecommerce, lost the order, was backordered on the product anyway, and ultimately issued me a refund. So this is where Russ, the handiest and most helpful husband in the world, came in.
I informed Russ of my dilemma. You see, I have only mini sized wood and molding in my stash, and some plywood. But not anything 5/8" square and not enough of any scraps to do the whole job. And nothing that looked like old timber. But Russ has a real workshop in the garage and had some leftover oak trim from a job. He also has a nice, real sized miter saw that he used to cut down the very hard oak. First, he made it 5/8" x 5/8". And then, going off my diagram, he cut the wood to size and with the angles I needed. All I had to do was sand, stain and install!


That ceiling is terrific!! Love the "updated" old vibe, it´s a fantastic idea!! I love the whole concept and how you achieved it to perfection. The beams and those skylights are superb!! Great job and also give your husband some praise from me, he did fantastic as well. The description of this kitchen is what my dream real kitchen would be.xxx
ReplyDeleteThanks Alex! I will give Russ your praise! Maybe your next project will include your dream kitchen? I'd love to see it!!!
DeleteThis kitchen is going to be gorgeous, based on how it looks already! I love how, in your pictures, the sunshine is already streaming through the skylights - a glimpse of things to come! Isn't it wonderful when you have a partner who is more than willing to jump in and add their talents to your build as well? I too am fortunate enough to have one of those. I am forever grateful. Russ's beams are prefect and, I am sure, WAY better than what you would have received in your missing order. Happy mini-ing! - Marilyn D., New Brunswick, Canada
ReplyDeleteThanks Marilyn! I hope the luck goes my way so that I can give Tasha something she loves! Sunshine is a precious commodity this time of year, and each time I see the sunlight coming through the windows I can feel my soul lifting. My material would have been balsa wood for ease of cutting, and would have left the option of putting lights in beams a very delicate surgery. Russ saved the day once again and I am so glad to be able to ask for his help and advice!
DeleteUn trabajo espectacular, me encanta como quedan todas esas vigas, y genial la forma de poner las luces !!!!
ReplyDelete¡Gracias Eloisa! ¡Estoy muy contento de que te gusten las vigas y la decisión de iluminación!
DeleteI’m glad you had a senior moment. Without a hinge, the ceiling looks really substantial, as it might have way back then. Nice job on the lights!
ReplyDeleteThanks Sherrill! I seem to have a lot of those moments, though I should come up with a much better way to describe them. The seniors I know are some of the sharpest and most talented people on the planet who don't deserve such a classification.
DeleteA delightful kitchen that is unfolding exactly as it should. Your husband created wonderful looking beams that add so much character to the room...well done!
ReplyDeleteCheers,
Alayne
Thanks Alayne! I'm so glad to have had Russ' help with these! My solution would not have come out as nicely!
DeleteJodi, you can hog all of my blog reading time you want! With this winter storm I am just about TV'd out and I have crafted my fingers to the bones,lol! ALWAYS enjoy your posts and I learn so much from them. The kitchen is really going to be awesome! Michelle in Tenn.
ReplyDeleteOh! Thank you, Michelle! I know what you mean about TV. I find I just can't sit still to watch. I find myself looking for shows that are just so-so, so that I can have them on in the background and work at my craft table with no fear of missing something that I am super interested in. The same goes for audiobooks and podcasts. But when it comes to reading blogs, they get my full attention!
DeleteOh Jodi. We must be one with the Universe, for it seems that you are leading the way. I've thought about adding a sky light to the addition since it will be a sunroom of sorts. Now you will teach me how to do just that. I love the open beams, too, making me wish I had the forethought to leave the ceiling/floor out of the addition and add beams, but that bit of inspiration came after I had the addition assembled. Oh well. I'll enjoy your work.
ReplyDeleteThat is great, Ann! I am happy that the ideas on Tasha's kitchen are inspiring you to look for ways to add more detail to your build! It's always fun to see what tidbits from real life houses we can incorporate into our mini versions! It's nice to bring in natural light when you can, so adding a skylight into the addition will make you happy! I'll be sure to document how I am making mine so that it will give you ideas for yours. If my corner molding ever arrives, that is!
DeletePS Bless our husbands.
ReplyDeleteIndeed! As long as they are about as useful as they can at times be annoying, we've got it made, lol! 🤣🤣🤣
DeleteThose beams look beautiful! I love the lights in them. So glad they came out well for you!
ReplyDeleteThanks Sheila! Not as flawless as I would have liked, but you have to pick your battles, right? 😊
DeleteThe ceiling with the oak trusses are truly splendid work, Jodi, I think you're a lucky bird, having a handy man as Russ. The way you installed the LED lights is great work. Keep on making miniatures, dear Jodi :).
ReplyDeleteHugs, Ilona
Thanks Ilona! I agree wholeheartedly - I am so very lucky to have Russ as my partner, husband and best friend! He is amazing! 💗
DeleteWow Jodi, those beams look amazing! Great work! And thanks Russ for cutting them up! This is all looking amazing.
ReplyDeleteThanks Shannon! I will pass on your encouragement to Russ! He loves it when the girls think he's neat and handy! 😊
DeleteWOW ditto what Shannon has said, it's brilliant.
ReplyDeleteThanks Polly! 💗
DeleteLas vigas son espectaculares. Los detalles de los remaches son perfectos y se ven bien robustas. Quedarán muy bien los tragaluces.
ReplyDelete¡Gracias Isabel! ¡Me alegra que te gusten las vigas! Definitivamente los probaré de nuevo en una versión futura, ¡ahora que tengo un poco de experiencia en mi haber!
DeleteThe sky lights are ingenious and will lighten up the room. I must file that trick away for future use. The beams are beautiful and the straps add the perfect detail. I am going to use strips of ribbon lights from CR2 scale in my latest house. They add some great viewing light and can be wired with a switch. Here is his video https://www.youtube.com/watch?v=hH99SIP73eA&feature=emb_logo
ReplyDeleteThey can be hidden very easily. They might be a good option for you??It is great to have you posting Jodi! (((hugs)))
Thank you, Carrie! I am going to go check out the video and the lighting system as soon as I am caught up on blog stuff! Your latest house? I wanna see! Please post about it, will you? 😁😁😁
DeleteQue techo tan espléndido Jodi,me encanta ése estilo, soy muy amante de lo envejecido y has hecho un gran trabajo con el revestimiento y las vigas. La manera de esconder los cables y colocar las luces es una idea fantástica!
ReplyDeleteFelicita a Russ de mi parte,ha contribuido perfectamente con el corte de las vigas!
Besos.
¡Gracias Pilar! ¡Estoy tan contento de que te guste cómo salieron las vigas y le daré a Russ tu aliento! Si tan solo pudiera planear y construir una casa llena conmigo algún día, ¡podría ser espectacular!
DeleteUn trabajo impresionante Jodi, será una cocina espectacular , pues las vigas que has logrado hacer son increíbles. Buen fin de semana, besos
ReplyDelete¡Gracias, Rosa María! ¡Espero que las cosas que he planeado salgan bien para poder darle a Tasha un regalo que le encantará!
DeleteFirst of all - please give your husband thanks from a far away German blogfriend for being there when you needed him and helping you out. And seeing the result I am convinced that it was a blessing that the shop where you ordered did not deliver and Russ had to stand in - your other solution could never have been that good.
ReplyDeleteIt was big fun to read this post and follow your progress, thoughts and even your senior moments. *grin* Adding the sklylights was a brilliant idea, it's so good to have natural light in such a roombox (let's be honest, we don't always switch the batteries on, do we?) and the wood strips you made with this shabby white look beautiful, even more with the contrast of the beams. This combination is always an eyecatcher and the construction of the beams is awesome. And it was even great for attaching the lights! But what I loved the most is this little detail of the "iron" straps... it's things like these which set a highlight. And using the brads was a great idea, although it made me wonder... It's so easy to write down "I cut the fastener flaps off silver metal brads and used them as the bolt heads"... but in real life it must have been quite a time consuming job to cut all these things off (and pick some of them up from the floor after they took the opportunity for a flight... or do things like these just happen to me???). But the effect is awesome! And as always I'm looking forward to see more!
Hugs
Birgit
Thanks Birgit! I will send your thanks to Russ! He is just tickled when my blog friends think of him as a hero! 💗 Sometimes the most unforeseen circumstances turn into life's most amazing blessings, and today is a lovely reminder of just that: 34 years ago today, at 18 and 22 years old, Russ and I were married. We were young, scared and not terribly supported by our families who were naturally concerned that young love does not last. But we did, became each other's everything, and are so grateful for the life we share and the family we created! He's a good one, and I am so lucky! 💗💗💗
DeleteI am so happy to know that you like and appreciate the little details of the ceiling/beams! Those little brads were a challenge to work with because there is not much to hold onto while you are removing the flaps! Luckily, this time, I did not have to get on my hands and knees to scour the floor. Only one brad fell from my hands but amazingly, landed in my lap! To be honest, sometimes when these things fall I hardly have the heart to look. Unless it is highly valuable, it will end up in my vacuum canister and be considered "spoils". 😋
As, usual, when I'm late with my comments, everything I want to say is already mentioned. I'm in awe about the sky windows and the beams Russ made, what a wonderful husband and wife combination job with stunning results.
ReplyDeleteThe beautiful floor and ceiling are perfectly in style.
Hugs, Drora
Oh Drora Thank You for your lovely comments! I always look forward to seeing you here just to know that we have connected because you are a treasure to me! 💗💗💗
DeleteMe encanta ese tejado. Es maravilloso.
ReplyDeleteEstoy deseando ver como queda la iluminación.
Un saludo
¡Gracias Marian! ¡Estoy emocionado de hacer e instalar las ventanas!
DeleteHello Jodi,
ReplyDeleteFirst I want to tell you that I have solved the mystery of my disappearing replies, like the one on your post about the kitchen floor. I accidentaly clivkrd the sign out button on the right instead of the blue publish button on the left. So no glitches, just me being stupid.
That being solved, I love tne miniature dream kitchen you are making for Tasha. The floor and beamed cealing both turned out great. Starting a haringbone or chevron parquet floor with a triangle in the middle makes sense and gives a stunning result. I will use this tip gratefully on one or two rooms in Huis ter Swinnendael. I myself love the herringbone floors.
And the cealing and beams really lift up the room. I look forward to tbe next post on this kitchen.
Huibrecht
Oh Huibrecht! I am so glad you were able to discover the issue - that sounds easy enough to fix! I often get mixed up when trying to decipher what I am supposed to click on when the blog language is not my native tongue. Just another wonderful reminder that our blogs and love of minis has brought us together from places far and wide!
DeleteI am so happy you like the project and have found something in it's process that may be of help to you in creating Huis ter Swinnendael. There was a lot of great information in those real life videos, but the geometry was too much for my brain. At least I came away with something I could understand, lol!
Hi Jodi! The roof trusses look amazing! Your husband did a great job with the oak.... nobody wants to hand cut oak! I love the added industrial effect with the brackets and silver bolts! Very "chic"! And the planking for the ceiling is just perfect too! I think you will find it is a good thing to have the roof glued down.... the trusses and wiring would have gotten in the way if it needed to hinge open. The sky lights are a great idea too and will certainly add to the modern feeling as well as the available lighting and views inside. This is one exciting kitchen!!! :):)
ReplyDeleteThanks Betsy! My little table saw worked hard enough on the 1/16" walnut. If I had even tried the oak on it I think it would have stopped working in protest, and I could not have blamed it! Thank goodness for Russ and his big boy tools!
DeleteI am so glad you like the roof! I was leery of having only the back half affixed to the walls and do feel better about not having to worry about affecting the wiring or if the hinge would be strong and secure etc. It was a happy accident in the grand scheme of things!
Excellent progress Jodi. Raising the roof has certainly made a difference to this project, plenty space for the trusses and I like what you've done with the lighting. Enjoying this!
ReplyDeleteThanks Irene! It is lovely to have you here and to be bolstered by your wonderfully supportive comments!
DeleteThe beams are fantastis! Your husband is really very good. You are two artists! The lighting are perfect; once turned on they will have a nice effect.
ReplyDeleteHa! Thank you Faby! It is lovely to have such a handy and willing partner! Glad you like the beams!
DeleteJodi, el tejado es espectacular, me encantan las vigas en madera oscura en contraste con la madera blanca.Deseando ver más avances.
ReplyDelete¡Gracias Carolina! Tasha realmente eligió algunas salas de inspiración para seguir y también disfruto trabajando en esta combinación de azul marino, blanco y nogal.
DeleteWow, Jodi, you've made quick progress on this project. The skylights make all the difference, the beams are the perfect touch, and I'm amazed at your confidence to forge ahead and get the electrics in place too. I think there's already a newer post from you. I'm off to read!
ReplyDeleteThanks Megan! I'm glad you like the direction Tasha's kitchen is heading! I don't have the next post ready just yet, but hopefully, later today! Things are getting exciting!!!
DeleteOMG! I can not wait to see this room box! I love the color of the cabinets. Can you explain how you figured out the kitchen on the cricut?
ReplyDeleteThank you MiniLife! It would take a super long time to explain here, but if you look at the tutorial I did on making fireplaces with the Cricut Maker it is the same process. Here's the link for that:
Deletehttps://my-miniaturemadness.blogspot.com/p/making-112th-scale-fireplaces-with.html