
I mentioned to Tasha early on that I would love to try doing a herringbone floor. I was taken aback at how excited she was about this idea, and then she reminded me how much she loved the chevron pattern. I knew immediately that I better source some great mini sized hardwood and then watch some videos to educate myself on laying herringbone floors. I learned that a true chevron pattern has the ends cut at 45 degree angles, while herringbone ends are straight cut and the boards are staggered. The blade in my mini table saw is known to have a little too much flex, so even with the guide set to cut 45 degrees, I was not confident in the precision and accuracy I could achieve. Better to do the herringbone, especially since this was my first time with this sort of thing.
I sourced the material, cherry and walnut, through an eBay seller called Bill and Walt's. The wood is excellent, as was the shipping cost, speed and packaging. I did subsequently place an order through their web site. It seems this is new to them and they are still working out some kinks. I would stick to placing orders via eBay for your protection, until they are better experienced with ecommerce.
I measured the area of my 14" x 9" floor, determined how many 1" long pieces of 1/16" x 1/4" strips of each species (walnut, cherry, maple) I'd need, then cut and sanded them all. See video for proper ratio of width x length you need to make the pattern. Starting with a right triangle, as suggested in the This Old House video (link above), I began in the center of the floor and worked my way outward.


After making the stain chart, I thought I'd like to use a stain that was light enough to really accentuate the different wood species.


It was pretty, but both Tasha and I agreed that in a more modern kitchen, the drastic variance might fight for attention with all the other features. After applying a few coats of dark walnut, I really like this look much better. I doubt I will share the results with her before the end of the project. Hopefully, it's a pleasant surprise!

This is with about six coats of polyurethane. Hard to capture the shine on camera, but it's beautiful!


After this floor experience, I am definitely excited about having another opportunity to do one!
A Sims4 Homage
I was contacted by a lady who saw a photo of the Storybook Cottage on Pinterest. She asked if I was familiar with Sims4, and if I would give her permission to recreate the cottage and share it with the Sims community. I told her I was familiar with The Sims, and had been slightly obsessed with it for a time when the latest version was Sims3. I said it would be wonderful to see a digital recreation and to have it shared! This is what she created...
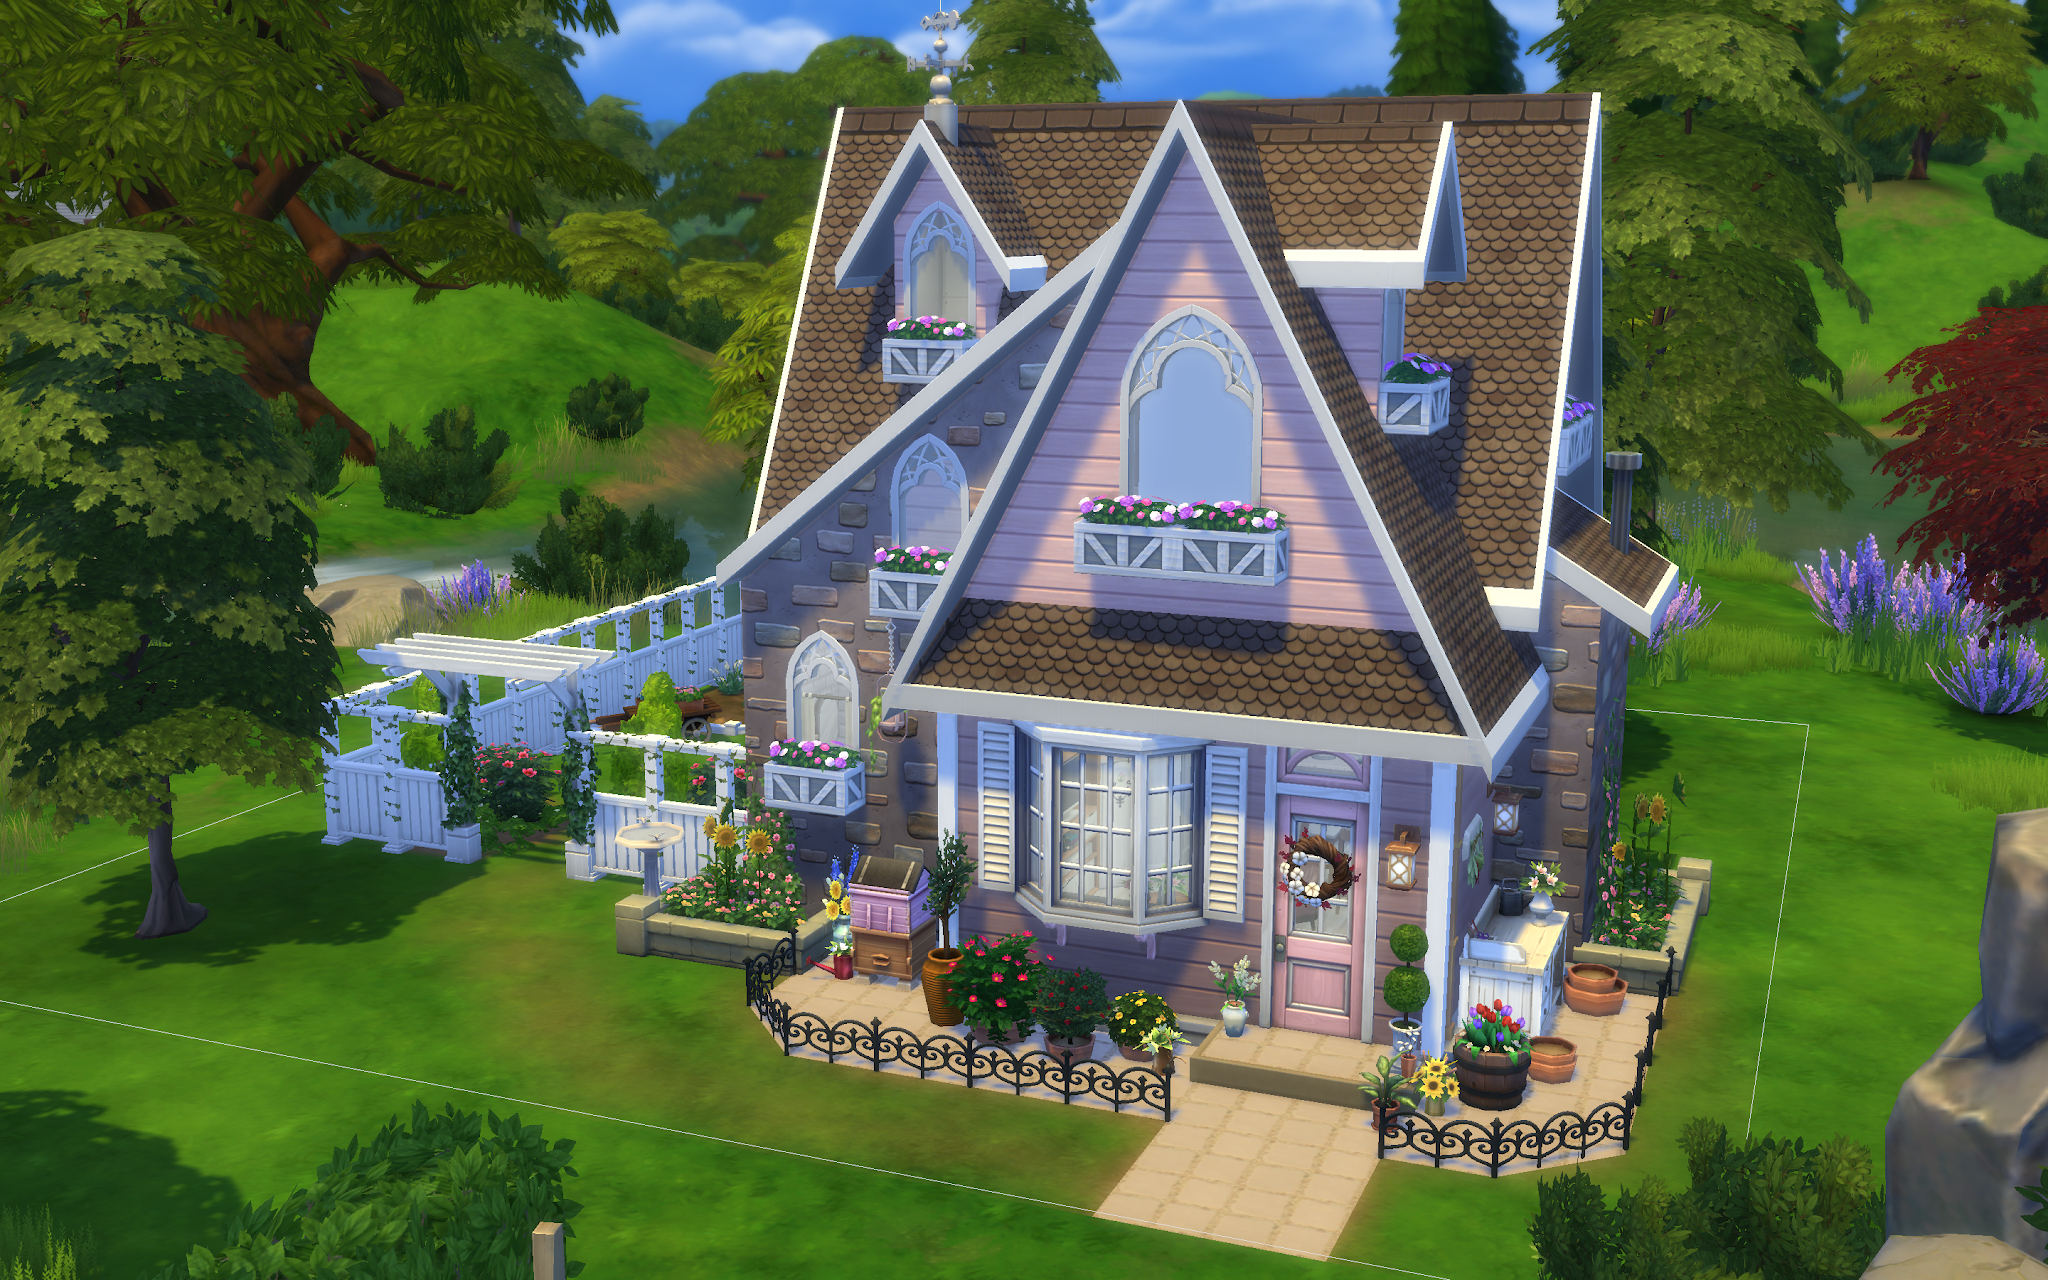


Amazing, right?!? Her Origin ID is drpbvibes, and you can download the Storybook Cottage for free to use in your Sims4 town!
Back really soon with more on Tasha's Kitchen! Suddenly, I seem to be making quick and exciting progress!
xo xo,
Jodi
Me encanta el colorido del suelo. Has acertado completamente con el tinte. ¡Un gran trabajo!.
ReplyDeleteStorybook Cottage como una casa de cuento. No es de extrañar que la gente se enamore de ella.
¡Gracias Isabel! ¡A veces la primera opción simplemente no es la correcta! ¡A mí también me gusta mucho más el nogal oscuro!
DeleteQue buen trabajo has hecho con el suelo en espiga, me parece precioso y la manera de trabajarlo, empezando por el triángulo se ve mucho menos complicado! Gracias por el apunte!!
ReplyDeleteStorybook Cottage es tan bonito! Me parece fantástica la recreación para los Sims!
Besos.
¡Gracias Pilar! Algunos de los videos sobre cómo hacer un piso en espiga eran muy complicados, usando geometría para encontrar puntos centrales y cosas por el estilo. Usar el triángulo para comenzar parecía algo bastante fácil de hacer, ¡y lo fue! ¡Lo simple es siempre mejor!
DeleteThe floor is stunning and looks so real. How much patience to cut all the pieces, but it was worth it.
ReplyDeleteThe recreation of the Storybook cottage for Sims community is a fantastic idea of the lady to show your masterpiece.
Thanks Faby! Cutting the wood certainly does put butterflies in my stomach - I have to go slowly and stay focused so that I leave with all my fingertips, lol! And also, the puppies do not like the noise. I have to show them the saw, encourage them to smell it and then in a very enthusiastic voice tell them that it's okay, only noisy. Better to get it all done in one sitting and then let the house become peaceful again. 😊
DeleteA beautiful floor that provides so much more interest than having the wood pieces laid lengthwise. The darker stain smooths out the contrasting colours in a most pleasing way...lovely!
ReplyDeleteCheers, Alayne
Thanks Alayne! I loved doing the floor, and it was an opportunity to tell the story of an old house which has been modernized but still cherishes it's history. I think that is where my daughter's heart takes her as she looks for her first home to buy. I wanted to encourage that dream in a 1/12th way with this project. Maybe the housing market will stabilize a bit this year and actually allow her to realize the dream in 1:1 scale! 😊
DeleteYou have taken flooring to a new level, Jodi. The floor is beautiful and goes beyond the "dollhouse" level. I love it. Your patience to go through all the steps and your craftsmanship to execute the design inspire us to up our skill set. On another note, I never got into Sim City, like everyone else. I guess I was too busy grading freshman essays to have the time, but to see your little house literally come alive has to be very exciting. Congratulations.
ReplyDeleteThanks Ann! I have long admired the mini folks who create beautiful inlays in flooring and furniture. We all have to begin someplace, and making this relatively simple floor was a great starting place for me. As with most tasks, having the right tools is essential. But figuring out what the right tools are and how to use them can be elusive! But once you know the key to starting, this simple straight edge floor makes it attainable for everyone, and gives an amazing sense of accomplishment. I hope you give it a try!
DeleteThe floor turned out gorgeous. I admire your patience and your skills.
ReplyDeleteThis is the first time I learn about Sim City. Your Storybook Cottage looks as if it belongs there. It's a great homage to you and your work. Congratulations!
Hugs, Drora
Thank you, Drora! Laying the floor was much like fitting a puzzle and the hardest part was keeping the gaps away and not wandering off too far! That is easier than it sounds, and I encourage everyone to give it a try! It's so much fun!
DeleteCreating the houses and neighborhoods in Sims is the best part, and it really is so neat that someone wanted to put one of my houses out there for folks to use! A geeks dream, really! 😊
I now notice that your blog posts didn't show up in my readerslist on my Blogger dashboard....? I even won't ask: how comes? I have had troubles with Blogger for quite some time now, but this is new......and not so nice for me.
ReplyDeleteOkay, so I now see that you're busy building for your daughter Tasha, Jodi, how lovely!
The floor looks gorgeous, you really did a great job.
Your Storybook Cottage looks wonderful!!
I've heard of Sim city by my kids, but at that time I was not quite interested in digital skills, nor computers. After I understood that it would be handy to learn it (for making miniatures and also for blogging) I learned it myself to work with a computer.
Hugs, Ilona
Thanks Ilona! A few years ago, my entire blog roll disappeared, too. I never did find out what the issue was, but luckily figured out that if I manually entered the address rather than rely on it to pick up every blog that I followed, it worked again. I am not sure if that will resolve the issue you are having but it might be worth a test. Betsy said that my new posts were not showing up in her blog roll and I discovered that it was because of the date that I created the post. If I started on a post but did not finish it and publish for several weeks, the post would default to the day I started the post. I "fixed" it by going into the post after it was published and set the date and time. I am still not 100% positive that it works. Time will tell and we will all learn the new bugs with this version of blogger. 🤔
DeleteI'm so happy you like the floors, and yes! This project is for my wonderful daughter so it makes me super excited to make progress!
My kids had the Sims on our computer back in 2002 or some such. I didn't pay it any attention then. But in 2013, my daughter's boyfriend (fiance now), put Sims3 onto my PC. It was marvelous! There was a mod called Create-A-World where you could literally plan and build whole cities with homes and businesses and theme parks! I was addicted. Until my city got so large and complicated that my PC just wasn't good enough to run the game. Many crashes later, I gave up and focused my attention back to 1/12th creativity in the real world. It's an honor to have new Sims players recreate my dollhouse! 😊
Oh Jodi, Betsy told everything (and of course, in correct English, which I can't do): THAT is exactly what I meant by not showing up in my blog roll (I name it my readerslist on my Blogger dashboard, wrong choice of words in English!)! So, she has the same problems with Blogger as I have...? However, it's just still hard to see who have posted a new blog message and who's not, it takes me hours of my daytime, which I want to use for making my miniatures...but I do my best to follow your blogs. So, I think that what you do with the date of your posts, that this will be part the problem. Because yesterday I saw no updates of blog posts, from no one, but this morning it seems that more bloggers did wrote a blogpost. But allthough I would had received their updates, it's not just annoying. It's also very timeconsuming to find out who wrote one and who did not, but again: I do my best to leave my friends a comment.
DeleteThanks again for your clear explanation, dear Jodi, and stay having fun making the dollhouse for your beloved daughter.
Hugs, Ilona
Thanks for all your efforts, Ilona! Our wonderful community is just not the same when we can't stay in contact, though each if us has times where we just can't keep up. Hopefully, as we discover the issues and fixes, we can try to find work-arounds. And your English is amazing! I so admire that you can communicate so beautifully in another language! 💗
DeleteI loooooooovee how the floor looks. Beautiful. The variations in the wood are just lovely. I do really like a herringbone floor. I need to do another of those at some point.
ReplyDeleteThe virtual house is awesome! That is so cool
Thanks Sheila! It was a lot of fun to do, and much less intimidating once I got going! I think you should incorporate another one into your next amazing project!!! I may try the chevron pattern next, but in an old and dilapidated setting so I can learn and make mistakes that look on purpose! 😊
DeleteHi Jodi. Great to hear your enthusiasm for the new kitchen. The floor looks fantastic. I agree about using the darker stain and think it looks beautiful. Well done! And cute Sims cottage, she did a great job.
ReplyDeleteThanks Shannon! It's so funny how you can be in love with something and then the very next day be absolutely against it! I am so glad just adding a darker stain was the answer! I used the same stain on the ceiling beams and just love it there, too. Hope I still do tomorrow, lol!
DeleteWhat a beautiful floor. I would like to try making a parquet floor but I don't have the tools for cutting all those tiny pieces of wood, I suppose I could buy them ready cut :-)
ReplyDeleteThanks Polly! Yes you can! I believe they make kits, though they may be quite pricey. If you got yourself and easy cutter and used flooring that was just 1/16" thick, I think you could rock out a beautiful floor! It's so fun to try a new challenge, so please do and share it with us!!!
DeleteEl suelo es sensacional.
ReplyDeleteHabéis realizado un gran trabajo.
Felicidades por la recreación de Storybook Cottage.
Un saludo
¡Gracias, Marian! ¡Estoy tan feliz de que te guste cómo quedó el piso!
DeleteYour floor is beautiful! So much patience and skill to create it. I love the high contrast version, but I see how the toned-version is more subtle and suitable for the kitchen.
ReplyDeleteIt must be really fun to see the Sims version of your cottage.
emjay
Thanks emjay! It was a lot easier to do than I thought it would be. I think the most difficult part may just be cutting the boards so that they are all the exact same length and that the ends are perfectly straight. There is room for error, though, especially if you are going for an old and weathered floor. I encourage you to give it a try and I know you will be happy you did!
DeleteBravo Jodi!! The floor is wonderful, you did an amazing job. Thank you for walking us trough every step of the process. Take care :)
ReplyDeleteThanks Alex! I hope it has encouraged you to try something new and fun, too!
DeleteOh Jodi - I loved the floor before but, with the darker stain I REALLY love it! You have inspired me, as happens so frequently when I read your posts. I have a "next project" percolating in my mind right now, to give me a break from the Christmas theme once I finish the North Pole Postal Service, and I am going to try this technique to make a herringbone marble floor. You have really seeded my imagination. Thanks so much for all your wonderful details. They are so helpful to the mini community as a whole. Big hugs. - Marilyn D., New Brunswick, Canada
ReplyDeleteThanks Marilyn! The more varied finish might be nice in a really fancy old castle or hotel, but the dark walnut is mush better for a modern setting. I'm so happy to know that you are inspired to start planning your next mini adventure! Herringbone in marble sounds incredible! Can't wait to see!!!
DeleteThe floor turned out awesome, so beautiful... Tasha will for sure be over the moon with it. And as always it was so interesting to follow your progress, I can only agree that "calming down" it down a bit with a darker stain was a good decision to give the future furniture room to shine. You would not believe how many tries I had to make until I came up with a solution for the kitchen floors both in my Beary House and the Christmas House...
ReplyDeleteAnd what stunning news about your beautiful cottage being digitally transformed to enter the Sims cosmos, what a deserved honor! It must be very special for you to see it in this version. This lady made a great job - although I miss many of your wonderful flowers. *LOL*
Hugs
Birgit
Thanks Birgit! I can believe the amount of tries - so much of what we do is trial and error. It's so much fun when an idea works out, though! And the Beary House and Christmas houses are true works of art so I am glad you kept on trying!
DeleteYep - it's so nice to know that mini houses make hearts in the digital community go pitty-pat, too! We are all suckers for cuteness! 💗
The floor is lovely and what patience! How nice too to have your Cottage recreated for Sims - what fun.
ReplyDeleteThanks Irene! I think patience is a mini person's best quality! The determination to make real life things small is, too! This is so apparent and appreciated when we see your incredible historical room recreations. I sure come away inspired!
DeleteIt seems that everyone loves hardwood floors for their dollhouses lately. When I started making parquet for my Del Prado house, I didn't have wood strips so I cut up a window blind that was made of bamboo. It worked surprisingly well.
ReplyDeleteYour floor turned out perfect, of course, and I love the chevron pattern. Starting in the centre of the room makes perfect sense. I will remember that next time I attempt a floor.
You are right, Megan! I think dollhouse trends tend to follow real life trends on the home makeover shows. I think using the bamboo blinds was a stroke of genius, and re-purposing something we already have on hand gives us an even greater sense of accomplishment! I am so happy that you like the way the floor came out!
DeleteOhhhhh, ese suelo es espectacular, íncreible trabajo.Jodi, gracias por el paso a paso.
ReplyDeleteYo también me quedé en los Sims 3, Storybook Cottage es una maravilla.
¡Gracias Carolina! ¡Me alegra que te guste el suelo!
DeleteRealmente extraño a Sims3 y desearía que devolvieran algo de flexibilidad en la próxima versión. Por otra parte, ¿quién tiene tiempo para Sims ahora con todos los mini proyectos aún por terminar, jajaja!