Search My Blog!

Use the Search box below to find keywords that you're looking for quickly and easily!

Search Feature

Thursday, June 16, 2022

Bucket List

One of the dollhouses that has always been on my bucket list is the Willowcrest. Unfortunately, the kits (made of 1/8" tab and slot plywood) were discontinued by Greenleaf sometime after the last release in 2009. I didn't get back into minis until 2012, so I thought I may have lost my opportunity forever. I've always kept my eye out for one, but whenever I saw them, they were way over my comfort price for a dollhouse kit. There are currently four of them on eBay ranging from $375 to $450, not including the pricy shipping. And they don't guarantee the condition or completeness. Yep - way out of my comfort zone. Farewell sweet dream...


And then... You know how when you make a wish, sometimes the universe conspires to make it come true for you? Well, imagine my surprise when, randomly, a Willowcrest kit showed up in my Facebook Marketplace feed! It was located less than an hour from me, it was the same price as the last release price in 2009, and it was brand new! Sort of. The nice man who sold it to me was selling it for his sister, who, received the kit from her parents back in the 1990's. She's a busy mom now and has no hope of ever having the time to build it. No problem! It'll be going to a good home - mine!


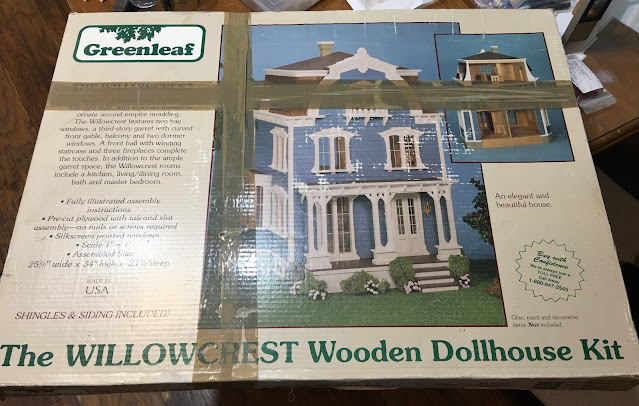
When I opened the box, everything looked to be there and was in amazingly good shape. You can imagine how delighted I was when I confirmed that every sheet was accounted for, and at least topically, in tact. There was even a brand new set of Houseworks door knobs in the box. Bonus! They aren't pictured here, but the instructions, schematics, warm up sheet, Greenleaf Guarantee sheet and catalog were also inside and in perfect condition. ✅


I really didn't want to start another big project, as I was enjoying the regular endorphin rush of completing my many "almost finished" projects this year. But you know how the miniaturists' mind works: let me just look at the instructions, let me just punch out a few pieces to see the wood's condition, let me just do a quick dry fit, let me just take some notes and make some plans for the future. Um hum. You know where this is heading. I'm alternating now between groaning "What Have I Done?" and extreme excitement.


Punched, primed and dry fit the pieces from the first page of the instructions.


I had a talk with myself. I said "Okay, so we're doing this now. Accept it and get to work!". I spent the first few days scouring the internet to see what those who've gone before me have done. There is so much inspiration! The kit definitely has a few awkward and challenging spaces along with it's uniquely beautiful Second Empire features. Many have tweaked the design or added on to gain square footage and maximize the usable space. The very best example of thinking totally outside the box and hitting a home run with the kit is blogland's very own Elizabeth at Studio E! Her Villa Leone, which is set in Venice, is astonishingly beautiful and extraordinarily creative! Fittingly, it won Best in Show at the Vancouver, Canada mini show! 

I am not that ambitious with my plans, though I can't help but want to make a few improvements and use a few of my technology tools to see what can be done. To that end, I began with the room that, by all accounts, they recommend you start with: the entry/stairwell that spans both the first and second floors. This is because it quickly becomes inaccessible, so it's a build/decorate/build situation. 

Kitchen, front, looking into the entryway/stairwell room.

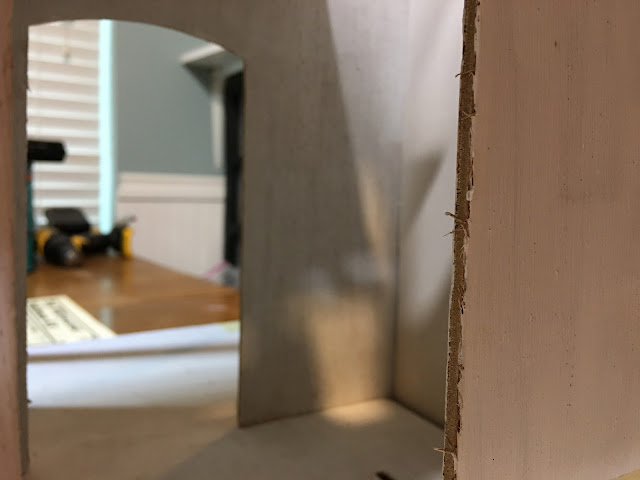
Looking thru the front door opening into the entry/stairwell room.

Spiral stairwell's left corner.

Looking thru the front door opening you can
go straight into the kitchen or left to the living room.

That meant I had to make some decisions right away. I often begin a project by finding an inspiring paper pack, and that's exactly what I did here. I wanted to do something totally different than any of my other projects, and kind of in keeping with Second Empire style. I chose the Stamperia Grand Hotel paper pack as my theme. My Willowcrest wanted a very romantic and old fashioned kind of feel, but because I am a die hard Laura Ashley fan, I'm going to mix many patterns and colors using these scrapbook papers as inspiration.


Next, I assembled the staircase. This was so that I could get it measured against the kit's right (looking at the front) wall. You see, I want the first and second floor entry/hall to be seen as much as is possible. It's a grand space, probably the best space in the kit because it's mysterious. It really ought to be appreciated! The kit comes with a very tiny (and cute) diamond square window, and the upstairs landing can be seen through the front window, but viewing into those areas is extremely limited.

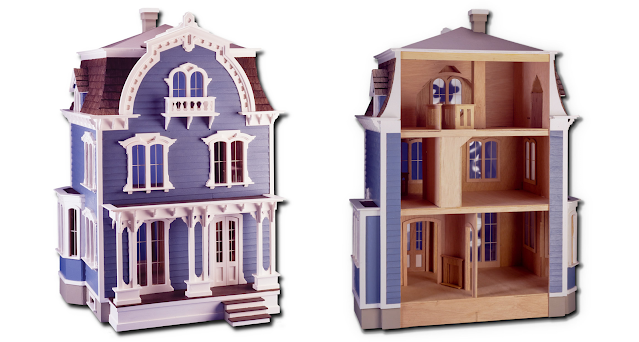
Photo Courtesy of More Minis
https://moreminis.blogspot.com/2018/12/the-willowcrest-dollhouse-revisited_21.html

After the stairs had been minimally constructed, I was able to mark up the main stairwell wall to plan for a much bigger window. In keeping with the kit's design elements, I decided to use the French Door window (from the first floor adjacent to the front door) as my template.

French Door Ext. Layer #2 of 4

Here is the interior layer of that frame traced onto the stairwell wall...


And with the stairs taped in place...


But how can I replicate the fancy, multi-layer and double arched interior and exterior frames? Technology - that's how! I'll even attempt to make them fancier! Details to follow in my next post.


Although it will probably take a very long time to accomplish this bucket list Willowcrest dollhouse, I am really going to enjoy it no matter how long it takes. I hope you'll come along on the journey, and I hope it inspires you to make a wish!

xo xo,

Jodi

Tuesday, June 7, 2022

1912 Pike Place


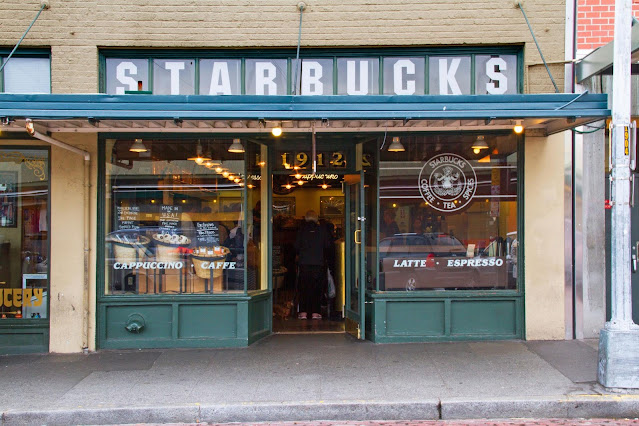
Some of you may know that the first Starbucks store was opened in 1971 along the cobblestone streets of Seattle's historic Pike Place Market. The name was inspired by the classic tale Moby Dick, evoking the seafaring tradition of early coffee traders. I wasn't even aware of Starbucks until the early 90's, when my mom introduced me to her ritual of getting a "mocha" every morning. From then and for over twenty years, going to Starbucks became a ritual for almost everyone I knew. A meeting place, a reward for hard work, a hug in a mug when life got hard. It was just a part of everyday life, especially because it seemed there was a store on every corner. And though I can't drink coffee much anymore, it still holds a special place in my memories. That is why finishing this project, which pays homage to that place and those memories, feels so good!


In an effort to keep this post to a reasonable length, I'll make the details short and sweet. To read all about this project from the beginning, just click the Starbucks At Pike Place blog topic. For the exterior cladding, I used a combination of egg cartons for the bricks, a Lucky Charms cereal box for the siding, Onetime spackling tinted with alcohol ink for the grout, Asphaltum brown and Ceramcoat hunter green paint.


Egg carton brick before grout. Space left for siding.


With cereal box siding strips added and bricks grouted.


By the time I had reached the back of the shop I was pretty much board with brick work. I opted for a simple paneled siding. I used a wide length of cereal box at the top for fascia (to cover the exiting wires) and some wood trims. It looks inelegant where the wires exit the shop, so I came up with an idea to distract the viewers eyes...


A dumpster! I found this model on Thingiverse. Thanks tanner3d!


I remodeled it a bit in Tinkercad, adjusting the depth and height to fit my limited space. I also added casters for the bottom to raise it up off the ground.


And while the wires don't completely disappear, they're not as intrusive.


For the front trash receptacle, I came up with my own design in Tinkercad to fit the 1-1/8" square space.


There is nothing like a custom fit!


In an effort to add about 50 years of age to the building, I added layer upon layer of dirty water washes (4 parts Raw Umber, 1 part black and 10 parts water) to everything, including the trash cans. Then I came back over some areas with a combination of green and brown chalk shavings, mixed with a little water, and painted mold and moss on the building, sidewalks, trash receptacles and planters. You may have also noticed that I made vinyl letters and address numbers with the Cricut, signs on my printer (not Cricut Print Then Cut because... LONG story) and sign holders/planters with the 3D printer.


Signs, planters with shrubs, outdoor seating and...


A grungy dumpster... But not too grungy!


The drive thru side of the building...


A peek through the front door...


And peeks through the top plexi covers...


Look! Rose and Roxanne popped by for a refreshing coffee beverage and baked goods?


And now, at long last, I can officially call Starbucks at Pike Place... Done...


Open for business and conveniently located in the neighborhood!


Now that another abandoned project has been finished this year, I have to decide what's next. Something old? Something new? While I'm pondering, my real house could use a good cleaning!

Have a great June, my friends! Hope to be back soon with something fun and interesting!

xo xo,
Jodi

Wednesday, June 1, 2022

Unfinished Business

Without intentionally planning it, 2022 is shaping up to be a year of finishing undone things. It's apropos because the motto that I have adopted this year is:

How can I embrace the future if my arms are still wrapped around the past? 

To continue this liberating trend, the next project on my list of things to finish was Starbucks. It is housed in the bay window shop of the Houseworks Street Of Shops set. At one time, I'd envisioned having an entire street of downtown Seattle landmark shops housed in them. That was the plan in 2013 when I bought the kits, but as you know, ideas evolve, time changes us and I lost interest in that idea.

Bay Window Shop

Nonetheless, here sat my little Starbucks shop nearly finished and collecting dust. It was a shame, really, because I had worked so hard on it at the time. 2013 - 2014 was a time in which I was able to get over my fear and lack of experience with building furnishings/fixtures from scratch and working with things like FIMO and resin casting. By the time I'd finished the Starbucks shop interior, I was pretty proud of my efforts. What I took away from the project encouraged me to never stop dreaming, trying new crafts or pushing the boundaries of my mini skills. It's a kind of time capsule now, so though it needed some minor interior repairs, I wanted to leave the interior pretty much as it was in 2014. The exterior was totally unfinished with the exception of a little trim paint and a remodeled front door.

Shop photo from 2014

I pulled the room box off the shelf and I think I actually heard it gasp in shocked surprise! Taking it over to the work table, I began to assess it's condition after being so long forgotten. Surprisingly, it wasn't too bad, though it really needed a good cleaning! The front wall, left, having never been attached, is leaning against the store. You can see where at some point in it's history I had applied Magic Brik tape in order to create the faux brick front. On the right is the tiny, separate restroom box that I'd originally constructed to attach to the outside, just on the other side of the restroom door in the store. It's front wall had not been installed, either.


Once I relocated all the dust colonies, I was amazed to see that almost all of the wee items had stayed in their places. You see, this shop was done diorama style, and everything was glued into place. Some of the clear resin pieces have yellowed over the years, but I decided to leave them as is, too.


Now was the big question: Do The Lights Still Work??? I had big doubts because:

1. This structure is made of MDF.

2. The lighting system is powered by tape wire.

3. My long term success rate with MDF + Tape Wire is 0/4 (the brads and eyelets always seem to wriggle themselves lose).

4. It was installed 9 years ago.

Make that success rate 0/5 because only 2 out of 5 LED light strips still worked. It wasn't all bad news, though! The LED light strips themselves still worked. And, I had just enough strip light connectors left to hard wire them in. I could remove all of the tape wire and go with a totally hard wired set up.

LED light strip still works.

Display case light still works.

The plug had to be jiggled to get a good connection or the
LED strip lights and display light would go out.
Definitely time to move on from tape wire.

These are the LED strip lights once they'd been removed from the walls and their connections to the tape wire strips had been removed. The strip light connectors I installed on the ends will now allow me to hard wire them into the transformer wire. One of them was broken, where the two plastic pieces connect to hold it onto the light strip, but I repaired it as best I could and crossed my fingers. 


I kept checking the lights and connections at every step since I didn't quite trust them. Phew! Still working!


With the tape wire removed from the shop, I installed the light strips again in the same place, just not on top of tape wire. I had to drill holes for the new wires to exit to the exterior of the room box.


I also added a strip of two rows of clear plastic tiles to the bottom of the original corner molding "shades". I painted them with Mod Podge and a drop of white paint to make them opaque. This gave me a little extra depth to prevent seeing the strip lights underneath.


I had to replace the strip lights in the food display, too, because the wires ran under the flooring where they connected to tape wire. Instead of adding another strip light, I opted for LED bulbs, one under each of the top two shelves. I ran the wiring under the floor, through a channel I cut, and then out the back to meet up with the rest of the wires.

5-12 volt, 3mm LED bulbs to light up the top two shelves.

New wires run down through the floor.

Wiring channel chiseled out. 

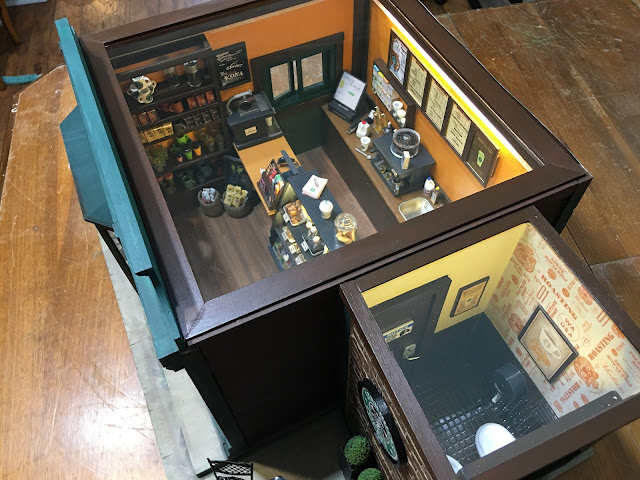
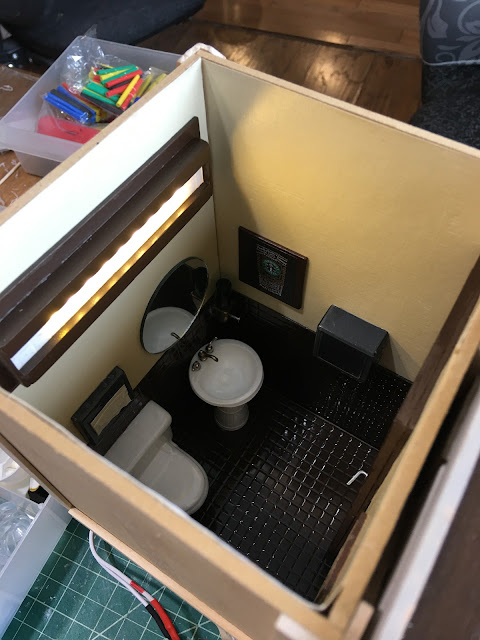
By this point, as you can see in the photo above, I had finished and attached the restroom box to the shop. This is a good time to talk about the restroom here because I don't think I have ever mentioned much about it on any previous post. It's constructed out of 1/8" plywood, made to be the same height as the shop and made to attach as a pop out to the side of the shop. Drinking coffee = having to pee, so I thought it was important to have a restroom.


Back in 2014 when I made the restroom I wanted it to look as authentic as possible to real Starbucks bathrooms. I made an industrial sized TP dispenser out of a clear plastic jar, painting the inside dark gray. Attaching dangling TP to the bottom sells the illusion. I used a plastic lid for the toilet seat cover dispenser, gluing a reasonable facsimile of one onto the front. In my family, we affectionately call toilet seat covers "ass gaskets". :O)
The toilet and sink are MBS plastic models. The sink is mounted on top of a painted Chrysnbon butter churn and the soap dispenser is made from beads and a nail. The wall and floor are also MBS clear plastic tiles where you paint the back any color and they look like porcelain. I made the light fixture from wood, more plastic tiles painted opaque white and LED strip lights.


The front fits into a channel created by installing corner molding with enough clearance for the wall to slide in and out. I made it like this in case the inside of the restroom ever needs to be accessed in the future. The paper towel dispenser s made from a clear plastic Chrysnbon box, painted on the inside, and then a brown paper towel is glued to the bottom.


With it attached and connected to the main shop, it was time to check the lights...


Phew! Now how about the rest of the lighting...

This side works...

The display unit works...

So far, so good... WAIT!!! What's this??? The left wall light strip is not working! ARGH! Wouldn't you know, my "repair" to the connector didn't hold. I can either pull the shade off and try to re-repair (but the result would probably, eventually be the same), or, I can live with it. Guess which option I chose...


At this point, I decided to attach the front wall of the shop and just move on. There is plenty of light without the left strip.

This is the last chance to see the window display unencumbered. Here's where all the coffee fixins are located.


And here's the progress on Starbucks so far...


Next week, I hope to be back with the plexi tops made and installed, decisions made and implemented for the exterior finishing, and with a little luck, just maybe another abandoned project will be done! It is June, already, and that means 2022 is halfway through! Better keep crackin'!

xo xo,

Jodi