Search My Blog!

Use the Search box below to find keywords that you're looking for quickly and easily!

Search Feature

Thursday, February 18, 2021

Natasha's Kitchen - Roof And Ceiling

In the post before last I'd shown you that I added extensions to the walls to make them about an inch and a half higher. Once that portion of the build was done it was time to move on to the roof/ceiling.

See the groove in the floor at the front of the room box? That is to hold a piece of plexiglass to protect the things displayed inside from dirt and dust. Originally, I had intended to make the front half of the roof hinge open so that the plexiglass panel could be lifted up and removed. But in a "Senior Moment" that I'll explain later, that was no longer an option. I'll share the new plan for removing the plexiglass in a later post on the main structure. For this post, in the interest of not hogging all your blog reading time, we'll stick to the ceiling/roof. 


Although I knew I would be installing lighting in this project, I thought it would also be nice to bring more natural light inside, too. So I cut holes in the front half of the roof for skylights.


While I had the scroll saw out and was already making a sawdust mess, I thought I better just cut the sink window opening, as well. More on that in the next post.


For the inside of the ceiling, I planned on leaving it vaulted with exposed cladding and roof trusses. As if the kitchen were in an old house that had been updated, but also embraced the home's history and the workmanship of an era gone by. Both Tasha and I appreciate Time's Patina, and when played off of more modern fixtures, magic happens. I am no expert on aging miniatures, but I gave it my best shot on the ceiling.

I painted a rough coat of 3 parts water to 1 part brown paint onto 1/16" x 1/2" basswood (both sides to prevent curling). Once that was dry I applied a light coat of white to one side. This is the same method I successfully applied for the shiplap boards in the Display Shop project.


Once dry, I lightly sanded until some of the white paint chipped and revealed some brown paint beneath. This was the look I was going for. 


To begin laying the cladding onto the ceiling, I first needed to join the ceiling with the 5/8" square beam that came in the kit. This is where I forgot that I needed the front roof panel to remain free so that I could attach a piano hinge. Instead, I plowed ahead and glued both roof pieces to the beam. I only realized my mistake after I'd already applied several of the cladding strips, too late to be undone.

Not to worry! "Senior Moments" don't have to be followed by "Charmin Moments". I calmly thought through the problem and contemplated ways I could still have a sliding plexiglass panel. In my next post I'll show you the solution I figured out that will still allow the plexiglass panel to be removed.

Once I had all of the cladding applied, I needed to come up with material to make the roof trusses. I had ordered some material in anticipation of the task, but it was not meant to be. The company is new to ecommerce, lost the order, was backordered on the product anyway, and ultimately issued me a refund. So this is where Russ, the handiest and most helpful husband in the world, came in. 

I informed Russ of my dilemma. You see, I have only mini sized wood and molding in my stash, and some plywood. But not anything 5/8" square and not enough of any scraps to do the whole job. And nothing that looked like old timber. But Russ has a real workshop in the garage and had some leftover oak trim from a job. He also has a nice, real sized miter saw that he used to cut down the very hard oak. First, he made it 5/8" x 5/8". And then, going off my diagram, he cut the wood to size and with the angles I needed. All I had to do was sand, stain and install!


Once the beams were in, I cut "iron" straps from kraft board using the Cricut. I cut the fastener flaps off silver metal brads and used them as the bolt heads. 


Here's what the ceiling looks like from inside...


And a peek through the skylights...


The last thing I could do on the roof/ceiling for now was to install the lights. I am using all LEDs in this build from Evan Designs. The ceiling will have six can lights, and possibly two additional pendant lights later on. Those I will try to create and print with the 3D printer. So for now, the 3mm bright white can lights with mounting clips are all I had to install.


I was originally going to mount them right into the ceiling. Due to the angle of the ceiling, the concern that they would give an irritating glare through the skylights and that the roof itself is only 1/16" luan, I decided to install them in the beams, themselves. This was really tricky, because I had to drill deeply enough to allow the mounting clips to seat, but then also at an angle so that the wiring could be concealed all the way through the beam and out through the roof.


Some came out better than others, but luckily, they are barely visible while looking through the front opening, and not at all visible when peering in through the skylights. What I am after here is good lighting, and I think I've achieved that. Phew! I have tested each individual light but still have to test them in the room at the same time to make sure I have enough. With supplemental cabinet lighting, and a few fixtures, Tasha will have plenty of light to play.


I am relieved that I don't have to worry about the roofing shingles just yet. I can procrastinate on that for a while. But if ever the corner trim shows up, I can begin making the skylights. Until then, walls, wall treatments, cabinets here I come...

May your "Senior Moments" always be followed by clever solutions, dear friends!

xo xo,
Jodi

Sunday, February 14, 2021

A Herringbone Floor For Tasha's Kitchen

I mentioned to Tasha early on that I would love to try doing a herringbone floor. I was taken aback at how excited she was about this idea, and then she reminded me how much she loved the chevron pattern. I knew immediately that I better source some great mini sized hardwood and then watch some videos to educate myself on laying herringbone floors. I learned that a true chevron pattern has the ends cut at 45 degree angles, while herringbone ends are straight cut and the boards are staggered. The blade in my mini table saw is known to have a little too much flex, so even with the guide set to cut 45 degrees, I was not confident in the precision and accuracy I could achieve. Better to do the herringbone, especially since this was my first time with this sort of thing.

I sourced the material, cherry and walnut, through an eBay seller called Bill and Walt's. The wood is excellent, as was the shipping cost, speed and packaging. I did subsequently place an order through their web site. It seems this is new to them and they are still working out some kinks. I would stick to placing orders via eBay for your protection, until they are better experienced with ecommerce.

I measured the area of my 14" x 9" floor, determined how many 1" long pieces of 1/16" x 1/4" strips of each species (walnut, cherry, maple) I'd need, then cut and sanded them all. See video for proper ratio of width x length you need to make the pattern. Starting with a right triangle, as suggested in the This Old House video (link above), I began in the center of the floor and worked my way outward.


It went down much faster than I anticipated, and I really, really enjoyed the process! So relaxing!


After making the stain chart, I thought I'd like to use a stain that was light enough to really accentuate the different wood species.


It was pretty, but both Tasha and I agreed that in a more modern kitchen, the drastic variance might fight for attention with all the other features. After applying a few coats of dark walnut, I really like this look much better. I doubt I will share the results with her before the end of the project. Hopefully, it's a pleasant surprise!


This is with about six coats of polyurethane. Hard to capture the shine on camera, but it's beautiful!


After this floor experience, I am definitely excited about having another opportunity to do one!

A Sims4 Homage

I was contacted by a lady who saw a photo of the Storybook Cottage on Pinterest. She asked if I was familiar with Sims4, and if I would give her permission to recreate the cottage and share it with the Sims community. I told her I was familiar with The Sims, and had been slightly obsessed with it for a time when the latest version was Sims3. I said it would be wonderful to see a digital recreation and to have it shared! This is what she created...


Amazing, right?!? Her Origin ID is drpbvibes, and you can download the Storybook Cottage for free to use in your Sims4 town!

Back really soon with more on Tasha's Kitchen! Suddenly, I seem to be making quick and exciting progress!

xo xo,

Jodi

Thursday, February 4, 2021

Natasha's Kitchen

Some of you long time readers know that my obsession with miniatures came sometime at the end of the last century. In secret, I was decorating and furnishing my daughter Natasha's first real dollhouse. I'd drop the kids off at school, rush back home, pull it out of it's hiding spot (under a cloth tarp in the laundry room's crawl space), and get as much accomplished during those school hours as possible. Christmas was coming up fast, and I was so new to every aspect of dollhousing. Wallpaper, trims, flooring, furnishings - what a dream! The house came as a pre-built plywood, two story structure with six rooms and a tiny porch. So much to do! Those short hours passed so quickly, and before I could believe it, it was time to hide it back in the laundry room again. Christmas came, she loved the dollhouse, and the whole family got involved in finishing the rooms and making little things to furnish and decorate with. But what a gift for me, too! I was left obsessed with an amazing and all consuming hobby. The rest, they say, is history...

Not long after Natasha got the dollhouse, she grew out of playing with it. That was the end of a short era for her. Now she's all grown up, 33, and while she likes to look at my projects and marvel at their tiny wonder, she has a busy life and has not been overly excited about miniatures. She's wonderfully encouraging and supportive of my interest, but hadn't shown a desire for her own to play with. Until recently.

There's a magical time in the lives of our adult children when they begin spending their weekends at Home Depot, improving their living spaces and becoming full fledged adults. Her texts now regularly include photos of furniture, design ideas and the style of kitchens she dreams of for her first house. The other thing to know about Tasha (as we call her), is that she is an amazing gourmet cook - something she definitely did not get from me!

Last fall, we started designing an imaginary kitchen for her, saving and comparing ideas and helping her to narrow down and identify her style. Meanwhile, I began to look for the perfect room box in which to create that kitchen for her in 1/12th scale. When I hinted that she may just get a mini kitchen for her birthday in July, she was immensely excited! And that, of course, made me extraordinarily excited! The goal is to give her a mini version of her dream kitchen. One that she can decorate for the seasons with tiny culinary replicas including fruits, produce, decore and wonderful mini cookware. It'll make giving future gifts so much fun! And maybe... She'll even go to shows with me!

Tasha's niche seems to be a little modern, a little rustic, open, not fussy, and with a slight nautical feel.

To house these exciting ideas, I found a unique-to-me room box on eBay. It seemed to have just enough space inside for a well equipped kitchen without being too obtrusive a structure for a new-to-miniatures person. It had a unique gable roof - unusual for a room box, and would be fully enclosed with a polycarbonate front panel that could be removed to play, decorate and clean, if I hinged the front roof panel.


Initial plans for her room box include a number if things she'd really like to have incorporated into her dream kitchen. Like her mother, she is very practical, loves a combination of modern and traditional styles, loves function mostly over form, and appreciates subtlety over crudeness. She wants to be involved in the periphery, making key decisions as I need input, but mostly she wants to be surprised. I've shown her some elements and gotten feedback, but she's got instructions to keep away from my blog!

To be absolutely certain of the layout and sizing, I made graph paper drawings of the space - all three walls and the floor. The back wall, 14" wide, will include a central gas cooktop, built in double ovens, a glass front cabinet and open wooden shelving.


The left side wall, 9" wide, will house the sink, dishwasher and more open shelving. My first challenge, and an affirmation of why I like to take the time to plan spaces out on graph paper, was the window. At first, I thought using a very large, 5-1/2" wide x 5-1/4" high modern looking window would be good. After drawing it in and seeing it with my eyes, I realized it was too large and really dominated the space.


Using a smaller, single window, I was able to enlarge the open shelving a bit and came up with a lower cabinet design I liked better, too. This one centers the sink in the space.


For the right side of the kitchen, I don't have a full wall to work with due to the area required for accessing the double ovens. Here, I decided to incorporate a wet bar, leaving space between the ovens and the wet bar for essential apron storage. Tasha loves aprons, and I am prone to finding really cute ones to give her as random "thinking of you" gifts. It would be fun to try and replicate some of them in the build. The wet bar was one of the elements that I really wanted to get Tasha's input on. So until we could collaborate, I created a generic template.


You'll also notice that I made a graph paper template of the floor. That way, I could really see how much floor space there would be with 2" deep counters. Is there space for an island? Yes, but the space actually left for bar stools is questionable. If the countertop overhangs enough, maybe there's room for two. The space between the counters and the island is the 1/12th conversion of the 1:1 standard space of 42". In one inch scale, that is 3.583 or approx. 3-19/32". Seems like a lot until you actually look at it. Often, you are able to shave a little off the 1:1 standard in your 1/12th conversion and it will still look reasonable. We'll see in the end if there are stools or no stools, but this is another confirmation for me that I should always take the time to make the graph paper drawings. It saves a lot of disappointment and frustration later on.

Since it was Russ' birthday last weekend, and because Tasha and her fiancé Brent have had Covid (and therefore antibodies), we felt safe about having a masked and distant gathering here with them. I was able to confer with Tasha about the wet bar, and with her input, came up with a combination of these two in the design for the last wall:


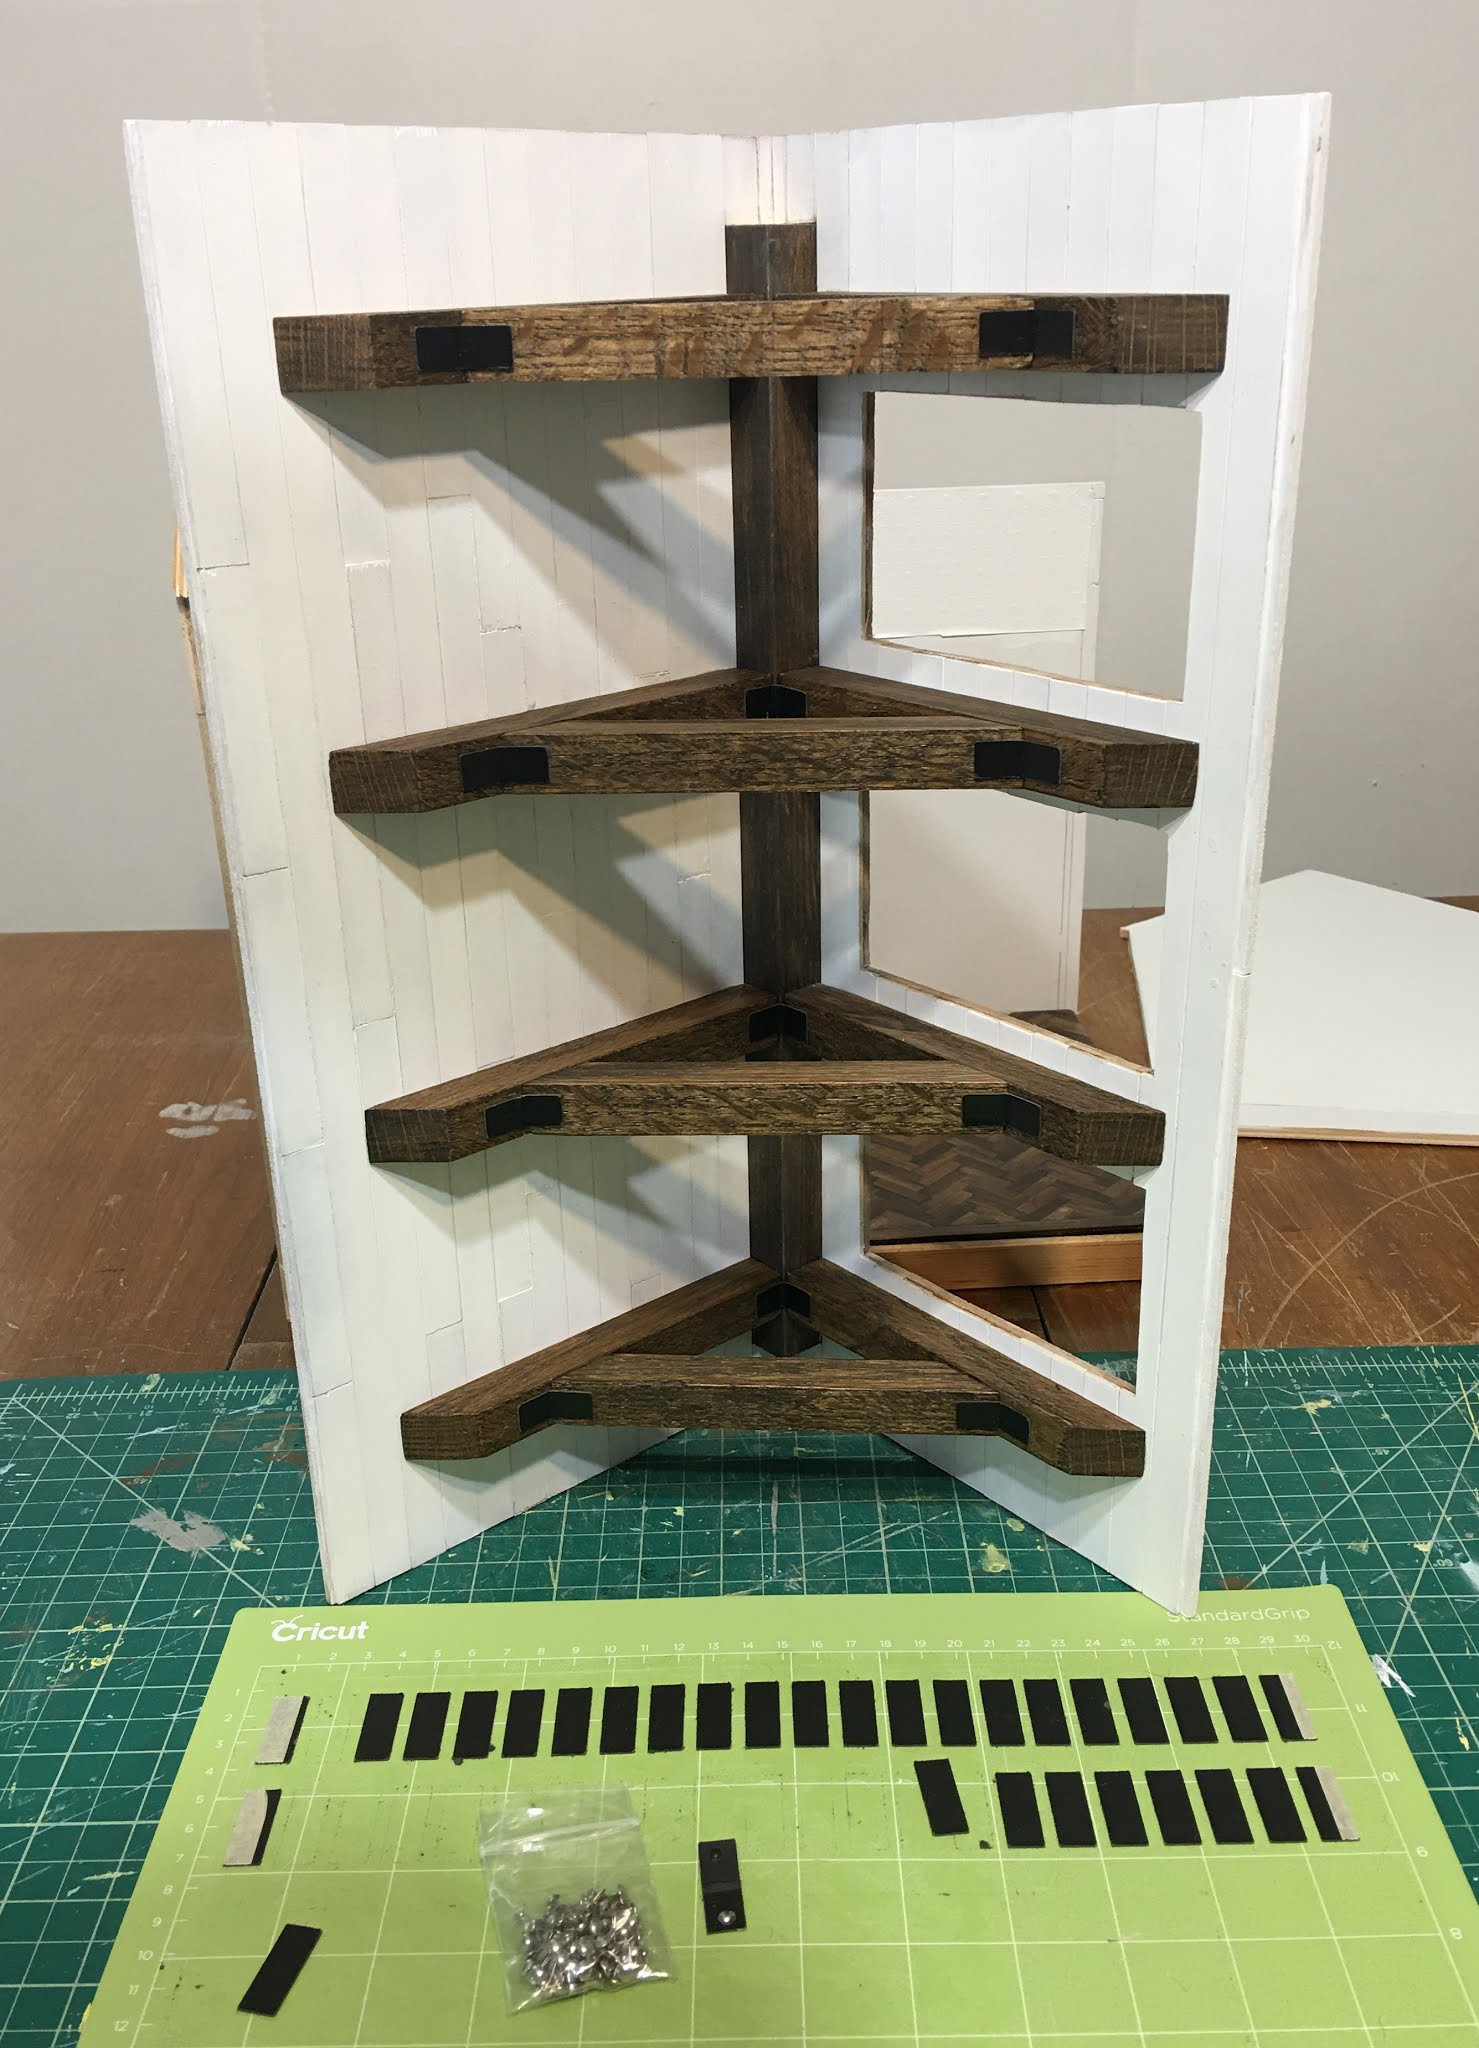
Now that the basic layout has been settled, I can turn my attention to the structural tasks. The walls in this kit are only 8-3/8" tall (not including the gabled walls). That will never do! A good, modern kitchen must have a minimum of 9 foot ceilings in real life. You can see in my drawings that I made lines at 9" and 10" on the graph paper to determine how tall I'd like the walls to be.   


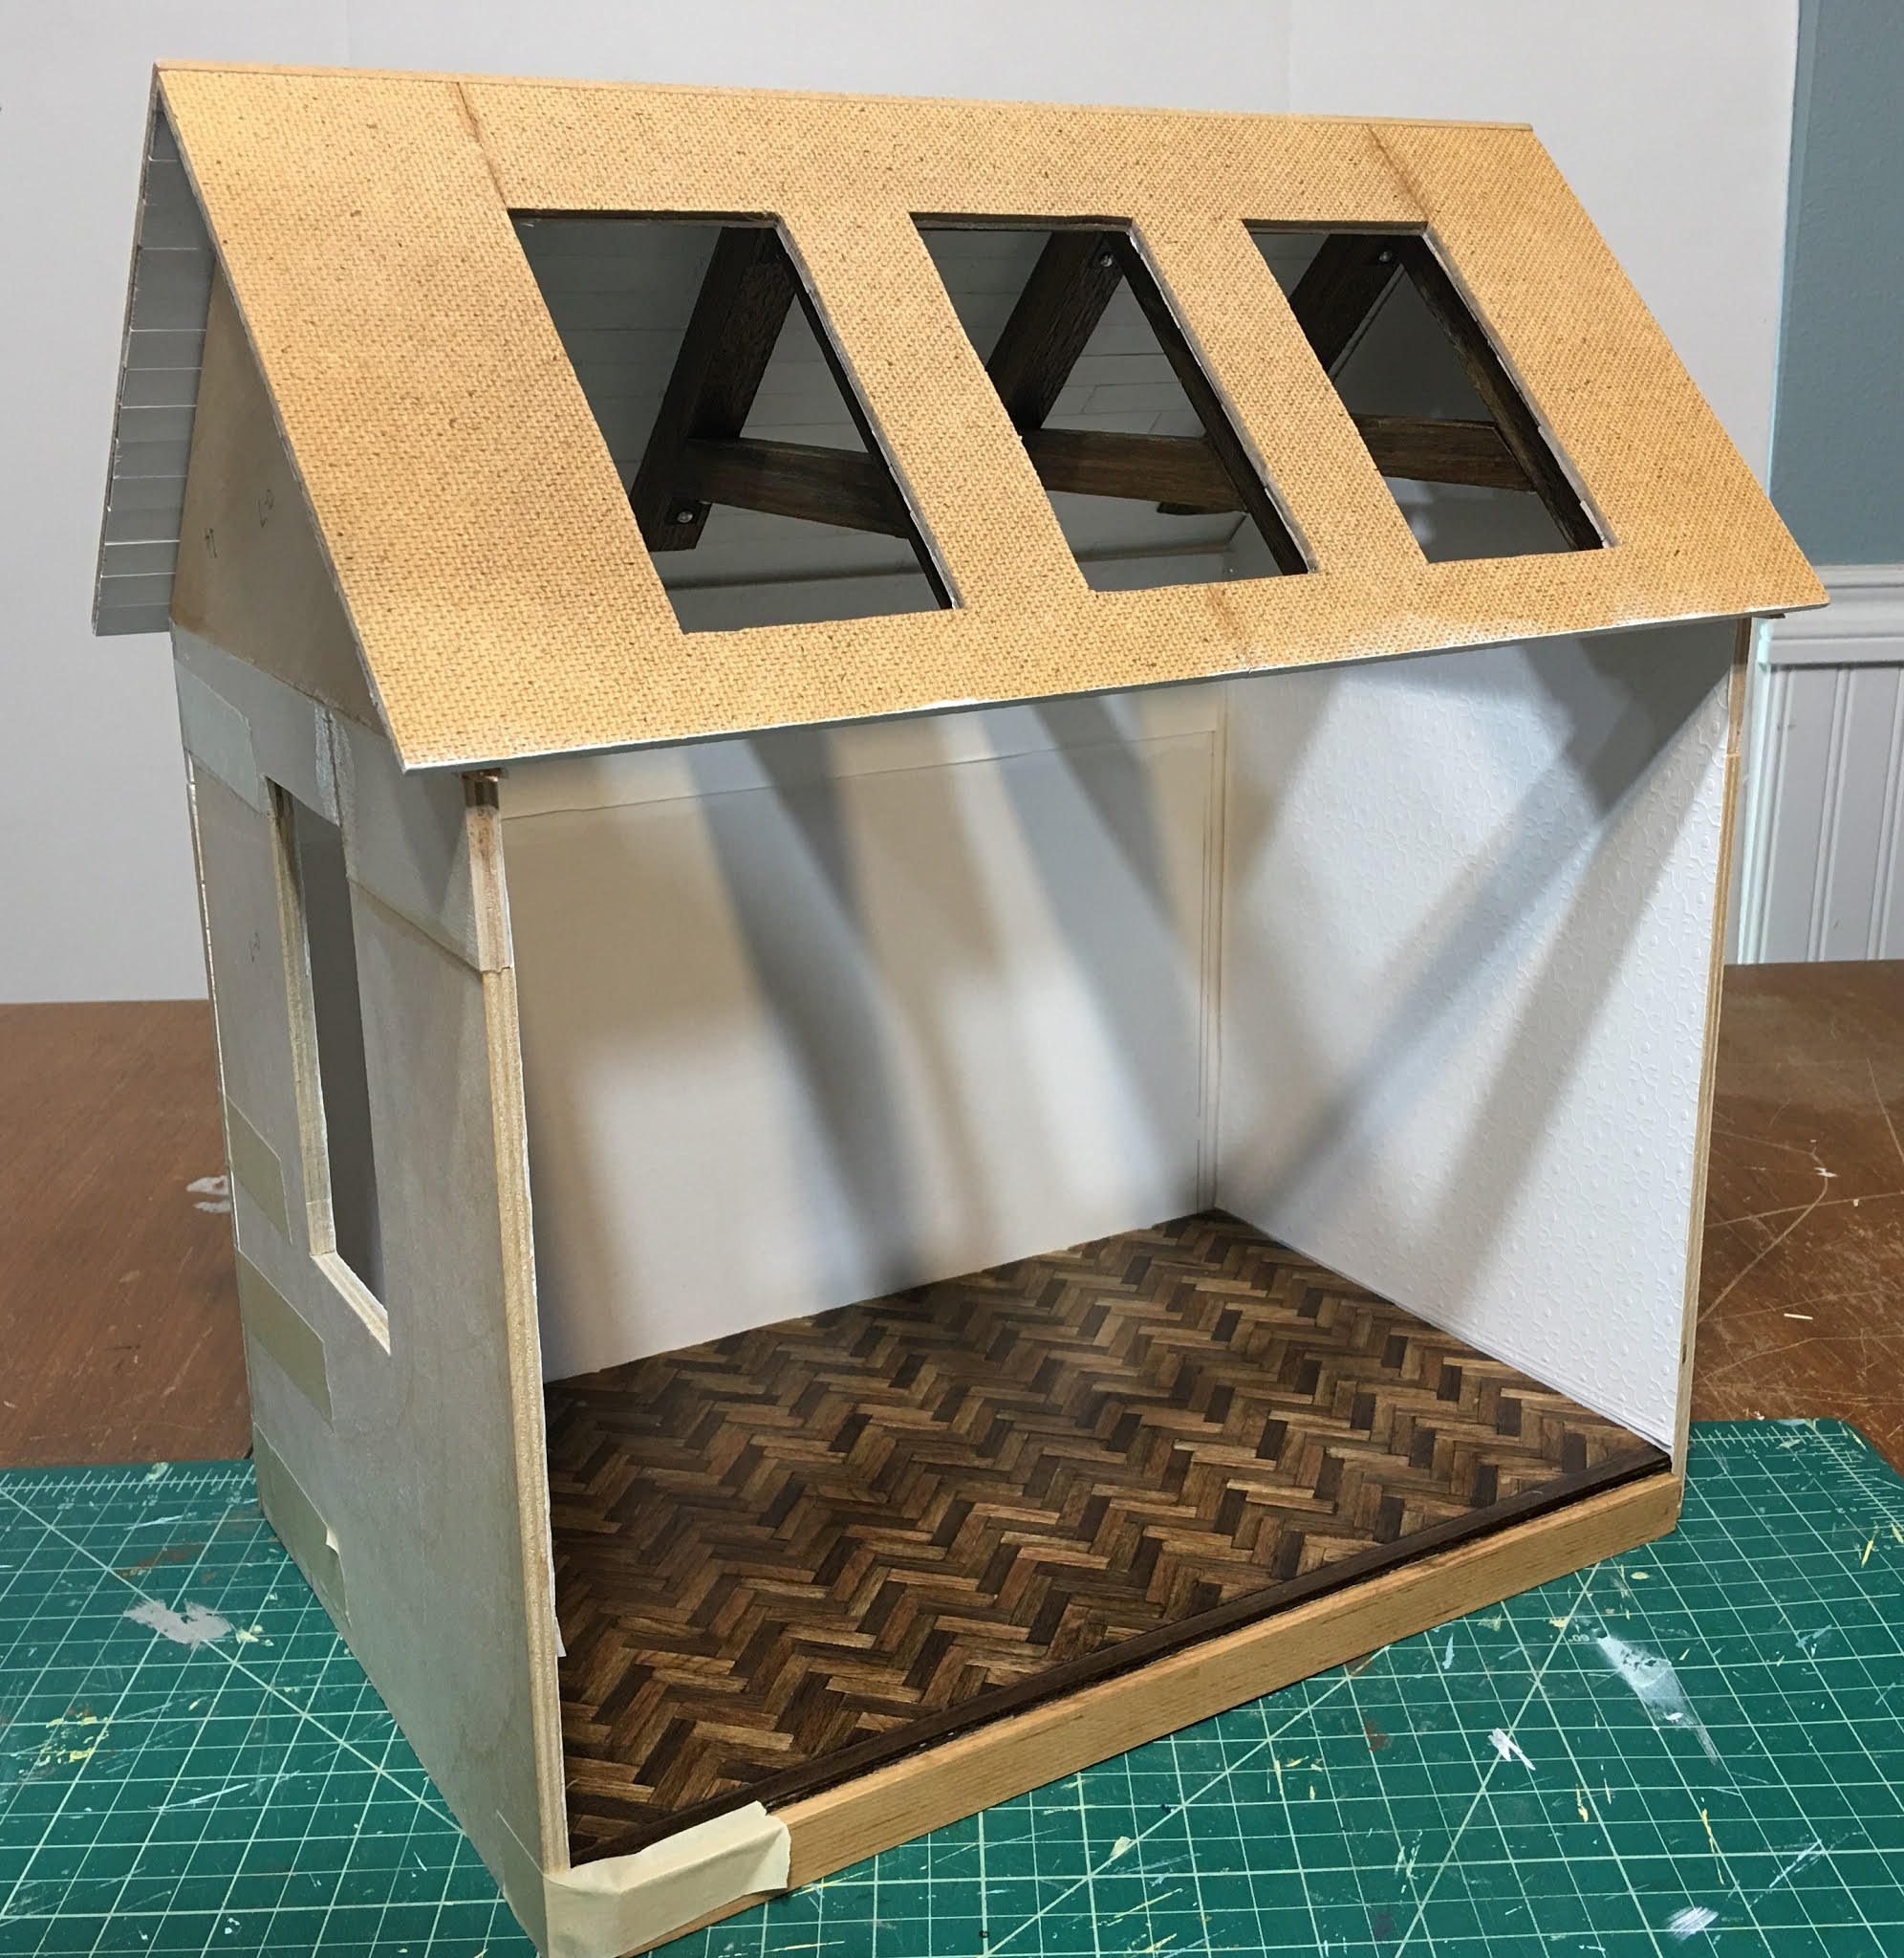
I added 1-1/2" strips of plywood to the tops of the walls to bring them up to 9-11/16" high. That should help to make the space feel more grand, and clear the way for open trusses in the gabled ceiling. She was very excited about that idea! Now I hope I can pull it off!


You probably noticed that the herringbone floor has been finished, too. Well, almost. When I consulted with Tasha, she was in agreement with me that the kitchen might feel more modern if there were less contrast between all three wood species. That can likely be achieved with a darker stain. I'm going to try the dark walnut that I used on the front edge strip and see how it goes. 

In my next post, I'll share all the info about the floor, including resources for the material, and how I got 'er done. Hopefully, I'll have the sink window and skylight holes cut, and the hinge installed on gable roof. Sawdust... Here I come!


Have a great week my friends! Hope it includes something creative!

xo xo

Jodi

Wednesday, February 3, 2021

Twenty~Two Tomorrows...

I am shocked at the degree to which time just slips away from me this past year. No excuses. Suffice to say that many times since December 10th, when I'd look at the roofing left to be completed on both Vera and Virgil's cottages, I'd say "tomorrow". There were at least Twenty~Two Tomorrows... But finally, the roofing is finished!


In looking at the last dozen of my mini projects, I managed to avoid using traditional wooden shingles on nine of them. There's no denying I have an aversion to them - probably because I am hyper critical of my results and therefore try to come up with any other kind of roofing that will do the job. If I need accountability, I look no farther than my "leftover shingles" drawer. There are at least four giant bags of various kinds in there to choose from, all from projects where I managed to avoid using them in favor of a metal roof, Paperclay tiles, or simply no roof at all. But this time, I faced my fears and made a deal with myself to accept and love the results no matter the outcome. It turns out I actually really enjoyed the process this time! Take the judgement out and I reconnect to the fun of mini building.


Now what's left on the cottages are the furnishings, the little details and to make a final decision on how I want to incorporate the plug strips for the wiring. These I can do as the urge to make furniture kits or cleverly hide wiring inspire me. Like with the bakery or the Storybook cottage, I hope that inspiration to finish them comes sometime. Until then, as is my true MO, I have started on a new project that has me captivated. I'll share more on that in my next post. Hopefully, it won;t be so long until the next one.


Stay safe, hopeful and patient, my friends.

xo xo,

Jodi