Search My Blog!

Use the Search box below to find keywords that you're looking for quickly and easily!

Search Feature

Sunday, May 31, 2020

Lisa's Country Cottage

I bet most of you are aware that HBS/miniatures.com recently re-released a couple popular past Creatin' Contest kits. For those that did not know, there was a vote held on Facebook between four favorites. The top winners were Lisa's Country Cottage from the 17th and MiniTown Loft from the 19th annual Creatin' Contests.


For Christmas 2013 (the year after the contest), I made the Lisa's kit into a fishing cabin and working lamp for my dad. I had so much fun, but it was early on in my foray back into miniatures. The scope of my idea and the finishes were pretty elementary. I wanted another chance at this kit and have coveted it ever since. Once in a while you'd see a kit come up on eBay, but for a lot more than I was willing to pay. Apparently, other people really wanted another chance, too! Seeing that they were available again, and at a great price, was like a dream come true!


Dad's Fishing Cabin/Lamp

The style of the kit by itself is completely adorable, but the innovative improvements that some of the contestants made have become my favorites. I wanted to incorporate many of those features into my cottages and see where the design lead me. You can see all of the entries and more photos from the incredibly creative contestants here. Below are just some of my favorite features.


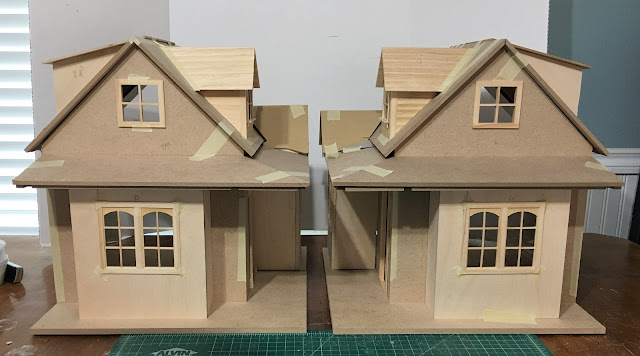
Wait! Did she say Cottages?!? You caught me! I did use the plural and on purpose! You see, I've had a project idea niggling at me since the Covid lockdown started, and this kit is perfect for both structures. I was going to make them from scratch out of foam core, but the Lisa's kits will be so much more sturdy while still providing a small-ish footprint. More on the concept later, but for this post, we'll just talk about the structural changes and additions.

I got the kit pieces taped together, then made cardboard walls/roofs to help mock up the additions. So far, I liked where it was heading...


I consulted with my on site contractor (wonderful hubby Russ) to check my ideas for soundness, and because I would need his help and big boy tools to cut new dados in the 3/8" MDF walls. This was necessary because I wanted to reduce the amount of ceiling height on the first floor in order to increase the head room in the attic space. By lowering the second floor (by cutting lower dados into the side walls), the attic now has a knee wall which will great for furniture. The first floor ceiling height is now 7-1/2" and the attic is 8" to the peak. This is perfect because the tallest inhabitant will be 5".


I wanted to make the second cottage a mirror image of the first. This meant creating an additional dado in the floor piece to accommodate the change in wall positions. An easy job for Russ with his big boy table saw. While it seemed as if me and my petite table saw and jigsaw took forever to cut my new walls from 1/4" plywood and the 3/8" MDF, Russ' saw was like cutting butter for him. Luckily, he was happy to help me. I did my best to woo him into being partners in the whole project, but he's just not that into minis and could not be persuaded. :O(

It took a couple days to get the cottages roughly constructed, but it was a lot of fun to see their new characters beginning to develop. You never really know at this stage if your idea is going to be a good one. You just have to follow the lead and hope for the best.

Porch Popout and Roof Dormer

Kitchen Popout and Dormer Profiles

Shed Dormers With Round Windows

New Interior Living Space

I dug through my window and door drawer and came up with the windows and doors from the 23rd Creatin' Contest kit. I didn't use them in the contest build because my Three Little Pigs theme had a Fairy-tale Tudor vibe. But they are really cute with the arch and mullions, and I had enough of them for the lower windows on both cottages. I was able to cut down the double door frame to make a single door for one of the cottages.


For the second cottage, I could have made another single door but I wanted it to have it's own character. I had a cheap $3 door from China that, with just a little remodeling, made a nice dutch door. First, I removed the door from the frame. Then I cut the door's bottom two panels off, leaving half of the upper frame piece. Next, I removed the metal door pins and heated it in the microwave until the glue softened enough to pull the upper panels and frames apart. After removing the remaining glue residue and sanding, I cut a piece of 1/16" Lexan to make the window. I gave the door a couple light coats of paint so that I could assemble it and not worry about getting paint on the glass. I drilled holes for an additional door pin where the two doors will meet and swing separately. I glued the upper frame pieces together with the Lexan inserted. I had to drill new pin holes in the frame because my door needed to swing the other direction. Thankfully, all the steps went smoothly and the new Dutch door will work well.


Here are some more photos of the expanded interior. While it's still a pretty compact cottage, the usable space has been improved considerably, and the character of the new facade gives ample opportunity for cuteness overload! I hope I can make the most of it! The old dado tracks will be filled in with 1/8" x 3/8" basswood strip.


Another project?!? I know, I know! I still have the bakery in progress and the poor old, nearly finished Storybook Cottage. I imagine I'll be bouncing around between all of these as the inspiration hits me, but only after I finish dad's Father's Day gift.  It seems strangely meant to be that I am working on new Lisa's Country Cottage kits as I am making new things to put into dad's old cottage after all these years. But if these last few months have taught us anything, it's that we must make the most of each day. You never know what tomorrow will bring. 

Stay safe and make all your dreams happen, my friends!

xo xo, 
Jodi

Monday, May 25, 2020

Hodgepodge


A confused mixture is exactly right in describing what I've been up to this past week or so. And it seems like I haven't accomplished or brought to conclusion any of the things I've started on. It's been entertaining at any rate, and worthwhile because I learned some new things. I'll hit the highlights...

I made some more bottles from the mold but am still waiting for the tops to arrive from the Netherlands. Once those arrive I can get the bottles finished up and start the drawing for the vanity set. These colors came out a little better.


It took two nervous days to work up my courage to complete the set up process and print the first test file on the 3D printer. I was astonished at how well it went, and in fact, that encouraged me to grab some of the stl files of things I'd previously made for Shapeways and give them a try. All it required was to open the files into the QIDI slicer program and then save them as gcode files onto a thumb drive for the printer. Then, just pop the thumb drive into the printer, make a few selections from the touch screen and you're off!


QIDI test file. I have no idea what it is, either. Is it something
really useful and I just haven't figured it out yet?

The first of my own prints was the modern wall mounted toilet. Red was the random spool color that came with the printer, though I ordered white to use after I get some practice in. It came out surprisingly well.


Then I threw a little more challenging print at it by making a phone holder in Tinkercad and testing that out. The first try got about 7% completed and then the printer started making a funny noise. Russ and I realized that the nozzle had clogged and the noise was the printer's attempt at trying to squeeze more filament out of the nozzle. Luckily, the printer comes with videos on a thumb drive that shows how to unclog the nozzle. It's a pretty common thing and a good learning experience. I'm so glad Russ was there to help me stay calm and confident that we could do it. Soon we were back underway! I am now the proud owner of a handy phone holder with my name on it!


After that I threw a few different challenges at it: side by side items, teeny tiny items and things with letters. In most cases it performed beautifully without having to change any settings. There are a couple things I can do to improve the designs for my printer, but that will all come in good time. For now, just learning the slicer program and all of it's functions and settings is plenty!


It is mesmerizing to watch as the printer adds the layers and then fills in the voids. It takes a really long time, though (9-1/2 hours for the phone holder), so you have to occupy yourself with other things. I put a few coats of paint on the tall planters. I like that they end up looking like concrete or pottery.

Red PLA

Painted With Thunder Gray
I also had these cake kits from Stewart Dollhouse Creations to look forward to...


I dove in to the first kit and quickly realized that it was going to be an all consuming activity. Like when I started on the Storybook Cottage garden, figuring it would take two weeks. It took nine!!! I did complete four cakes from one kit over a few days, so, yippee! It is apparent that I will need A LOT more practice!!!


I looked at all of the bakery shelving that will need filling for Pound Cake's displays, estimated how many more I would need, ordered some more Original Sculpey and Soft Fimo, and will now wait until it arrives before I dive back in to the project. Making mini baked goods tends to monopolize your work table and it looks like June will arrive before the supplies do. Craft stuff is getting harder to source and more expensive by the week!

It's probably a good thing I'm stalled, though, because Father's Day is coming up fast. I have an idea and a direction for dad, but need to get started. Here;s a hint...


Oh, and one other distraction and major rabbit hole to report for the week. I bet most of you are aware that HBS/miniatures.com re-released a couple popular Creatin' Contest kits. For those that did not know, there was a vote held on Facebook between four popular kits. The winners were Lisa's Country Cottage and MiniTown Loft. I bought two Lisa's kits and, call me MAD, got them out to start planning...


More hodgepodge to come. Y'all come back soon, ya hear?

xo xo,
Jodi

Monday, May 18, 2020

~Happy Birthday Alexis~!!!

Guess what? I didn't do what I was supposed to do again this week. I'm not surprised that you're not surprised. You all know me so well by now! But let me explain... You see, my son Ande met Alexis  when she was working at her family's bakery and Ande was helping with the bakery's remodel. Apparently, it was SHAZAM at first sight! And after their first date they realized that they "totally got each other". That was in the fall of 2017. Since then, these two crazy kids have gotten engaged. No formal plans for a wedding yet, but they are saying "someday".

Alexis has shown interest in my miniatures and dollhouses. In fact, she said she'd like to have a dollhouse and all of the little treasures that go inside, one day. That's all I needed to hear. She is also a budding young artist. She and Ande painted a couple acrylics together with instruction from YouTube videos. Alexis continued with interest painting several more. I am so proud of her! They are really awesome!

So what to do for her birthday on May 18th this year? How about making all of her paintings into mini ones with a small space to display them? Yup. That's what I did...


 I began with a plywood base measuring 5-1/2" x 5-1/2", then used foam core and 1/4" x 1/4" basswood beams to make the 10" high walls. I used a scrap of Houseworks walnut flooring and stained it in walnut to contrast with the white painted magik brick walls. A blank canvas!


I kept the back side simple with leftover brick wallpaper.


Next, I needed an easel. Since I'd given myself only days to have this project finished, I thought the quickest method was to turn an unfinished Classics ladder into one by adding a wide shelf for a canvas to sit on. Alexis' favorite color is yellow, so I used every shade I had of it in the project. I could not bear to dirty up the apron so I made a dirty paint rag instead.


I had a tray table kit from Jane Harrop so I painted the legs yellow, decoupaged yellow art onto the tray part and then made it look like a flea market treasure.


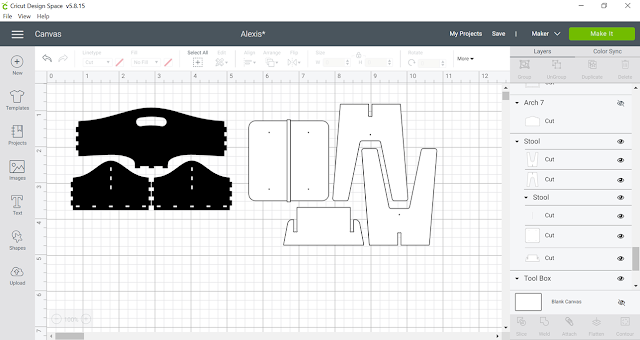
I made the stool and tool caddy using svg files intended for 1:1 furniture. I simply had to resize them in Cricut's Design Space for 1:12th scale.


I definitely needed art supplies, but wouldn't you know - that was one category of miniatures I hadn't collected things for! So I made 'em!

The little acrylic bottles were made based on Rainbow Tinkle's video:

https://www.youtube.com/watch?v=Zm4nbv0RPpo

She provides the printie in pdf format but I definitely had to resize it significantly for 1/12th scale. It was an otherwise great method, and if I'd had the right foam on hand for the lids, my bottles would have been perfect.


The paint tubes were made by rolling toothpicks in aluminum foil tape. I will make a tutorial soon as well as one with how I used heat shrink tube to make the paintbrushes. I cut the artists palette with the Cricut and then looked at photos to see how to make it look well used. I had the pretty yellow bottle in my stash, and the sketch book with the initial "A" is from a fun kit by Nancy.


I had a yellow teacup and saucer, too, so thought I'd make Alexis a nice cup of tea with a tea bag and cookies. She will even have seven more tiny tea bags in a box when she needs to relax a little. I really need to make a tutorial for the tea bags and boxes, too!


Of course there needed to be flowers, and I just so happened to have yellow roses, a white bunch of something and a yellow watering can. I feel like I cheated, not making the flowers, but I just didn't give myself a whole lot of time!!! I am getting so disorganized in my old age!!! They are still so lovely, though!


And the best part for last... Alexis' amazing art!


Between Facebook, Instagram and asking Ande to sneakily take straight on photos to text to me, I managed to get seven of her paintings. I know - there are nine in the finished photo at the top of the post but I will explain the other two in a moment...

I resized them in my graphics program and then printed them on this canvas inkjet paper. It's such a nice effect! I cut exactly matching chipboard shapes with the Cricut, sealed the edges with SuperGlue, painted the edges white, then mounted the art on to the chipboard with wallpaper mucilage. Just look at that texture! We won't speak about how I had to uninstall my printer and then download new drivers and software. That was a bummer, but my printer is doing a fantastic job again!


Now for the other two "paintings". I love this picture of Ande and Alexis' puppy Thug Rose (a.k.a. Rosie), my grandpuppy. I have a free program called FotoSketcher that will stylize any photo into pencil, chalk, oil, watercolor, acrylic, pen and ink, impressionist etc... I took Rosie's photo and applied the oil painting effect. I think if I'd had time it would have been fun to experiment with a texture medium to create brush marks on the canvas. An experiment for another day...

Left - Original, middle - FotoSketcher oil, right - oil printed on canvas.
The canvas on the easel was a color selfie photo that Alexis posted. I changed it into a pencil sketch as if it were an in progress self portrait.


And now Alexis has her own mini art studio with her own mini art! Everything is stuck down with FunTack so she can rearrange and play whenever she has the urge. She seemed really excited with her gift and I hope I have created a monster!!!


And now, since I have finished this fun birthday project for Alexis, I can finally and bravely unbox this amazing gift from my daughter Natasha. This may be a rabbit hole that I don't emerge from for a while. Wish me luck!!!


Back soon with more adventures and, maybe, some tiny 3D printed wonders!

xo xo,
Jodi