
I bet most of you are aware that HBS/miniatures.com recently re-released a couple popular past Creatin' Contest kits. For those that did not know, there was a vote held on Facebook between four favorites. The top winners were Lisa's Country Cottage from the 17th and MiniTown Loft from the 19th annual Creatin' Contests.

For Christmas 2013 (the year after the contest), I made the Lisa's kit into a fishing cabin and working lamp for my dad. I had so much fun, but it was early on in my foray back into miniatures. The scope of my idea and the finishes were pretty elementary. I wanted another chance at this kit and have coveted it ever since. Once in a while you'd see a kit come up on eBay, but for a lot more than I was willing to pay. Apparently, other people really wanted another chance, too! Seeing that they were available again, and at a great price, was like a dream come true!
 |
| Dad's Fishing Cabin/Lamp |
The style of the kit by itself is completely adorable, but the innovative improvements that some of the contestants made have become my favorites. I wanted to incorporate many of those features into my cottages and see where the design lead me. You can see all of the entries and more photos from the incredibly creative contestants here. Below are just some of my favorite features.

Wait! Did she say Cottages?!? You caught me! I did use the plural and on purpose! You see, I've had a project idea niggling at me since the Covid lockdown started, and this kit is perfect for both structures. I was going to make them from scratch out of foam core, but the Lisa's kits will be so much more sturdy while still providing a small-ish footprint. More on the concept later, but for this post, we'll just talk about the structural changes and additions.
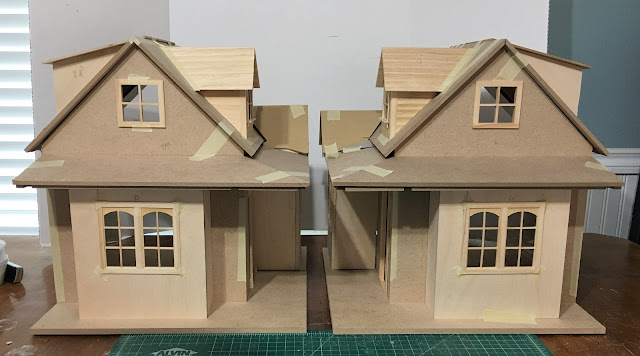
I got the kit pieces taped together, then made cardboard walls/roofs to help mock up the additions. So far, I liked where it was heading...


I consulted with my on site contractor (wonderful hubby Russ) to check my ideas for soundness, and because I would need his help and big boy tools to cut new dados in the 3/8" MDF walls. This was necessary because I wanted to reduce the amount of ceiling height on the first floor in order to increase the head room in the attic space. By lowering the second floor (by cutting lower dados into the side walls), the attic now has a knee wall which will great for furniture. The first floor ceiling height is now 7-1/2" and the attic is 8" to the peak. This is perfect because the tallest inhabitant will be 5".

I wanted to make the second cottage a mirror image of the first. This meant creating an additional dado in the floor piece to accommodate the change in wall positions. An easy job for Russ with his big boy table saw. While it seemed as if me and my petite table saw and jigsaw took forever to cut my new walls from 1/4" plywood and the 3/8" MDF, Russ' saw was like cutting butter for him. Luckily, he was happy to help me. I did my best to woo him into being partners in the whole project, but he's just not that into minis and could not be persuaded. :O(
It took a couple days to get the cottages roughly constructed, but it was a lot of fun to see their new characters beginning to develop. You never really know at this stage if your idea is going to be a good one. You just have to follow the lead and hope for the best.
 |
| Porch Popout and Roof Dormer |
 |
| Kitchen Popout and Dormer Profiles |
 |
| Shed Dormers With Round Windows |
 |
| New Interior Living Space |
I dug through my window and door drawer and came up with the windows and doors from the 23rd Creatin' Contest kit. I didn't use them in the contest build because my Three Little Pigs theme had a Fairy-tale Tudor vibe. But they are really cute with the arch and mullions, and I had enough of them for the lower windows on both cottages. I was able to cut down the double door frame to make a single door for one of the cottages.


For the second cottage, I could have made another single door but I wanted it to have it's own character. I had a cheap $3 door from China that, with just a little remodeling, made a nice dutch door. First, I removed the door from the frame. Then I cut the door's bottom two panels off, leaving half of the upper frame piece. Next, I removed the metal door pins and heated it in the microwave until the glue softened enough to pull the upper panels and frames apart. After removing the remaining glue residue and sanding, I cut a piece of 1/16" Lexan to make the window. I gave the door a couple light coats of paint so that I could assemble it and not worry about getting paint on the glass. I drilled holes for an additional door pin where the two doors will meet and swing separately. I glued the upper frame pieces together with the Lexan inserted. I had to drill new pin holes in the frame because my door needed to swing the other direction. Thankfully, all the steps went smoothly and the new Dutch door will work well.


Here are some more photos of the expanded interior. While it's still a pretty compact cottage, the usable space has been improved considerably, and the character of the new facade gives ample opportunity for cuteness overload! I hope I can make the most of it! The old dado tracks will be filled in with 1/8" x 3/8" basswood strip.


Another project?!? I know, I know! I still have the bakery in progress and the poor old, nearly finished Storybook Cottage. I imagine I'll be bouncing around between all of these as the inspiration hits me, but only after I finish dad's Father's Day gift. It seems strangely meant to be that I am working on new Lisa's Country Cottage kits as I am making new things to put into dad's old cottage after all these years. But if these last few months have taught us anything, it's that we must make the most of each day. You never know what tomorrow will bring.
Stay safe and make all your dreams happen, my friends!
xo xo,
Jodi
Me gusta ver los diferentes diseños de un mismo kit,las fotos son geniales!
ReplyDeleteJodi,las mejoras que has ido incorporando a las cabañas,me parecen fascinantes,más espacio y más interés tanto en la fachada como en el interior! deseando ver como prosigues,creo que serán unas cabañas muy acogedoras!
Que tienes muchos proyectos comenzados? claro,eso está muy bien ya que las musas nos visitan cuando quieren y con ideas diferentes,cada una para una ocasión determinada y para un proyecto concreto!
Sigue soñando y creando amiga!
Besos.
Gracias pilar! ¿No es divertido intentar sacar el máximo provecho de una mini estructura? Y el espacio siempre es primordial con estas pequeñas cabañas. Espero poder aprovechar al máximo el espacio y las oportunidades de diseño. Me encanta ser arrastrado por una idea y últimamente, ¡ha habido tantas! ¡Me alegra tenerte conmigo en todas las aventuras!
DeleteWow great new project, love your change of the roof and YES I know how helpful hubbies can be!
ReplyDeleteHave fun stay safe!
groetjes van Marijke
Thanks Marijke! There is nothing more thrilling than beginning a new project full of hope and ideas! And helpful husbands are a treasure! Glad you have one, too!
Deleteme encanta esa cabaña y los cambios que le has introducido ...
ReplyDeleteGracias carmen! ¡Ha sido desafiante pero también muy divertido!
DeleteGorgeous as always and so full of promise. Stop feeling guilty about flitting around it is a lovely thing to do and will keep everything fresh, I wish I could do the same. I have just plain stopped.
ReplyDeleteThanks Marilyn! I hate to hear you have stopped and can only think that maybe you need a fun little side project to get excited about again. Please do a little planning and get busy again - we need your creative input to keep us all going!!!
DeleteFantástico Jodi el nuevo proyecto , los cambios son geniales. Me encantan todos los kit que nos has mostrado,buena semana:-)
ReplyDeleteGracias rosa maria! ¿Arent las cabañas son tan adorables? ¡La creatividad de la gente me inspira tanto! ¡Espero que hayan hecho lo mismo por ti y que después de esa increíble escena de jardín que hayas creado, estés listo para otro proyecto nuevamente!
DeleteWhat fun!
ReplyDeleteThanks Keli! Eagerly awaiting an update on the boathouse!!!
DeleteOh this is going to be so much fun to see! I love that you're doing two! The Dutch door is so cute! I bought this kit too and I'm debating if I want to play with it or finish my Loft.
ReplyDeleteI love the pushed out wall, almost like a bay window. And the windows will be wonderful. They have character but they're not insanely specific you know?
Oh awesome, Sheila! Thank you, and I am glad you got a kit, too!!! I'd say do whatever is inspiring you the most. It's a job if it's not fun and riding the wave of motivation is so much fun! I hope an idea catches fire for you!
DeleteI have always loved the doors and windows and am so happy to finally have a structure for them!
I'm very curious to see the progress of your project. The changes you've made are fantastic. Have fun!
ReplyDeleteThanks Faby! I am curious to see how they'll come along, too! Glad you are here with me for the adventure!
DeleteA two’fer! This will be a fun project to watch. Your changes add so much character.
ReplyDeleteThanks Sherrill! I am so looking forward to being able to fulfill working in two slightly different styles at once! I hope each one will have it's unique and special elements!
DeleteI can't believe what a difference a few carefully chosen, relatively small changes can make to the look and feel of a kit! I already know these will be fantastic, Jodi, at the hands of a master! BTW, - the assistance from your DH with the cutting - is this what they mean when they talk about "fringe benefits"?? I always wondered! *smile*
ReplyDeleteThanks Marilyn! It is so much fun to see the small changes make an impact and give more opportunities for cuteness! Russ is definitely packed with "fringe benefits" and the fact that he is eager and enjoys helping me makes me more excited about projects, too! If only he would participate with me by designing and building his own ideas! His mini houses would be so good! A girl can dream...
DeleteYour work is always genius. I wouldn't have any idea as to where to begin. I might take one cottage and do something with it.
ReplyDeleteThank you, Ann! Oh I hope you do get a cottage kit! And where to start? With photos and then cardboard. Keep mocking ideas up until your understanding clicks and you like the look. Walls can easily be made from foam core if the wood is just too much to think about at first. We all start someplace and for each of us it begins with a desire and the will. You have both so you can make your mini dreams come true! I am happy to answer any questions, too!
Delete....................................................................................................................*speechless* I'll think of a witty comment once I close the gaping hole on my face AKA: mouth.
ReplyDelete😊
DeleteP.S. Do you sleep?
ReplyDeleteEvery night! Some nights a little more than others. But, no kids at home = lots of free mini time! Just wait... One day you'll enjoy the same "after raising children time windfall"! 😊😊😊 It's awesome, but don't tell my kids.
DeleteSuch a difference! I love it!
ReplyDeleteThanks Brandy! It's fun to remodel these tiny houses!
DeleteMe encantan todos los cambios realizados en esos proyectos. Quedan maravillosos.
ReplyDeleteUn saludo
¡Gracias Marian por tus comentarios alentadores! ¡Me alegra que estés aquí para disfrutar del viaje conmigo!
DeleteYou are amazing! I cannot believe the incredible work you have done on these two little cottages. And I've always liked a good Dutch door. I would never have thought of taking a door like that and upgrading it to a Dutch door, but yours turned out beautifully. It will be fun to watch these develop. I never tire of any your projects, and am always happy to see whatever mini magic you've been making!
ReplyDeleteThanks Deb! Doing the work is easy when you're so excited and inspired! I love to see what can be done to improve or change up an ordinary mini stock item and I know you share this adventurous "is it possible" spirit with your builds, too! I'm happy that you are here to partake in another adventure with me!
DeleteWhat an incredible transformation in just a few days (?) It is amazing how much more interior space your alterations and additions have made. Oh, how I wish it wasn't so expensive to get these kits to Australia, I would love to have go at one. Following this (these) project(s) is going to be the next best thing.
ReplyDeleteAnna X
Thanks Anna! I wish it was not so expensive to get things to you too! I feel like there is an unprecedented amount of mini talent in Australia and New Zealand but that it is stifled due to the availability and affordability of supplies! If we could only talk Shannon of Red Cottage Miniatures into expanding her line of incredible cottages and furniture kits to 1/12th scale it would solve so much for all of you down under! And for those of us everywhere else who are afraid to work in half scale! But you have shown by the from scratch construction of your toy shop that you do not need a kit to create amazing things. I believe you could make your own cottage and even better than the mass produced ones.
DeleteDear Jodi, you're a true architect/designer of (doll)houses!! For combining these tiny cabins into cottages, you have to be clever and also an eye for seeing the opportunities BEFORE you start working: you have plenty of these talents and skills!! Your photos made it all clear to me, thank you for taking these clear pictures. I love seeing the combination of kits and the way you've worked them out: so clever since this way you now have created much more space on the same base! I can imagine that you start with several project now during the pandemic, play with ideas and do what you like to, dear Jodi.
ReplyDeleteStay dreaming and make your dreams come true, dear Jodi, stay safe, take care.
Hugs, Ilona
Such kind and encouraging words, Ilona! Thank you! If I get to come back to Earth another time and keep a little of myself from this life, there is no doubt that I would get degrees in architecture and design. I am mad for it and so grateful that I can at least play around with buildings in 1/12th scale. But I must give credit here to being inspired by the ideas of the creative and clever folks who improved these kits before me. And to Russ who helped me to figure out how to tie one roof into another.
DeleteI am glad to know that my explanations and photos help to explain to you what I am trying to share. I always worry that I am not going enough in depth but if I do my posts would be too tedious to read! And uninteresting to readers who just want to see before and after!
I can't express how grateful I am to have been given the chance to work so much in something that I absolutely adore. It means the world to me and I will strive to keep exploring minis as long as God allows the dreams to come and my hands to work!
Beautiful houses, I love the round windows and doors
ReplyDeleteThank you, Gonda! Isn't it wonderful to play with all of these features!
DeleteIt looks like the Corona virus brought out the best in you, Jodi. Combining these two kits was a very good idea, who else but you would make it possible. It will be great to see your following work on this new project. Thanks for sharing.
ReplyDeleteHugs, Drora
Thank you, Drora! I am so happy to finally have a chance to work on this kit again! And making choices on how to finish and furnish them will be much easier now that I get to pick two ideas instead of one! I am so glad you are here to share the joy with me!
DeleteHas conseguido ampliar bastante el espacio útil y dar un aspecto exterior mucho mas bonito. Ha sido un buen trabajo.
ReplyDeleteGracias isabel ¡Es muy divertido explorar las posibilidades que pueden hacer algunos cambios!
DeleteWhat an excellent transformation and I love your Dutch door.
ReplyDeleteThanks Irene! It was a fun challenge to find a way to make the regular door into something more unique!
DeleteHi Jodi! Do you read minds? I am about to (finally!) finish Carmen and Tulio´s house and have been thinking on what´s next. I have to say that I have a favourite so far and that little cottage is just perfect for it!! I´m just going to add that something you have done is what I was thinking of... So! this post has given me a lot of inspiration. Sadly it´s out of my reach to order from the US but I think I have options 😉. And about what you are doing, it´s marvellous that you can work in 2 projects at the same time and give your self more room for creativity, great! I really like what you have done so far, can´t wait to see more!
ReplyDeleteHi Alex! I am glad that you found some inspiration and that my cottage changes gave you more courage to move forward with your own ideas for your new project! I am excited to hear more about it! I think that inspiring one another is the best part about our little community and it's wonderful to hear when it happens! Just imagine what creativity could be achieved if the Creatin' Contest kits could be attained within the budgets of everyone around the world!!! I hope you are having a great time with the last of Tulio and Carmen's house and I can't wait for your next post!!!
DeleteLos cambios son espectaculares, ya no parece el mismo kit.
ReplyDeleteEs un trabajo impresionante, espero pronto esos progresos.
Gracias Eloisa! ¡Es divertido tomar una caja, agregar más cajas y ver qué pasa! ¡Me alegra que estés aquí para explorar conmigo!
DeleteOhhhh, esas cabañas son 😍, estoy deseando ver avances.
ReplyDeleteLos cambios realizados son estupendos.
Un besin.
Gracias carolina! Me alegro de que estés siguiendo el progreso!
DeleteWow, Jodi! Two at once!!!! WOW! I am so far behind... you work like a whirlwind!!! These cottages are packed full of charm and "cuteness" and you haven't even started with the decor! LOL! This is going to be amazing to follow along with! :) I can't begin to imagine what the "theme" will be... but clearly we have a "twinsies" thing under way... and the "residents" are only 5" tall? Hmmmm....???? I am intrigued! LOL! Don't keep us waiting too long! :):):)
ReplyDeleteThanks Betsy! It feels like a whirlwind around here lately with all of the varied projects and activities going on! Is is really June and 2020 half over already?!? I am glad you are here on the new journey with me and I promise to get to revealing my plans for the cottages soon!
Delete"CUTENESS OVERLOAD" is RIGHT!
ReplyDeleteI am INCREDIBLY IMPRESSED by the renovations you're making to these two cottages and the fact that you've built one in reverse and raised the rooflines and added bump-outs and modified doors, it's ALL so AMAZINGLY CLEVER!
Keep it up Jodi because when it comes to your creativity AND your productivity ; the sky's the limit!!!!
Thanks Elizabeth! I love your support and enthusiasm! But I must give credit for the inspiration to all of those visionaries who built the kit before me! And to Russ for helping me figure out degrees and angles and tying one roof into another. It is so much fun to see the possibilities come alive!!!
DeleteThis project looks so fantastic! Mr. Skellie wants his own house now and with the 23% off sale going on at HBS, I think the Lisa would be great! Thanks Jodi, the changes you made give more space in the same footprint.
ReplyDeleteThanks Deb! Lisa's would be a perfect place for Mr. Skellie and a fun cottage to build for him! I'm sure he'd appreciate more head room in the attic, too, and with you and Bill as the building team, his change orders can be easily managed! :O)
DeleteJodi, these little cottages are so cute and you've improved upon them immensely! I'm looking forward to following and watching how you work your magic transforming them. And now I'm thinking . . . perhaps Reginauld needs his own little cottage on the Pennethorne Estate?!
ReplyDeleteThanks Teresa! Perhaps Reginauld has an interest or a hobby in which a small out building would offer him quiet for study and contemplation? That would be a fun endeavor and a way to keep creating once the manner is completed!
DeleteWhat fabulous little cottages Jodi... I imagine you are going to make them as enchanting as all of your previous builds. I’m looking forward to following along :D
ReplyDeleteThanks, Sam! They really are such adorable structures but were crying out for more! I'm so glad that you stopped by to catch up! 💗
Delete