Search My Blog!

Use the Search box below to find keywords that you're looking for quickly and easily!

Search Feature

Thursday, June 4, 2020

Let's Have A Giveaway!

Hooray! My package of bottle caps arrived and so I could finally have a try at some better product bottles! That means it's finally time to give away the lavender vanity and bathroom decor set!


The new bottles look a bit more realistic, though I'll send both sets to the winner. Who doesn't need more bottles to fill up shelves and baskets?!?

Old version left, New version right.

Included in the set are Pillar Candles...


Framed and Matted Lavender Prints...


Basket of Guest Towels...


Matching Throw Rug


Heart Shaped Grapevine Wreath...


Vase of Lavender...


Farmhouse Vanity With Vessel Sink, Old Fashioned Taps and Modern Drain and Liquid Soap Dispenser...


And free shipping anywhere in the world to the winner...


What's the catch? What are the rules? Only that you move through this world in the spirit of kindness to all. Oh! And that you leave me a comment to let me know that you want a chance to win.

I'll draw a random winner of all comment entrants on Sunday, June 14th at 4:00 pm Pacific Time (US West Coast). This also happens to be Monkey Around Day, a day set aside to put down your troubles and worries and just have fun. It's also Father's Day here in the US. OOPS! Nope! It's actually the 3rd Sunday in June, so the 21st. Sorry!!!

If you are a person who has trouble leaving comments, you can enter by letting me know via email. jodihippler (at) gmail (dot) com.

May your kindness infect those you meet, whether virtually or in person, faster than any virus ever known to mankind. 💗💗💗

xo xo,
Jodi

Sunday, May 31, 2020

Lisa's Country Cottage

I bet most of you are aware that HBS/miniatures.com recently re-released a couple popular past Creatin' Contest kits. For those that did not know, there was a vote held on Facebook between four favorites. The top winners were Lisa's Country Cottage from the 17th and MiniTown Loft from the 19th annual Creatin' Contests.


For Christmas 2013 (the year after the contest), I made the Lisa's kit into a fishing cabin and working lamp for my dad. I had so much fun, but it was early on in my foray back into miniatures. The scope of my idea and the finishes were pretty elementary. I wanted another chance at this kit and have coveted it ever since. Once in a while you'd see a kit come up on eBay, but for a lot more than I was willing to pay. Apparently, other people really wanted another chance, too! Seeing that they were available again, and at a great price, was like a dream come true!


Dad's Fishing Cabin/Lamp

The style of the kit by itself is completely adorable, but the innovative improvements that some of the contestants made have become my favorites. I wanted to incorporate many of those features into my cottages and see where the design lead me. You can see all of the entries and more photos from the incredibly creative contestants here. Below are just some of my favorite features.


Wait! Did she say Cottages?!? You caught me! I did use the plural and on purpose! You see, I've had a project idea niggling at me since the Covid lockdown started, and this kit is perfect for both structures. I was going to make them from scratch out of foam core, but the Lisa's kits will be so much more sturdy while still providing a small-ish footprint. More on the concept later, but for this post, we'll just talk about the structural changes and additions.

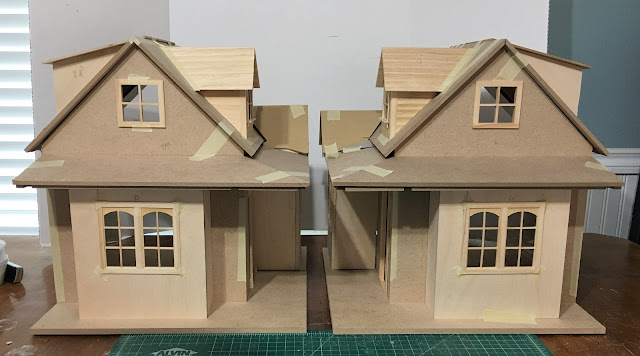
I got the kit pieces taped together, then made cardboard walls/roofs to help mock up the additions. So far, I liked where it was heading...


I consulted with my on site contractor (wonderful hubby Russ) to check my ideas for soundness, and because I would need his help and big boy tools to cut new dados in the 3/8" MDF walls. This was necessary because I wanted to reduce the amount of ceiling height on the first floor in order to increase the head room in the attic space. By lowering the second floor (by cutting lower dados into the side walls), the attic now has a knee wall which will great for furniture. The first floor ceiling height is now 7-1/2" and the attic is 8" to the peak. This is perfect because the tallest inhabitant will be 5".


I wanted to make the second cottage a mirror image of the first. This meant creating an additional dado in the floor piece to accommodate the change in wall positions. An easy job for Russ with his big boy table saw. While it seemed as if me and my petite table saw and jigsaw took forever to cut my new walls from 1/4" plywood and the 3/8" MDF, Russ' saw was like cutting butter for him. Luckily, he was happy to help me. I did my best to woo him into being partners in the whole project, but he's just not that into minis and could not be persuaded. :O(

It took a couple days to get the cottages roughly constructed, but it was a lot of fun to see their new characters beginning to develop. You never really know at this stage if your idea is going to be a good one. You just have to follow the lead and hope for the best.

Porch Popout and Roof Dormer

Kitchen Popout and Dormer Profiles

Shed Dormers With Round Windows

New Interior Living Space

I dug through my window and door drawer and came up with the windows and doors from the 23rd Creatin' Contest kit. I didn't use them in the contest build because my Three Little Pigs theme had a Fairy-tale Tudor vibe. But they are really cute with the arch and mullions, and I had enough of them for the lower windows on both cottages. I was able to cut down the double door frame to make a single door for one of the cottages.


For the second cottage, I could have made another single door but I wanted it to have it's own character. I had a cheap $3 door from China that, with just a little remodeling, made a nice dutch door. First, I removed the door from the frame. Then I cut the door's bottom two panels off, leaving half of the upper frame piece. Next, I removed the metal door pins and heated it in the microwave until the glue softened enough to pull the upper panels and frames apart. After removing the remaining glue residue and sanding, I cut a piece of 1/16" Lexan to make the window. I gave the door a couple light coats of paint so that I could assemble it and not worry about getting paint on the glass. I drilled holes for an additional door pin where the two doors will meet and swing separately. I glued the upper frame pieces together with the Lexan inserted. I had to drill new pin holes in the frame because my door needed to swing the other direction. Thankfully, all the steps went smoothly and the new Dutch door will work well.


Here are some more photos of the expanded interior. While it's still a pretty compact cottage, the usable space has been improved considerably, and the character of the new facade gives ample opportunity for cuteness overload! I hope I can make the most of it! The old dado tracks will be filled in with 1/8" x 3/8" basswood strip.


Another project?!? I know, I know! I still have the bakery in progress and the poor old, nearly finished Storybook Cottage. I imagine I'll be bouncing around between all of these as the inspiration hits me, but only after I finish dad's Father's Day gift.  It seems strangely meant to be that I am working on new Lisa's Country Cottage kits as I am making new things to put into dad's old cottage after all these years. But if these last few months have taught us anything, it's that we must make the most of each day. You never know what tomorrow will bring. 

Stay safe and make all your dreams happen, my friends!

xo xo, 
Jodi

Monday, May 25, 2020

Hodgepodge


A confused mixture is exactly right in describing what I've been up to this past week or so. And it seems like I haven't accomplished or brought to conclusion any of the things I've started on. It's been entertaining at any rate, and worthwhile because I learned some new things. I'll hit the highlights...

I made some more bottles from the mold but am still waiting for the tops to arrive from the Netherlands. Once those arrive I can get the bottles finished up and start the drawing for the vanity set. These colors came out a little better.


It took two nervous days to work up my courage to complete the set up process and print the first test file on the 3D printer. I was astonished at how well it went, and in fact, that encouraged me to grab some of the stl files of things I'd previously made for Shapeways and give them a try. All it required was to open the files into the QIDI slicer program and then save them as gcode files onto a thumb drive for the printer. Then, just pop the thumb drive into the printer, make a few selections from the touch screen and you're off!


QIDI test file. I have no idea what it is, either. Is it something
really useful and I just haven't figured it out yet?

The first of my own prints was the modern wall mounted toilet. Red was the random spool color that came with the printer, though I ordered white to use after I get some practice in. It came out surprisingly well.


Then I threw a little more challenging print at it by making a phone holder in Tinkercad and testing that out. The first try got about 7% completed and then the printer started making a funny noise. Russ and I realized that the nozzle had clogged and the noise was the printer's attempt at trying to squeeze more filament out of the nozzle. Luckily, the printer comes with videos on a thumb drive that shows how to unclog the nozzle. It's a pretty common thing and a good learning experience. I'm so glad Russ was there to help me stay calm and confident that we could do it. Soon we were back underway! I am now the proud owner of a handy phone holder with my name on it!


After that I threw a few different challenges at it: side by side items, teeny tiny items and things with letters. In most cases it performed beautifully without having to change any settings. There are a couple things I can do to improve the designs for my printer, but that will all come in good time. For now, just learning the slicer program and all of it's functions and settings is plenty!


It is mesmerizing to watch as the printer adds the layers and then fills in the voids. It takes a really long time, though (9-1/2 hours for the phone holder), so you have to occupy yourself with other things. I put a few coats of paint on the tall planters. I like that they end up looking like concrete or pottery.

Red PLA

Painted With Thunder Gray
I also had these cake kits from Stewart Dollhouse Creations to look forward to...


I dove in to the first kit and quickly realized that it was going to be an all consuming activity. Like when I started on the Storybook Cottage garden, figuring it would take two weeks. It took nine!!! I did complete four cakes from one kit over a few days, so, yippee! It is apparent that I will need A LOT more practice!!!


I looked at all of the bakery shelving that will need filling for Pound Cake's displays, estimated how many more I would need, ordered some more Original Sculpey and Soft Fimo, and will now wait until it arrives before I dive back in to the project. Making mini baked goods tends to monopolize your work table and it looks like June will arrive before the supplies do. Craft stuff is getting harder to source and more expensive by the week!

It's probably a good thing I'm stalled, though, because Father's Day is coming up fast. I have an idea and a direction for dad, but need to get started. Here;s a hint...


Oh, and one other distraction and major rabbit hole to report for the week. I bet most of you are aware that HBS/miniatures.com re-released a couple popular Creatin' Contest kits. For those that did not know, there was a vote held on Facebook between four popular kits. The winners were Lisa's Country Cottage and MiniTown Loft. I bought two Lisa's kits and, call me MAD, got them out to start planning...


More hodgepodge to come. Y'all come back soon, ya hear?

xo xo,
Jodi