Search My Blog!

Use the Search box below to find keywords that you're looking for quickly and easily!

Search Feature

Thursday, July 6, 2023

Fragments

Hi Guys! I've missed you! As usual, my summer is filled with fun, life sized activities that leave less time for minis. And the time that I do find is comprised of short stretches of work that leave my progress (and my chronicling of it) fragmented. As I begin to assemble my photos to recreate the story of my progress, I am a bit weary of how well I can make it flow. Please bear with me as I try!


I believe I last left off with trying to finish up the trunkhouse's first floor living room. I had made a mess applying Paperclay between the timbers and needed to sand and touch up the paint. I've done that and managed to get a very rustic look. Here is where the room stands today. It is ready for window frames and ceiling.


I stopped there to begin getting the small entry/front door attachment sorted out. To refresh your memory, it is made up of a foam core floor, walls and roof, and will have a fairy shaped door.


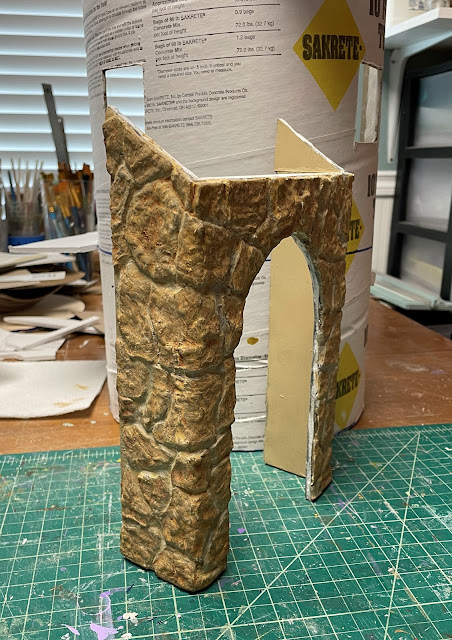
To the walls, I've added "stones" just like the wood stove hearth.


The floor is covered in wooden floorboards to keep it simple. Part of them will show on the "porch", and part of them will show inside.


With Fred's Weathering Stain applied.

I can't be sure if the underside of the porch will be exposed after I apply all the bark, so just in case, I finished it with deck boards and wood beams.


After staining.

The ceiling/roof were finished similarly, with a rough wood ceiling and a standing seam "metal" roof. Beams and paint to come...


I said I wanted to cut a window in the fairy door and I did, Then, I made an interior and exterior window frame out of a couple laser cut Tudor style windows that I had in my stash. In the photo below, it is hard to see that the door is painted in a satin purple paint called wisteria and that the window frames are painted in a contrasting, sparkly metallic paint called Amethyst. It is a nice contrast and, hopefully, will show up better in later photos. I have yet to "glass", embellish and install them, but hope to this week.


In the photos below, I have all the stones applied, sealed, grouted, age washed, sealed again and the door frame installed.


In this photo, I have installed the timbers and applied the Paperclay inside. Though a little cleaner job, I still have a bit of touch up to do.


But not until after I get all the moss applied into the exterior stone's crevasses.


With a little luck and some quieter days, my next post will have better continuity. Maybe the first floor living room might even be completed! I know Roz and the gang will be delighted to reach that milestone!

Until then, my friends, work on making your mini dreams come true. Even if tiny piece by tiny piece!

xo xo,

Jodi

Monday, June 26, 2023

Learning Curve

Last post I left off with waiting for the mail. Story of a miniaturist's life, right? 😊 But this wee package held the big hopes of Roz and I, as they were potentially the last two windows for the trunkhouse. I saw them on eBay: Calico Critters replacement windows. While they're a little outside the box for a regular dollhouse (they are closer to half scale, too), Roz and I loved the size, the carved detailing and the working shutters. We thought it was worth taking a shot that they'd work for the living room. We weren't disappointed!


Like all the other windows in the trunkhouse, they had to have a little customization in order to work with the curved walls. The way the plastic windows are constructed, it was really easy to attach a box made of chipboard using wood glue.


Unlike the rest of the trunkhouse's windows, the boxed part will be outside of the room. This way, Roz can enjoy all their pretty details while she's sitting in the living room. And she can close the shutters when she wants a little privacy.


Of course, even more customization to the windows was requested from Roz, but more on that next post...

The next task to tackle was getting the living room ready for it's heat source: a wood burning stove. Being inside of a tree trunk, it was imperative that we have some kind of heat shield. So, I went over options with Roz, showing her photos to choose from. She really loved the look of natural stone, but again, we faced unique challenges because of the curved walls. The solution was quite simple, and in fact, also allowed us to recycle part of the Sonotube. We simply had to cut a scrap to the width and height we needed - the exact curve of the wall was already formed! For the hearth piece, it was only a matter of tracing the curve onto a scrap of chipboard and then cutting it out. I had pieces of nicely textured cardboard packaging saved, which proved to make perfect fieldstones.

The "fieldstone" has been applied to the wall and hearth pieces,
has been sealed and is getting ready to be grouted.

The wall piece after grouting, age washes and affixed to the wall.

With the heat shield and windows ready, it was time to begin the wall treatment. For this, I needed more "timbers" which I cut from cereal box cardboard. They are 1/2" wide and are glued together in three layers to achieve the right thickness. 


Here's where time has skipped far ahead and you see a jump in progress. Unexpectedly, I found myself with only tiny stretches of mini time (as a consequence of my real life activities hoarding my time). Something had to give and that was my chronicling process. In the photo below, you see I have already painted and installed the "timbers" to the living room walls as well as the baseboard and header timbers (which hold up the ceiling/kitchen floor).


Part of my "learning curve" was figuring out how to work in this tall, awkward, unbalanced tube. Laying it down on the table proved to be the best solution, though working in through the various openings was challenging. Here, I am applying glue to each "timbered" panel before I applied Paperclay to it.


I'm not sure at this point how the "tree bark" is going to tie into the openings, so I'm adding an outline with Paperclay to cover the cardboard edges.


Below you can see that I have applied Paperclay in between all of the "timbers". I tried my best to be neat, but wrestling with a round tube, this was the best I could do. I have plenty of painting, sanding and clean up ahead of me.


Here in the US we'll be celebrating our Independence with a long holiday weekend. Hopefully, with all that behind me, I'll have more interesting progress to post about!

Until then, hope you're enjoying a fun and busy summer, too!

xo xo,
Jodi

Thursday, June 15, 2023

Trunkhouse Windows, Doors, Ceilings and Floors

This week turned out to be all about the trunkhouse's windows, doors, ceilings and floors. I am struggling to know the best order to do things in, but I figured if I at least had some idea what is going where, I could work on getting them ready. If I start with the first floor and work my way up, I can just grab the next part when I need it. For those of you who are considering building a trunkhouse of your own one day, even if I proceed in the totally wrong order, maybe my trials, errors and solutions will help save you from a few headaches.

Last week I had cut the floor/ceiling dividers from chipboard. This week, I added some nice wood flooring strips to the floors and some rough and ugly veneer strips to the ceilings (I didn't have enough of the nice ones). Then I treated them all with Fred's Weathering Stuff.

I needed to add rim bracing beneath each floor of the Sonotube to prevent the floors/ceilings from falling through. For this, I cut strips of cereal box cardboard. Trix aren't just for kids! 😊 I laminated many layers to counteract imperfections in my circle cutting. The same cardboard strips, which I'll use as baseboard later, will offer a similar solution for any gaps showing above the floor.

A paper cutter helps me keep the strips consistent in width.

Some strips are tripled where bigger gaps persist.
These "joists" will be hidden beneath the floor.
You may notice that I primed the Sonotube's interior.

Last week I touched on the challenge I'd face with the trunkhouse's windows. I had a few frames in my stash that I was looking forward to using, but how to create/place a window into a curved wall? I took a little Hobbit liberty for the solution and decided to build out some boxed windows. This will allow me to ignore the curve in favor of the size and shape of each individual window. When all is said and done, it will seem as though the trunk of the tree is much thicker than it is. And an added benefit is that each of these windows will offer a little shelf, of sorts. Who doesn't need more storage???


Some of my window shapes themselves offer unique challenges. Using the half circle windows as an example, not only do they have to fit into a curved wall, they have to have a special frame made for them. To accomplish this, I first measured the outside dimensions of the window -  8-1/2". I cut an 8-1/2" strip of illustration art board to the depth that seemed appropriate, then at every 3/16", I made a slice - not all the way through, just enough so that the strip would bend.


I applied wood glue around the straight edge of the window, making sure where the strip would have to turn the corner there was a slice. I held it in place until the wood grabbed - about 60 seconds or so. Then I let it dry thoroughly. I applied glue to the rounded part of the window frame, and again, held it until it set. Once the glue had grabbed, I secured the assembly with a thick rubber band to firmly hold it for the rest of the drying process. 


Once dry, the frame and housing can be sanded flush.

Prior to assembling the "boxed window", I traced/cut the window's pattern onto scrap cereal box cardboard. I measured for placement on the Sonotube, traced the window pattern onto the Sonotube, then cut out with a box cutter. With minimal sanding, the window fit. I traced the contour of the curved wall onto the window and will cut away the excess when it's time to glue it in.


This same process also worked for the round window. When I eventually apply the Paperclay to the interior walls, I'll be able to blend the seams in nicely.


And when I (eventually) create the bark for the exterior, I can turn the window's protrusion into a cut branch, a knot, or just a bump in the bark. All of these "features" should serve to add charm to the tree trunk's character. I hope! 🤞


For this unique window, I created a foam core box to mimic its shape. Then I traced and carved the curve right into the foam core. Perfection isn't necessary - between the glue, Paperclay and "bark",  no gaps will be left behind.


At this point I changed my mind on the placement of the round window which had been installed in the bedroom's alcove. I replaced it with two "leaded" square windows to create more symmetry. For these, I added basewood frames attached to foam core boxes.


 I moved the round window beside the bedroom's balcony door.


I had two more of the square "leaded" windows, so I used those to create both the interior and exterior window frames for the front door.


I have an idea for the living room windows which will flank the wood stove - I am waiting for a package before I will know if the idea is actually going to work. Until it arrives, I will spend my time painting the doors and windows, cutting beams for the ceilings and more cardboard strips for the trim. Boring, fiddly, repetitive but necessary. See you next week!

xo xo,

Jodi