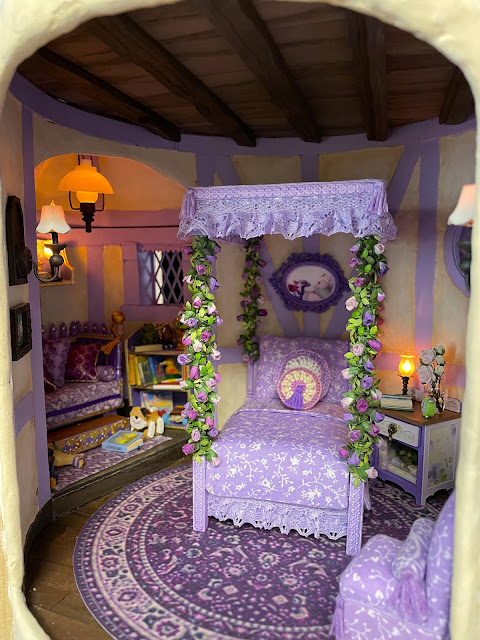
Finishing Roz's bed last week had me feeling pretty good about my progress, but I couldn't forget the "functional" part of my promise. She was definitely going to need a place to hold her nighttime things. It had to be the right height for reaching the reading lamp from her bed, be big enough to hold her current book and glass of water, have a storage drawer to securely stow her wand, have display space for more books and tchotchkes, fit into the limited bedroom floorspace and still feel "feminine". Oh Boy! I had my work cut out for me! I got some measurements then got to work designing the perfect nightstand in Design Space.
Once the pieces were cut, I decoupaged strategic sections with some very pretty scrapbook paper and assembled the chipboard parts. I made trim pieces with cardstock to overlay on top. The tabletop is finished with the leftover fruitwood stain from the Chrysnbon table kit I made for the breakfast nook. Waste-not-want-not, right? The chipboard takes this stain nicely. I added a fancy pull to the drawer and Ta-Da! Very pretty and yet "functional", too! The solid purple cubby gives a nice contrast to but will not compete with whatever Roz decides to store and display in there. As you can see, I had assembled it before adding the rose buds to the bed posts. It still needed many accessories to make it "function" well for Roz.
First we'll talk about her lamp. It was part of a Chrysolite Mantle Lamp kit set from my stash. I loved the compact size, but it needed a larger base. I added a fancy spacer bead to the bottom and then a small round wood circle, which I cut a channel into so the wire could exit the back. I painted it a unifying black, then gave it an aged bronze finish with glaze, burnt sienna and dark brown paint. Its aged bronze look matches all the other lighting fixtures in the project.
The alarm clock is a Playmobil piece that Birgit sent to me in a Christmas package. It is adorable, so all I did to it was add a bubble of "glass" (UV resin) to the clock face. The vase is made up of more mulberry buds and flowers and secured in the vase with UV resin. Little Women is one of Deborah's wonderful books from her Etsy shop. The bottom cubby is stuffed with books covered in pretty scrapbook paper and a potted plant I made. That should give Roz a good start to the "functional" part in her bedtime ritual!
When it came to addressing Roz's floor, I knew she needed a rug. Stepping from a warm bed onto a cold floor in the winter is not my idea of "functional" - it's enough to make you stay in bed all day!
Unfortunately, I encountered loads of challenges trying to get this job accomplished. First was finding a rug photo for the round room. There is not much to choose from, surprisingly, when searching for "Round Purple Rug". Maybe I am just too picky?
I attempted to change the color of rugs with patterns I liked, but with unsatisfactory results. I learned how to change objects in a vector to a different color, but could not find a suitable vector image of a rug.
I finally found a pretty purple rug photo, but it was layered on top of several other round rugs. This prompted me to learn how to cut out a circle shape in Inkscape (very helpful!). Unfortunately, my low budget, eight year old Canon printer thinks purple is the color of red wine. I have done all the tutorials to calibrate the colors, many times, with no improvement. It's just not that versatile.
As its final insult, it refuses to feed my velvet paper through regardless of the settings I choose. No nice piled rug is ever going to come from it. I won't even allow myself to contemplate the cost of the ink I've wasted all these years.
Below you'll see the rug on the left is the one I sent to the printer, the one on the right is what I got... Yuck!
I am not one to give up easily. So, thinking through all my limitations and options, I decided to print a rug I liked in a light color scheme and then color several elements with markers. It didn't come out too bad but it still really wasn't what I had in mind.
Throwing money at a problem always helps, right? LOL! But I did finally break down and buy a new (and supposedly much better) printer. The rug I printed on the new printer using cotton printer fabric came out much better than the one from the old printer, but it's still not fantastic. Until I have time to play with materials and settings, I am calling it good enough, for now.
Moving on! The next functional element Roz needed for her bedroom was a place to sit. Since the floorspace was going fast I decided to make Kris Compass's Parson's Chair Tutorial from her website. If you are new or unfamiliar with Kris' tutorials, I encourage you to go explore. They are fabulous! I was able to reduce my pattern to a more appropriate size for Roz and her room. It is maybe 1:16 scale now - perfect!
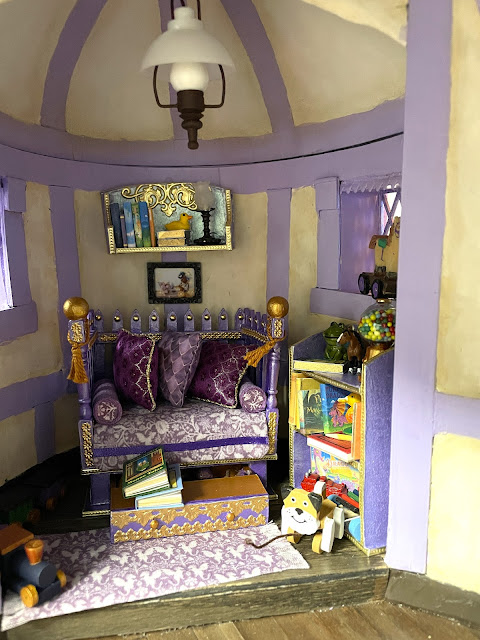
Before we get to Roz's bedroom photos, let me share Rozario's nook furnishings. Aside from his bed, there will be a wall shelf and a floor shelf to house all his treasures. Because of the curved walls, I made the shelves out of Sonotube scraps, again. I primed, painted in a metallic purple and added gold Dresden detailing to match his bed.
 |
| Floor Shelf Back |
 |
| Floor Shelf Front |
 |
| Wall and Floor Shelf Primed |
 |
| Wall and Floor Shelf Painted and Trimmed |
I let Rozario go through my stash and take anything he liked. I also made him some board games and books. A special ~Thank You~ to Johnny's momma and to Birgit for passing so many of these great minis on to me. I will treasure them and make sure they are put into use, eventually! Here's what we made, gathered and spruced up in Rozario's favorite colors...
 |
| Toys |
 |
| Books~Games~Family Photo |
 |
| Board Game Printies |
Rozario also asked to have a photo of his heroes, the dragons Draco and Tschang, to hang above his bed. He wants to be as honorable and as powerful as they are when he grows up. And if he feels like misbehaving, the photo reminds him to expect a little visit and some words of... encouragement from the pair.
xo xo,
Jodi


