
Last week, I left you with a sneak peek of the tiled kitchen floor that I was working on for the Willowcrest. I was laying it on a floor template made out of kraft board. I believe I even called it dessert? Well... Let's just say it didn't turn out so sweet...
 |
| It started off so promising! |
I did follow all the way through with it, but I debated with myself about starting over many times. You know how part of you just wants to be finished with something, so you tell yourself it's good enough? Yet, there's this other (nagging) part of you that will never be satisfied because you know you could have done better? That's my struggle. I know I will end up redoing it, I'm just waiting for the four year old inside me to quit throwing a fit about it. And, I'm waiting for my wood supply to arrive.
 |
| All the white space is the under the cabinet area. |
What's wrong with it, you ask? Well... If it's not already glaring at you, I will give you the long answer. Are you ready for a story?
You may want to grab a snack... 😉
All the trouble started when I tried to set my mini table saw on fire...
Now there's a headline!

You see, the blade was wearing out while I was cutting the plywood for the new kitchen bay extension. I did not have another 80 tooth blade on hand (yet another long story. They are $29.99 and only available at MicroMark. Add their minimum shipping of $9.99, tax, and now you have a $45 blade. I only order them when I have enough in my cart to justify the shipping charges).
All I had on hand was the 100 tooth blade for very fine cuts. That does not work well with 1/8" plywood. So, having only eleven inches left to cut through, I just kept using the dull blade. When a blade gets dull, it gets hot by being overworked as it tries to cut through the material.
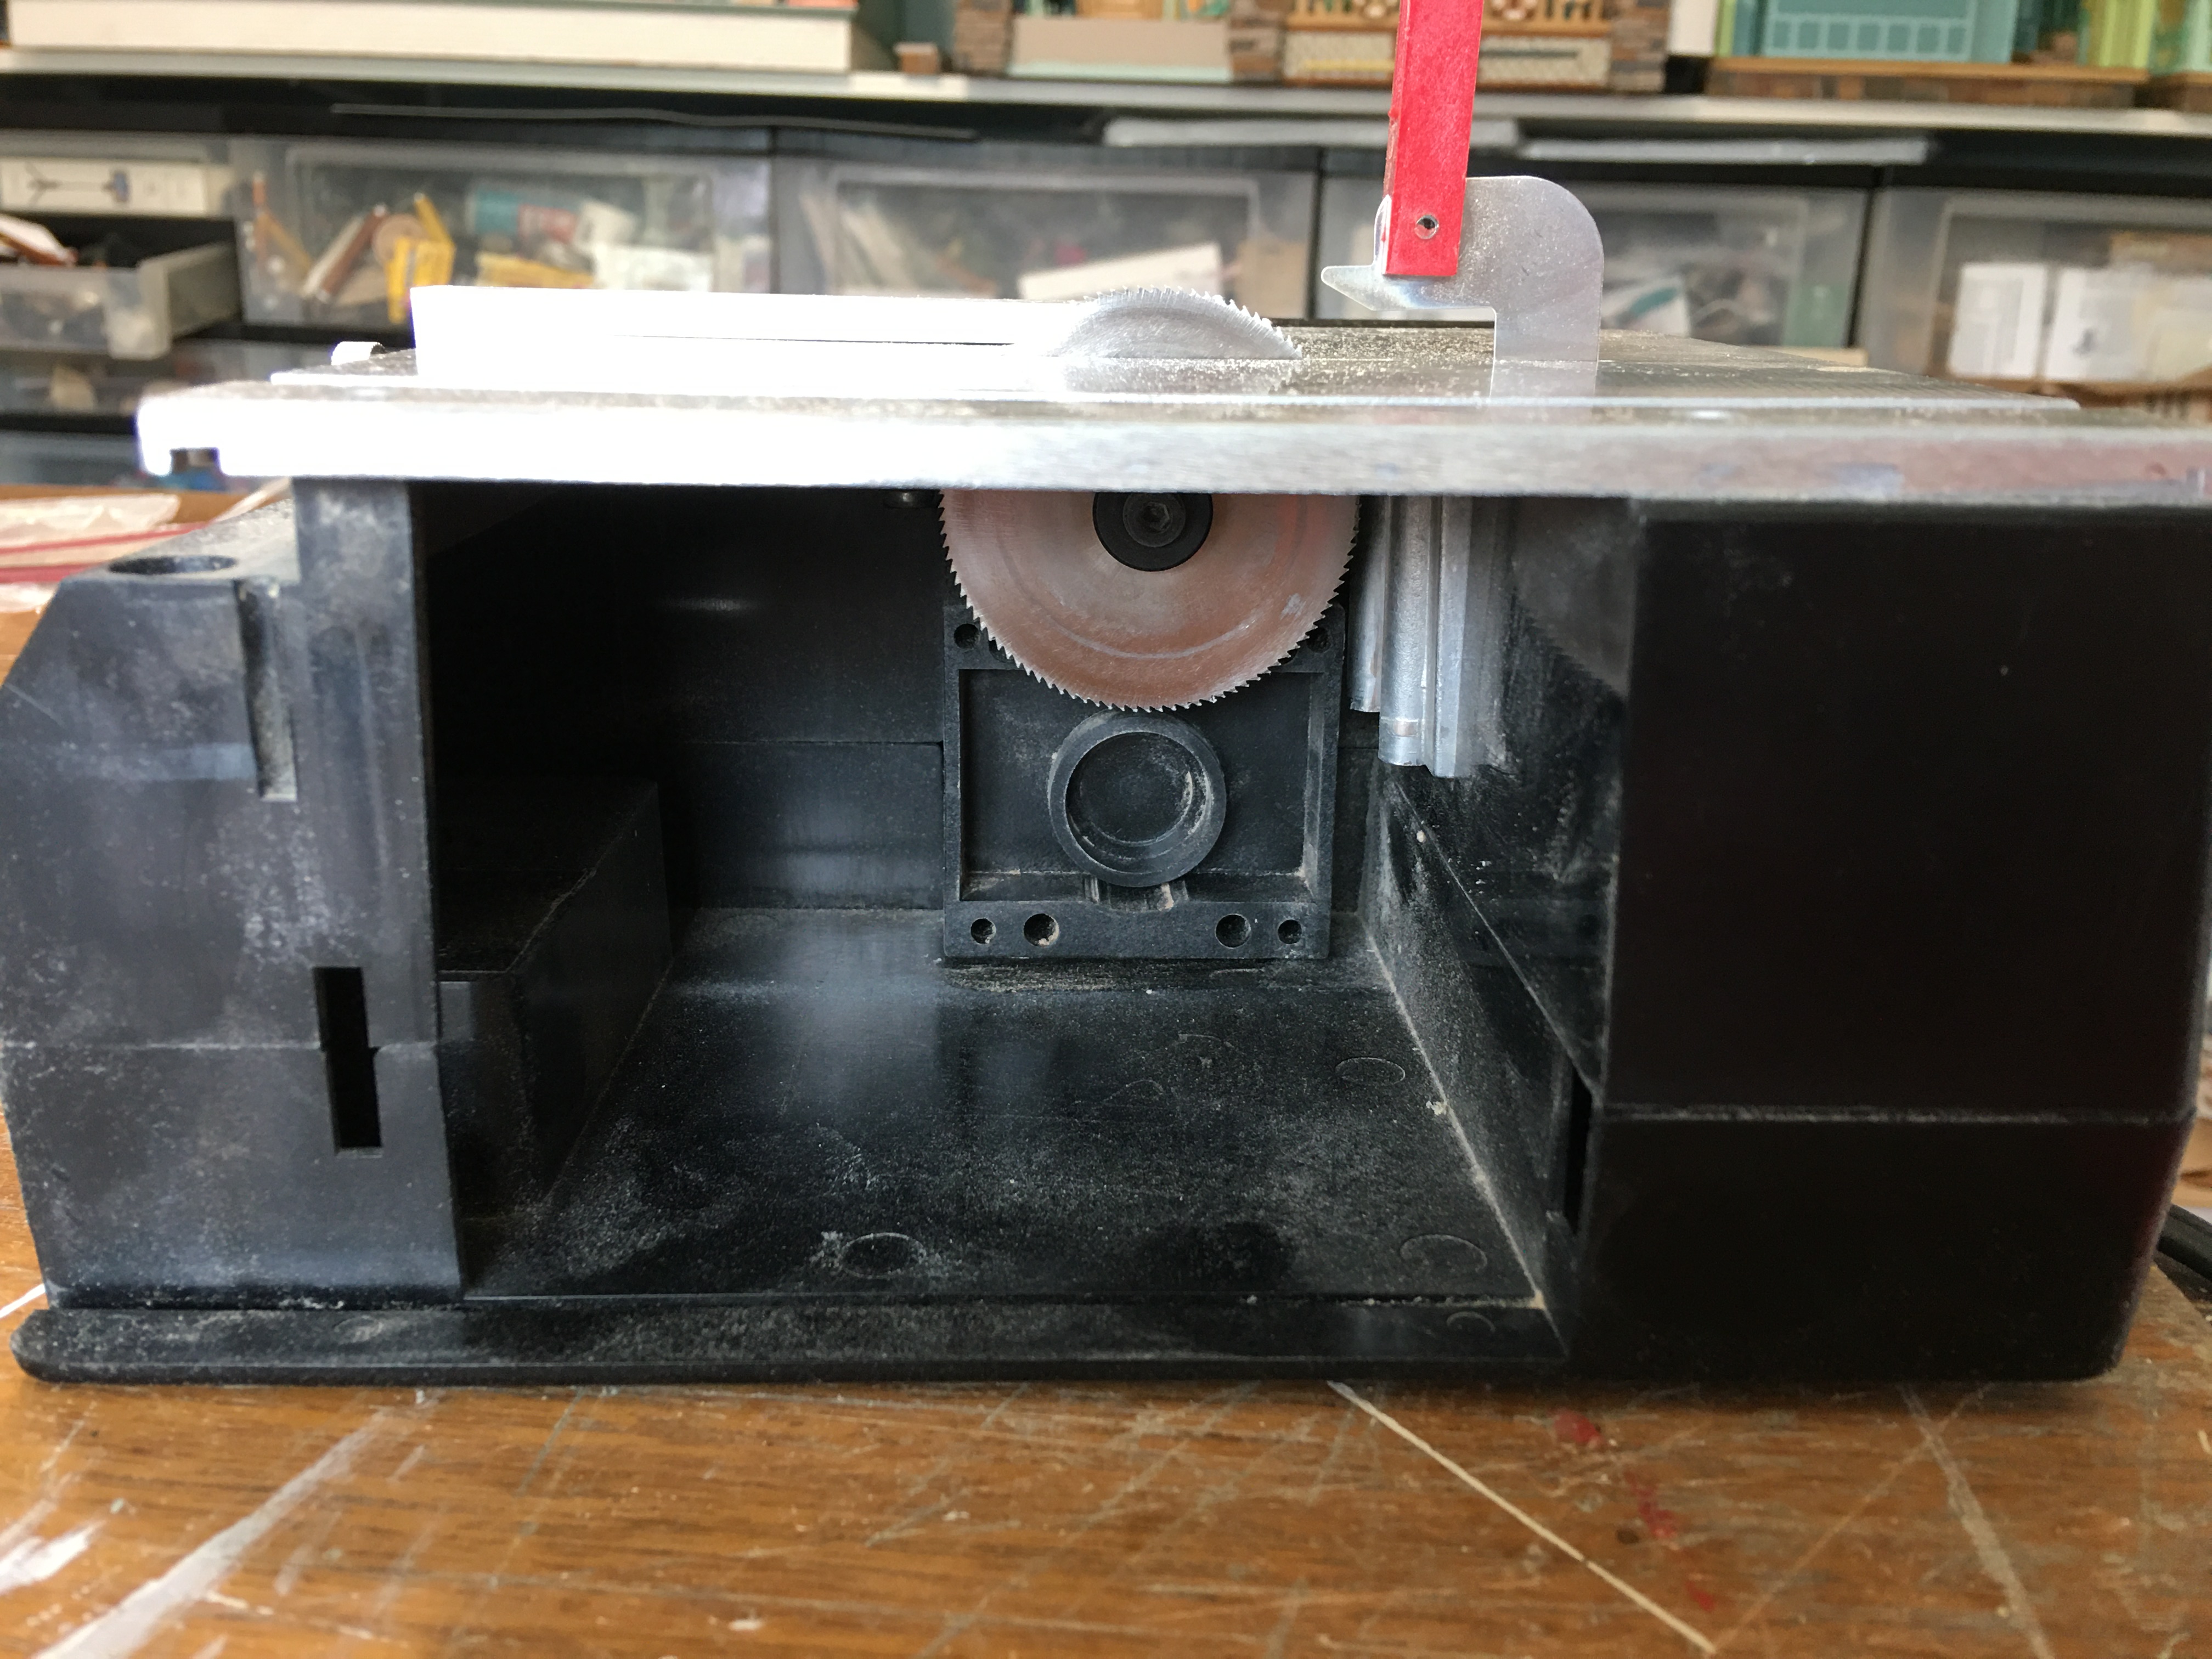 |
| Sawdust and blade compartment. |
See the compartment in the above photo? Do you see the bottom of the saw blade? A lot of the sawdust goes in that compartment, sharing space with the blade. A hot blade + sawdust = fire. Well, it could catch fire. For me, luckily, it was only smoke. There were no actual flames, thank my angels! But there could have been. Fortunately, I finished the cut for the bay walls before combustion occurred! Lucky, lucky, lucky!
I cleaned the compartment and changed the blade to the 100 tooth. That would have cut like butter through basswood, but I was out of the wood I needed. The next best material I had on hand to use for the tiles was illustration art board.
To avoid making all those cuts by hand (which I know I am not precise at), I thought I'd use the saw with the rip guide set to 3/4". I could rip 3/4" strips, then cut the strips into 3/4" individual tiles. Sounds reasonable, right? Unfortunately, the blade did not seem to work well with that material at all. The cuts weren't clean, the blade (which has always had a little too much side movement, causing tolerance issues) wanted to bind (scary when your fingers are that close), and it shot paper particle cannon balls in my face! Ever had a spitball facial? It's like sandblasting your face. I don't recommend it! 😣
But, like the plywood with the dull blade, I carried on. The results were tiles that were not always square. I think, out of pure stubbornness, I laid them anyway. This, of course, lead to part of my dissatisfaction with the floor. It left gaps, but I kept telling myself that you'd hardly notice when I got the wax applied. 🙄
 |
| 🙄🙄🙄🙄🙄 |
As if that wasn't bad enough, the orientation I set for the diagonal tiles was just wrong. Instead of squaring the room and starting the diagonal in the center, I drew a line from one corner to the next and then followed it. Because of this error in my method, all of my edges end with unequal tiles - a really sloppy looking job. I also came up with a better idea of how to do the borders, after I'd already gotten a lot of the red border finished. But did I ever halt at any of these warning signs? No. When I mess something up, I really do a good job at it! So, the floor is awful and I am dangerous with tools.
This concludes our tale of How To Really Screw Up A Tile Floor And Live To Regret It. The moral of the story is: Listen to that little voice telling you to stop. It might save you time, material, frustration and embarrassment. It might even stop you setting yourself on fire. 😒
Meanwhile, while I was letting the four year old throw her fit in the background, I had gotten started on the kitchen's "tin" ceiling with much more satisfying results. I made the design up in Design Space and let the Maker do my cutting for me.
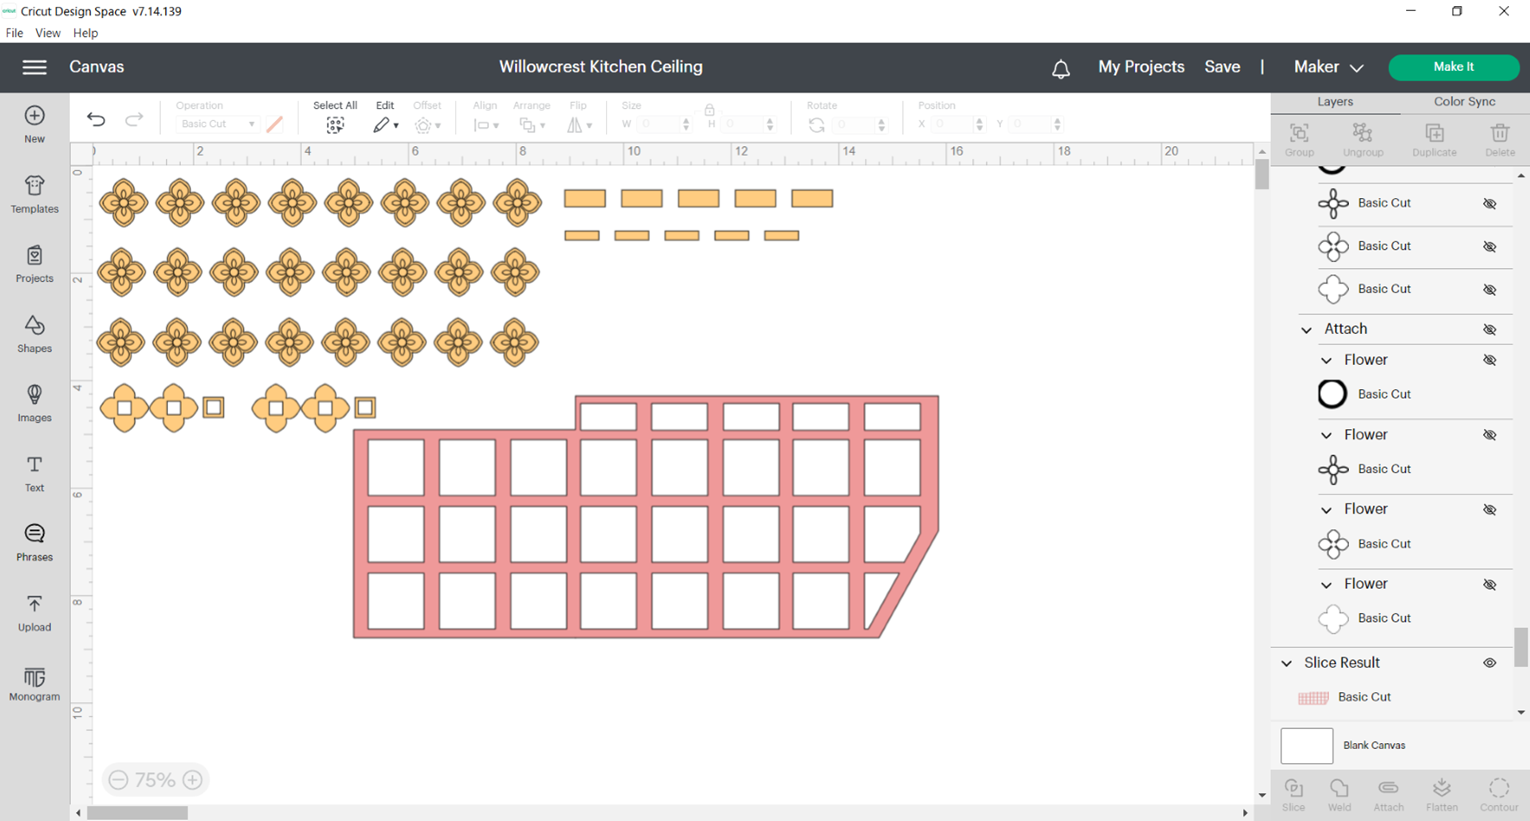
The grid that creates the recess was cut in illustration art boards (perfectly), and the four layer flower pattern for the recesses was cut from kraft board. I should have let the Maker cut my floor tiles for me! 🤪
 |
| The flower design is made up of four layers. |
 |
| After cutting I just assembled the layers. |
 |
| Close up of layers. |
 |
| The "waste" squares could have been my tiles!!! 🤪 |
It was a pleasant surprise when the graph paper pattern I made for the kitchen floor worked perfectly as the pattern for the ceiling. The grid fits in the center of the pattern, which is cut from more kraft board, and the space around it will be filled with trims.

Here, I have filled in most of the squares with the layered kraft board flowers. I am getting the angles I need to cut using my angle finder. My geometry teacher must be up in heaven somewhere screaming "I told you you'd need to know how to use a protractor!". If she'd only told me it would come in handy for dollhouses, I'd have probably taken her more seriously! Luckily, if you were daydreaming during geometry class like I was and need a refresher, we now have YouTube! 😁

The photo below is the ceiling with the center grid completed. The three squares with only two layers of the large flower shape are where pendant lights will hang. The two squares with the square holes in the centers are where recessed lights will go. I have added cove molding around the edges, a stepped molding against that, then stacked a plain layer and chair rail molding around the grid. My angle measuring and cutting was not precise, so I have been aided by wood glue caulking to help conceal any gaps. I added the half pearls to the intersections to add another layer of detail.

It seemed like in a house that is at lest 60 years old, the original tin ceiling would have probably been painted over a few times, so, I decided to paint it in the trim color I'm using in the rest of the house. It looks so nice with a couple coats of paint, and it turned out even better than I had envisioned! It makes me feel a little bit better about screwing up the floor. 😊

And here is the test fit in the kitchen. I just love it! I can't wait to see it with all the other kitchen pieces!


Oh Jodi, I didn't know if to cry or smile about your struggle with the floor tiles and the saw blade. At least the beautiful ceiling compensated for the mistakes.
ReplyDeleteIt's wonderful to have a co-operative loving partner to solve the saw blade problems.
Now I'm looking forward to seeing a beautiful kitchen floor.
Hugs, Drora
Thanks Drora! I laughed and cried, too, then dusted myself off and got back to work! Only very brief pity parties are allowed around here because there is so much to be thankful for. Supportive Russ is at the top of that list!
DeleteCan't wait to share the new tile floor! It is going much better with the knowledge I gained from my mistakes! Hugs
Russ is DEFINITELY One In A Million, as far as husbands go Jodi, but I totally understand your frustrations not only with the smoking saw blade but also feeling not entirely happy with a finished project- which of course is familiar ground for so many of us.
ReplyDeleteAll Artists are their own worst critics.
Even so, as far as I can tell, your tiled floor looks GREAT! I LOVE the color of the tiles AND I love that you've laid it on a diagonal since it provides visual movement and makes your kitchen look bigger!
AND I didn't even see that insignificant sliver of a gap until you circled it, so IN my opinion, it doesn't even count!
Once the kitchen fittings and fixtures are installed then the focus will be off the floor and onto the stove and the countertops! 😜
Meanwhile, your NEW COFFERED CEILING is TO DIE FOR! WOWEEEEEEEEE!
The complex cove molding IS AMAZING!
I think your geometry teacher would be SO PROUD and I'm certain the protractor would totally agree with me too!❤️
Thanks Elizabeth! We are our own worst critics and I think just to be a miniaturist there has to be some degree of "type A" in our personalities. Things don't always go well on our first try and part of me is totally okay with that and part of me (the four year old) has to express her indignance, lol!
DeleteI'm so happy that you like the idea for the tiles, and I hope when my best version is finished you'll love it! It's a true friend that can overlook and ignore our flaws! The finishing is going to be an experiment and a first for me, so I have to allow for the possibility that I may have to do the floor a third time, though I hope not!
I'm so happy you love the ceiling! There are so many exciting ways to do the ceilings in second empire houses and it's encouraging to know that what you envision can come to life!
Thanks for all your encouragement! When I see Mrs. Martin in heaven, I owe her an apology for not only not respecting the valuable lessons she was teaching but also for having participated in the Halloween TP-ing of her front yard. 😞🥺
Un techo fantástico y ahora esperaremos a ver si el niño de cuatro años logra el cambio del suelo:-), tienes un encanto de marido tus deseos se convierten en realidad al instante .feliz fin de semana
ReplyDelete¡Gracias Rosa María! Por lo general, se puede sobornar al niño de cuatro años para que haga lo que se debe hacer. :O)
Delete¡Y Russ es mi héroe! ¡Me alegro mucho de que te haya gustado la cocina hasta ahora y espero que te encante el nuevo piso!
Absolutely beautiful ceiling, Jodi. When you have such a wonderful result it has to take a lot of the sting out of the parts that didn't work earlier. There's always something to make you smile when you work on minis - it just takes a little longer to show up occasionally. BTW - what makes me smile is you - and your talent, and your incredible vision, your super skills with technology.....I could go on for a very long time!. Cheers. - Marilyn D.
ReplyDeleteThanks Marilyn! I am so happy you like the way it turned out! Even the bad days in minis are good ones, so as long as you know how lucky you are to have the opportunity. And if you know how to reframe your thinking around the "failures", the bad times never last for long! I really appreciate your praise, but the truth is there is nothing special about me or my skills. Miniaturists must be the most ingenious and clever folks in existence, I am constantly blown away and inspired by others' talents, and that most certainly includes YOU! 💗
DeleteYour ceiling is magnificent. I read with great interest your notes about the saw. I have one on my wishlist so I am taking lots of notes. Thanks for sharing these kinds of details, even if they are painful! :)
ReplyDeleteThanks Noel! I'm so happy you like the way the ceiling came out and I thank you so much for your comment!
DeleteThe saw is such a step up! I just hope I am worthy, lol! The set up was interesting. Technical instructions translated from German to English will really make you put your thinking cap on and methodically follow the steps. It's probably just me, but there were so many new terms to learn for the parts (knurled screw?) so it took a little time for me to assemble. I had Russ check my work when he got home, and I am so glad I did. I had installed the saw blade guard with splitting wedge incorrectly in front of the plate clip rather than behind it as it should have been. It was so hard to see in the compartment. Russ removed the plastic housing in order to access the plate clip more easily, and then the splitting wedge slipped right in. If you find you need help when it's time to set your up, feel free to email! We can set up a Zoom call, too, if that is helpful!
Thanks Jodi. I'm months away from getting the right equipment. But I'm having fun dreaming right now.
DeleteAhhh Jodi, we’ve all been there haven’t we? A nagging thought in the back of our mind telling us to rethink and we ignore it…. Why I don’t know. Perhaps because we are already invested in the idea and think we can make it work, or maybe we just want it to be finished and think it will look good enough. This is a big reason why my mini projects are always unfinished - something is just not right and needs fixing or I need to find just the right piece. The ceiling does look fantastic. I am sure you will make an equally fantastic floor. And your saw! What a magnificent beast and amazing husband. Definitely a keeper!
ReplyDeleteThanks Shannon! Why do we still do what we know better of? I am pretty sure it is so we can work on our response to such situations, lol! Once they don't phase us at all any longer, we get to graduate! 😆
DeleteI'm so glad you like the ceiling! It is encouraging to have some of my ideas work out! I can't wait to use the saw for one of the wood floors!!! And Russ just gets better with age, lol!
Sometimes we focus on the end product and do what it takes to get there. Call me strange, but I prefer to focus on the process. I make tradeoffs along the way and ask myself, “is this good enough?” after each step. If my task is to learn a new technique my standards might be lower than if I’m doing a house or roombox. I think you will be much happier with new tiles, cut with your new saw. Btw… I have that saw and just love it. I did have to make an adjustment (under the guidance of Proxxon) to square up the blade because it was a little off.
ReplyDeleteYou are so very wise, Sherrill! It is the process that truly delights us, and if we stayed present in it consciously, we'd probably have more fun and, as a byproduct, a better end result!
DeleteThanks for the tip on the saw! Russ and I were discussing "zeroized", and I was explaining to him that I would probably continue to measure directly from my blade with my ruler as I have always done, rather than from the "scale" like you are supposed to. I had to adopt this with the MicroLux because in addition to accounting for the kerf, the blade itself and the rip guard had the tiniest bit of movement that affected my tolerance. I am also a "left side" cutter, which is weird for Russ because he has always been a "right side cutter". 😁
DITTO everyone. As I am about to follow your suggestion that I cut separate tiles for the bathroom floor, you show exactly what not to do. I think I'm going to figure out how to import the printed pattern in Design Space to cut them on the Maker. I know exactly what you mean--settling for lesser quality only to redo it. I'm having that push-pull argument with my kitchen cooktop cabinet. I've made it twice--is "3" a charm? Once again, you tell a good story and teach a fine a lesson. The saw is awesome; the husband a keeper.
ReplyDeleteOh Ann! Using Print Then Cut sounds smart and very promising! I can't wait to hear how it works for you! As for how many times a charm? I was thinking I'd pose that very question in my next post! In trying to design a chair to 3D print for the kitchen, it took me 7 tries just to get something I felt was good enough to work with, though it is still not "perfect"! I say keep making the cabinet until it is worthy to live in that amazing kitchen!
DeleteI was staring at your floor wondering what went wrong. It looked so good but then I read the story (no snack, though)... oh no! Trial and error is often the best way to learn and I wouldn't call it a waste of time. On the bright side, the ceiling turned out wonderful. I've seen some of those tin ceilings in American and Canadian "love-it-or-list-it"-type of programs. It's definitely the type you would never find at this end of the world.
ReplyDeleteThanks Millimari! One of the best parts of building a dollhouse is all the new skills you have an opportunity to learn! One of the skills I have learned with this one is that you should do things in the proper way if you want them to turn out good, lol! But sometimes, in my excitement, I ignore that voice telling me to brush up on my technique before I begin. 😊
DeleteI don't know too much about Finnish homes except that they try to be very energy efficient? That is such a great goal! In the time of tin ceilings, people were trying to replicate the look of fancy plaster work on a budget. Tin was a cheap material then, and because it was also fire resistant, it was great for kitchens. Now, I think we love them just for nostalgia's sake. I am so glad I had the opportunity to try to reproduce one for this project!
Entiendo muy bien a esa niña de 4 años que llevas dentro,yo también la tengo con sus berrinches! Al final reharás el suelo,pero no te dará tanta pereza después de haber creado ese magnífico techo,es maravilloso!!
ReplyDeleteBesos.
¡Gracias Pilar! ¡Tienes razón! ¡La pereza realmente crea más trabajo y debería haberlo hecho bien la primera vez! ¡Fue una buena lección para mí volver a visitarla! Creo que mi hijo de 4 años estará conmigo, dando sus ataques por el resto de mi vida. ¡Y la amo! Ella me ayuda a expresar los sentimientos que la sociedad encuentra inaceptables pero que todos sentimos. ¡Me alegra saber que tú también la tienes dentro de ti! Es importante que nos amemos a nosotros mismos. 💗
DeleteDear Jodi, oh boy can I sympathize with your pain! :( I agree, your floor is probably best re-done, on the true axis and with no gaps! Anything off the true axis will always make one feel tipsy.... :) - just have a look at M.C. Escher if you need elucidation! At least your floor is not already permanently installed like mine is. And thank heavens you didn't set yourself on fire!!!! Yikes! I hate those scary moments! :( And thank goodness for a supportive partner jumping in to rescue you with a newer better machine! And it was a good idea to move onto the ceiling instead of keeping at the floor... sometimes a change can make us see what we don't want to admit but is staring us in the face... toss that old floor! The ceiling is a true Jodi wonder! I look forward to seeing it with the lights installed (but maybe keep in mind that can lights are a very recent invention) even though they provide good light coverage... you would be screaming "modern" to history types like me! :):):) (Just my point of view.... you get to be anachronistic in your own house! LOL! I hope your inner tantrum has subsided and that you are cheerily engaged on a newer better floor and having nothing but fun! I just love what you are doing with this house!!! :):):)
ReplyDeleteBetsy Thank You! I was searching for elucidation on the ineffable sensation that looking at this floor was inflicting upon me! I could keep it to use as an exhibit to explain to people who do not drink what it feels like when you begin to feel the effects of alcohol, lol! And also I must thank you for sharing M.C. Escher with me! I have so often thought about how much I love perspective in all art forms (stage sets, paintings etc.) but because I've never had any sort of formal (or informal) art lessons, I did not know it was a "thing"! I am going to enjoy finding out more about his art!
DeleteYou are so right that the can lights would ruin the historical feel of the house if I am not careful about the way you can see them. I am trying to give enough good light to see each room, but at the same time, force myself to use what lights I have or make what I need. I have to find clever ways to make you ignore the light source as best as I can and that will be challenging!
I really am enjoying doing the new floor! And my 4 year old has gone properly through the grief stages and come to acceptance. 😊 I used to be so mortified at the thoughts and tantrums of my inner 4 year old. Now, I know she is healthy and important to me expressing my feelings. I just let her throw her hissy fit in the background, give her love and acknowledgement, and then we move on. There is a great meditation I do to help connect me with my inner child. If you're interested, email me and I'll send you the link. 💗
Hi Jodi, I have followed your builds from time to time and I always enjoy readed your post and watching the transformations. Everything always turns out so beautiful when you're done. To bad the kitchen floor has to have a redo...I can understand when creating something and you're just not feeling it; but the ceiling is just gorgeous, it makes for a regal kitchen. Hopefully your next kitchen floor will work out the way you want it and compliment that ceiling!
ReplyDeleteHi Melva! Thanks for coming by and for commenting! It is so nice to meet you!
DeleteI am so glad you like how the ceiling came out! I always swoon looking at these fine old homes and their gorgeous finishes, and I am so glad that we can make our versions in miniature! So much less maintenance, lol!
Remaking the floor was actually fun, once I started off the right way! The varnish is curing now, and I can't wait to share it! I hope you like it, too!
Hope to see you again soon!
The ceiling has become beautiful what an angelic patience to make something so beautiful. Glad you have a new sawing machine, Proxon is very good.
ReplyDeleteThanks Gonda! I can't really take credit for my patience, because I really enjoy projects like the ceiling! I had so much fun, especially when I saw that the idea was going to come out well! As for patience for the things I don't enjoy, well... I am a work in progress!
DeleteHa sido toda una odisea pero has terminado con un techo ¡¡¡que me encanta!!! y una sierra nueva que promete mucha diversión.
ReplyDelete¡Lo ha sido, Isabel! Esperaba terminar y pasar a la siguiente tarea rápidamente, pero como suele ser el caso, Dios tenía otros planes, ¡jejeje! ¡Estoy tan contenta de que te guste el techo, y espero que también te guste la nueva versión del piso!
DeleteLet me put it this way: I was dropping by to enjoy a new post of yours, to see what you've been up to in the meantime, was expecting to see your finished kitchen floor as you're always working at the speed of light and then I have to learn that you tried to burn the house!!! Aaaahhhhrrrrggggghhhhhh!!! I'm still shocked!!! So good nothing bad happened and all you had to cope with was the shock about what could have happened. But it's a reminder that we always need to be thankful for all the good happening to us - even more if luck is coming along in the shape of a saw which was near to catching fire but did not.
ReplyDeleteSo good all went well... and even more that your wonderful and always supportive husband came along with the perfect gift for avoiding future risky saw experiments. I'm already looking forward to see how you're getting along with the new member of your ever growing machine park. And although I too could not spot what bothered you about the floor tiles when looking at the first picture I understood after reading the whole story what bothered you about it. It's that ol' bug nagging "Even if nobody else will ever notice - but you will know it's there". It was a good decision to do this floor again - it would have bothered you always. And even more, now with your new saw you will learn how to get along together and you will achieve fantastic results, the two of you. ;O)
Speaking about fantastic results - the ceiling is awesome!!! What a beautiful design... and what an inspiration how you've done it. And now I'm wishing you loads of fun with the new floor tiles... or whatever you're up to at the moment.
Hugs
Birgit
Hi Birgit! I am so sorry to have had a shocking post for you this week rather than a finished floor! I really expected to be working on making little items for the kitchen by now, but as I told Isabel, God had other plans, lol! I promise that the next post will be much more pleasant to read! 😊
DeleteRuss has outdone himself again in my expectations! I am so lucky that he subscribes to the "Tools are life's greatest gifts" ideals! There are limits, though - when I showed him the Proxxon milling machine he screamed "there's no way you're getting a milling machine for your workshop before I get one for mine!". 😃😃😃
Would you believe that I have still not had the pleasure of taking the saw for a joy ride? My wood supply is still not here. I guess I am in the midst of a lesson in patience and tolerance. I'm doing my best, but fear my confidence will leave me if I don't jump right in and saw something soon! 😔
I went with plan "B" on the replacement floor, and I am much more happy with my efforts. I used art board again for the main tiles so at least I was able to make a little progress on the kitchen. We are back in the throws of a heat and humidity situation, so it's hard to get motivated to do anything but park myself in front of a fan, lol!
I'm so happy you like the ceiling! I am excited to get to the wallpapering so that I can start the installation of all the elements for the kitchen. Hopefully, it'll cool off soon!
Hugs!