
I knew that I wasn't going to be able to live with the first attempt at my encaustic tile floor for the Willowcrest kitchen. I did such a poor job, and this project deserves better! My next attempt still isn't exactly perfect, but I think the second try is going to be the charm. The four year old is very happy!

My wood did not arrive as I'd hoped. In fact, it was supposed to be here by today (at the latest). It has a UPS label, but as far as I can tell from the tracking, at the time of this writing, it hasn't even left the seller's shop yet. So, Plan B was to cut the 3/4" x 3/4" main body tiles from illustration art board using the Cricut Maker. Unlike me and the mini table saw, it did an amazing job! I had room to cleanly cut 99 tiles from one 9" x 12" board. I took that as a sign that we were about to embark on a very pleasant journey. In our optimism, the four year old and I sang "99 Bottles Of Beer On The Wall" as we worked.

TIP: I like to use my old Cricut mats to cut heavier materials. Once they lose their stickiness, I use dots (every few inches) of Aleen's Tack It Over & Over to help hold the material in place. Any material that I have to use the knife blade for, I automatically use masking tape on the edges, as well. The Aleen's adhesive removes easily by simply rubbing your finger across it. It comes off like a sticky booger, so have something handy to wipe it onto. There is nothing worse, in the middle of a cut, than having the Cricut stop because the knife blade jammed. This step prevents that.
 |
| First tile is set exactly in the middle of the floor template. |
 |
| Main kitchen body tiles. |
Here, I am beginning to lay the first border tile. I had the wood on hand for this part of the floor design. It is 1/16" x 1/8" basswood. On my first floor, I cut and laid each individual tile. This caused the tile line to wonder a bit. In this floor, after I had laid the strip, I scribed in a tile line, using my Xacto blade. I began in the center and scribed each consecutive line every 3/4". The next row of tiles were offset to the middle of the tile above it. It looks much more consistent and you can't tell the the tiles aren't individually laid.

Here I have added a red border with the same 1/16" x 1/8" basswood, scribing the tiles in the same way.
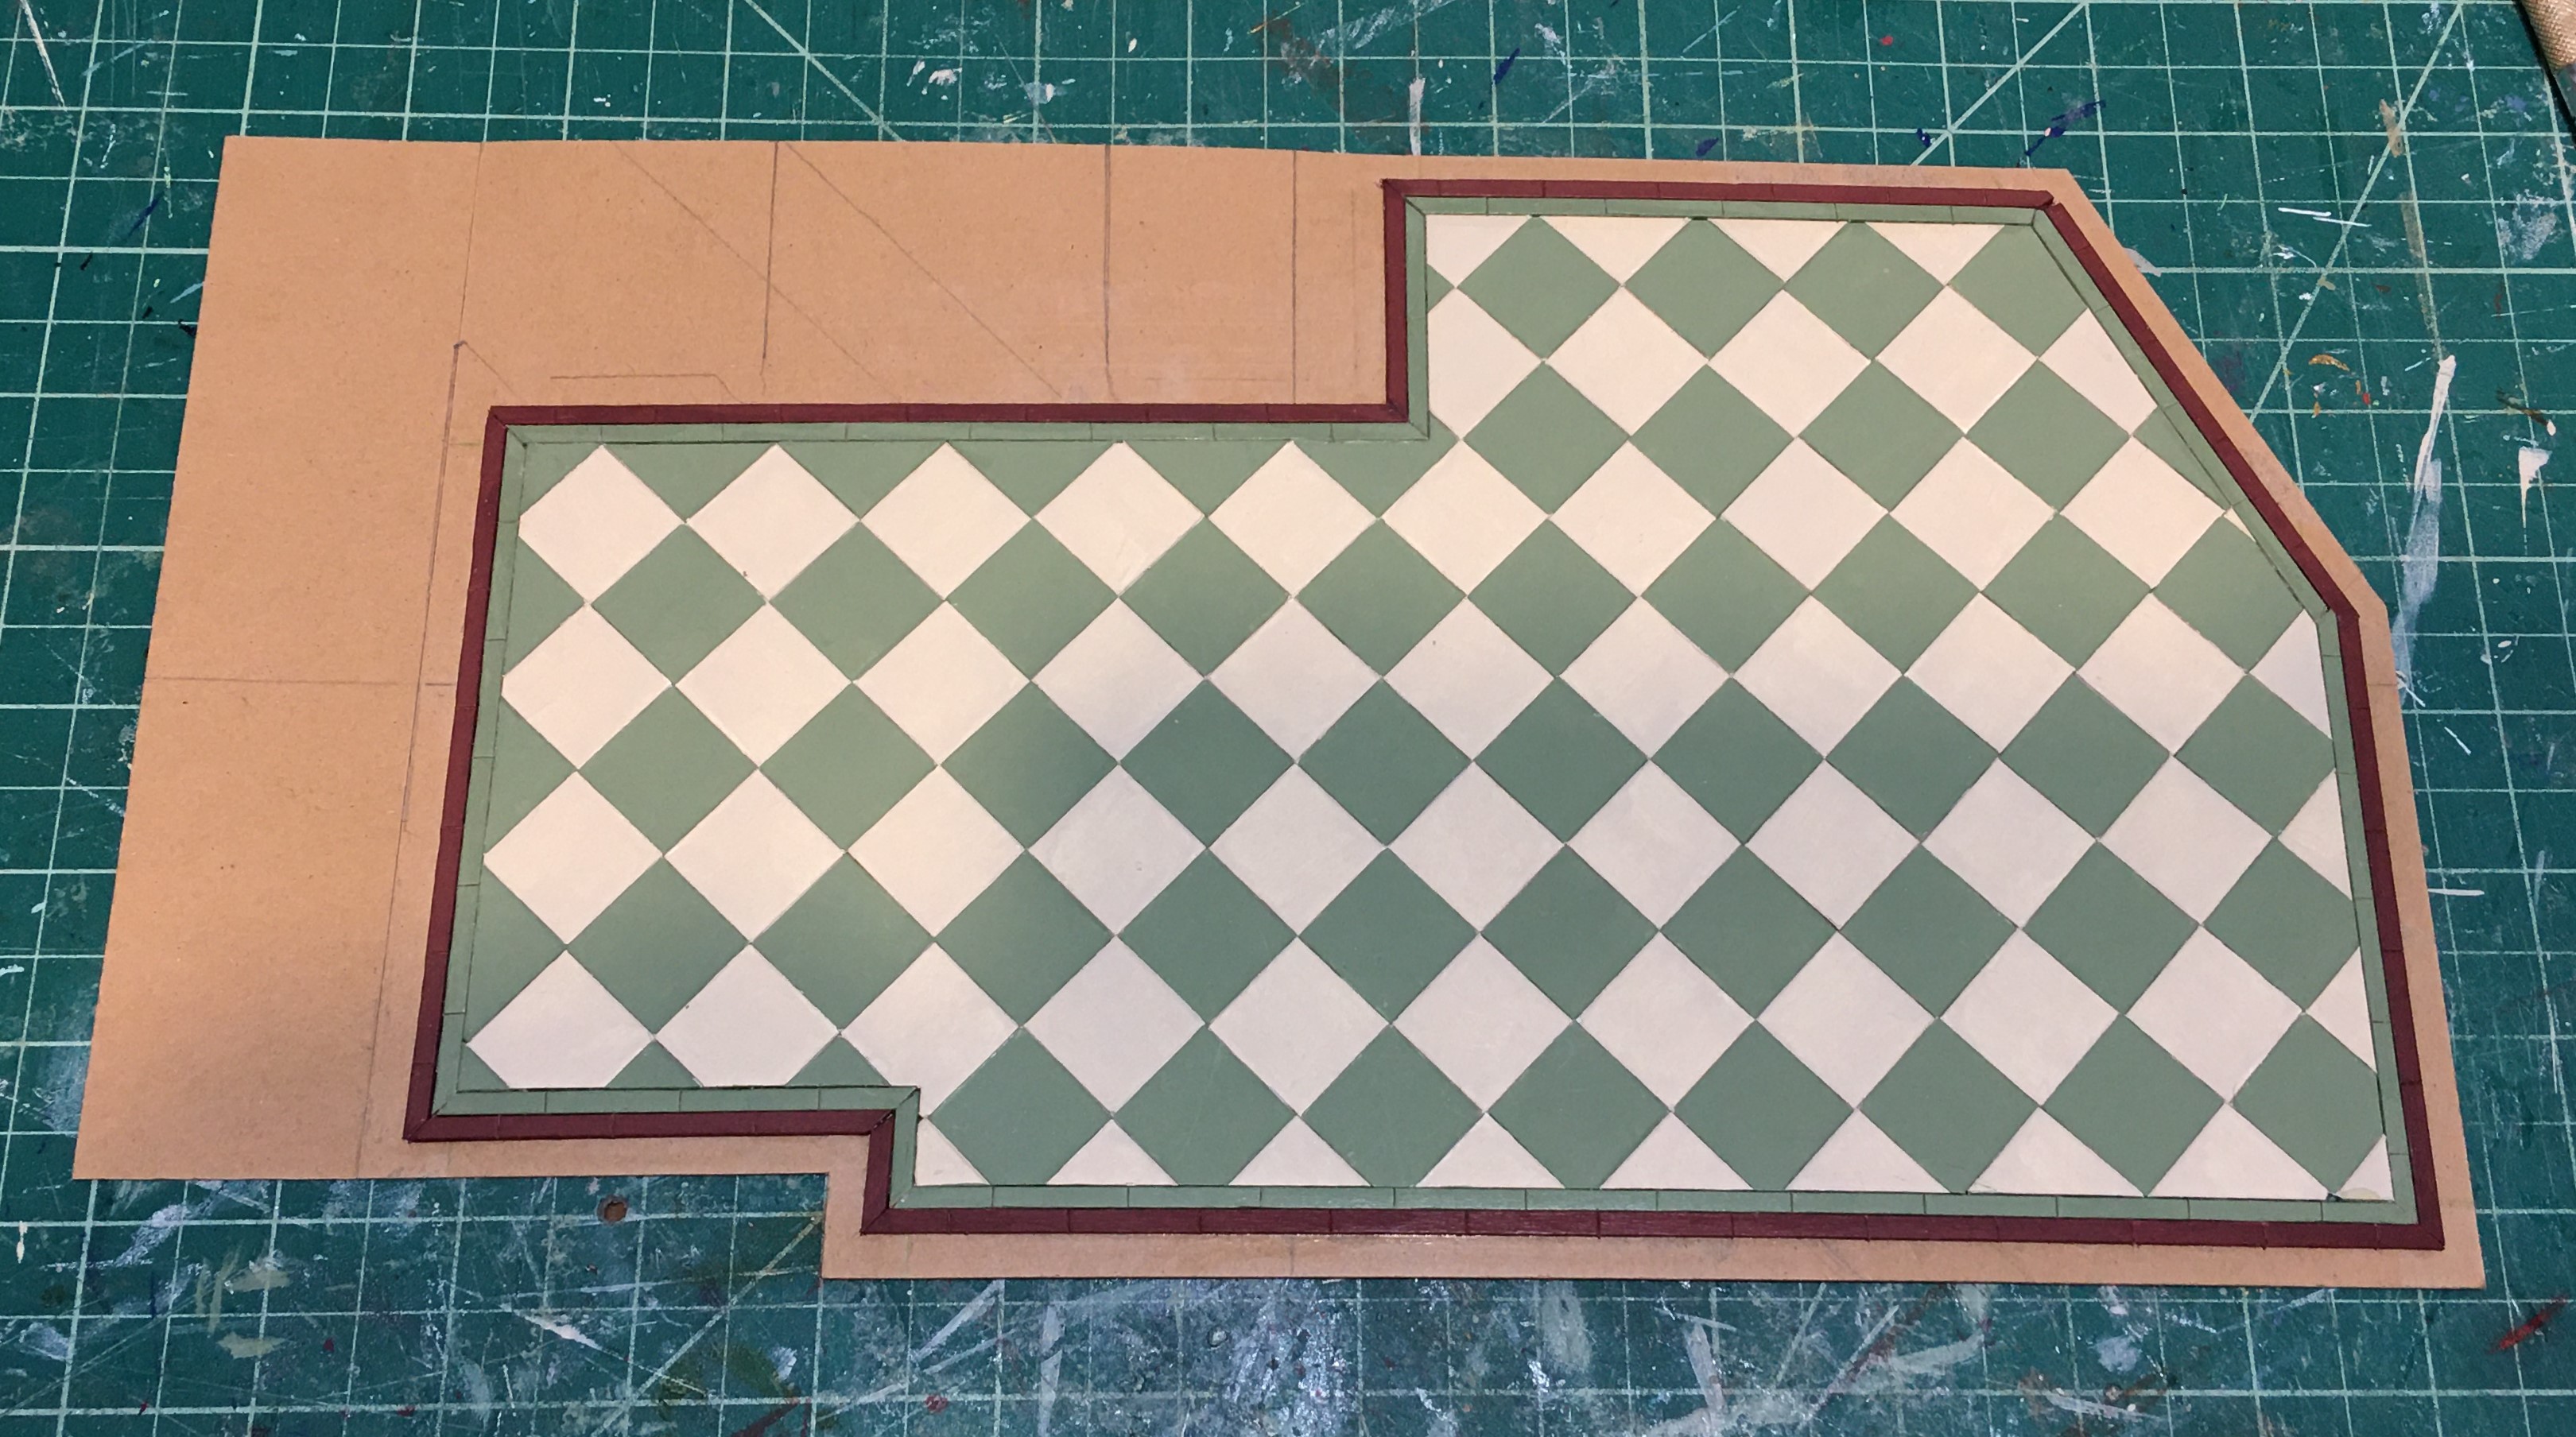
And the final border tile is green but in 1/16" x 1/4" basswood. The area where the tile pattern is laid straight will be under the cabinets. You will see a bit of it under the stove, but I hoped, being different, it might add interest.

I had an idea to use wood floor paste wax to seal the floor. I thought it would be fun to do and would create a very shiny, smooth surface. Unfortunately, my test piece didn't turn out like I'd hoped. Warning bells were sounding, and unlike with the first floor, I listened to them. It may have turned out fine with many, many coats and much buffing, but I didn't want to take the chance, end up ruining it, then have to make a third floor. Ultimately, I used several coats of Krylon Colormaxx clear satin spray varnish.


Look ma! No gaps!

Finally, it was time for the finished floor's test fit. It is so exciting to reach this point, at last!


I had to load in some of the cabinets for a dress rehearsal. You can see the straight tiles under the stove. The border tiles and edges seem to be lining up pretty well...


How about the sink cabinets? Those seem good, too! By golly! I think it might be time to start installing all of the elements of this kitchen!


Jodi
With obligatory projects nearly complete, I'll be getting back to the Manchester with the bathroom floor project on the list. So you have show me exactly how to build that floor, except that I have a printed pattern, so I'll import a tile into Design Space to see what sort of quality I get. Thank you. And you tip for using older Cricut mats is wonderful! Thanks again. Your'e a gem for the miniature community. I made a green tile floor for the Fairfield, but I printed it from DS. Maybe I'll rethink that, too. Oh is illustration board the same as mat board?
ReplyDeleteOh Ann I am so excited for you to get the chance to get back to the Manchester! For me, being forced away by life's commitments, makes me realize again how lucky I am to be able to play so often with minis, and my enthusiasm is renewed! I am so happy that my post has helped you to focus in on the next method to try for the bathroom tiles. I am sending all my good thought your way!
DeleteI use the material setting "Art Board" but I can't remember if I made that custom of if it is actually an option in the material menu. But I set my pressure to 750, 17 passes and use the knife blade. As long as my material is stuck down to the mat well, it works perfectly. I hope it works for you, too!
If you didn't tell that this is a miniature, it could be taken for the real-life size floor and the entire kitchen. Fantastic work!
ReplyDeleteThanks Millimari! I am so happy to hear that! 😊
DeleteIt looks wonderful! I know what you mean about aging it. It's not easy to do when something looks so good pristine and perfect. Maybe gently aged? Like its an old kitchen but its been taken care of?
ReplyDeleteThanks Sheila! Yep! I think I better start with a very diluted wash and slowly creep up on it. I'm in no mood to even try until this heat/humidity gets back into the "normal" range!
Delete“Whatever is worth doing at all, is worth doing well.” -
ReplyDeleteand your new floor is VERY Well Done, INDEED! ❤️
Thanks Elizabeth! I am much happier with the second effort!
DeleteJodi por fin tu niña interior y la mujer exterior podéis estar orgullosas de vuestro trabajo con el suelo, es magnífico!! Con el envejecimiento, estoy segura que encontrarás el punto exacto.
ReplyDeleteLos primeros muebles colocados se ven perfectos!!
Bravo Jodi!
Besos.
¡Gracias Pilar! ¡El segundo esfuerzo fue bueno para los dos! Estoy emocionado de comenzar con el papel tapiz, ya que las fichas de dominó pueden encajar después de eso. Pero primero, ¡espero un clima más fresco!
DeleteHello Jodi. I'm sorry to see that the first floor did not turn out as intended. I wholeheartedly agree that your second attempt and method has produced a great floor! And it looks great with the kitchen cabinets in place. Well don indeed!
ReplyDeleteHuibrecht
Thanks Huibrecht! When things don't turn out well the first time, I try to see it as an ultimate "good thing". In this case, it has forced me to slow down a bit and work on other goals. These other goals have me sitting at the computer in front of a fan, which is great because it is too hot to sit away from the fan at my work table!
DeleteWow Jodi! The floor is gorgeous! I'm so happy for you that your plans went well this time. Fantastic work, as always.
ReplyDeleteHugs, Drora
Thanks Drora! A better plan, properly cut tiles and viola! It was a lot of fun this time! Thanks so much for your encouragement!
DeleteLovely work as always. The green and cream rile floor is so evocative of my fifties childhood and my mom's lino. As for aging the kitchen when my mother left that house 35 years later her kitchen was immaculate….very little sign of any aging. Her vitrous enamel stove looked brand new, the floor was still good…. She had little rugs to protect the places which might wear faster than the rest 😄. So you could pretty much be very gentle with your aging. You could even imagine you are seeing that project set in its own time and absolutely brand new.
ReplyDeleteThanks Marilyn! I'm glad you like the way the tiles turned out! So many of us grew up with these type of tile floors, and apparently, they are making a comeback! My grandma's kitchen showed lots of signs of daily use and years of it, yet she kept it immaculate, as well. I really need to find the balance in this kitchen of just enough wear so as not to look new or unused, but at the same time, cared for an appreciated. New or grungy seem easier to achieve than the middle ground, lol! Where is my courage...
DeleteSorry forgot I come up as anonymous. marilyn O here
ReplyDelete😊💗
DeleteAquí decimos "que a la tercera va la vencida" pero tu con la 2ª vez has hecho un precioso trabajo. ¡Me imagino la sensación que has tenido la verlo colocado!
ReplyDelete¡Gracias Isabel! ¡"The Charm" también se conoce aquí como la tercera vez! Estoy tan feliz de que la segunda vez para mí haya sido lo suficientemente buena, ¡jajaja! ¡Me alegro mucho de que te guste cómo ha quedado el suelo!
DeleteYour first try was a learning experience for all of us. I’m so glad you remade the floor; now it is “charm”ing.
ReplyDeleteHa Ha! Thanks Sherrill! It feels much better knowing that we can use our mistakes to help others avoid them! Now if only I would listen to my own advice!!!
DeleteDear Jodi, Your floor looks Perfect to me!!! The colors are just right! The first picture screams "forties" in my old brain! Lol! I Love the border you gave it and the slight variation of the pattern under the stove actually is a great idea! It keeps the stove from "feeling tippy" over there along the wall! The cabinets are coming along great too! Oh boy, I can't wait to see the "decor" that will get to live in this kitchen! You are turning this Willowcrest into such an amazingly beautiful, gracious and welcoming home! You are Brilliant!
ReplyDeletePS. I regetted not constructing a "pocket door" that would be able to partly close the kitchen from the hallway in my Willowcrest. I know we want to see the hall, but in those "old days" the "ugly" kitchen was not ever open to the hall! Check out Brae Oktober's Pocket door in her "Haunted Heritage" project. If you have not seen it I recommend it highly! And her operating pocket door is genius!!!
Thanks Betsy! I'm so glad you like the tiles! It feels great to know that they read 40's to you, too! I hadn't thought about the "tippy" feel for the stove, but it's so true! In the early days of our married life, Russ and I used to have an actual tippy stove that we had to cook on. It took us a while to figure out that the legs could be screwed up or down to level it, lol! It was avocado green and was a hand me down from Russ' beloved aunt and uncle. In a funny way, I kinda miss that stove!
DeleteI'm so happy to know that you like where this Willowcrest is leading! I am sure having fun! The pocket door is such a brilliant idea, and now that you mention Brae's Heritage, I remember it! I'm going to have to go over to her blog and read about it again just for fun. It really is too bad that It's too late for this kitchen! I'm going to regret it, too!
My work this past week has been dismal. Between real life stuff and this summer heat, my creative motivation is down to a trickle! For the first time in my life, literally ever, I will be glad when summer is over!
Es un trabajo maravilloso.
ReplyDeleteMe encantan los colores que has elegido para el suelo. Son maravillosos.
Un saludo
¡Gracias Mariana! Me hace muy feliz saber que te gustan los colores! ¡Simplemente se siente tan bien para esa época para mí!
DeleteFAB! FAB! FAB!...amazing, looks so vintage..love it!
ReplyDeleteThanks Sandi! I'm really enjoying playing with this era!
DeleteAlthough it was a lot of additional work to make this second floor the whole team (you know... you, the 4-year-old and the machine park) will always be satisfied that you did so. The old floor would have bothered you forever! And this one turned out awesome and gap-free... what else could a miniaturist ask for?! ;O)
ReplyDeleteIt was a feast for the eye to see floor No. 2 aka floor perfect in place with the kitchen furniture under this gorgeous ceiling with the hall peeping in to admire the neighbor room. Wonderful work... and lucky me: I'm able to enjoy another post of yours right away now.
Hugs
Birgit
Thanks Birgit! Yep - we all really needed a second chance at redemption, lol! Everyone is happy now and all of our souls are soothed. 😊 I'm glad you like how the kitchen elements are working together! I can't wait to share the rest of the stuff I've been working on!
Delete