
This week I concentrated on the final steps to completing the structure of the Beachside Bungalow. That included shingling the roof and finishing up the tile floors in the rest of the house.

We'll start with the shingles because in spite of the many dollhouse roofs I've done over the years, it was my first time using real shingle dye! One package is supposed to be enough for 1000 shingles - perfect because the Beachside Bungalow kit includes 950 of them!


I picked up a couple disposable aluminum roasting pans from the dollar store and poked holes in one of them. This allows for easy soaking and then straining of the shingles. I let them soak overnight in the dye, then spread them onto a metal screen in the garage the next morning. The weather was hot so they were completely dry in one day. Unfortunately, many of the shingles were also purple, not gray or black like some others. I recaptured the dye and soaked them again overnight. They were darker the next day, but many of the shingles still seemed not to have absorbed very much of the dye, giving them a purplish sheen. Because there was not much dye left, I decided to apply them to the house "as is" and then mitigate the purple once they were on the house.
One note here for those of you who have yet to try shingle dye - the instructions said to mix with 2 cups of water (about one water bottle). I used bottled water because our water here is very hard. I didn't want hard water to factor in in a negative way with the process. There was barely enough liquid to cover the 950 shingles and I sorely wished I'd bought another package. It costs anywhere from $7.50 to $11.50 per package, not including tax and shipping, so not exactly budget friendly. Roofing a dollhouse can certainly add up, so it's great that this kit includes the shingles.

 |
| Some shingles absorbed less dye, causing a purplish hue. |
I used Kraft cardstock to make flashing. Flashing is nice when you need to cut a lot of angled shingles around dormers where the two roofs meet. It takes away worry about seeing gaps if your accuracy in cutting is questionable. It's also helpful to install it where you want the shingles to butt up to a clean, straight line as in where the dormer walls meet the angled roof. It adds a little realism, too, so why not? My preferred method of applying shingles is by using a Surebonder hot glue gun and glue sticks. It makes the job go so quickly and there's never a concern over curling shingles or harmful fumes!


Under my craft room's bright white LED bulbs, I was still seeing an annoying purple hue to the shingles. To try and mitigate this effect, I decided to apply a Minwax gray penetrating stain over the top using a paint brush. In spite of being very stinky, I think it really did help to color the shingles better and knock down the purple appearance.

 |
| Before |
 |
| After application of Classic Gray stain. |
I do like the way the shingles look now, but I can't say I'm in a big hurry to use shingle dye again - I've had outcomes just as good with stain pens and acrylic paint. But I have learned never to say never unless that is exactly the thing that I want to have happen. It was a valuable experience and dying shingles seems to be a rite of passage for miniaturists.
Now for the tile floors in the rest of the Bungalow...
Last week I shared how I made natural stone tiles in the Opus Roman pattern for the great room. But in the rest of the house, I wanted something a little more subtle. Often, beaches are in warmer climates, lending themselves to homes with Saltillo or clay tiles. That's the look I was trying to achieve. In last week's post I also talked about how I made templates for every room, then transferred the templates onto mat board. I also used the same painting/glazing method for these tiles, though in very subtle colors. For the tiles I used Illustration Art Board again. See links to materials in last week's post.
 |
| Base coat. |
 |
| Chalk paint, acrylic paint and satin glazing medium. |
 |
| Finished with subtle color variations like a sky. |
I cut the tiles in 1" squares to emulate 12" tiles in real life. To find the dead center on the substrate, I drew a 1" grid. This also helped me to keep my grout lines straight, as did using 1/16" spacers (Woodsies) as I laid the tile. I really like tiles laid on the diagonal, as it feels a little fancier and more interesting to look at.


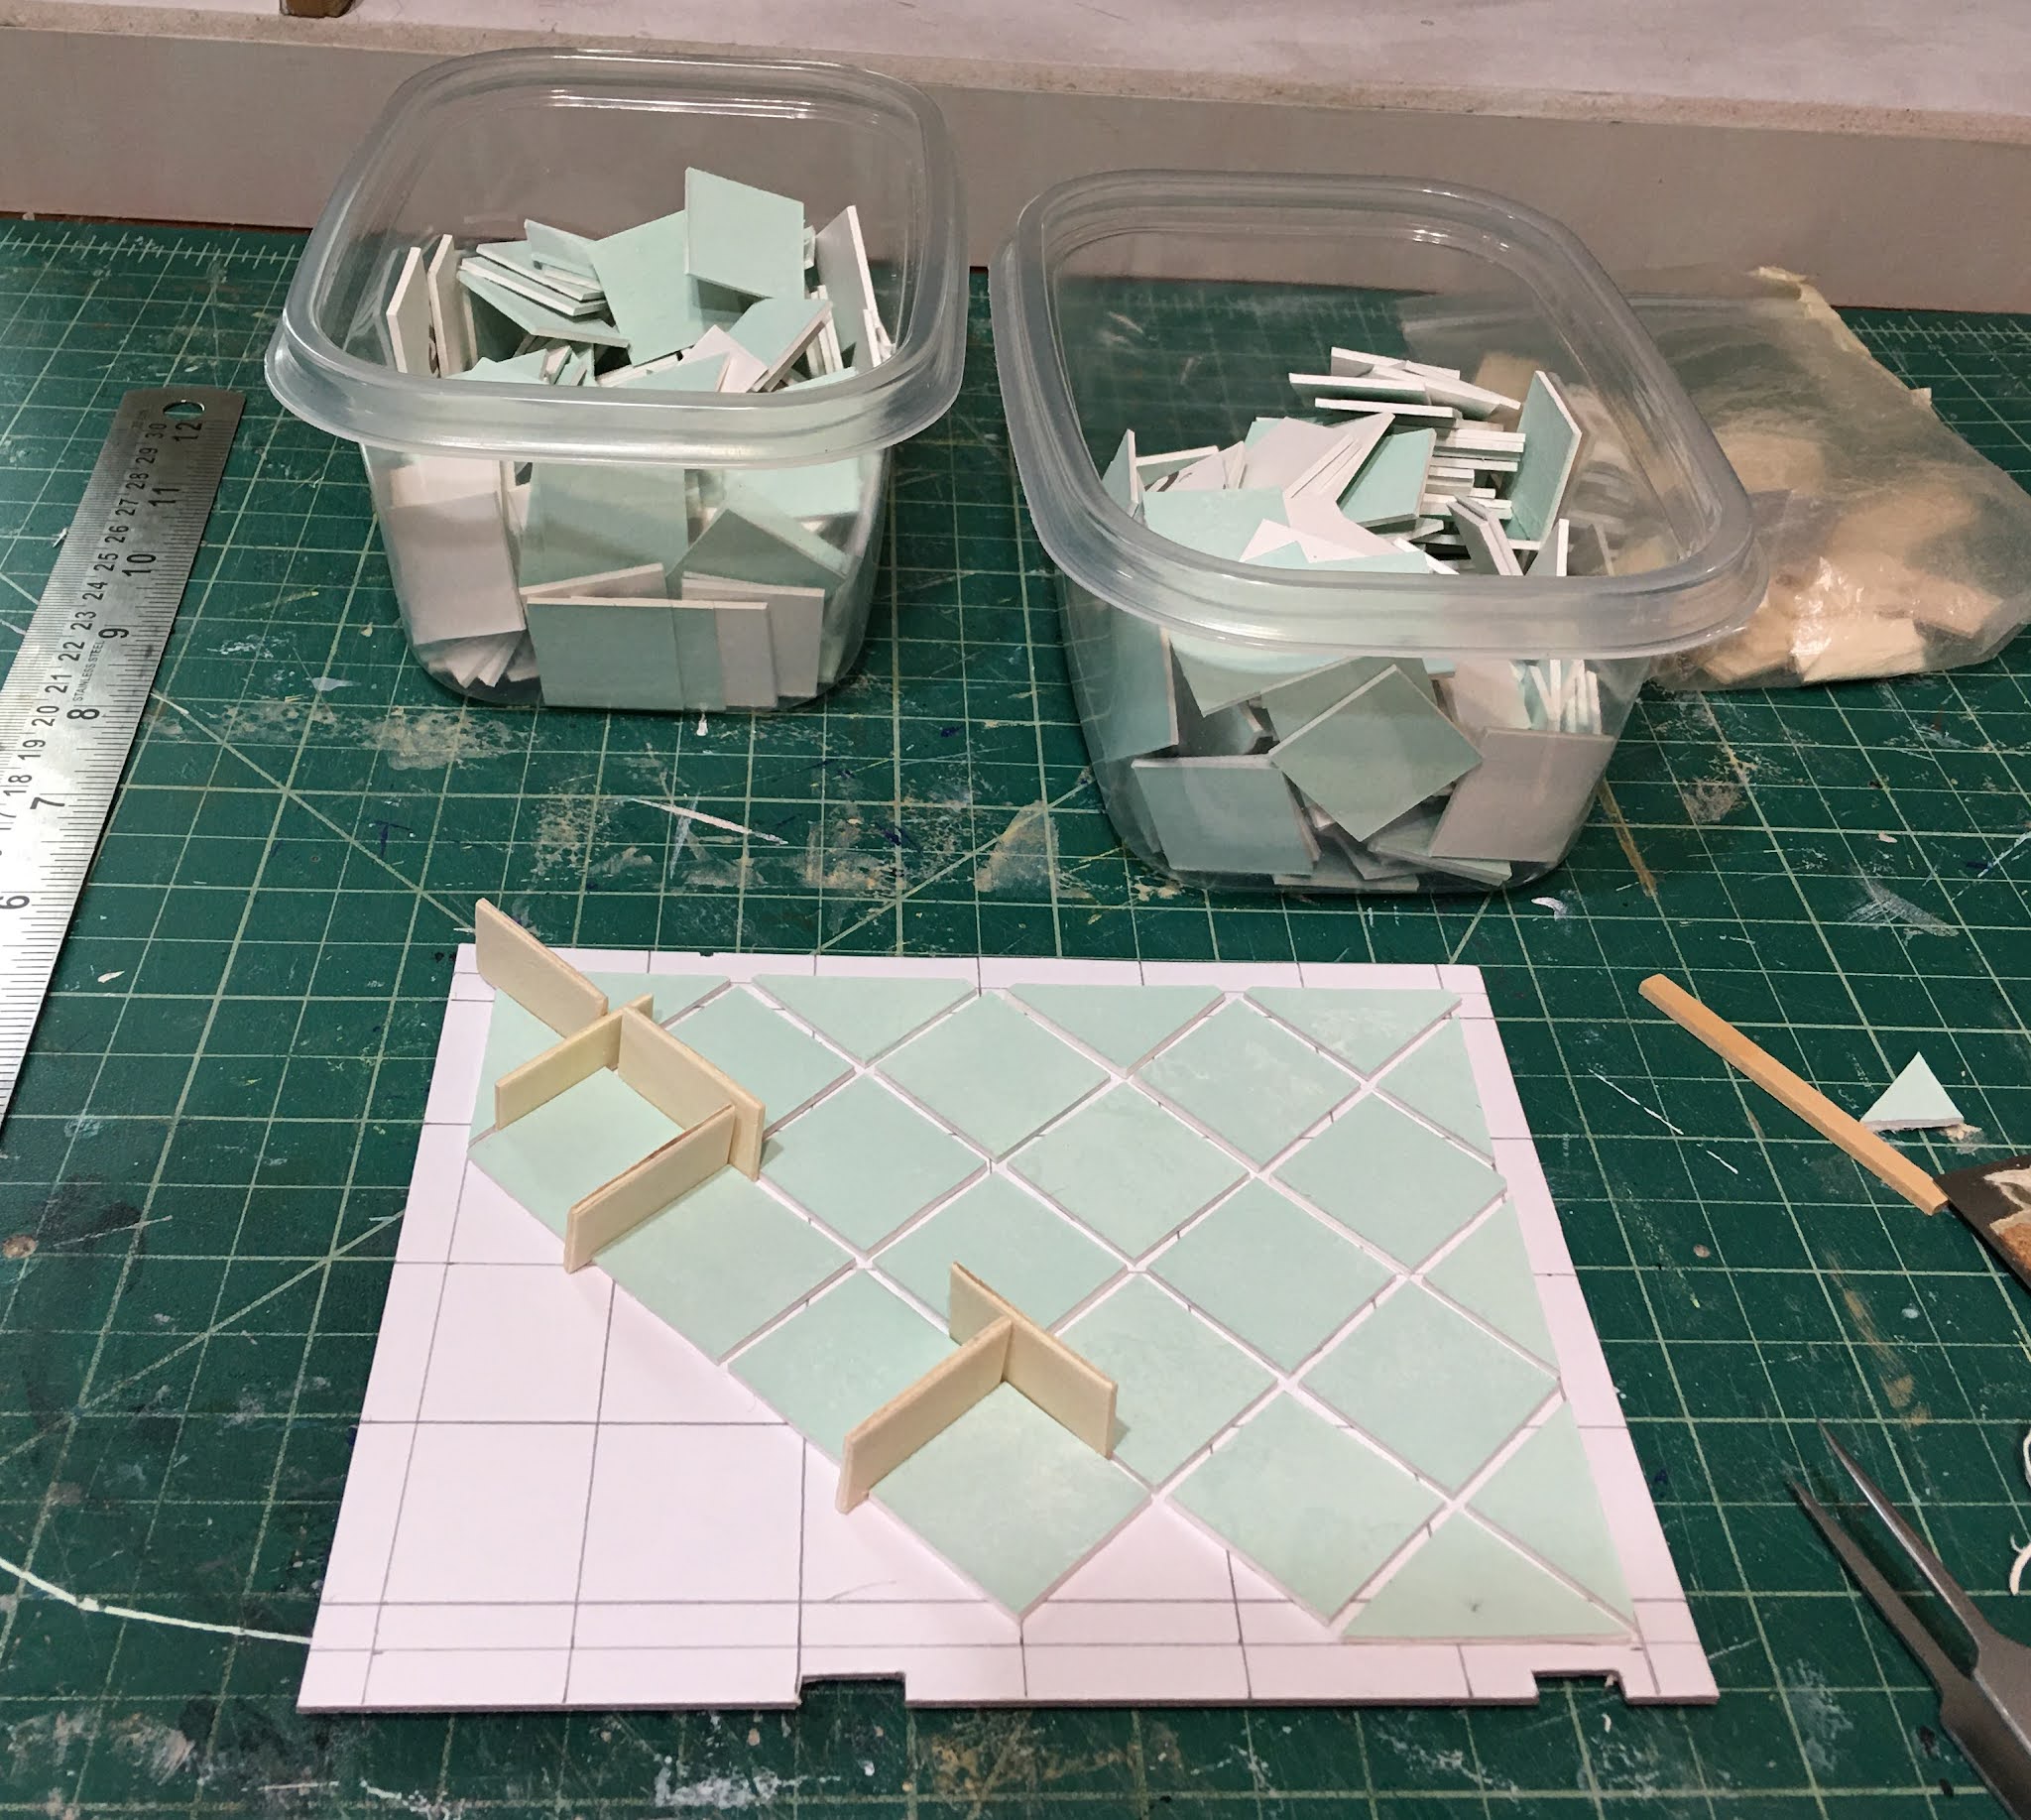 |
| Spacers help to keep grout lines even. |
 |
| It's always nice to have a border tile running in a different direction. |
 |
| Just let the tiles overlap the edges. |
 |
| You can cut them flush after the glue dries. |
 |
| Testing the fit. |


Meanwhile, I got the job done, then sprayed the floors again with satin varnish. It's got a little shine without looking too shiny like slippery porcelain tiles. If you want a porcelain tile look, just use a high gloss varnish as the final sealer.

 |
| My grout lines are ALMOST straight! :O) |
Finally, after all the work preparing the floors it was time to install them! I double checked the fit again, removed the floors, applied a good layer of Tacky glue to the dollhouse floor (being sure to get it to the edges), laid the floors in, smoothed them, covered the surface with scrap cardboard, added weights on top and left it to dry overnight. Whew!
Here is the second floor with the tile floors installed in the stair hall, bedroom and main bathroom. Notice how the baseboards in the bedroom are stained wood to match the other trim.


The wee powder room...


The great room got stained baseboards, too. In the right corner the baseboard does not meet the wall. This is because the fridge will go here obscuring most of the baseboard anyway. I was able to use up a scrap piece here. All along the right wall will be the built in kitchen cabinets. Once I see where they will end, I may have to add another tiny piece of baseboard to finish off the wall to the opening.

With the exception of the back edge trim, the Beachside Bungalow is finished and ready for the interior and exterior details!

 |
| First sketch of the oven side of the kitchen. |
One last thing that I hope will inspire your creativity this week...
Tasha texted me the other night after she'd accidentally run the clean dishes through the dishwasher twice. She asked me if I remembered the dishwasher magnet I made when she was little. I vaguely remembered making one, but not really. She said I had made a clever "Clean/Dirty" sign using Barbie plates. Guess I should have taken a picture back then because my memory can be unreliable! In any case, she asked me if I'd make her one that she and Brent could use. I said I'd be glad to and here is what I came up with: A simple box with a sliding door to indicate a happy "Clean" plate, and a sad "Dirty" one. It's got more of the 1/8" mini magnets on the back and will stick to the front of the dishwasher. I hope it will prevent future confusion for her!
 |
| Happy "Clean" Side with half pearl smiley face. |
 |
| Sad "Dirty" side with dinner's red peppers, fig and carrots left in sauce. |
 |
| 1/8" Countersunk Magnets. These little guys are strong! |
 |
| Displayed on my dishwasher. |
Hope all your projects are happy, inspired ones from top to bottom!
xo xo,
Jodi
Fantásticos los suelos.
ReplyDeleteNo me canso de repetirte lo bien que planificas cualquier proyecto y como lo llevas a término.
El imán para el lavavajillas es muy divertido !!!
¡Gracias Eloisa! Tampoco me canso de escuchar tu aliento, así que ¡Gracias! Realmente disfruto la mayoría de los aspectos de este pasatiempo, ¡incluso la parte aburrida de planificación!
DeleteWow. There is a lot to 'unpack' here, as 'they' say. First the shingles. I've used the shingles and dye that come with the kit on the Ballet Studio, adhering them with caulk?--a messy white builder's stuff. My first experience, with okay results for a beginner. On the Bellingham, I use the Green Leaf speed shingles, adhering them with hot glue, I wish I'd known how to add the the flashing first, because I have very sad, uneven edges where roof elevations join. Used two stain colors to stain the shingles and like that effect. So now the Manchester? I don't know yet. The shingles that came with the kit are very thin. I was not happy using hot glue or tacky glue or the caulk. At any rate, your roof looks lovely. The house is adorable. I admire your tile work and love the green. Can't wait to see the kitchen. My main problem right now is creating counter tops. Great post with so much good information. Thank you for sharing.
ReplyDeleteHi Ann! I know, right? I am always so worried about the posts being too overwhelming or just skipping over important information because I just don't think of it! I have used that caulk stuff, too. I think it's called Liquid Nails. It turned out fine, but the shingles had a tendance to slide, and because it took 24 hours to cure I was uneasy walking away. Those of us that bean crafting in the 80's cut our teeth on hot glue guns, so we are past the learning curve of burnt fingers. For that reason and the low cost and high speed it is definitely my preferred method of applying shingles. I love the speed shingles, too, and have used them on several projects! You can use the flashing with the Manchester and if you have questions or need confidence just email me! I can tell you my process for the hot glue and shingles, too, and maybe that will be just what you need! As for countertops, there are so many directions you could go in. Do a blog post about it and myself and many others will chime in with advice and ideas! It's going to be great!
DeleteMuy bonito el techo, los diferentes matices de color le dan más vida. En cuanto al suelo el color y la configuración de la colocación es un acierto.
ReplyDeleteMuy divertido y además útil el imán del lavavajillas.
¡Gracias Isabel! ¡Estoy tan contenta de que te guste cómo salió todo! Me preocupé por las tejas durante todo el proceso, ¡pero al final me gustan! ¡Qué alivio!
DeleteI am new to your blog. I love your dollhouse. That is what caught my eye. Great work! I wish I had the room in a tiny apartment for this hobby.
ReplyDeleteMarion
Hi Marion! Thanks so much for following the progress! When I began my first dollhouse for my daughter many years ago, we lived in an 800 square foot basement apartment. It was tricky! But it can be done! Where there is a will there is a way! Have you considered half scale, quarter scale, or 1/144th scale? It might be the best of both worlds: space saving and still creating! I hope you will stop telling yourself why it's not a good idea and just go for it! The way often reveals itself AFTER we take the first step. 💗
DeleteYour beach house looks terrific! Love the green tile floors. Clever dishwasher idea too.
ReplyDeleteThanks emjay! I always love the time when the foundation stuff is finished and the fun stuff can begin!
DeleteThe work is always fabulous. Thought out, precise, careful and loads of care and patience all of which shows in the perfect end result. What wows me just as much is your choice of lovely colours in your projects. They are totally original and always beautiful.
ReplyDeleteThanks Marilyn! I am so glad to know you think I do a good job and that you like my colors! Things I always admire in your work, too! 💗
DeleteI love your tile. Never thought of using woodsies as spacers but I'm going to have to try that out. I should try that joint compound too, because spackle does just wipe away so easily!
ReplyDeleteThe colors are so pretty!
And I feel your pain with the shingle dye! Ran into the same problem and ended up going over my shingles with watered down black paint. Less smelly but a little messy.
Thanks Sheila! I am keeping my fingers crossed on the joint compound! Let us know if you get to try it before I do! So glad you like the colors - I have next to nothing to go with a green interior so I'll have to make a lot of things and hope they compliment! Yes, shingle dye is not a miracle, unfortunately, and I can't imagine choosing it again. Those stain pens are so easy and paint wash so inexpensive!!!
DeleteIt's wonderful to see how everything you planned on paper resulted so accurate and beautiful. I love the floor tiles and the way you used the spacers. Sorry for your trouble with the shingles but the end result looks stunning. Wonderful work, as usual!
ReplyDeleteHugs, Drora
Thanks Drora! Things do seem to go better for me when I think and plan them out - especially complicated tasks! I am so happy that you like the tiles and the shingles! I am so glad to have it finished!
DeleteNice work, very inspiring. I love the color palette on your second floor!
ReplyDeleteThanks Troy! I have been wanting to use that Mint Julip scrapbook stack for years! Glad you like it, too!
DeleteThe shingles look great with the aqua/green of the walls Jodi but interesting to read your comments about the dye vs other methods of colouring them. I guess it’s really just preference and what works for you. Love the more subdued flooring for the bedroom/bathroom/powder room. Such a pretty colour and doesn’t compete with the wallpapers. Good choice! And lastly, how cute is the dishwasher magnet?!? Great idea.
ReplyDeleteThanks Shannon! It totally does come down to whatever works best for each person! Some swear by the dye and others swear it off, lol! I always love a dark roof. It seems to ground the structure somehow, especially in more contemporary dollhouses. I am glad you like the floors! I knew if I was going to go with a tile in the busy bedroom it would have to fade into the background instead of competing for attention. I could live in a room that was all that color. So soothing to the soul!
DeleteOh Jodi! Amo tu bungalow de arriba a abajo! Las tejas son preciosas,nunca oí hablar del tinte.Los azulejos en tono aguamarina se ven espectaculares,crean un contraste con el colorido de las diferentes habitaciones increíble y hermoso,me encanta todo,todo,todo!!!!
ReplyDeleteEs impresionante de que manera tan artística combinas las formas,los colores,los materiales..creando algo único tan personal,todo lleva tu "sello".
Gracias por los consejos.
Besos.
¡Gracias Pilar! ¡Tus amables palabras y tu entusiasmo también me hacen amar aún más las habitaciones! Será una lucha para mí crear un espacio cohesivo con tanto verde en la gran sala, ¡pero espero que mis ideas terminen creando un espacio cálido y cómodo para Kairi!
DeleteWow! That went together fast. Your colors look so cool and fresh, and the tile flooring is just perfect. Now I, excited to see what you do with the furnishings.
ReplyDeleteThanks Sherrill! I hope my ideas for the furnishings will elevate the space, too! My screen's colors and my printer's are currently in a disagreement, so printing my fabric for the sofa is going to be challenging. I am hoping an updated driver when the time comes will be the magic cure. If not, the challenge will grow in scope and time. :O)
DeleteHi Jodi! You are just Amazing! You have so many great ideas and tips... the "drainer" tray for the shingle dye.... what a time saver! The dye probably looked worse to you that it did to me... but following your inner guide is always a good idea! The shingles look great in the end... and they went on so fast! LOL! (Slow poke that I am... I apply the shingles one year.... wait a few years and then decide to paint them... ! ) The floor tiles look so amazing too! The color is cool and fresh without being too sweet... just right to offset the bright pinks on the walls. And boy, do they take the "reality" illusion up about ten notches! I had to look three times to be sure the bathroom was a mini one!!! WOW! I also look forward to seeing the wonders you will achieve with that cute powder room! :) You are on a roll! And I always can't wait to see (and learn!) more!!! :):)
ReplyDeleteWow, Betsy! Thank you for the uplifting compliment! 💗 I know you know I think you are ~A~M~A~Z~I~N~G~ too! You keep on taking as much time as you like to do all the incredible things you do because the timing is always right on time and perfect! All is well that ends well, and the roof looks just fine now. I am so glad you like the color of the floor tiles! That color sends my soul to peaceful places! The diagonal orientation makes me swoon, too! I am working on the plumbing for the wee powder room -I hope what works in Tinkercad translates well in the space! If not, it may become a closet, lol!
DeleteLa idea para el lavavajillas es muy original y fantástica.
ReplyDeleteEl bungalow esta quedando maravilloso.
Los suelos, el tejado, los colores ... todo forma un conjunto precioso.
Un saludo
¡Gracias Marian! ¡Me alegra que te guste el progreso y el imán y espero que también seas creativo esta semana!
DeleteYou're a genius! The roof is fantastic with a perfect color. The floors appear to be done by a tiler and I really like the color. And the dishwasher magnet is so cute.
ReplyDeleteThanks Faby! I'm glad you like the progress and are here to make progress with me!
DeleteWhat a wonderful post! ;O) But I wonder now... as I often did before - do you get enough sleep??? It's always amazing how much you're able to get done in a few weeks. Things like roofs and floors take me ages... but okay, I'm the snail and you're working faster than the ray of light.
ReplyDeleteIt was interesting to see you using shingle dye, I must confess I've never heard of that or seen this before but I suppose that's because the miniature hobby is not that common in my country. As always you've explained everything so well that I have no doubt it will be valuable advice for others who still have to give it a try. The result looks awesome - and I can honestly say the same about your tiled floors. What a wonderful choice of colour, it matches so well with your wallpapers. It was fantastic to see the two floors ready for the decoration - what a cheerful and inviting place you've created. Btw - for somebody from the rough North of Germany the idea of having tiles in the bedroom is somehow funny... *LOL*
I bet Natasha is over the moon with her new little kitchen helper, she's blessed to have a creative Mom like you who's always coming along with the best ideas. I really like the way you've created the sad face for the dirty plate.
Hugs
Birgit
Ha ha! Thanks Birgit! I sleep fine and get enough unless Ande's puppy Rosie is spending a few nights. She's still just 2-1/2 and must have been a hummingbird in a past life. She never stops moving, and keeps waking me up all night long! Did I mention that all three dogs sleep in bed with us? But back to minis...
DeleteThanks so much for the nice comments! I imagine if I had other interests to occupy my time, like a beautiful garden to bask in, I may run short on mini time, too. However, I am a One Hit Wonder, and aside from playing the occasional video game with Russ, concentrate all my free time on minis. I used to read quite a bit, but with podcasts and audiobooks, I can do both at once!
There are no prizes for going fast in minis. In fact, it just means I am creating more things to dust at a quicker rate than you. So really, you win!
Never heard of shingle dye? Wow! It's amazing how our experiences vary across the globe! I believe in the 70's and 80's, it was the same process but done with actual oil stain instead. I heard it was stinky and messy, so I am glad at least that with the dye there was no smell.
I am so glad you like the color of the tiles with the walls! I love the combo, too! And when I first became aware that most homes in Florida have tile throughout their entire houses, I was miffed too! What?!? No carpeting in the bedroom?!? Those of us in colder winter climates could not imagine getting up in the middle of the night with no carpet under cold feet! But it's a thing - I promise!
I'm happy you like the dishwasher magnet! It was a lot of fun to come up with the idea and then make it! Natasha is a scientist through and through. It's funny that she thinks that creativity is some anomaly that her mother happens to have. She's convinced that she has none, but I point out her creativity to her all the time It's just nice when our kids think we are specialists in something and turn to us first for help!
I love how this house is turning out. I do think the addition of the Minwax stain improved the roof. The tiles are fantastic. One thing I really like about your re-design of this house is the powder room on the first floor. I have the half-scale bungalow by RGT, but it was my first house, and I never thought that I could really change the layout. It always struck me as ridiculous that if the little homeowner was working in the kitchen and needed the bathroom, she had to go through the entire house to get there! Also really love the shower upstairs. It is always a delight to watch your projects take shape and to see all the interesting, inventive ideas you come up with for them!
ReplyDeleteThanks Deb! It really has become unthinkable to us that there be any house without a powder room! I don't remember how we didn't have more conflict growing up with only one bathroom. Any time there is opportunity for a toilet on every floor, in real life or in mini, I'm going to make it happen! Especially as we get older and all our gaskets are wearing out!!!
DeleteI'm so glad you like how the BB is coming out! I am pleasantly surprised by it, too! It's been a lot more fun and a lot more roomy inside than I had imagined!
If joint compound is the same as dry wall compound, I found it worked well in my Tudor Apothecary workshop. My tiles were sealed with an outdoor sealer, before I added the compound. In the case of roof shingles, I tend to use painted cardboard, and apply it a few rows at a time, using yellow carpenter's glue - wood and cardboard are both cellulose, right? Then I clamp a spare piece of wood over the newly glued shingles, and in half an hour I can do the next section with this method. I do love the colour variation in your roof shingles!
ReplyDeleteOh great! I am excited to try it, and just happened to see a 3 lb tub of it on Russ' bench in the garage! Wish I'd though of it before I finished these tiles!
DeletePainted cardboard is a great idea! It's almost free and helps recycle, too! Bet I could cut shingles with my Cricut in strips if I had the right thickness! As for the gluing and taping a row at a time, you are a patient woman! Glad you like how these shingles came out!