
This week has been a time of trial and error, to the drawing board and back again. It makes me feel a lot better when I read that Henry Ford spent two years and over a million pre-depression dollars to create an eight cylinder engine, in spite of every "expert" telling him it could not be done. I know minis are not a modern marvel on the level of an automobile, and I'm no genius inventor, but if Thomas Edison failed 90 times before he succeeded with the light bulb, I can give my experiments a try or two. I always manage to learn something in the process, and this just proves Thorndike's Theory.

I started off the week's adventure drawing up a rough idea of what the island should look like. I included all of the pertinent data such as the length, width and height, but I also kept in mind what I'd like to end up with in terms of functionality. I wanted some working drawers and maybe an opening cupboard door. Since the rest of the cupboards and appliances in the project are dummies, at least with the island, Tasha can pull it out to arrange and play with the accessories when the urge comes.


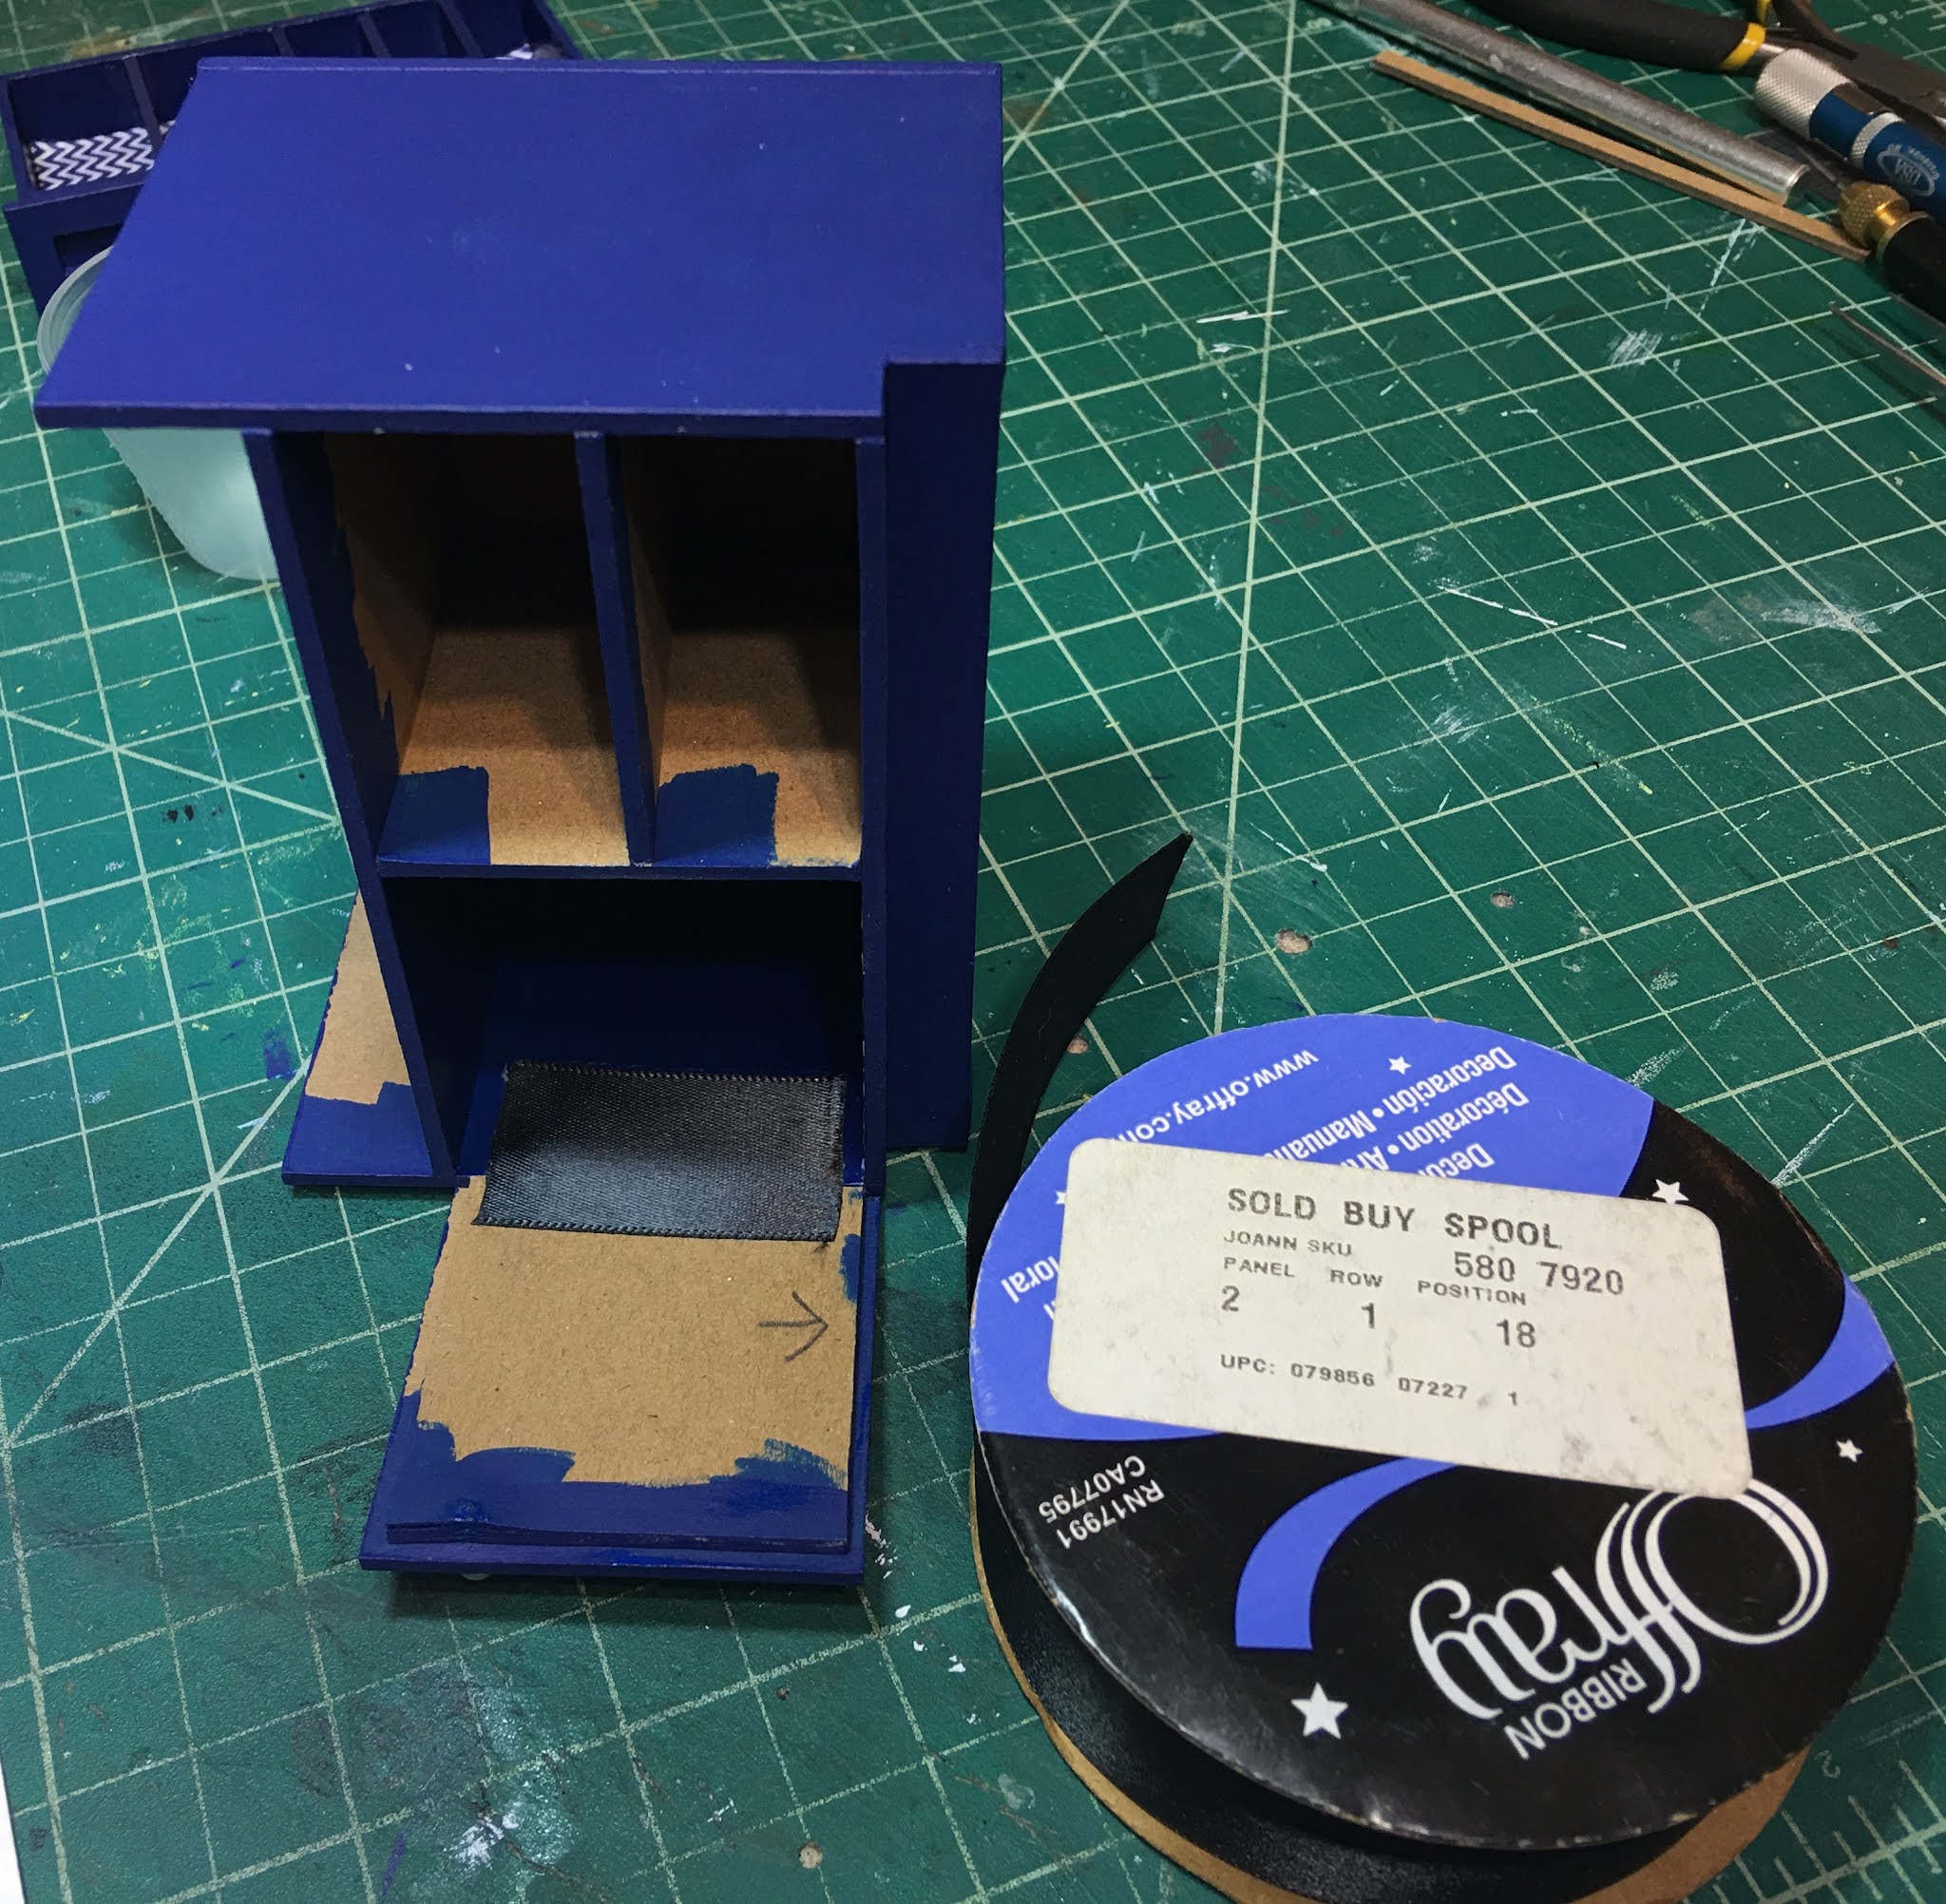
My first attempt at the outer shell hit a hiccup right at the start. I forgot that the interior brace piece was supposed to be placed where the top drawer could rest on it. Making non opening cabinets so often has trained my brain to center the supports. Instead, in opening units, I need to be thinking about where they are supposed to go to support the opening parts! It was a happy accident, though, because I had also forgotten to cut the sides with a recess for the toe kick!
Ah, well... Luckily, chipboard is cheap and I have all the time in the world. 😊

Once I re-cut the pieces, I began to assemble the island - correctly this time!


Next I assembled the drawers and door. See the torn cardboard in the top drawer? Mistake #3. I glued the drawer bottom to the top of the drawer by accident. It mattered because of the way the drawer needs to slide and fit into the front. I pulled it off, glued correctly and sanded smooth before I finished the drawer.

 |

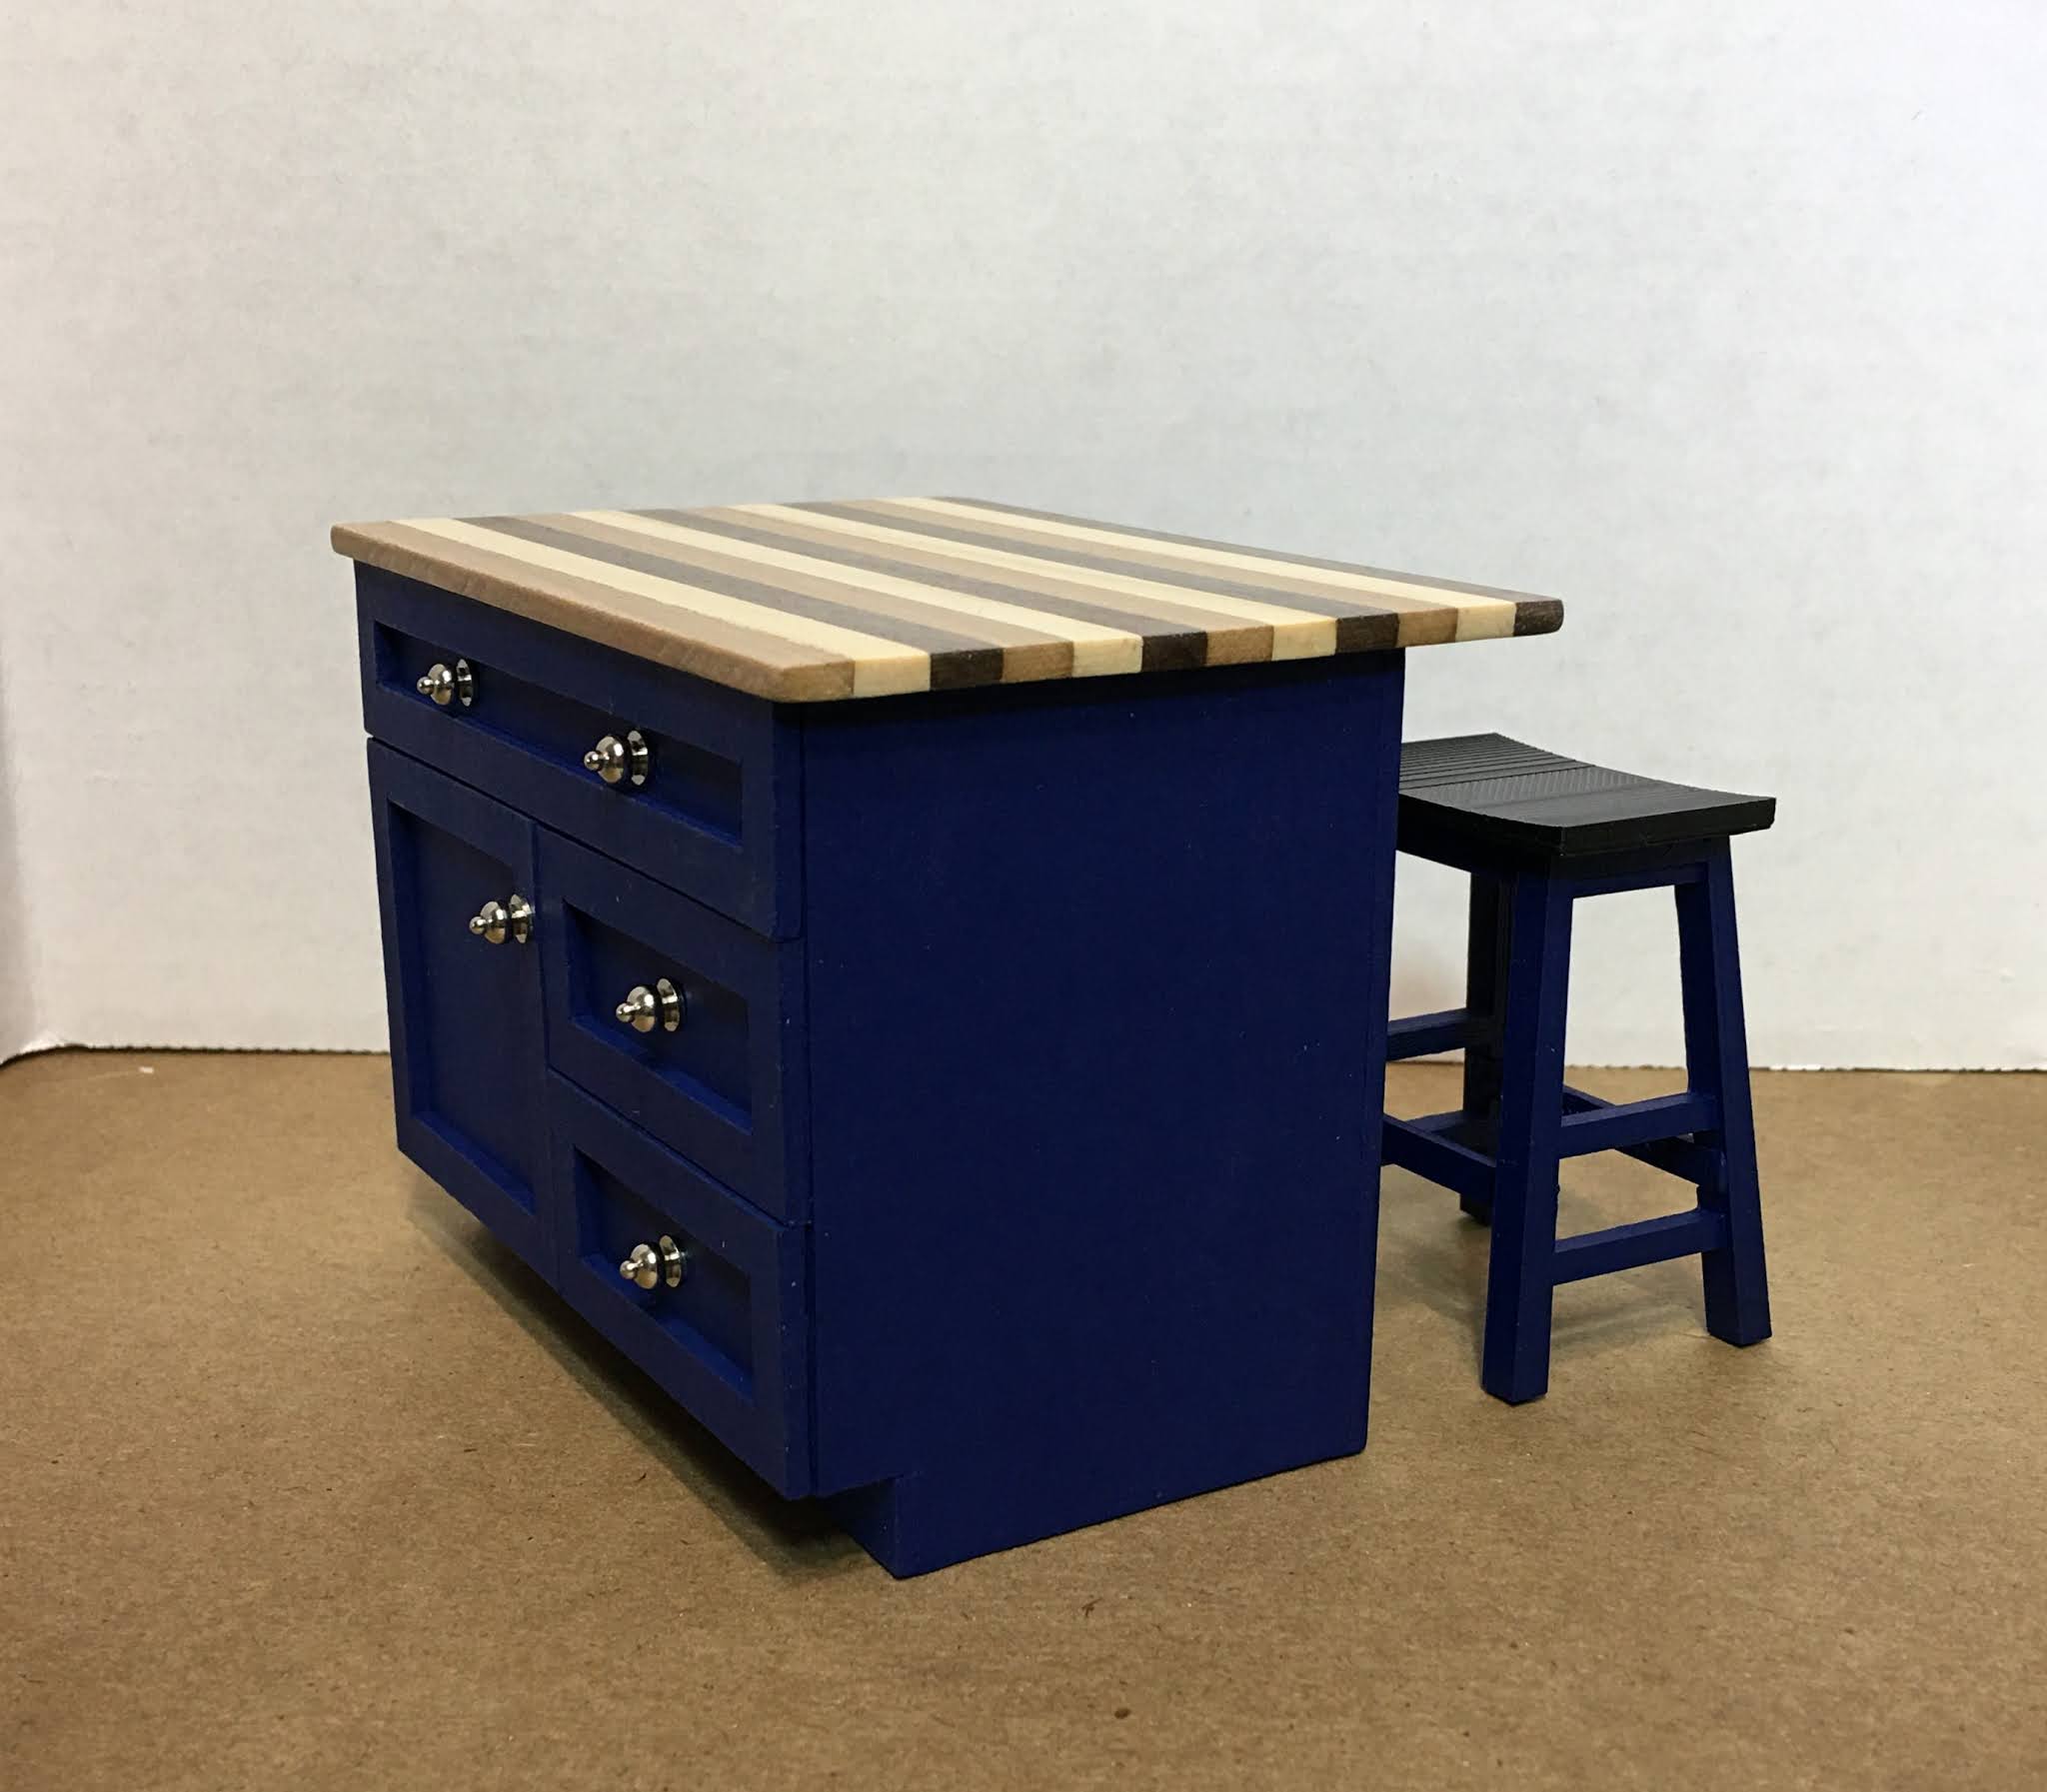
I painted everything in what Betsy is calling Freda Kahlo Blue (because Freda's famous house, now a museum, is blue). I printed off some chevron patterned liner to Mod Podge into the drawers, then added silverware dividers. Tasha is a big fan of chevron patterns!


When it came time to attach the door, I got out my supply of hinges. For a person who feels dread the minute I think about installing them, I sure have a lot of the little devils!!!

Here's where I am like Henry Ford. I KNOW they can be done, and I am determined to solve all the required mysteries to become a Hinge Master someday like Betsy, but it might take me $1,000,000 and a couple more years. After consulting with the resident expert contractor (a.k.a. Russ who was very impressed at the variety of hinges I have), he advised that due to the way I made the door panel fit into the cupboard opening, and the fact that I used chipboard rather than wood, I would have my work cut out trying to successfully use a hidden or recessed hinge. I did not want to place hinges on the outside of the cupboard because that would really detract from the clean design aesthetic that I am trying to achieve. So after weighing all the options and not wanting to ruin the island (effectively forcing myself to start over), I went with the old tried and true fabric ribbon hinge method. It functions well enough, though it is a little disappointing not to have been able to achieve a hinge victory.
I hope Tasha and Betsy will not be disappointed in me. 😔
The next thing was to figure out if there would be enough room in Tasha's kitchen for stools. If the answer was YES, then I could make an overhang for the island's top. If the answer was NO, then the island top would have a minor overhang equally around all four sides. I was really hoping for a YES!
I had some Classics Bar Stools in my project stash drawer for the Beachside Bungalow. Being bar height, they would be too tall as counter height stools, but could I cut them down? At only $8 a stool (what I paid for them), it was worth a try. I took the cushions off, nuked them on paper plates in the microwave for about 30 seconds each, then using a cotton kitchen towel as a glove, pulled the pieces apart.


How about painting them teal, perhaps? Tasha's favorite color.

That's not it. How about white? Better, but still not quite what I had in mind.

You know, when you just don't love something, you have to throw in the towel and try something else. Sorry Henry. Guess I am not quite as stubborn as you. The chairs will get stored in a drawer and maybe work for a different project in the future.
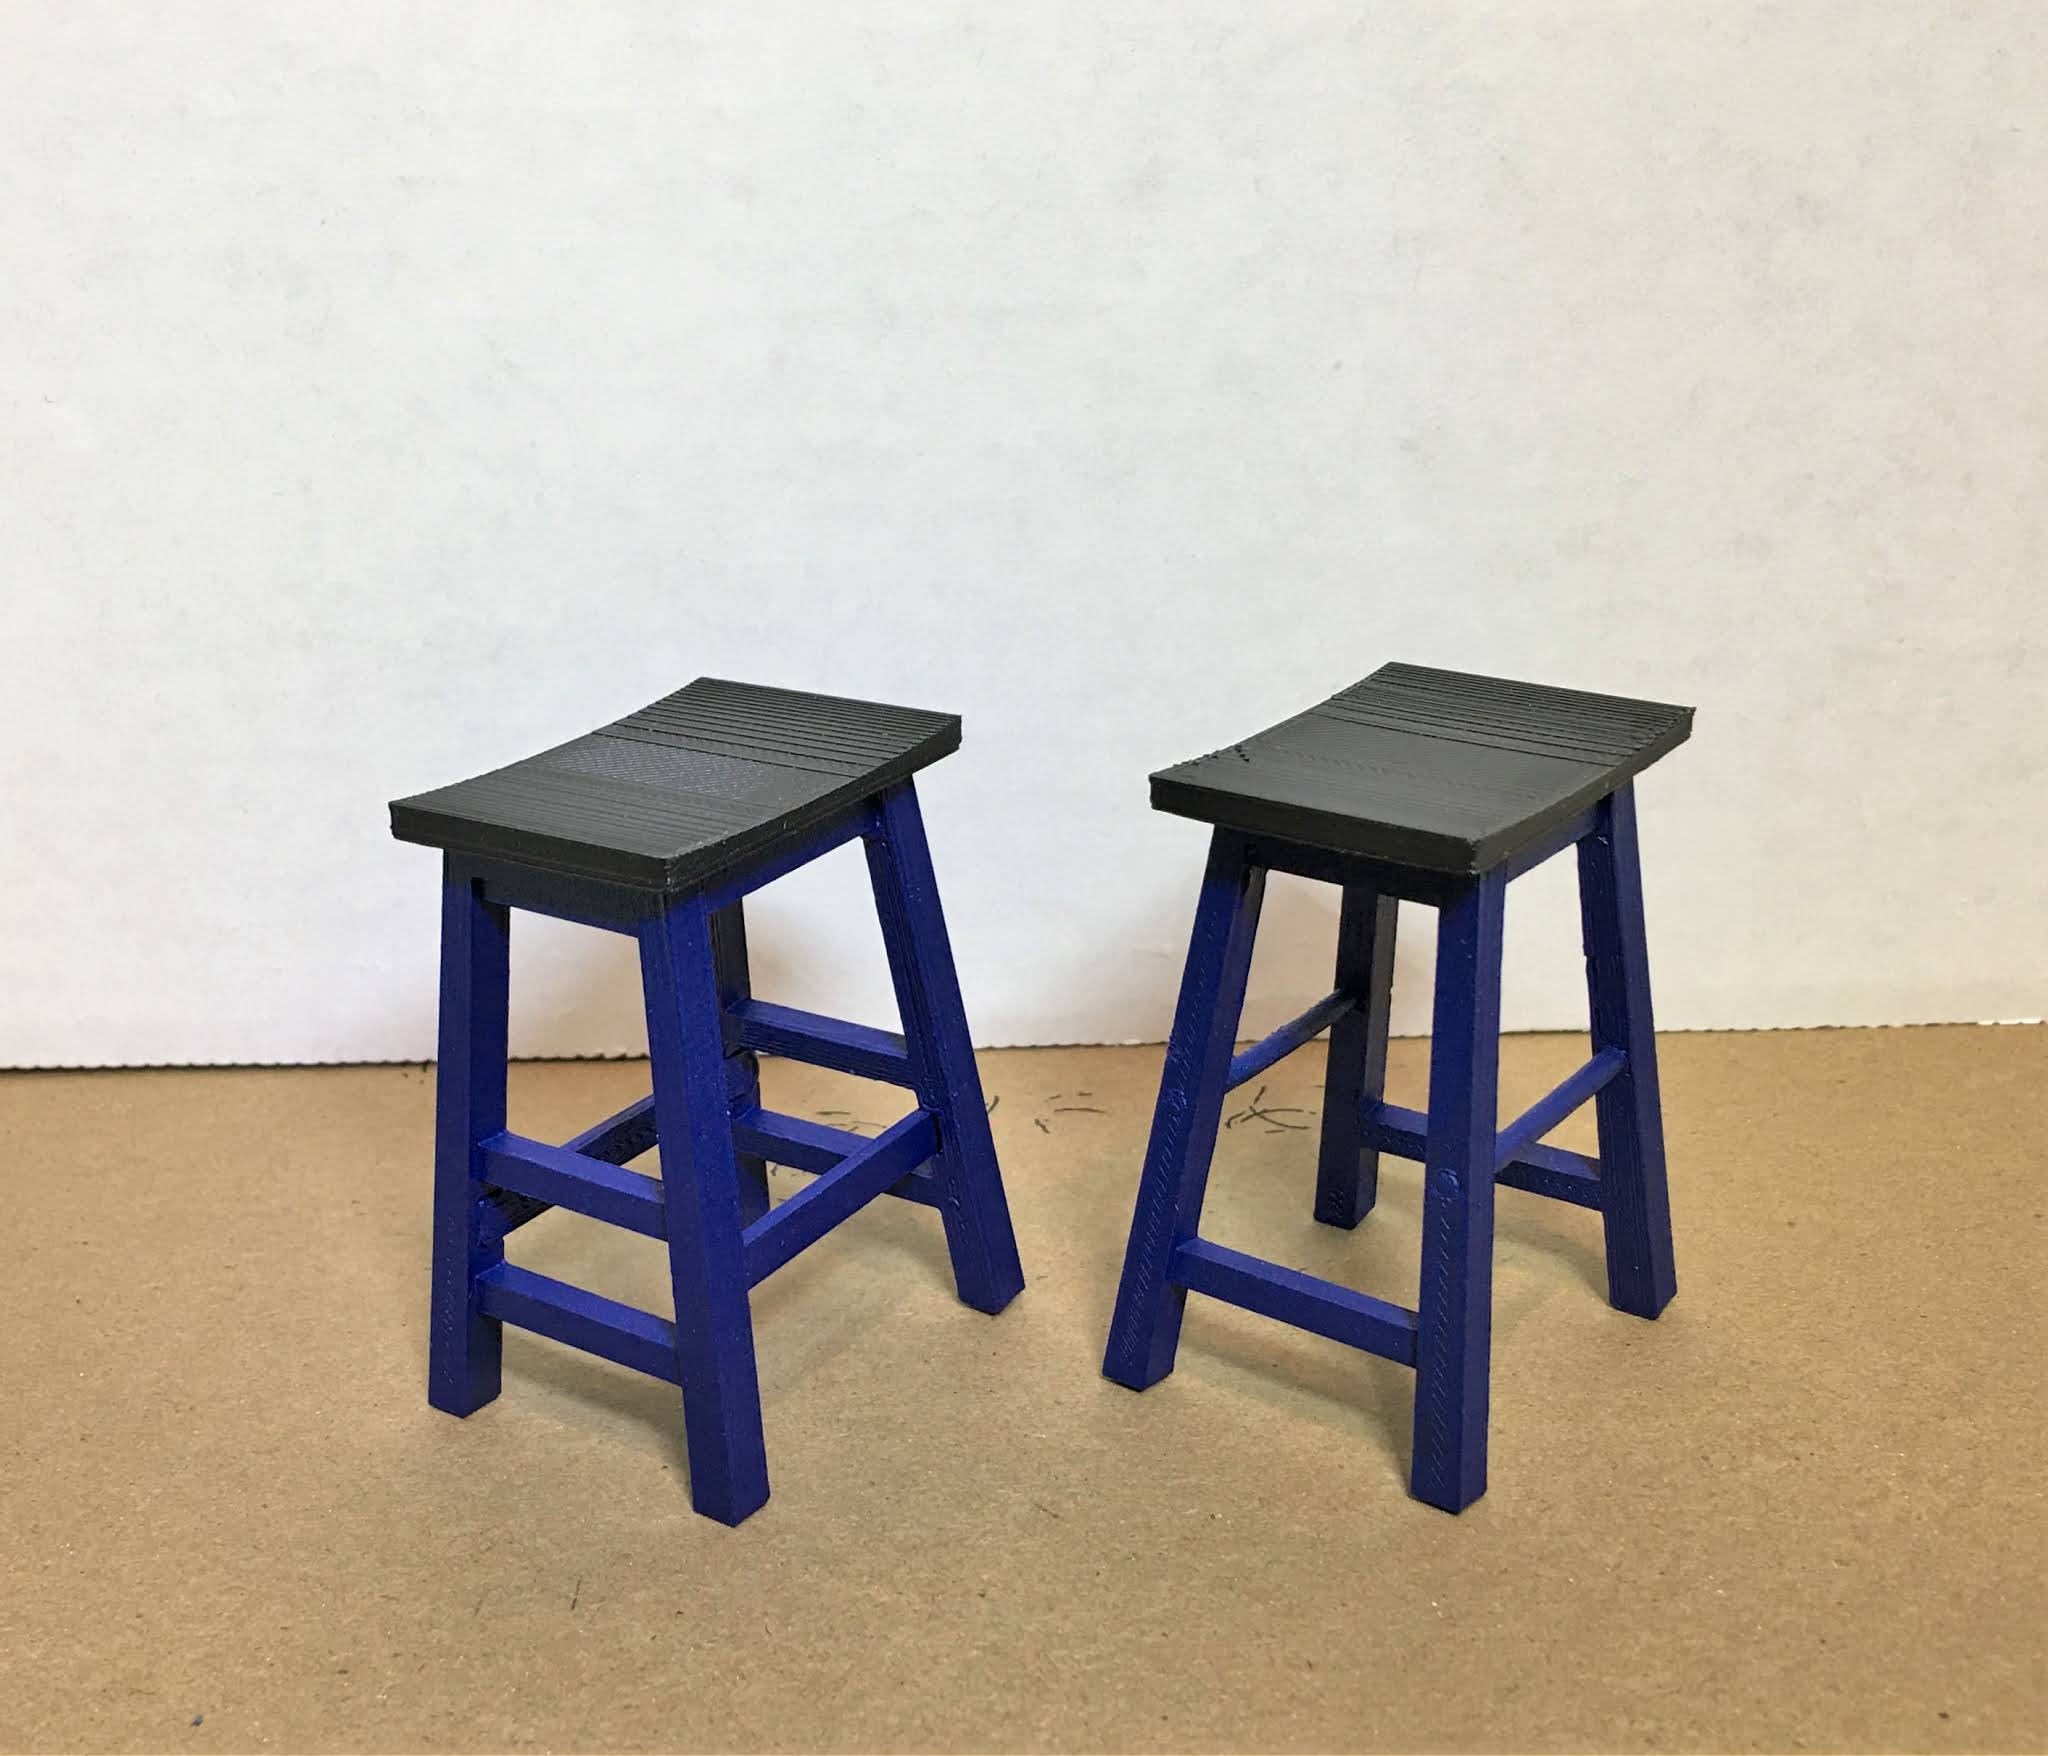
I decided to see if I could make my own stool with the 3D printer. I'd done it before, and that stool is still being sold in my Shapeways shop. That gave me the encouragement to try. I found this stool online and not only did I like it's simple, modern vibe, it looked like something I could make in TinkerCad by just manipulating shapes.

Sure enough, just three shapes (trapezoid, round roof and square) and 30 minutes later, I had my first prototype!


One of the things I am still learning about with 3D printing is that just because you create precision parts in TinkerCad does not mean that they will fit perfectly together once printed. Especially if, in the slicer program (the program that prepares the model and settings for printing), you add support for unsupported areas of the model (like overhanging or hollow areas). Imagine a roller coaster track. All of the support structure under the track are what the slicer program adds to support overhangs and recesses. Normally, you just snip them away post print. In my case, the support frame reduced the size of the openings that I had created for cross leg supports to seat into. So for the first set of prototype stools, the cross supports were too large for the recesses. To salvage the effort, I replaced the printed braces with wood ones, instead.
The good news is that the rest of the stool design was perfect! Just the right height and depth to fit the island and still not make it feel like the floorspace around the countertops was crowded by them. Stools were a YES! Especially if you imagine that the "fourth wall" isn't really a wall at all but an opening to the room beyond.

But I was compelled to take what I had learned from the first stool design and try for better results. In the second stool design, I made the openings larger to account for the reduced space that would occur as a result of the support structure added by the slicer program. I also tweaked the design a little, adding an additional leg support on the sides and adjusting the placement of the front and back supports.
 |
| The patterned design on the pieces is a naturally occurring result of infilling by the 3D printer. Sometimes it adds nice detail as a bonus. |
I painted the legs blue, left the seat black to tie in with the black areas on the appliances and sprayed them with matte sealer.
 |
| First attempt, Right, Second attempt, Left. |

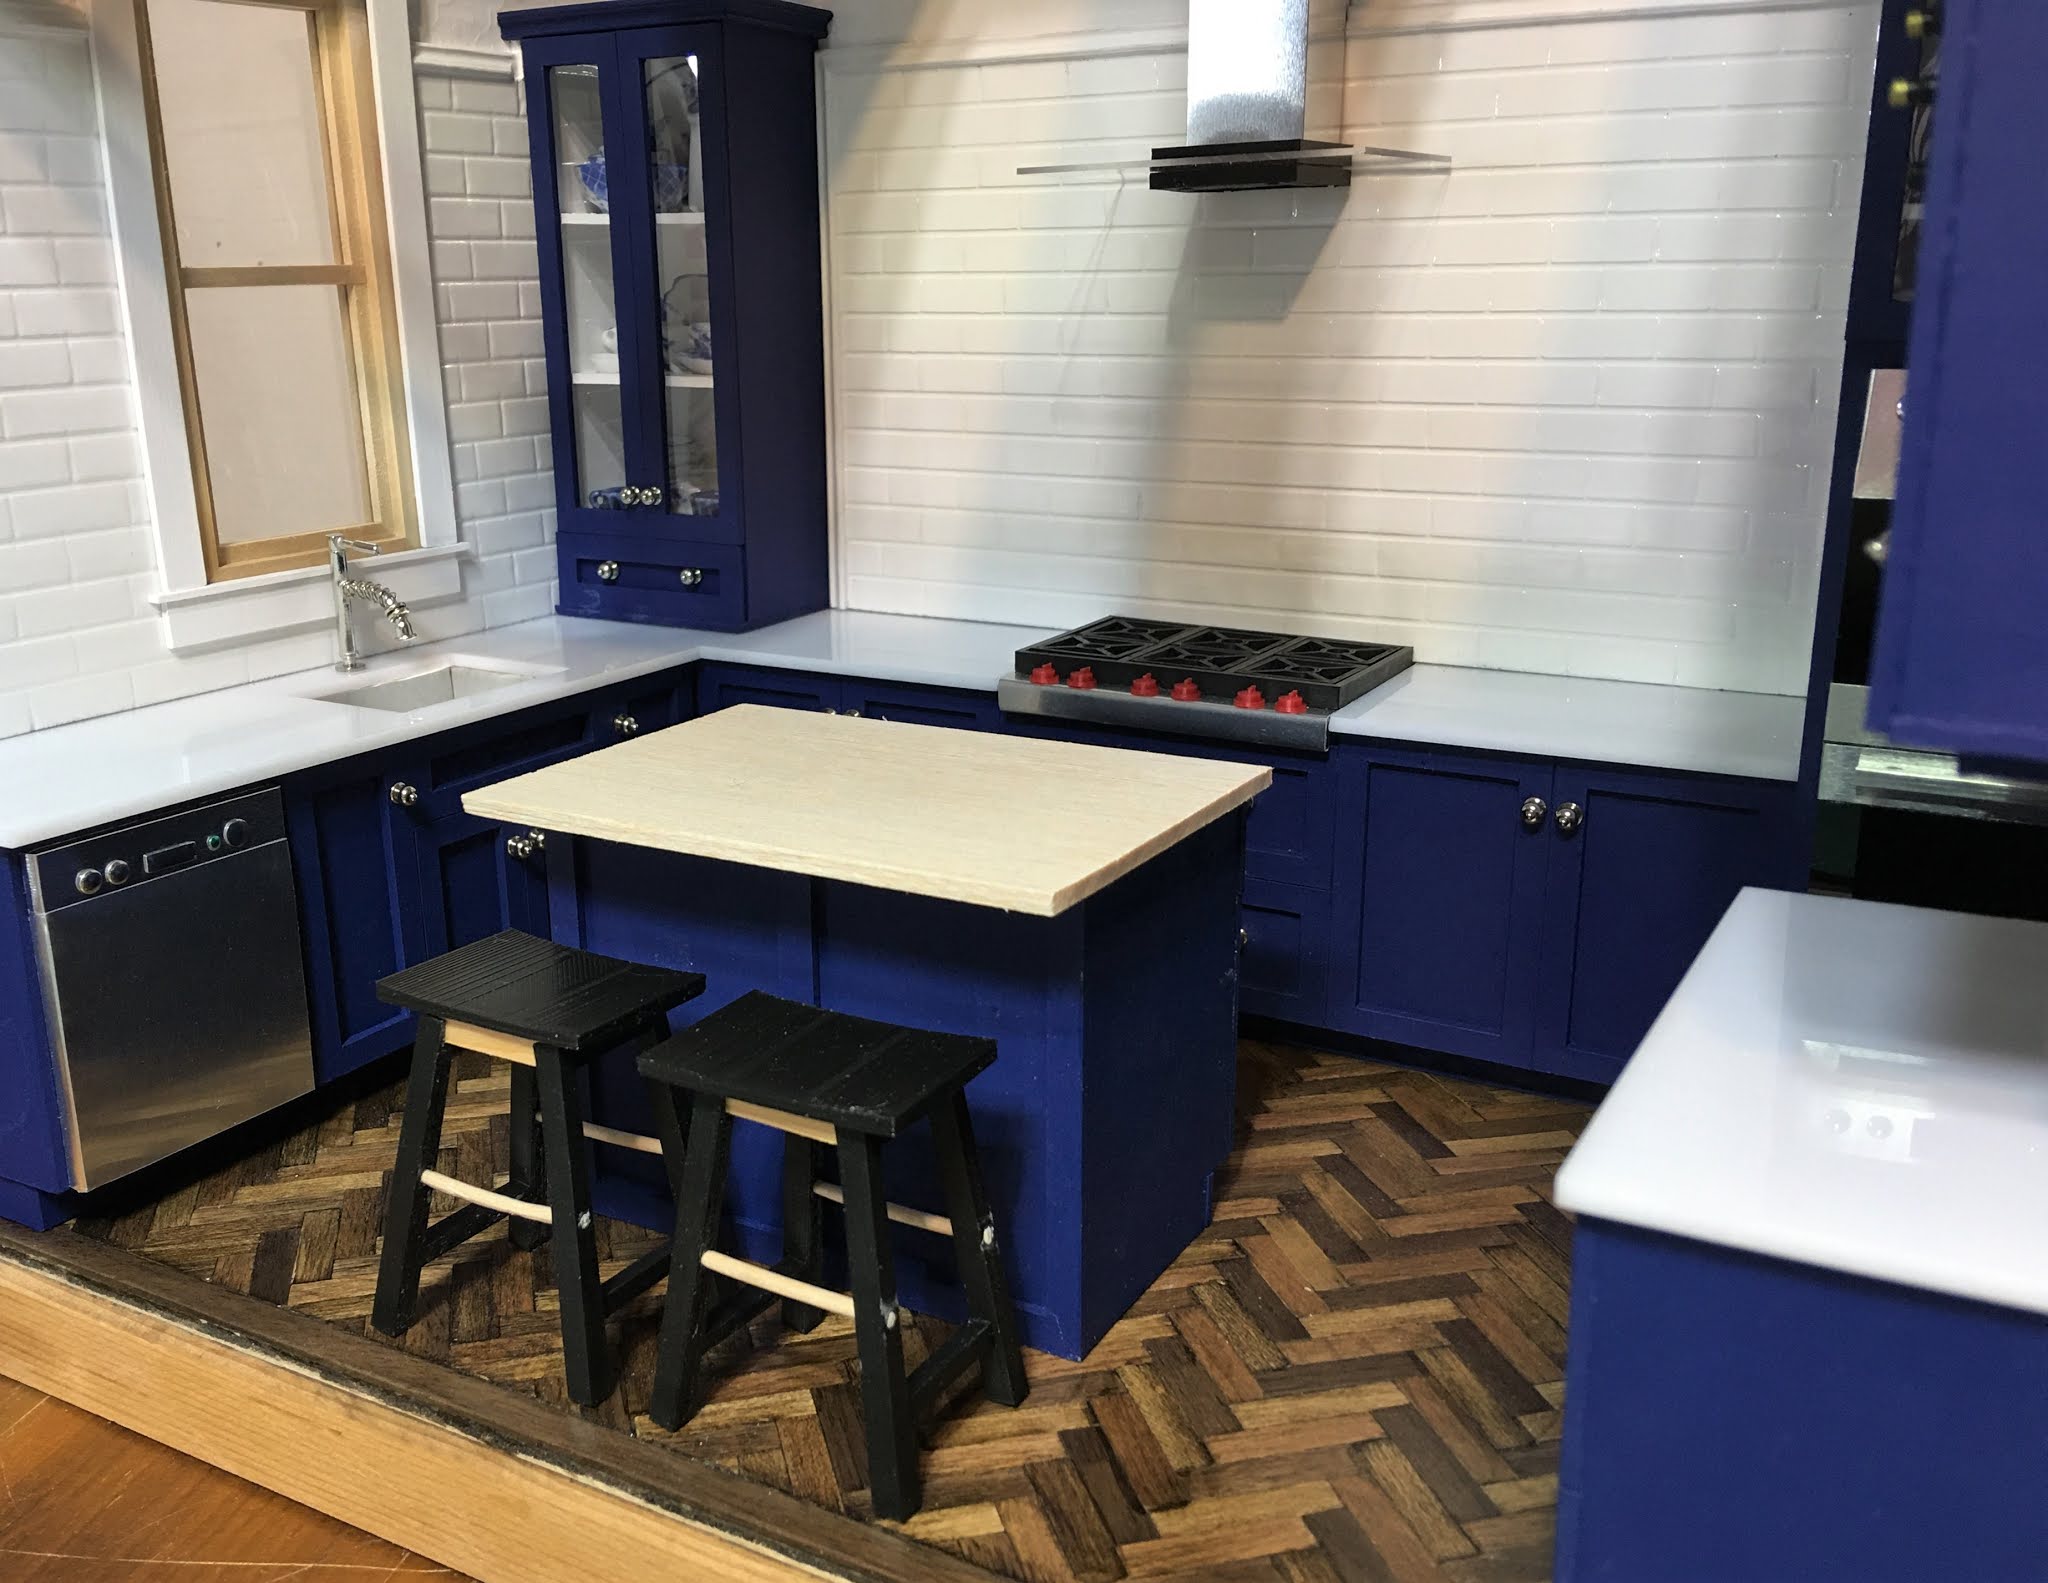
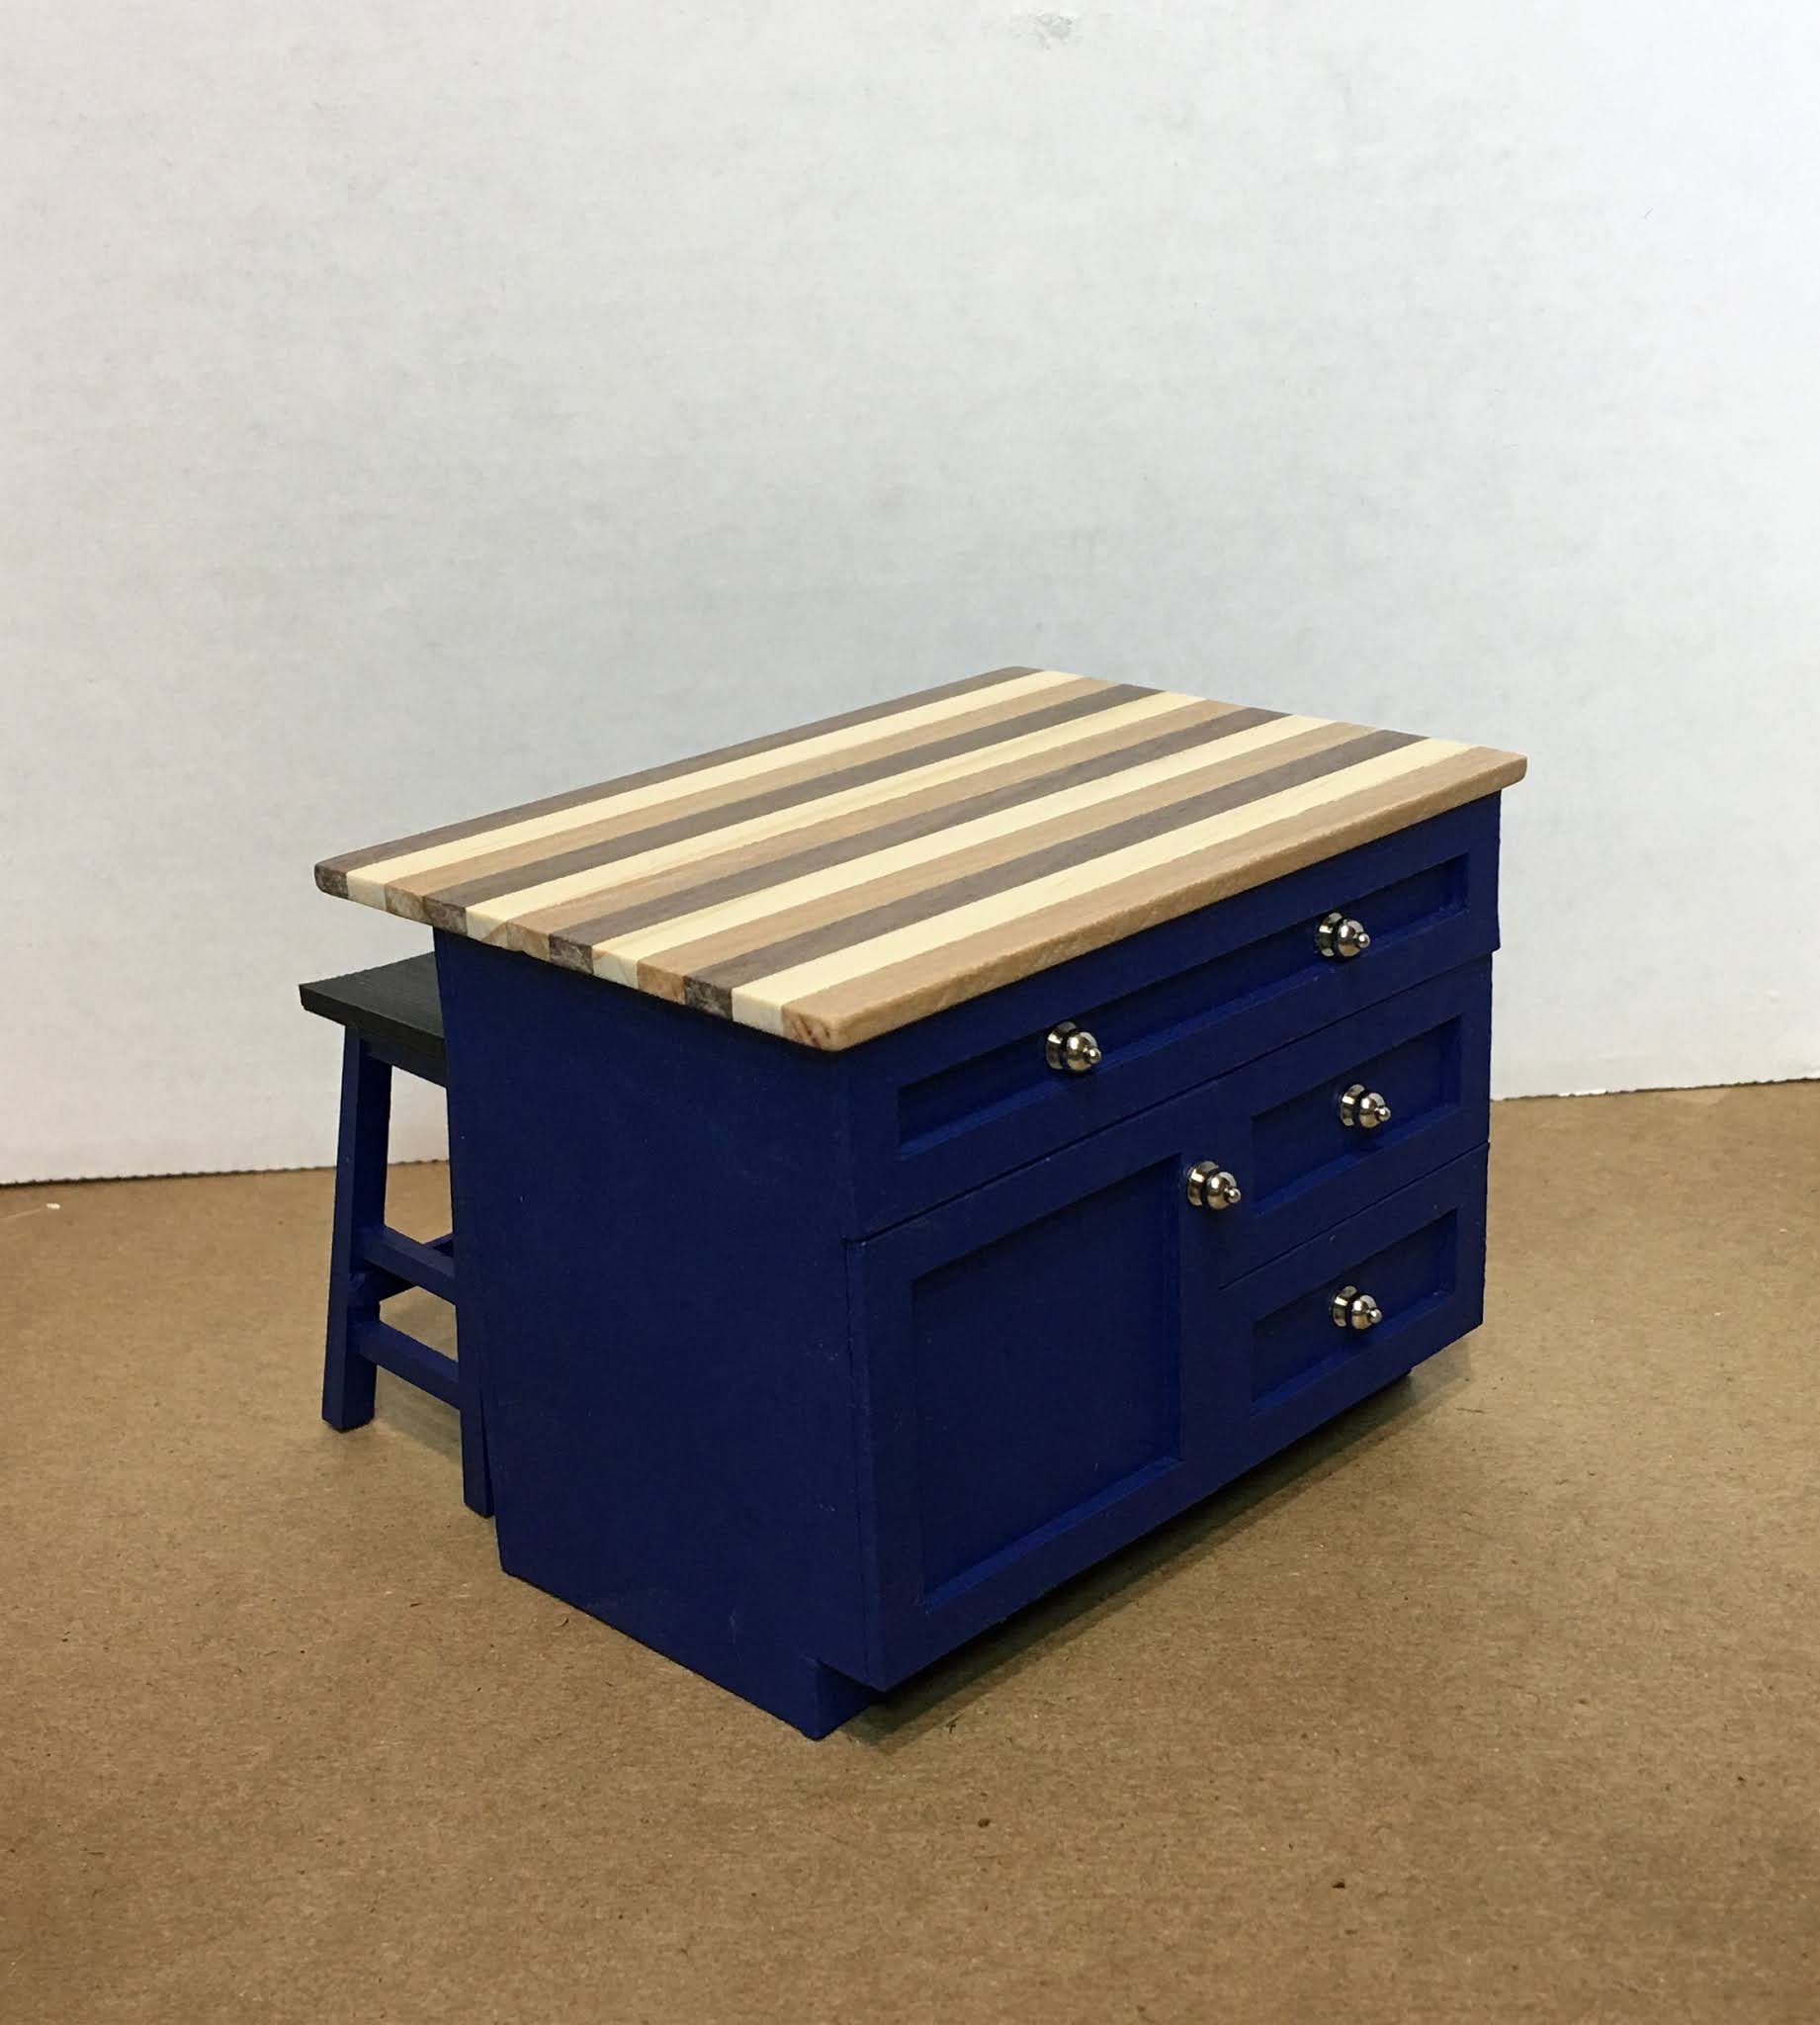
I'll show them with the island in a moment. But first... Let's talk about the island top. Now that I knew for sure there would be stools, the island's countertop needed an overhang. Since she loves to cook and is always chopping something, a butcher block top using the same three species of wood that I used to make the herringbone floor would be a great feature for Tasha's kitchen. I was also planning to use that pretty walnut for some floating wall shelving. I wanted to tie the floor and the walls together visually, somehow. So I got busy laminating the 1/8" x 1/4" wood together. The butcher block top and cutting boards are comprised of maple, cherry and walnut. The wall shelves are all walnut.

Once the laminated boards were dry (overnight), I cut, sanded, waxed and buffed them.

And attached the large one to the island. I love how it turned out! I am so excited to fill the cupboard and drawers up with treasures for Tasha to discover!


The wall shelves were sanded, stained with dark walnut stain pen waxed and buffed. Then I attached them as floating shelves to the walls. These will make swapping out seasonal décor fun and easy for Tasha!


Other than the ceiling/roof installation, making pendant lights and the decorating, of course, I think the inside of Tasha's Kitchen is pretty near finished! I'll probably spend the next batch of mini time getting my plan finalized for the exterior of the room box. I'm sure there's plenty of trial, error and opportunity to prove Thorndike's Theory out there, too!
xo xo,
Jodi
I love the bar stools Jodi....you did the right thing.
ReplyDeleteOh, and hinges are the devil!!!!!! No other explanations needed.
I seldom like something I make the first time, so extra materials are a must. It is nice to know there is a theory I can use when my husband says, " What was wrong with the first two?"
Thanks Carrie! Ha ha! Yes! It is good to have a reason why we keep trying to perfect our minis! One person's "good enough" is another's masterpiece! :O)
DeleteYou always teach us so much. I've explored using really sticky tape as a hinge, but not ribbon. I may have to try that. Julie Warren shows how to use straight pins, but I have a hard time getting the drill holes place properly and often the 1/16 bass wood splits. I often think that faux cabinet doors that don't open would be so much easier. I am determined, though, so I am using 3/32 basswood when actually chipboard would probably work better. Love the stools and the butcher block top. Now, I am excited to see how you create the lights.
ReplyDeleteThanks Ann! I hope the ribbon hinge method will come out of your rolodex one day and be just the right solution for you, too! I love using pin hinges with doors, but these chipboard cabinets have their own limitations for me. If only our Makers could cut 1/8" wood we'd have it made! Best of luck with your cabinet doors - I am sure all of us will be learning from you, as well!
DeleteThat island is fantastic! I love the butcher block top. and the stools are perfect in the space.
ReplyDeleteThanks Emjay!
DeleteI love the top of the island. So pretty. I would have loved the top of the stools in wood. But over all do fun. She is
ReplyDeletegoing to love it.
Thanks Scrapfancy! I would have loved to have wooden seats on the stools, too! Maybe one day I can try the wood looking material for the 3D printer, or will feel the urge to improve my sanding skills to make curved top wooden seats. Now that the stool has been created, it would be fun to experiment with different looks.
DeleteI've so much enjoyed your work and explanations on this stunning project that I'm almost sad it's nearing the end. The island is stunning! I love drawers and doors, not to mentions the butcher's top and chairs. Fantastic, meticulous work!
ReplyDeleteHappy Easter to you and yours!
Hugs, Drora
Thanks Drora! I have loved having you along on this adventure and appreciate your encouragement so much! Once the structure is finished, there are some fun things to make for the inside. I expect all of it should take through May, but we'll see. It has been so much fun I hate to see it end, too!
DeleteNice to read that you're still learning, Jodi, while making your wonderful and genius mini's. I think it's one of the most attractive things of making minis, at least it's for me ;).
ReplyDeleteThe island and the top turned out amazingly beautiful, but how you invented to make the stools is genius, Jodi, what a lot of work to do. But you got them they way you want!! And again: it's all in the details, the wall shelves are a great addition.
This kitchen for your beloved Tasha is a dream kitchen already! She will be over the moon with this gorgeous gift.
I'm curious with what you'll come up with next, Jodi.
Stay safe, take care.
Happy Easter to you and yours.
Hugs, Ilona
Thanks Ilona! I still have so much to learn and so much to improve on but that is the wonderful part of miniatures. No matter how many houses or projects I make, there is always new challenge and new skill waiting!
DeleteI'm happy to have your seal of approval on the island top and the stools. It is fun to have a partner like the 3D printer to make ideas come alive!
As for what is next, my responsible side tells me to finish the Storybook cottage, but my frivolous side keeps pestering me with ideas for a French morning room. It also reminds me that I have never done a Valentine's Day project and coaxes me by telling me how cute it would be living next to the autumn shop. Oh Ilona - I am hopeless! 😊
Oh Jodi, this kitchen is so beautiful it brings tears to my eyes! You are truly a genius. I'm with you when it comes to hinges. If I really thing I MUST have hinges then I will add a piece of actual wood to each of the two walls because we all know hinges just don't work well with mdf, chipboard or other materials like that - it's real wood or you revert to the ribbon or use pin hinges instead. Just one more of our challenges that we always manage to overcome some way! Your choice of using the stools was absolutely spot on. They repeat the modern esthetic while not blocking anything from the view of that gorgeous butcher block you created. I see you also used it for a couple of small cutting boards - just like we would in real life. Tasha must be giddy with excitement. I am so pleased for her and so in awe of you and your skills. A very happy Easter to you and yours. - Marilyn D.
ReplyDeleteThanks Marilyn! That is quite a compliment and one I feel unworthy of!
DeleteI think you are so right about hinges - I will need to learn them on solid wood before I ever trust relying on them in chipboard. I love pin hinging my dollhouse doors so have not found myself backed into a corner to hinge them yet. Making the cutting boards was fun, and if I get really brave, I may try to cut one of them into a fun shape. We'll see... Hope you have a wonderful Easter, too!
Jodi, the kitchen gets better and better. The island and stools are lovely. I definitely relate to Thorndike's theory. I have lost the impetus with my miniatures because the sink unit I’m trying to make just doesn’t look right. I know I will return to it, and eventually it will be all right.
ReplyDeleteThe Freda Kahlo Blue is a beautiful colour. I’ve never used hinges but I think I will have to in my next dolls house, not looking forward to that! Happy Easter :-)
Thanks Polly! I know what it's like to get stalled out on a project for a bit. But do not fear - you will spring out of bed one morning with the perfect idea and inspiration to pick right back up again on the sink!
DeleteHinges look so great so I think it is a must that both of us take the opportunity to employ them in the future! Hope you have a Happy Easter, too!
Many thanks to Henry, Thomas and Thorndike, for without their precedent you might have given up and gone on to another project. The results of your trial and error are just perfect. The kitchen looks wonderful and would probably also be quite functional in real life.
ReplyDeleteThanks Sherrill! The tenacity and wisdom of those great men are encouraging for sure! I wish I had the patience that they had to reach that level of perfection, but my standards fall squarely in the center of the bell curve. 😊 Glad you like the stools! They were fun to make!
DeleteWow it looks great! So pretty! I love the butcher block and I think the floating shelves are going to be so nice for different pieces of décor.
ReplyDeleteThose stools are soooo cool. I'm totally jelly of your design skills.
Thanks Sheila! The butcher blocks were a lot of fun and come out so pretty with the paste wax! I want to try to cut them into shapes but I need to work up my nerve! You should go play with TinkerCad a bit! You will find that you are just as creative with the shapes as me, and if ever you want to send me a prototype to print for you, I'd be pleased to!
DeleteThis kitchen is always more beautiful. I really like the peninsula with stools.
ReplyDeleteHappy Easter!
Thanks Faby! So glad you like the kitchen's progress! Hope you have a wonderful Easter, too!
DeleteFinalmente los taburetes han quedado muy bien. No tapan la maravillosa encimera de la isla como hacían las sillas. Me encanta como ha quedado la isla y los baladas. Hacen un bonito contraste.
ReplyDelete¡Gracias Isabel! ¡Me alegra que también te gusten los taburetes más minimalistas! Creo que atraerán más a Tasha y su preferencia de diseño. Fue un buen proceso de aprendizaje y divertido cuando en realidad salieron como esperaba.
DeleteUna maravilla Jodi como vas solucionando cada obstáculo que se te plantea, pero con la planificación que haces es espectacular ; así que el resultado no es para menos, ¡impresionante!. Felices Pascuas, besos
ReplyDelete¡Gracias Rosa María! ¡Estoy feliz de que te gusten las nuevas incorporaciones a la cocina! Es emocionante a medida que me acerco a poner todos los accesorios que creo que a Tasha le encantarán.
DeleteDecir que me encanta, es quedarse corta.
ReplyDeleteTu cocina es espectacular !!!!
¡Gracias Eloisa! ¡Espero que Tahsa se sienta tan entusiasmado como tú! Si no es así, es posible que necesite tu dirección, ¡jajaja!
DeleteOh oh... I'm a bit worried now... So far no comment from Betsy - let's cross fingers she didn't faint when reading about your clever way of avoiding hinges. *LOL*
ReplyDeleteFrom post to post about Tasha's kitchen I'm learning one thing - you're going to need bigger and bigger tissue boxes whenever you're handing this over. ;O) My, this gets more and more beautiful and awesome with everything you're adding. And I see I was right with "La isla bonita" - wonderful work... with the awesome wood stripes and the well chosen drawer papers. And it was a good decision to go for stools instead of the high chairs, the kitchen island appears to be "less heavy" now. I'm always in awe with your ability to solve these issues by using your machine park and throwing in lots of Jodi-genius. And now I'm really curious to see what you'll do to decorate the outside.
Hugs
Birgit
Ha ha! Betsy is probably just thinking of a nice way to tell me to stop being a chicken, lol! One day I will find my courage with hinges!
DeleteI am glad you like the new additions, and you'll be happy to know I have been steadily working on the exterior this weekend! I can't wait to share how glad I am that some of the things I was hoping would work out are heading in an encouraging direction and seem to be winners!!
Have a Happy Easter Birgit!
Dear Jodi, you would have had to adopt the Great Industrial Hinges look and applied them flat to the outer surface for them to have worked at all! And even with lots of super glue, the mdf is not designed well for screws. So I think you did the right thing.... unless your next kitchen wants to try the Industrial style! :):)
DeleteYa no me quedan palabras nuevas para describir lo que veo, así que tengo que repetirme.
ReplyDeleteMaravillosa.
La isla es sensacional y loa taburetes geniales.
Me encanta la encimera de la isla y el modelo de taburete que has colocado al final.
Un saludo
¡Gracias Marian! ¡Me alegra saber que te gusta la isla y los taburetes! ¡Espero que Tahsa también sea fan de ellos! ¡Mantendré los dedos cruzados para que el diseño exterior le resulte igual de agradable!
DeleteOh, my goodness. I admire your skill immensely. You have done a huge amount of work.The island is very cool.
ReplyDeleteHave a Happy Easter,Jodi!
Thanks Sirkka! Tasha's kitchen is reaping the benefits of many trial and error attempts, but boy they are fun! Hope your Easter was a Happy one, too!
Deletemuy buen trabajo y muy buenos planos despiezados, gracias por ellos, feliz pascua
ReplyDelete¡Gracias Carmen! ¡Espero que también hayas tenido una Feliz Pascua!
DeleteYou surpass yourself! I admire your skills and your ability with technology but that is nothing compare with your good eye, I don´t know how to call it in English, but it is that something intangible that can make the good extraordinary. Yes, your pieces are good, but they are taken to the next level by your excellent eye and taste. Your are achieving a wonderful and stunning kitchen. Happy Easter dear Jodi.
ReplyDeleteThanks Alex! This has been a fun style to work in and if not for Tasha, I never would have taken the chance! What a gift she has given to me, right?!?
DeleteI'm so glad you like the style and I hope you will find some inspiration here for a future project, too!
Dear Jodi, this is just so outstandingly Beautiful!!! And I love learning something new (Thorndike's Theory) that proves to be so useful too! :) The shelving you created is perfect. The butcher block island top and cutting boards are stunning and even the interiors of those drawers have gorgeous appropriate chevron patterned paper in them!!!! And on top of all that you Engineered perfect bar stools for this space!!! Bravo and Bravo again... for each successive accomplishment! Most of us would have stopped at "close enough"! And you do it all at lightning speed (zingy chevrons again!) I am in awe of your skills and your perseverance... and your Vision for this space! Beautiful work! I can't wait to see what is next! :):):)
ReplyDeleteThanks Betsy! I am glad that you liked learning about Thorndike's Theory! It makes me feel like I am doing okay that I have to try things several times to learn them! I think the younger generations are born these days having already been imparted with all kinds of technical knowledge! Glad you like my interpretation of Tasha's ideal kitchen, too! I hope she will!!!
DeleteOh, and ummm I forgot to mention the Hinges issue....!! :) But that is because I was so stunned by the results of all the rest that the "other" kind of hinges you used didn't bother me at all! LOL! I admit I have used "cloth" or "leather" hinges on a number of my mini houses... especially the ones where the walls are too thin to take the screws properly. :) And I also admit that as much as I Love hinges, I am often using them in unconventional ways and certainly out of scale applications! I agree completely with Russ that the mdf is not well qualified to hold the screws properly especially in "end grain" installations! So you chose Wisely and Well and I am sure your hinges will hold up well over time! :):):)
ReplyDeleteI am so glad that you are not disappointed in my compromise! What I admire most about you is your patience and willingness to try until you've achieved what you need from the hinges! I am working on my "thought ladder" to stop fearing them altogether. Maybe I ought to build a hinge shop so I am forced to get over it, lol!
DeleteHi Jodi, hinges are just science in motion or the motion defined and controlled. I know it seems daunting, but looking at RL hinges helps! I think you will find the way to conquer them.... start small! LOL! :):)
DeleteThe only way to fail is to give up trying. But I don't need to tell you that, you've proven here that you're one determined miniaturist, and that you are a genius for figuring it out.
ReplyDeleteI love the stools and the island top. I still haven't mastered hinges either.
Can't wait to see what you fill the drawers and cupboards with, and how the exterior turns out.
Thanks Megan! You are so right! There's no corner too tight to get out of. You just have to be willing to go out through a wall, instead, lol! Glad you like the progress and thanks for your kind support!
Delete