This week in Tasha's Kitchen the focus was on the tile backsplash, crown molding for the cabinets, window trim and making a gas cooktop.
Although I had purchased an Elf Miniatures Gas Hob Stove Top Kit, I looked online for inspiration. I was thinking it might be a fun endeavor to try to make one instead. This was my inspiration photo...
Easy right? Well, maybe not easy, but if you have a 3D printer, thanks to a generous Mother's Day gift from the very daughter you are making this kitchen for, it's a heck of a lot more feasible. So, I started in TinkerCad, working up a design that could eventually look close to my inspiration photo. I made a six burner model and included separate components such as the gas burners, the grates, a frame to house them in and some teeny control knobs.
Now the big test! How did it work in the space? Amazing!
To make the base, I used a 2" x 3" piece of 1/16" basswood then glued a 3/16" trim piece on the front. I covered that with craft aluminum, bending it around the front so that it looks like a solid stainless steel cooktop.
I had originally painted the 3D printed parts with regular acrylic paint. I was not very happy with the finish, so the next day I printed a new set of parts and this time painted with a Posca Paint Marker. It came out much smoother and actually looks like cast iron!
 |
| First Try Using Acrylic Paint |
 |
| Second Try Using Posca Paint Marker |
And then I printed them two more times until I got all of the little adjustments right. Each time it took nearly four hours to print.
When it was finished, I set about painting the parts with the Posca markers, then sealed them with a matte spray sealer.
 |
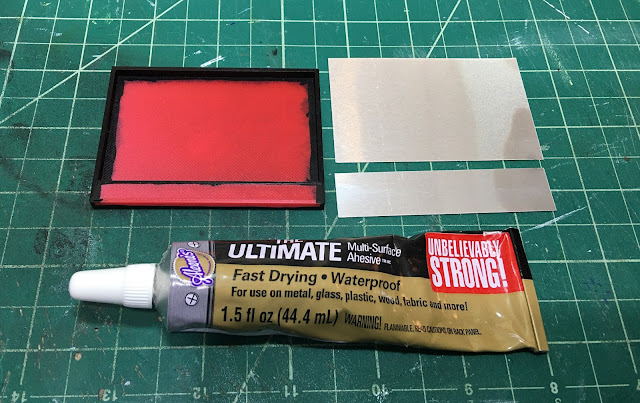
| The tray piece will be lined with aluminum, so only the edges get painted. |
I cut a piece of aluminum for the front panel with enough extra to bend around the front and a piece to lay inside the tray. I used Aleene's The Ultimate Glue to adhere the aluminum to the PLA.
Once the adhesive had a good grip, I scored the aluminum and gently bent it over the edge.
I applied the adhesive to the back of a piece of aluminum for the tray and to the bottom of the tray itself. After a few minutes I joined them together.
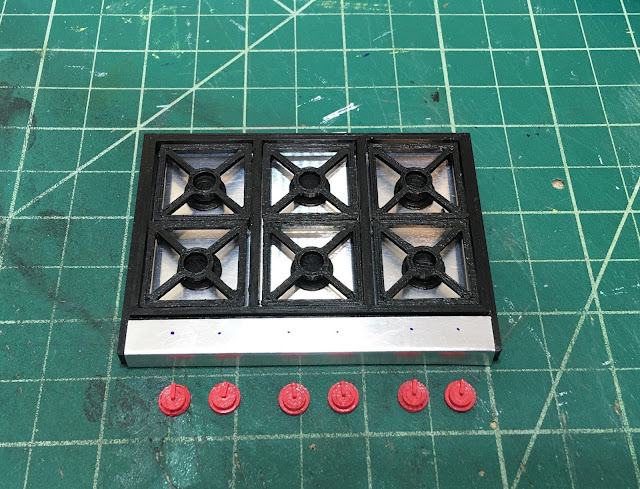
To attach all of the other components, I used 5 Minute Epoxy.
To make sure the gas burners would be aligned correctly, I set the grates in place...
I marked the center with a Sharpie and then removed the grates.
I placed a small amount of epoxy on the bottom of each of the four legs of each grate and set them into place. The legs hold the grates up at just the right height above the gas flame (theoretically).
I measured, marked and applied the epoxy for the control knobs next.
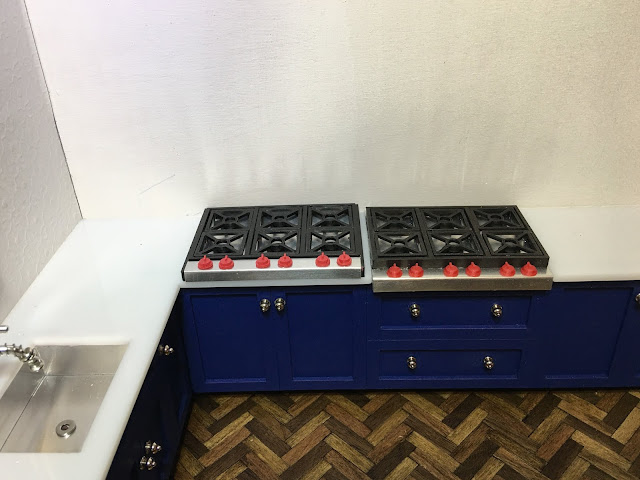
Ta-da! A gas cooktop! In the photos below I have just set it on top of the mini fridge unit to give you an idea what it looks like on the top of a countertop.
Here you see the first built in version with the basswood base (right) and the new 'all inclusive' countertop version (left) side by side. The great news is that the second model can be utilized whichever way your project calls for. I'd call my endeavor to create a gas cooktop a rewarding success! What do you think?
If you are interested in obtaining a gas cooktop for your project, either assembled or in kit form, Click Here.
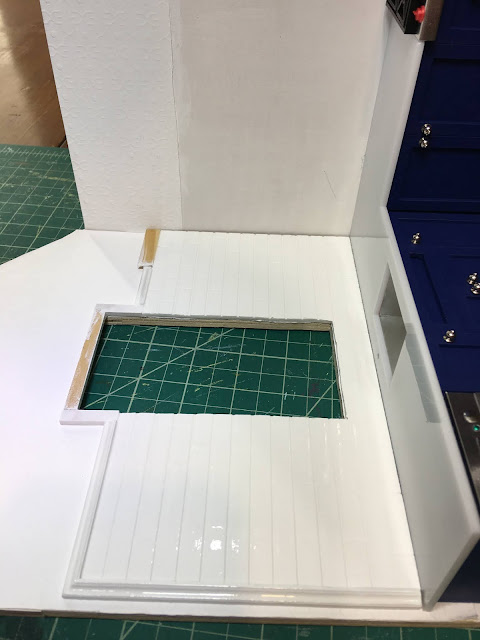
In the meantime, while the cooktop components were printing, I kept busy on the backsplash. I mentioned in last week's post that I was using the same MDF brick sheet that I had used in the New Orleans kitchen (and bathroom). It comes as a 5" x 9" sheet and has the brick pattern etched into it. I was only able to source the Streets Ahead brand from a dealer in the UK this time. I was a little surprised to see that the bricks were a little bit larger than the Houseworks brand that I got last time. They were still going to work fine, as there is a lot of variation in real life tile sizes.
 |
| Here I have done the bottom four rows. The upper rows show the defect. |
I only had to cut the sheets down by 1/8" to fit the wall space on both walls. I painted them with white acrylic paint, sanding any brush lines smooth after each coat had dried. After a final dry fit, I was able to cut out the window opening in the sink side piece with my jigsaw.
I added trim to the edges of the tile sheets and around the top of the window opening to make an even surface for the window trim. I checked the final fit with the cabinet in place. All good! Now I could finish painting and sand one last time.
 |
| Ready for the high gloss coating! |
I sprayed a couple heavy coats of Krylon Triple Thick and then let the panels dry for several days before attempting to install them. I did not want to ruin all of my dedicated work by getting a fingerprint in the finish! It's hard to capture the sheen, but they are very shiny and smooth just like porcelain tiles. The best thing about using this type of tile with this method is: NO GROUT! Yippee! Who else loathes having to grout due to a disastrously bad past experience? 🙋♀️
While the tile panels were curing (and while I was waiting for the cooktop parts to finish), I worked on crown molding for the upper cabinets and the wet bar. It's amazing how such a little detail can add so much style to the look of a cabinet!
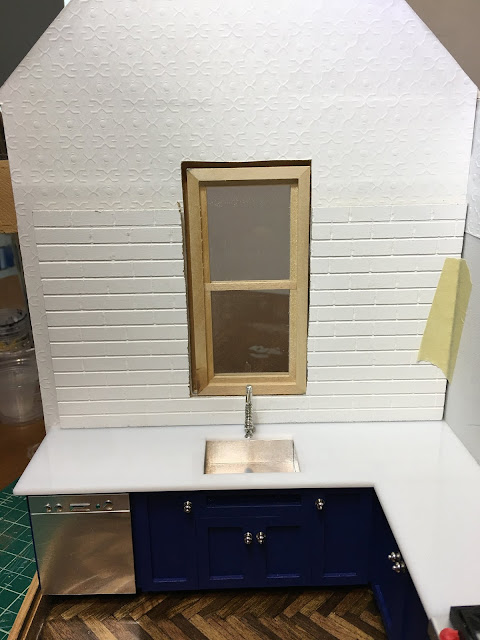
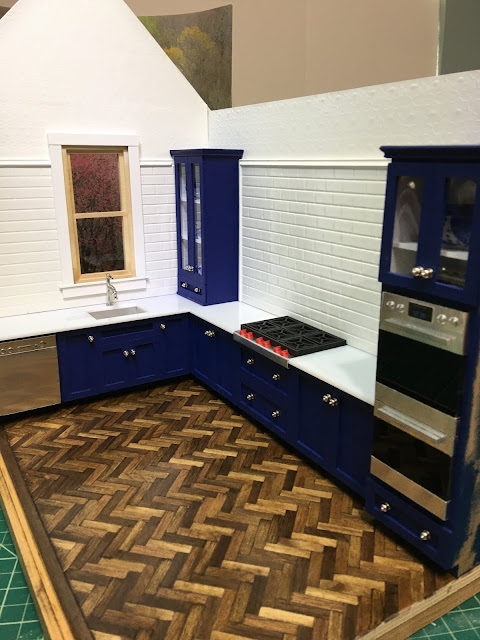
And then finally, it was time to install the tile panels!
And then the china cabinet cupboard and window trim.
Just for Marilyn D. and Sherrill, a better view out the kitchen window. Cherry blossoms are just around the corner, and they are so much nicer a view than a bunch of paintbrushes!
Please look past the rough and unpainted sashes. That part of the construction is still in the queue!
Next week, I hope to bring the kitchen into mini house code compliance by adding an extractor fan, attaching the right wall, and maybe even raising the roof! A lofty bunch of goals, I know, but this kitchen is practically building itself!
Have a wonderful week, my friends, and Happy Spring! For those of you in the other hemisphere, I hope you are just as excited to welcome a nice, cool fall!
xo xo,
Jodi














Tee Hee Hee - yes, Jodi, the cherry blossoms are lovely - but so was that modern piece of artwork with the paint brushes! As far as this gorgeous kitchen practically building itself - you have to be kidding! Between the planning, execution and installation you have done a tremendous amount of work on this build, and your attention to all those really wonderful details really shows. Your daughter will be so thrilled with this beautiful piece of art - because that is truly what it is. I now have kitchen envy to top off all the other envy I have. I so want to be just like you when I grow up - if only I wasn't already considerably older than you. *smile* Thank you for bringing so much joy to my world! - Marilyn D.
ReplyDeleteThanks so much, Marilyn! It is much more fun when you are making a thing or an entire project for someone else, right? Especially when you are trying to open them up to the magic and wonder of miniatures! I hope you are right and that Tasha loves my interpretation of her thoughts and ideas!
DeleteAs far as being like me when you grow up... You are already amazing, and the minis you make and your imagination and creative use of things is extraordinary! I am sorry but you have nothing more to aspire to, except maybe getting a 3D printer and playing around with it a little. I KNOW you'd be making marvelous things in record time!
Dear Jodi, WOW! Just plain WOW!!! Clearly, you and the 3D Printer are a match made in heaven! You took to running that like you knew what you were doing! LOL! The results are just perfection! And your "improvements" on Perfection are just another indication of your Mini Genius!!! To see where improvement could be tried and to give it a try... and to succeed so spectacularly! WOW! (I can see Jodi's Minis Hardware shop opening in the not so distant future!)The stove top cooker is just beautiful... elegant, streamlined, clean and slick and just a show stopper! WOW! And add to that all the other bits... the tiles the window frame... the trims... this kitchen is going at Top speed and looking Incredible! I just LOVE it!!! (That Frieda Kahlo blue with the herringbone floor and now the aluminum stovetop.... I am swooning!!)
ReplyDeleteKeep up the great work! :):):)
Thanks so much Betsy for your enthusiastic support and encouragement! Through much trial and error, I am working my way to utilizing this wonderfully useful 3D printing machine. As for the mini hardware shop - what a dream! If only to pay for my mini habit, lol! We'll see how the gas cooktop sales go, and what kind of feedback I receive. 😁
DeleteYou amaze me with each post. I love how you harness all of the new technology and make it work for you. You go girl!
ReplyDeleteThank you Carrie! When you are a terrible cutter, you get a cutting machine. When you want stuff that nobody sells, you have to make it yourself. Necessity (and covetousness) is the mother of taking the leap and forcing yourself to learn new things. It is not hard, I promise! It just takes a little desire and a willingness to try. You know exactly what I mean because look at the incredible dolls you've learned to make, makeup and costume!
DeleteOh Jodi! Your work is incredible! The 3D printer has found a perfect operator. The gas stove-top is marvelous, the molds add a beautiful finish to the beautiful tiled walls. I love this kitchen, modern, clean, a heavenly work site for a mini chef.
ReplyDeleteHugs, Drora
Thank you, Drora! I am so happy that you are liking the kitchen and all of the stuff going into it! My excitement for Tasha's birthday is going to burst! I hope she loves it, too!
Deletethis is so cool! I love the 3D printer items they are so crisp and clean. I an loving the cabinet color.
ReplyDeleteI can't tell you how amazing it is to be able to 3D print exact measurements and have the pieces you printed snap perfectly together! It is thrilling, even if it's on the third attempt, lol!
DeleteIt's a fantastic kitchen! So real and modern.
ReplyDeleteThanks Faby! The modern ones are so fraught with terror as you strive for perfection and to keep everything clean! I will be ready for a nice, shabby project when this one is over, lol!
DeleteWow, Jodi, you and your 3D printer and other smart tools are a golden team! This kitchen is going to be more and more beautiful by every step you do in it. The gas stovetop looks just as a real one, amazing work.
ReplyDeleteI love every bit and piece I see, your dear Tasha is the most lucky girl (woman) on the world, having such a genius in making miniatures, as her Mom!
I too love seeing these cherry blossoms in front of the window, it gives me the ultimate feeling of spring.
Stay safe, take care, dear Jodi, and keep on crafting and spoiling us with your art works in mini!
Wishing you a lovely weekend.
Hug, Ilona
Thanks Ilona! Somehow, my kids don't quite get what it takes to achieve this kind of mini project, but it's okay because I have you to encourage and support me! You know what striving for perfection is, and you are a master at the most difficult and tiny reproductions of real life's wonders! I just hope Tasha likes her gift in the end, and that it gives her an opportunity to play and connect with the fun things in life again. She has a stressful career and works very hard to be her best!
DeleteIt looks wonderful! I love the metal with the black. So striking.
ReplyDeleteForgive me if I missed it. I love the wine fridge and rack, but where does the refrigerator for the food go?
Thanks Sheila! It feels like a giant victory and I hope Tasha loves it!
DeleteYou didn't miss the fridge part at all. With the constraints of the space I have to work with in this project, and all the things I wanted to fit inside, I decided that the walk in pantry and the refrigerator will be located on the imaginary fourth wall. 😁 Maybe if Tasha likes this kitchen well enough, someday I could make the other half of the room? I have to let the love for minis creep up on her a little before I bombard her home space with a real dollhouse. 😋
Great job with the cooktop! Isn’t technology fantastic?? There is still a lot of working drawing the files and then jiggering with them to get them right though. And I like the blossoms out the window - it would be hard to get any work done though, watching the animal life going about their business! I am not at all ready for autumn. The summer has been very mild and not warm enough for me. Enjoy the rest of your week.
ReplyDeleteThanks Shannon! Yes! When it's working, technology is fantastic! When there are technical issues, it is maddening!!! But when you can dream something up and make it happen - it's the most satisfying feeling in the world!!!
DeleteI don't blame you for not wanting autumn to come, especially when you got such a bummer summer! It's been like a shot of joy to the heart hearing the birdsong back again! You don't realize how much you miss it until they come back again!
Que trabajo tan increíble has hecho con la cocina de gas Jodi! se ve tan real, es asombroso lo bien que la has impreso y que tus medidas encajaran "a la primera". Un perfecto trabajo de medición y ajuste!
ReplyDeleteLa zona de las baldosas te ha quedado genial con los marcos y esa bella vista desde la ventana!!!
Disfruta del fin de semana!
Besos.
¡Gracias Pilar! ¡Es maravilloso cuando las cosas funcionan bastante bien la primera vez! ¡Especialmente con el aprendizaje de esta nueva tecnología y máquina 3D! Me alegro de que te gusten las baldosas; espero que a Tasha también le guste, aunque creo que preferiría una lechada de color gris oscuro en la vida real. Pero mamá solo puede replicar hasta cierto punto antes de que su talento y valentía lleguen a su fin, ¡jajaja!
DeleteWow Jodi! You are a miniaturist ROCK STAR!! There´s nothing you can´t do. I am so proud of you, hey, you have a kit but you think let´s make it from scratch, that´s something I don´t see myself saying, lol. But, you were right because you achieved the most amazing results. Your daughter´s kitchen is to die for. Love, love, love everything so far. Have a great weekend.
ReplyDeleteThanks Alex! Just look at all the things you have achieved by being willing to try! It's the same with me. If I fail (and I do a lot), I just keep trying until I learn what I need to to make an idea work. It feels so great when it finally does! Thanks for your encouragement! I am so glad you like where this kitchen is going!
DeleteUna cocina fantástica y me encanta ver el proceso ;como vas solucionando los problemas aunque lo tengas que repetir, así te queda un trabajo de excelencia. Buen fin de semana, cuídate
ReplyDelete¡Gracias Rosa Maria! Todavía hay mucho que aprender y tanto miedo que tengo que superar, ¡pero los minis son la mejor manera de hacerte más valiente! ¡Gracias por tu apoyo!
DeleteYour work this past week can be described in one word, perfection. You made a perfectly respectable mini cook top, but you knew you could do it better, and you did! Thank you for sharing your process and results with us. Tasha’s kitchen is looking so stylish.
ReplyDeleteThanks Sherrill! The anticipation while waiting for the thing to print can be excruciating, but oh what a feeling when the idea works! You know this exuberating feeling all too well! Thanks for the positive feedback!
DeleteOh! And thank you for for thinking of Marilyn and me when you staged your photo 😉.
ReplyDeleteYou are so welcome! I appreciate your keen observation, and have gotten a bit lax in the art of setting up photos, lately! Sometimes it's nice to see more than a person's messy workspace. 😊
DeleteEs una autentica obra de arte.
ReplyDeleteCuida esa magnifica maquinaria que tienes para que te acompañe en otros muchos proyectos con esa precisión.
Es todo un proyecto de ingeniería.
Un saludo
¡Gracias Marian! ¡Es una bendición tener más posibilidades gracias a la nueva tecnología! Aporta un nivel completamente nuevo de creatividad a los minis y nos obliga a usar diferentes partes de nuestro cerebro, ¡no es una tarea fácil a medida que envejecemos! ¡Pero las recompensas son tremendas! ¡Muchas gracias por su fiel aliento!
DeleteJodi your cooker hob is brilliant. Lucky you getting a 3d printer. Last time I visited my Aussie daughter she was printing some work stuff, I was fascinated watching it. You’ve done a great job with the tiles, they look lovely, you can see the gloss very well. I like the trim on top of them. The next house I will be working on is called Lake View. It doesn’t have side windows so I thought it would be nice to put false ones in and stick a nice image of a lake on them. The kitchen isn’t building itself, you are doing a lot of fantastic work. Have a good weekend :-)
ReplyDeleteThanks Polly! I know what you mean - I get mesmerized by the 3D printer! Not just watching how amazingly fast and precise it prints, but hearing the robotic sounding variations of noises it makes as it creates different shapes!
DeleteIf that is the kit I am thinking of, it is going to be incredible!!! I am so excited to see what you do with that blank canvas!!! You must be raring to get started!
Thanks so much for your support! I am so happy you like where Tasha's Kitchen is heading!
Oh man, Jodi, I'm way behind. I dropped in to see how you assembled your shaker cabinets. I'm trying to find a better way to hinge my cabinet doors using pins; instead, I find this beautiful tutorial on how you made your cook top. AMAZING. I'll be using Elf and mine won't be as grand as yours. Nor will I invest in a 3-D printer, but I sure do admire and enjoy your work. Tasha will be blown away.
ReplyDeleteThanks Ann! You are bravely taking on so much already just creating your cabinets on the Maker! The Elf appliances you got are going to look wonderful, too!
DeleteAs for hinging... I have not ever tried to hinge any of the chipboard pieces until this island I am currently working on. I think it can be done, but it might require better engineering than I planned for. I ended up using the fabric hinge method on one door, and it's not a stellar result. If you find a genius way, please do share it with all of us! The drawers come out great, though!!!
The entire kitchen is wonderful but the counter range top is just incredible!
ReplyDeleteMaureen
Thanks Maureen! I'm so happy to have your approval! 💗
DeleteAbsolutely awesome and realistic kitchen,I love it!
ReplyDeleteThanks Paky! I am beginning to get excited about putting all the everyday kitchen items in there to get some photos!
DeleteMerci d’avoir laissé un commentaire sur mon blog , cela m’a permis de découvrir le vôtre . J’aime énormément la façon dont vous vous servez des techniques modernes . Je suis vraiment vieille !!! Haha ! C’est une très bonne idée . Le rendu est impeccable . Je suis ravie de découvrir votre blog
ReplyDeleteCatherine
Merci de m'avoir trouvée, Catherine! Je suis ravi d'avoir découvert votre blog aussi et j'ai hâte de lire vos mini-aventures passées!
DeleteJe suis tellement heureuse de savoir que vous aimez la cuisine de Tasha - les projets modernes me font toujours peur mais ils me font vraiment grandir aussi! Il y a beaucoup de bonnes choses sur le fait de vieillir, et l'une est d'être moins occupée pour que nous puissions passer plus de temps à nous livrer à notre passion pour les minis!
Je suis si heureux de vous avoir ici!
Like Marilyn already mentioned being the first one to comment I too had a good laugh about the "kitchen building itself"... haha, this was a good one! This kitchen is lucky to have a mastermind builder with a trusted machine park taking care of it!!! As always you did not stop to amaze me! I suppose it goes like this: Hmmmm... I have a kit for this, but hey... why not try to make one myself? And after creating a stunning cooker: Hmmmmm... it looks nice... but what if it would look awesome? I should better try again to make it even better.
ReplyDeleteIt's stunning to see you struggle for fantastic results and chapeau for already handling your 3D printer so well after such a short time. But most of all "BRAVO" for what you've achieved in total - my, this looks so beautiful, I foresee loads of eyesweat for Tasha, better have a lot of tissues at hand when you'll give this masterpiece to her. And I can only agree - it's amazing what difference for example a trim makes, it's those little details which always make it extra special. Wonderful work and a beautiful composition of colours.
Btw your inspiration photo made me smile because it was a cooker by Wolf - the heating of my house is run by a gas boiler by Wolf. And a few days ago I saw a tv thriller playing in Norway and there was a police detective who also had a white tiled backsplash in his kitchen. But the rest of his kitchen was far from being this stunning... ;O) Keep on having fun!
Hugs
Birgit
Ha ha! Oh, Birgit! You are so good at making me feel good about myself! Thank you! 😊
DeleteIt is interesting to learn that Wolf also makes heating systems! Here in the US, if a person has a Wolf stove in their kitchen, they are thought to be well versed in gourmet cooking and also very well off! Only the best mini replicas for my little girl, lol!
I think Tasha would have preferred a dark gray grout, but me + grout = risky results so I took the safe and easy exit! 💗
la precisión de esas maquinas 3D para hacer elementos es asombrosa.¡Claro que también hay que saber manejarlas! La cocina de gas ha quedado fantástica y los paneles de azulejos me encantan. El acabado y el brillo son espectaculares.
ReplyDelete¡Gracias Isabel! ¡Siempre es un gran alivio cuando los planes funcionan! ¡Todavía estoy en la curva de aprendizaje con la impresora 3D, pero paso a paso estoy agregando piezas fundamentales a mi conocimiento que hacen que sea más factible crear las cosas que imagino!
DeleteYour kitchen looks absolutely fantastic!!! I have been looking at the 3d printers. I have no space as it is...so I must wait until we move.....but darn if your post didn't make me want it more!!!!
ReplyDeleteThanks MaryFran! You know... Once you say something out loud the stars begin to align to make it happen for you! Bet your situation changes and you have one sooner than you think!
DeleteJodi, this is really turning into a dream kitchen! You are a master builder. I admire your dedication to do things over until they are perfect. You should use the leftover parts to construct some stoves and sell them on eBay or something. They are definitely good enough.
ReplyDeleteI also love Posca pens. You don't get them here in South Africa, but I have a few that I bought on an overseas trip. They should be in every miniaturists toolkit.
Thanks Megan! I may just make up a few of these cooktops to sell if I can - a little fund to help the next mini project along would be awesome! I love those pens! The green ones work really well on phone wire to turn them into realistic looking garden hoses! I take for granted our access to supplies over here. You should send me a wish list so that I can send you a care package! It would make me super happy to do so!!!
DeleteThank you for the offer of a care package, Jodi. Some day when I manage to escape this blighted continent, we can swap supplies. I'm already busy selling and giving away household items. Our move to Germany is planned for the first part of 2023. Nothing is cast in stone since many things need to come together to make it happen. Henning's illness and the pandemic are not helping either. South Africa is on every country's red list so I can't travel at all at present. Right now, it doesn't look as though we will get vaccinated here at all so I don't think the world's opinion of us is going to change any time soon. Not that I think vaccines are going to be the game changer that everyone was hoping for, but that's another story.
DeleteI was planning on two more trips to Germany before the final move to start preparing things on that end. I've already missed my first deadline and it doesn't look as though the second will be possible either, so I have to reconcile myself to arriving over there with everything in chaos. It's going to be a big adventure!
Oh Megan! What a complicated time to have to move! Especially to a whole other country. I can't imagine the complications, and I hope all the pieces fall into place with ease for you guys. I also hope Henning's health continues to improve now that the newest surgery is behind you. With the situation getting more unstable in South Africa, it will be such a relief once you are in Germany. Expecting the vaccines to be a quick fix for Covid and all of it's variants is likely too optimistic, and we may just be revising our "new normal" for a long time.
DeleteIf I can offer my biggest piece of advice for a big move, it would be to get yourselves there and leave as much "stuff" behind as possible. Our stuff causes so much stress compared to the amount of joy it actually returns. And replacing it can be fun and rewarding once you're settled. We sold nearly everything in 1998 before our more to Washington from California. We lived in a 700 square foot basement apartment for two years with a 10 and 8 year old, a dog and a cat. It was so much fun, and with so little living space, we had so many adventures out of doors! Replacing things at garage sales became a family activity like a scavenger hunt, and little by little we grew out of that apartment. We still merrily reminisce about our "big move' as some of the happiest times for our family.