
I began to look around at the graveyard of unfinished projects on the shelves in my work room and think about why I stalled on them. I considered the kits I have and thought it may be fun to start on a new project. I quickly realized that was a bad idea! The guilt of having started yet another project (while so many are still waiting in varying degrees of completion for their turn to become all they can be) would crush me! I finally decided to drag out the card table again, bring down the New Orleans, and pick up where I left off - the kitchen. But there were a lot of issues to figure out. You see...
 |
| Original New Orleans Kit |
Back in the summer of 2016 I used a 40% off plus free shipping coupon from Hobby Lobby to buy a Beachside Bungalow kit. It was a total impulse buy because it was so inexpensive. I liked the old LA bungalow look of the house, though it seemed small and hard to lay out a proper function. I began to make plans for a remodel and started collecting seaside and beach-y things for it. I also worked with Elizabeth from Elf Miniatures to design a really neat and contemporary kitchen. Then, like my usual M.O., it got put in the queue of projects and moved further down the list as I became excited about other things. I know! I am rotten!
 |
| Original Beachside Bungalow |
But, could that kitchen, with a little adjustment, work for the New Orleans? I'd have to do a little bashing to make them fit, but I do enjoy kits and bashing. Not only would it assuage my guilt, I love the New Orleans and felt excited at the thought of working on it again! So that is what I did...
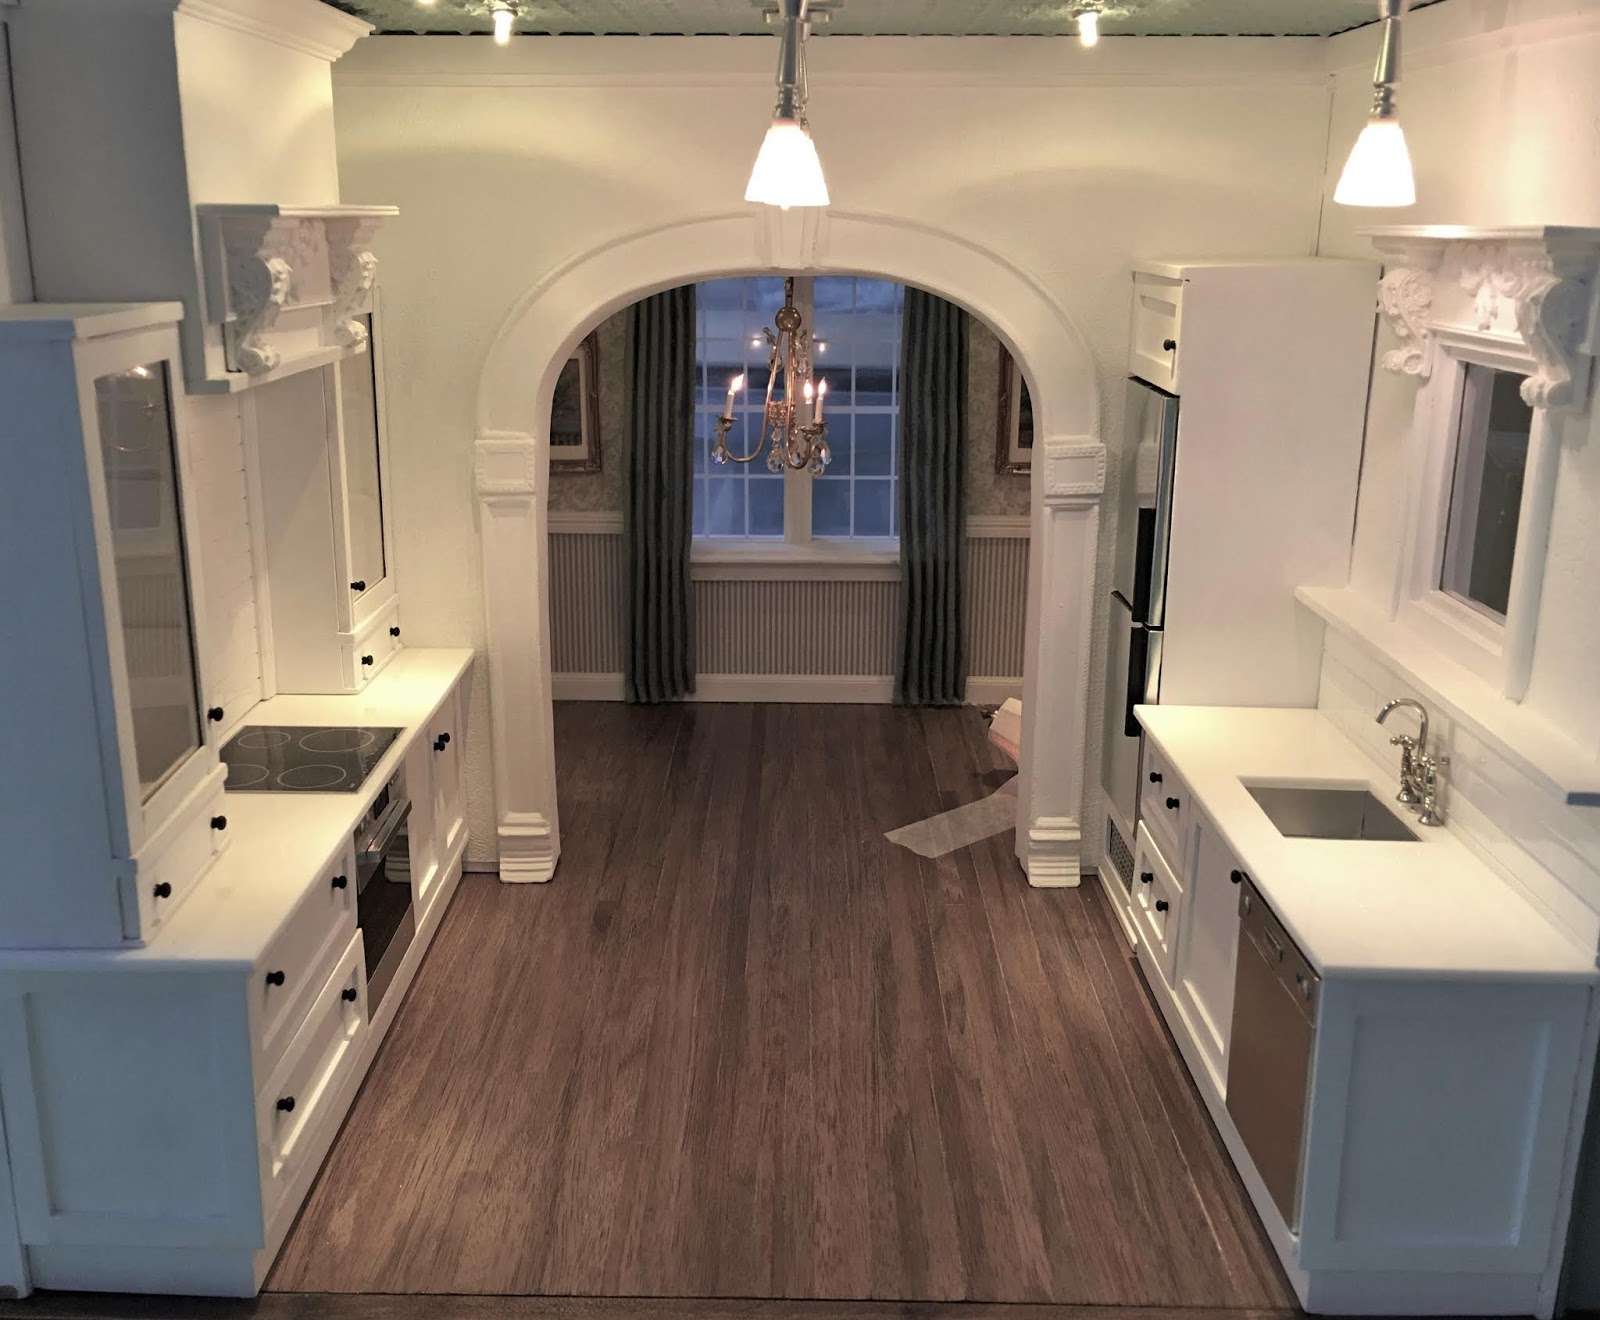
The Elf kitchen cabinet kits as intended for the BB had a wall of cabinets and an island with the sink. The New Orleans kitchen is laid out galley style, and after assembling the kits, I realized the room was just an eighth of an inch too short to fit each cabinet run. So the first puzzle to solve - how to lengthen the floor. Also, The original plan had a double door fridge/freezer built into a cabinet. The NO kitchen would need a smaller fridge and enclosure. Luckily, I had a small kit in my stash and could make an enclosure.
 |
| Original layout for the BB kitchen. |

 |
| Base cabinets assembled without toekick. |
 |
| Just slightly too long past the flooring. |
 |
| There is no cabinet built around the fridge yet, so another 1/8" will make the right side too long, too. |
 |
| With fridge cabinet, as predicted, too long. |
 |
| Added 1/4" x 1/4" trim to edge and dividing wall across the whole length of the first floor. |

Once the length and layout were worked out I could paint the cabinets. The kitchen plan was always going to be white on white with blue and white decor. The handles that came with the kits, "D" shaped stainless, seemed a little too modern for the traditional house, so I opted to go with simple wooden knobs painted black to help tie in the more contemporary appliances.


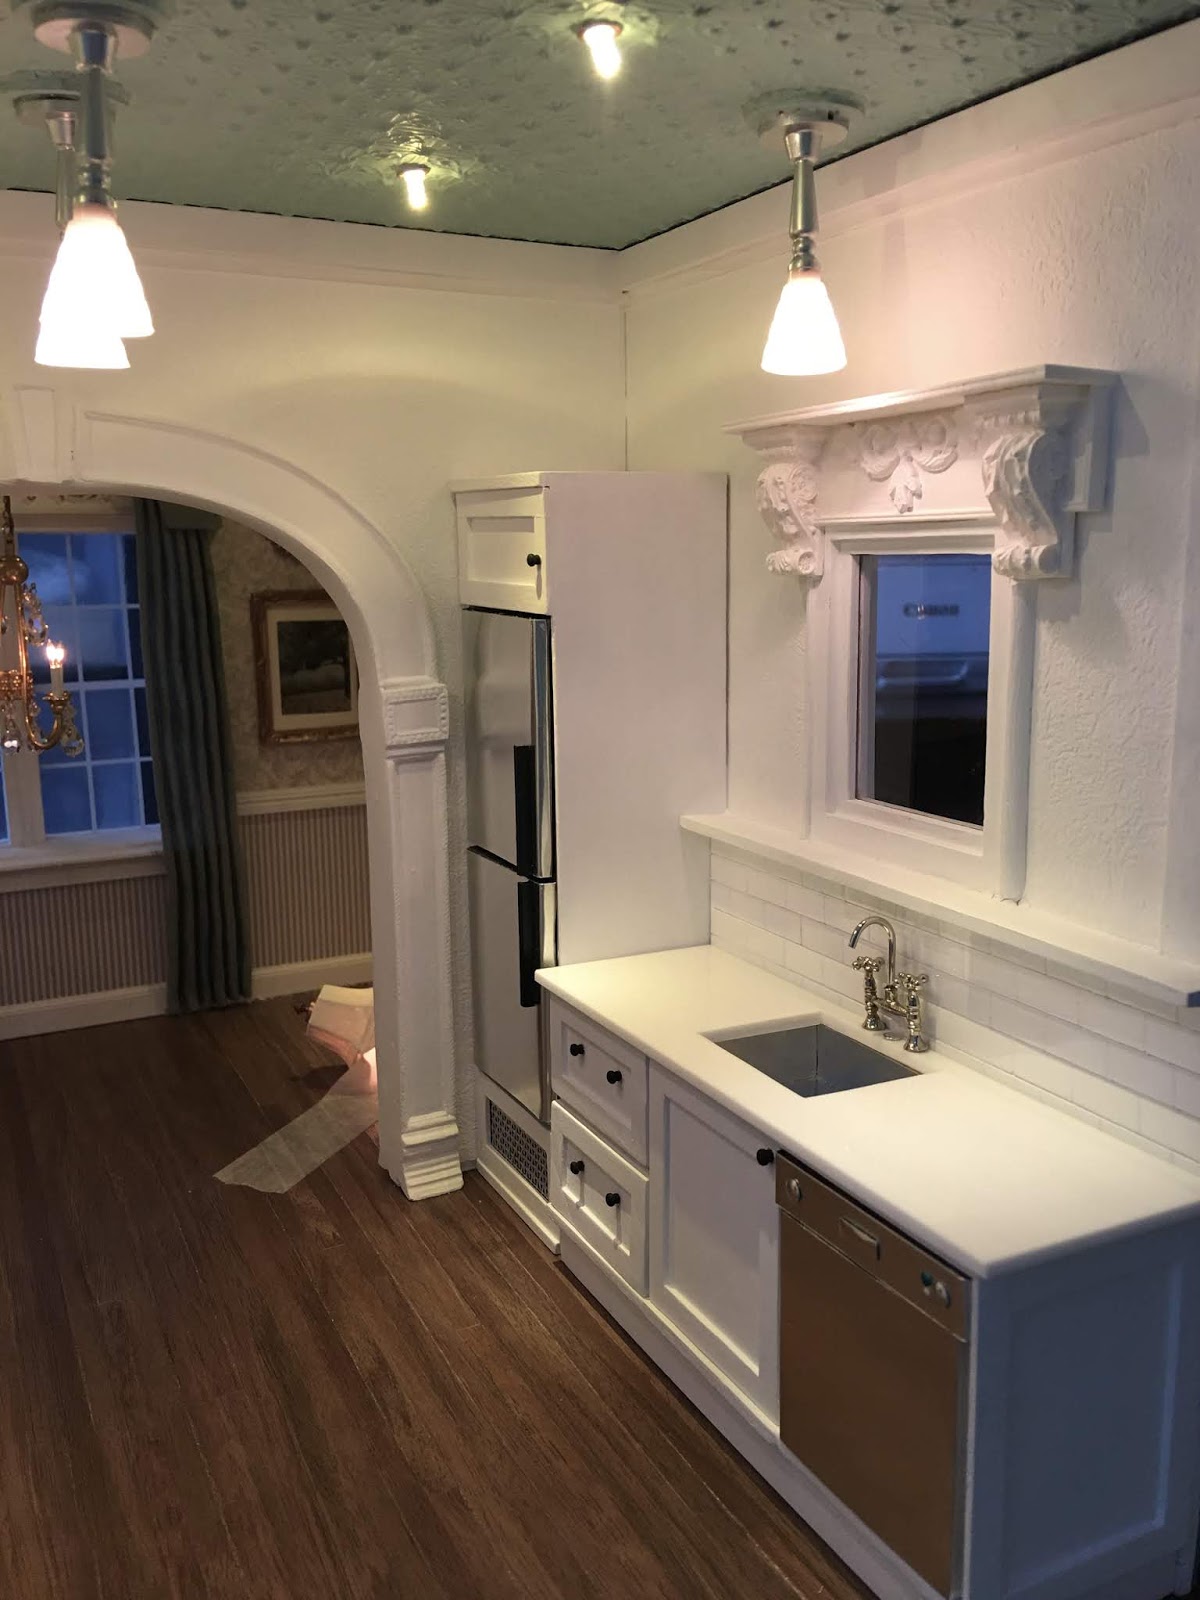
The fridge cabinet is right in front of the door molding, so I added a vent to the base so that the door would appear to clear the molding that may otherwise hinder it's operation (even thorough it is only a dummy fridge and won't really open anyway). The height matches the cabinets flanking the stove. It's a really neat feature in this kit that the ceilings are 10" high!


Whenever I set out to make up the appliance kits with aluminum, I get more nervous than I have cause to. They usually work out very well using E6000. The modern stove hood was the exception. The aluminum just didn't want to stick to the curved wood. I was just getting ready to sand the aluminum with steel wool and clean it with alcohol for another try when I realized: It wasn't supposed to work. The hood is just too modern and wrong for this kitchen. So, I set out to make one with a more traditional style.
 |
| I'll save this puzzle for another project! |
Little side note here - when I was trying to figure out what to use to make the vents for both the fridge and the stove hood, I asked Russ for a piece of drywall patch tape. It's on a roll like tape, has a square mesh pattern, is yellow and is good to keep in mind. However, Russ brought me in a piece of leftover screen from when we re-screened the sliding screen door. This is the type that they make for people with pets who like to claw at the screen door when you don't immediately heed their demand to be let in. It has a rubber type of coating that keeps it from shredding at the hands of paws with nails. It worked out very well on our sliding screen door and is perfect for mini vents! The aluminum paint marker worked great, too!


I was so hoping to be able to use the Unique Miniatures shelves I've been saving for the project, and the stove hood gave me a great place for one of them! I made up a basic top and bottomless box, added crown to the top, a light bulb inside and a frame with light lens and screens for the bottom. The light lens is a piece of plastic packaging painted with many layers of opaque Gallery Glass.


For the stove backsplash, I wanted to try out a new product that I bought on impulse a while back, too. It's a Wood Brick Sheet which has the brick pattern scribed into it and is very inexpensive. It is 9" x 5" x 1/8" thick and was also easy to cut using the mini table saw. I painted it with three coats of white chalk paint, sanding in between, trimmed it in wainscot molding, then sprayed it with Krylon Triple Thick Glaze to make it look like porcelain subway tile. Yeah! No egg carton bricks this time!


With the stove light on... Yikes! That screen shadow is disturbing! Had to make some light block panels and install them...


While I was at it, I decided to add a couple pendant lights in the center of the ceiling for the eventual island/bar (more on that later). I also added very simple trim where the walls meet the ceiling. I may have to raise the ceiling up about an eighth inch (more on that later, too).


For the sink side of the kitchen, I had to cut the perspex countertop, originally the island dimensions, down to my counter width and length. Also an easy job with the table saw. I used the same tile backsplash, adding a shelf along the top, and was able to find a way to use the second Unique Miniatures shelf above the window by trimming up the window molding.


And some photos with the lights off.


I really love the way the kitchen worked out, and I love knowing that in just over two years my confidence, tools and skills in minis have improved enough that what was intimidating and stopped me from continuing with this project was only a temporary setback. There are many more challenges ahead of me with the New Orleans, but I am happy to feel ready to tackle more of them!
In closing... As many of my regular readers know, one of the most precious aspects of the miniature hobby for me is how having a blog and other social media resources has allowed me to be involved in a tiny world full of incredibly kind, supportive and talented miniaturists. From newbies to artisans, those connections have helped me get through some of the toughest of times in my life. You are truly a blessing and lifeline to me. In light of that, I'd like to take a moment thank all of my new and old followers, and tell you just how much it means to me that you visit and share this joy with me! If you have a blog, please do leave a comment and let me know so that I can follow your work, add you to my blog roll, and hopefully, help others find you, too. You can never have too many friends or too many minis! :O)
xo xo,
Jodi
What a beautiful kitchen! I'm sure many people would love to have it in their 1:1 homes. Your extension of the floor and dividing wall was a brilliant solution, and I love how you made the new hood, with light and everything! The ELF cabinets look great. I have been very intrigued by her site because she does 1:24 scale, too, but so far haven't had a project to use them in. That wood brick is a wonderful find, and it made perfect subway tile, a lot easier than with egg carton! (And it looks much better than the plastic brick that is out there.) I always look forward to your posts, because it is such a treat to see the work you do. I will need to go look at earlier posts on this project.
ReplyDeleteThank you for the positive feedback and kind comments, Deb! I know you will love the Elf cabinet kits because they are cut very precise and the instructions clear. It might even be fun to plan a project around them like I had intended to do with the BB!
DeleteI always look forward to your posts, too, because I always learn something and am always tickled at what you can achieve in 1/24 scale!
I think you're right on the money when you mention leaving projects behind when they overwhelm or new things come along, but then you realize how much you've learned and they are no longer overwhelming when you return. :D There are so many things I do now that back then I would just grin and say, "Riiiiiiight." hahaha This is a gorgeous kitchen I would love to have in real life. :D
ReplyDeleteThank you, Brae! I can't remember ever seeing one of your projects where I was not amazed by your talent and inspired by your ideas! You make all of us want to be brave, push our limits and try new things because we see the magic and realism you achieve! You keep pushing yourself, please, because you make us all better!
DeleteHi Jodi! Wow! WOW WOWEEEE!!! What a fantastic job you have done with this kitchen!!! I am (slowly) realizing that my own long detours through other projects are really a great way to gain the skills I need to overcome my roadblocks! That you so quickly adjusted the width of the Entire House just to fit the Perfect kitchen into this room is a great example of time and experience giving you the courage and wisdom to know what to do! I think it is amazing that the kitchen fixtures fit so perfectly now! The changes you made in the decorative trim on the hood and the window, the raising the entire fridge... great steps and gorgeous results!!! Those "subway tile" bricks look awesome and give this project that modern but traditional feel. I love it! And you even charged forward with the lighting too! You are on a roll! And I have to confess, I love it when "detours" turn out to be so much more than you ever imagined! I can't wait to see more..... no matter what project you are working on!!! :):)
ReplyDeleteThank you so much, Betsy! I am so happy you like the kitchen and have enjoyed the little detour with me! It is so funny how we can completely change gears on a dime, but I am like you - so grateful to have several projects waiting for inspiration to strike!
DeleteGorgeous kitchen Jodi. I am so glad you got your mojo back for this build. I can't wait to experience more of The Orleans.
ReplyDeleteThanks Carrie! I am so excited about some of the ideas I have for the second floor, but I have a giant puzzle ahead of me to figure out where to put the lighting hub and how to make it accessible now that my "behind the fireplace" idea is a bust. So, back to the drawing board and trying to invent a solution!
DeleteI really love how your kitchen looks. The ornate touches on the window trim and stove hood make it look as if the kitchen has been there for ages and was just refinished.
ReplyDeleteThank you Sheila! I would really love it if the house had the feel of a home that is a couple hundred years old but has been lovingly refurbished and modernized a little. Having some throwback touches to try and keep the elegance of it's initial time is what I am after, but making that happen within the restraints of the kit and the budget are challenging! I am happy you see where I am trying to go and like it!
DeleteI love your kitchen Jodi, it looks so fresh and crisp. I also love to read about how you undertook changing the size of the floor. I thought why not just cut the cupboards BUT as I followed I can see that that would put everything out or proportion.
ReplyDeleteOur hobbie offers a lot of challenges for persons crafty and I can see you are meeting those challenges.
Looking forward to seeing the next step.
All the best Jodi.
Janine
Thanks Janine! I am happy that you like the kitchen - white on white has always been a favorite style of mine but one I didn't dare to do in real life with kids and pets and a husband who's hobbies were messy ones. I love the mix of traditional with modern touches because to me they are the best of both worlds. Cutting the cabinets down was an option, but losing even an eighth of an inch would have thrown things off balance. If only I had thought of using this kitchen before I installed the arched wall - could have used 1/8" plywood instead of 1/4" but hindsight being what it is... :O)
DeleteThe kitchen looks amazing! I'm ready to move in, lol.
ReplyDeleteThanks De! You are welcome to come stay, but I'd recommend letting me get a toilet installed first! :O) Outhouses and honey buckets are no fun in the middle of the night! We were without our only toilet for about four days during a remodel once when the kids were 5 and 7. Never again!!!
DeleteLa cocina se ve preciosa,es increíble el grado de realismo que has logrado en ella Jodi!! La plancha de ladrillos de madera es genial,un buen hallazgo!
ReplyDeleteMe gusta como has alargado la estancia y con la pared divisoria,queda una perspectiva muy interesante,gran trabajo!
Besos.
Gracias, Pilar! ¡Estoy tan feliz de que te guste la cocina y el comedor al fondo! Estaba tan entusiasmada con las ideas para este proyecto cuando comenzó, ¡y se siente tan bien superar los desafíos y sentirme emocionado nuevamente!
DeleteClean, neat, contemporary, FABULOUS!! These are the words that come to my mind when I saw your wonderful kitchen. Jodi, you are a pro! I love this kitchen and I thank you because you have given me some ideas to apply to my own moder kitchen. I am happy you are back with the New Orleans´as I found you when you were working on it, then I fell in love with your blog and your work. Yes, I agree, this hobbie gives us a lot of satisfactions and allows us to meet wonderful people along the way.
ReplyDeleteThank you Alex! I am so happy that you like the kitchen but you give me far too much credit! I stumbled through every step and got really lucky that the ideas worked out. Figuring all of it out had me frozen for over a year and a half!
DeleteIt's great to hear that you have found some ideas and inspiration, although your kitchen is already looking divine and I am so excited to see the new house become your vision! You are one of the nicest and most creative mini people out there, and I am so thrilled that we found each other, too! 💗
You have managed exactly what a really good real life interior designer would manage - how to put a sleek modern very functional kitchen in a traditional house without being at all kitsch or jarring in any way. That is a meant-to-be kitchen - super modern with a nod to the traditional with the oven hood and its partnered widow. I absolutely adore (and envy) those ten foot ceilings! Gives everything room to breath. I am going to take up your offer to leave my blog address in hopes of adding more followers who leave a message now and then because, like you, I so value and depend on mini friends to chatter with. The more the merrier my current blog: https://daltonhouse.blogspot.com/ and a link to all my blogs: https://allmyblogaddresses.blogspot.com/ Thank you Jodi
ReplyDeleteThank you Marilyn! I am so happy to have your resounding approval on the modern-meets-traditional design! It's exactly what I want for this house and it makes me so happy that what I am trying to communicate comes across!
DeleteI hope everyone will go and read your blogs from cover to cover! You give such excellent advice on every step of dollhousing, and even those of us who have been at this a while always learn something. Your how-to's always include great photos, concise explanations and an honest review of the products you use. I really enjoyed your YouTube videos as well and have many saved as refresher info to refer back to!
The blend of contemporary and traditional is brilliant...especially love your solution for the subway tile wall and the fume hood design. The kitchen has a beautiful appearance! It's so appreciated when you share the 'how-to' method used. Miniature skills do improve with doing but it helps tremendously when you 'learn' from others with more advanced skills. Cheers, Alayne
ReplyDeleteThanks Alayne! I am so happy to know you like the kitchen, but am thrilled that sharing my experience has been helpful, too! I think when we get to see others try things, it takes the mystery and intimidation out of it a little. I know that the reason I try at all is because of the brave miniaturists that have generously shared their knowledge and encouragement. It's how education is supposed to work - we all share and it makes everyone, as a whole, better!
DeleteHello Jodi,
ReplyDeleteI think this might be one of my favorite miniature kitchens ever! I absolutely love it! the cabinets are wonderful and I love the design of them. The backsplash tiles came out just beautiful and I cannot give you enough praise for that amazing hood. The vents are fantastic. I am glad you reworked the room itself to make everything fit. It is stunning...just stunning!
Big hug
Giac
Thank you Giac! You don't know how happy it makes me that one of my mini heroes loves this kitchen! I will thank you, Giac, because by sharing your bravery and willingness to try things, and to keep at them until they are "right", you have given me the encouragement to keep trying and not limit my dreams or expectations! I appreciate you and your relentless encouragement to those in our community more than I could ever express! 💗
DeleteEvery new visit to your blog brings with it, untold visual Delights! WHAT A BEAUTY!!!!
ReplyDeleteI love EVERYTHING you've done and especially how you re-worked what you already had and made it work Even Better, than what it started out as.
When I read that the units were too long, I thought you would be cutting them down but NO! You thought outside the box and made the floor longer! When the stove hood wouldn't cooperate, you changed it out entirely for an original model and IT IS SUPERB!!!
I love the light and the vents you've developed for it and THE TILES are INCREDIBLE! Love your solution for the fridge too and the ornate embellishments on both the stove hood and window frame. What a JOY this room is to look at and I am eagerly anticipating the next phase of this house which I am Absolutely Thrilled that you've returned to.
I'm Throwing roses at your feet - BRAVO,Jodi! ♥️ :D
elizabeth
Thank you Elizabeth! Your comment gives me wings! 💗
ReplyDeleteI know you know I was stuck on this kitchen for sooo long! It's yet another sign that things unfold exactly when and how they are supposed to!
I am so happy that you like the elements and how they work together! I am delighted that so many of the ideas and the overall feel I wanted has come through! It's so encouraging, and as I face the next great challenge (where and how to run the electricity now that behind the fireplace won't work) I am bolstered by a win!
Tienes que estar muy feliz con el trabajo que has realizado en tu cocina , es fantástica, me encanta .Buen fin de semana:-)
ReplyDeleteGracias Rosa Maria! ¡Creo que porque estuve tan estancado e intimidado durante tanto tiempo que haberlo terminado y lucir tan bien es un logro muy especial! Estoy muy feliz de que te guste también!
DeleteSwooning over here in Oz! What a gorgeous kitchen!!! White on white is right up my real life alley and your mini kitchen is not dissimilar to my rl one... However!.. My stove hood is nowhere near as spectacular as yours! I have hood envy lol. I particularly like how you thought of everything and added vents and a light. I was contemplating just shoving a battery light up in my sf kitchen hood and calling it done... but now I must have vents! I’ve thought of using fly wire as mesh before.. but hadn’t tried it. So great to see it turn out so well in this application. Great fix on extending the room.. added bonus, it gives you a lovely finished edge for the open side. I’ll have to do this too, because one of my uppers cornice hangs out of the room just a teeny bit and I don’t want to knock it off in the future. Love the wood brick! Copying that subway tile for sure! What a great product! I have to give you lots of golf claps on completing that oven kit so well. I epically failed with mine. I couldn’t control those little knobs and lost a couple flying across the room, haha! And i lost the clock and scratched the metal when I tried to reposition my wonkily placed knobs (well the ones I had left!) lololol. Well, I’m off to my local miniature show today so I must run. I’ll return with an empty wallet and a bag of treasures hopefully. Your kitchen is stunning Jodi! Can’t wait to see you fill it with your treasures :D
ReplyDeleteOh Sam you are so lucky to have white on white in real life! The closest I ever got in rl was when we remodeled our kitchen in our first home 2004. I had white cabinets, but they were the kind you order and put together yourself. I couldn't afford granite or stone counters, so I had the laminate ones that were black and "looked like granite". It was a fun experience to design and plan, though! Constant cleaning!
DeleteI am happy that you are going to add a light and screens to your hood - I think you'll have fun and it will make the kitchen even more special to you! The stove kits are difficult - to place the knobs, I add the tiniest of dollops of Mini Hold to the end of a toothpick to use as a handle for the knob. When I have the adhesive on the back, I place the knob, leaving the toothpick attached until the knob is absolutely set. Then remove the toothpick and wipe away the wax with a cotton cloth. It takes all day, and I have to be more patient than I want to, but it works. :O)
I have seen a lot of dollhouses with trim framing the opening of the back, so I think it's a great solution for your cornice length problem, too!
I hope you come home with loads of treasures and who cares if your wallet is empty! You work hard and deserve to enjoy the dreams that mini projects tend to propagate!
Oh Jodi! Trust you to come out with the right solutions and create a kitchen that is simply beautiful and contemporary. I love it and I'm happy to know that there will be more to see and admire on this project.
ReplyDeleteHugs, Drora
Thank you Drora! Sometimes it takes a long time to figure out how to solve so many issues, but when it works out it just feels so great to have it done! I am so happy that you like it, and I hope you'll enjoy the rest of the construction with me! So many more very challenging puzzles to find solutions for!
Deletelove, Love, LOVE it!!!
ReplyDeleteHi Jodi, I did (briefly) your post when if first appeared. I was super busy and deliberately did not scroll through it because I wanted to time to savour it. I am so glad I did.
I am so new to this and every time I come by here, it opens my eyes even more to just what is possible. Your unique and clever problem solving is never ending and the what I really love and appreciate (I know it takes time and effort) is that you always include so many links and 'hands on handy' info on how you achieve your fabulous creations. I don't have a mini blog (I think my embroidery blog would suffer LOL) but you are right - the internet community is invaluable and it is a two-way street.
Your kitchen is to die for. I usually don't to favourites, but I particularly like how you used those fancy mouldings above the stove and window to add the most classiest twist to the otherwise quite contemporary kitchen. Perfect.
Anna x
Thank you Anna! I am so happy that you like the kitchen, and I know what you mean about having two competing hobbies! I have to tell you, though, if I could embroider as incredibly as you do, I may chuck minis altogether! Your embroidered pieces truly make my heart flutter and I wish, wish, wish you would sell mini pillows and bedcovers and such! My eyesight is such, and I suffer migraines so often, that to even try to learn would be a bad idea.
DeleteI am so happy that you like the kitchen and so happy that you are here to experience this mini journey with me!
This is exactly what I love about blogging - you're literally observing the accumulated exprience and problem solving prowess of thousands of people. As mentioned above, the kitchen is a perfect mix of traditional and modern style. I love the chrome and white.
ReplyDeleteIt's amazing how many full scale DIY materials can be adapted to small scale. I spend a huge amount of time browsing DIY stores thinking, how can I break this expensive thing to make something miniature :D
It's so true! I have learned so much about products, techniques, tools and most importantly just to try and keep trying from so many countless creators! Back in the early 2000's there were books and magazines, but nothing like how so much information was available when I came back into the hobby in 2012. All of you who share in the community are why I enjoy this so much, and dream bigger than I ever would have!
DeleteI am glad you like the kitchen's mix of modern and traditional - it's my favorite style for rl homes because I enjoy historical homes so much. But having lived in many, modern conveniences were often lacking!
My eyes are always looking for as yours are for big world things perfect for mini applications!
What beautiful houses do you have, so you do not have to get bored. The white kitchen is great! how do you manage it everything is so beautiful and decently, great job!
ReplyDeleteThank you Gonda! There are so many ideas swimming around in my head and a pressure to try them all before I can't craft any longer! And they all take a lot longer than I think they will, so I tend to get bored and need something different. It is a blessing that I have many projects started and a good supply of materials so that the only limitations are my imagination and drive to do them!
DeleteThis kitchen is simply and beautiful. The details are perfect.
ReplyDeleteThank you Faby! In doing the kitchen I may have just opened Pandora's box! This project and all I want to do with it is sooooo complicated!!!
DeleteHi, Jodi - This mostly-white kitchen is so beautifully crisp and simple, and I love the traditional touches - the tile backsplash, the shelves over the range hood and window - that add a bit of homey coziness. You did a brilliant job on the range hood, especially your creative addition of the screens and light lense. You are so talented in your methods of turning the mundane, utilitarian features of a room into works of art! I like your very attractive solution to the too-short space; the room extension looks professional and finishes off the edges to perfection. I'm so glad that you had this lovely project to keep you busy while you wait for the snow to melt and the temperature to rise so that you can return to the Storybook Cottage.
ReplyDeleteMarjorie
Thank you Marjorie! It is funny how a project can sit for so long and then suddenly you find the passion to begin work on it again. I have spent a little time today dry fitting the second floor, and have re-remembered why there are complications at every turn! My memory is too short for my own good, lol! We'll see how long the detour here lasts!
DeleteGreat work on the kitchen Jodi and fortuitous that you had it and that it was a quick fix to make the walls a tiny bit deeper. It looks great in situ and I agree that the modern range hood wasn’t quite right for the space. What you came up with is perfect. It is funny how something will just click for us and we are off again on a project that has stalled. Have a great week. Xx
ReplyDeleteThanks Shannon! Yes I was so happy to have been able to make the kitchen kits work here, as it may be a very long time until I would have actually gotten to use it for it's intended dollhouse. I have more of what I need on hand to work on the New Orleans, so it just made sense to get to work on it again. I am starting to be okay with my workroom looking like chaos, so that will allow me to work on more than one project at a time. It'll be nice to let myself be taken where the mood leads me!
DeleteHope you have a great week, too!
Love your post. I am rather new to minis as I have just completed my 2nd. I'm working in shabby chic as it allows me more leeway when it comes to little errors. Although I never aspire to being a perfectionist because it just isn't my style, I can't help but admire your accomplishments. I discovered this hobby as therapy after my cancer, and at age 70, I'm a little past my prime. My blog can be found at www.childhoodrevisited.blog on Wordpress. I'm going to attempt French Country on my next build. I love reading other miniaturist's blogs to give me ideas. Looking forward to reading more of yours.
ReplyDeleteHello and Welcome! It's so nice to have you here, and I can't wait to sit down and catch up on your entire blog! I have added you to my blog roll and hopefully everyone will go take a look at your Storybook Farm! Once they see that photo, they'll be hooked! It's incredible, and I'd say you're perfectly prime right now!!!
DeleteCongratulations, too, on beating the cancer! You must also be a fighter and an inspiration! Thank you so much for posting your blog link and lovely comments!
Me encanta esa cocina, es preciosa, y tus ideas brillantes !!!
ReplyDelete¡Gracias Eloisa! Me hace feliz que te guste la cocina, ¡y lamento que me haya costado tanto descubrirlo!
DeleteI really love how this unexpected turn turned out in the end!!! This kitchen is simply beautiful - and at some of the pictures (those who are not showing or giving hints that this is a miniature house) it looks like a real one, nobody knowing this could tell it's a miniature project. It was fascinating to see how this stunning kitchen developed from the bare kit under your magical hands. And I'm in awe how you've solved some of the problems on your way like the missing space or how you've created the stove hood. It must have been fate that this kitchen had to wait some time for you to work on it... now you were meant for each other! ;O)
ReplyDeleteHugs
Birgit
Thank you, Birgit! I really am surprised that I got so excited suddenly about working on this poor, neglected house, but it just sort of compelled me! I am glad the kit for the kitchen worked out so well, though I can't say the same for the island and stools. Back to the drawing board on those! :O)
DeleteJodi, I love your work. I made the beachside bungalow and bashed it to make it open-concept. I left out the stairs, made the bottom floor completely open, and made a false wall to create a small hallway by the front door.
ReplyDeleteHi Nancy! Thanks so much for leaving your comment! It sounds like you created a perfect solution for the space issues with the BB kit! I'd love to see photos, but noticed that you stopped access to your blog? If you ever decide to reactivate please let me know! Your Google page previews show some neat mini activities I'd love to explore!
DeleteStunning work, Jodi. I would have been too stubborn to try to adapt the kitchen to another house. It turned out beautiful. Isn't it amazing how our skills develop while we're not looking? I also often stand amazed at how far I've come. (One of my greatest personal achievements is the sewing machine. Though I'm a whiz at hand-sewing I've never trusted something electrical with needles, haha I would rather chop down a tree with a chainsaw. Lately, I've started just sitting down and doing something with the sewing machine without anxiety).
ReplyDeleteI love reading your blog, and your photography skills are becoming better by the day, not that you were ever not good.
Happy indoor mini making through the cold weather.
Hi Megan! Thank you! I am learning that every project has it's time and when it's right, there is no stopping the mojo train! Like you, I seem to be pretty successful when I use the machine, so why it stresses me out so much is a mystery! I'd rather chop trees, too!
DeleteWhat a blessing it is to have the hand sewing skill! My hand sewing is sloppy, so if I wanted to get better I'd need a lot of practice! My poor eyes would fail me as they are already struggling to see 1/12!
Jodi, this kitchen is gorgeous!!! One of my new favourites!!! You're making me re-think the white on white look, it's so lovely here. The layout is perfect for this space and it's so neat the way you were able to fit in the kit you already own. I love the backsplash and the vent hood, both are so elegant. Can't wait to see it with the island :)
ReplyDeleteThank you Kristine! After the last couple kitschy kitchens it was fun to do something more contemporary but classic. I love white on white, but it's probably only practical in houses with a person who enjoys cleaning or in dollhouses, lol!
DeleteI've never added lighting in one of my dollhouses because I'm afraid of it and after seeing those pictures, I'm frightened to death lol. Also, I'm in love with your kitchen!
ReplyDeleteThanks Brandy! Lighting can be so intimidating and expensive! I have had my share of "learning the hard way", and the biggest tip I can offer is do round wire wherever possible and avoid using tape wire with MDF. MDF tends to crumble over time when penetrated with brads or eyelets, so just when you think everything is connected securely, it's not. and by then you've wallpapered and moved on only to discover that a light has stopped working. Enormously frustrating! So for me, mostly round wire and even some battery lights from now on!
DeleteThank you for the tips!
DeleteI just discovered your blog today! Woohoo! I’m so excited to start from your beginning! Your work is gorgeous!
ReplyDeleteThanks so much! I am so glad to have you here sharing on my creative journeys!
DeleteAbsolutely astonishing! What beauty. I just started working on a doll house I got in an auction 15 years ago when i was introduced to this world by my Ex mother in law at the San Jose Good Sam miniature show. I have been doing a lot of homework as very slowly work on it. I have been making my own kitchen cabinets and it has been going good but I have not been too happy about the stoves and refrigerators I have found could I please have the information on where you purchased them or the kits? I would so much appreciate it.I have fallen in love with the doll house world!
ReplyDeleteHi! Thanks for the kind words! You have the mini bug and it's the most fulfilling intruder in the world!
DeleteFor this project, both the cabinets and the kits for the appliances are from Elf Miniatures. Here is the link below:
https://www.elfminiatures.co.uk/
Elizabeth is the owner and is so helpful for custom orders which are often needed in our tight and sometimes awkward mini kitchens. I would advise paying a little extra for the insurance and tracking. Mail, especially coming in from other countries, is not so reliable in the Covid era!
Best of luck and have fun!
Jodi