Search My Blog!

Use the Search box below to find keywords that you're looking for quickly and easily!

Search Feature

Wednesday, August 28, 2019

Autumn's Pantry: Home Goods

This week's focus for Autumn's Pantry was to get the Home Decor wall of the store fitted. The first thing I needed to do was to create a lot of linens. It can be a challenge finding fabrics with an in scale print, in the colors of your decor and in the variety and amounts you need. So when faced with this dilemma, I often just print my own.


I have posted before about the Inkjet Fabric Sheets on Amazon that I use, but here it is again for the new folks. It comes in US standard printer size which is 8.5" x 11", but I believe you can find it in A4, as well. Maybe in a different brand, too. I just tend to stick with the brands that I have success with. The sheets feed into the printer in the exact same way that office paper does, though I just load in one sheet at a time so that a mis-feed and resulting waste of expensive fabric doesn't occur. It is very thin, but looks really good in a variety of household objects, even rugs. I find that increasing the color intensity of the ink by 10-15% (in your print settings) makes for a richer end result. If you want a faded, shabby look, decrease the ink intensity a little.


I look for fabrics online from many different sites. I also scan in scrapbook paper that I like. If there is only a small section of fabric, I fuse together several images to achieve the size of piece and pattern I like. Below is a sheet I printed and it includes tablecloths, fold-over potholders, tea towels, washcloths, and pieces to make an apron (tutorial later in the post).


The fabric comes with a peel away backing but it has no residue. Do not peel the backing paper away until you are ready to assemble the fabric into your desired object. It frays really easily and needs to be glue hemmed. I generally use an Xacto knife and steel ruler to cut the straight edges from the sheet because my scissor skills leave a lot to be desired.


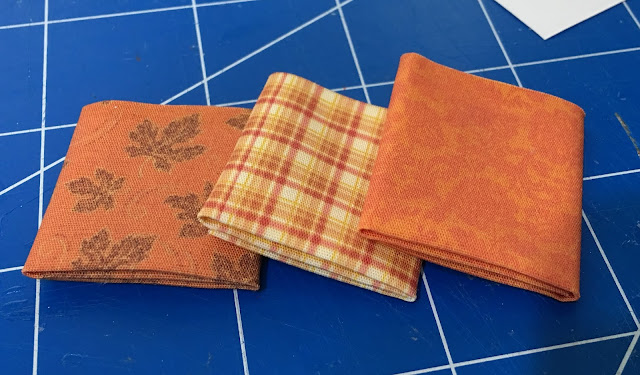
You don't really need to make a full scale version of things you'll display folded. These tablecloths are only 2.7" W x 3.5" L, but when folded and displayed, pass for the real deal.


To make a tea towel for a drawer or a basket, you'll just fold into thirds and glue the left and right thirds together on the back. Then fold in half. Regular Tacky glue, used sparingly and spread evenly, works great.


If you want to display a tea towel on a towel bar, or when the ends will show, you can create fringed ends. Leave 1/8" at the end of the fabric free of glue. To prevent the fray from going beyond where you want it to, run a thin bead of glue across both ends of the towel. Let dry completely.


Then, just carefully remove the horizontal threads from the 1/8" end of the towel.


Ta-da! Fringe! This method works great for rugs, too. Then just fold the towel as above.


Now for a super simple but really cute apron. I first discovered this easy no sew method when making a potting shed for my aunt for her 70th birthday. That was way back in 2015 and was the first thing I ever blogged about. For that apron, I used a piece of the quilt my grandma had made me growing up. I knew using that material would mean a lot to my aunt, and it did!

You'll need:

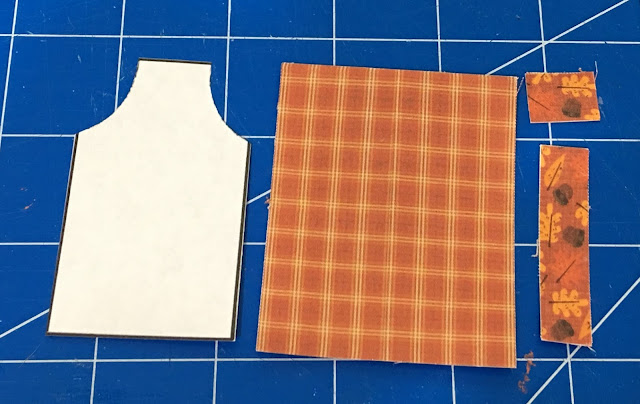
Apron Pattern (provided)

2-5/8" x 1-9/16" Fabric
1-9/16 x 1/2" Coordinating Fabric For Bottom Strip
1/2" x 5/8" Coordinating Fabric For Pocket

16" of 1/8" width Coordinating Silk Ribbon

Two 1/16" Flat Back Pearls, Buttons or Metal Studs

Tacky Glue
Scissors
Toothpicks


Apron Pattern.


Cut your fabric pieces and your pattern.


Fold pattern in half and place centered on your fabric. This will let you see how wide the seams will be on each long side.


Create a seam on each of the long sides of the fabric with a thin layer of Tacky Glue. Fold and press.


Using the pattern, carefully cut the arm curves. Create a 1/16" seam along the raw edges with Tacky Glue. Let dry.


Apply a thin layer of Tacky Glue to the bottom piece of the coordinating fabric (1-9/16" x 1/2" piece).


Affix to the bottom edge of the apron. If it is too long you can trim or glue and fold back.


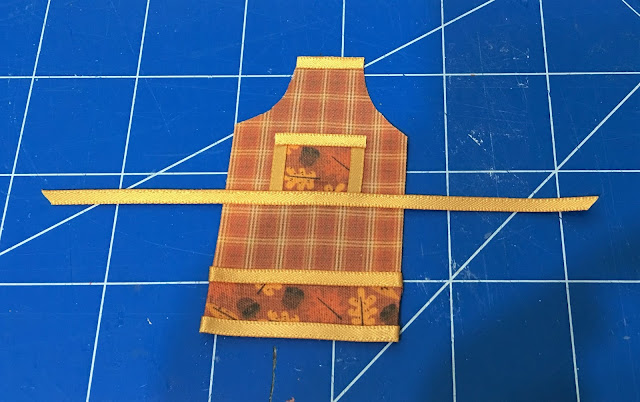
Apply a thin layer of glue to the pocket piece of fabric (1/2" x 5/8"piece). Attach centered on the apron, 3/4" below the neckline.


Cut two pieces of silk ribbon 5/8" long. Glue to either side of pocket.


Measure and cut a piece of silk ribbon for the top of the pocket which is long enough to cover both side ribbon pieces. Glue.


Apply a thin line of glue across the middle of the apron, using the pocket's bottom as a guide. Cut a piece of silk ribbon 5" long. Fold in half to find the center. Place centered on the pocket across glue. Cut the ends to points and then seal the ribbon ends with a tiny amount of glue.


Cut two pieces of ribbon slightly longer than the bottom fabric piece. Using a thin layer of Tacky Glue, attach one strip at the top of the bottom fabric and one at the bottom.


Turn the apron over. Add a thin layer of Tacky Glue to each of the four exposed bottom ribbon strips, then press into the back of the apron. This is so that if seen from the side, it gives the illusion of printed fabric on the back.


Measure and cut a piece of ribbon for the neckline of the apron. Glue.


Cut a 3-3/4" piece of ribbon for the apron's neck strap. Apply a small dot of glue where the neckline ribbon meets the left edge of the apron at the arm curve. Press the end of the strap ribbon into it and let dry completely.


Attach the strap's opposite end to the right neckline/arm curve, twisting the ribbon so that the same side of the ribbon is affixed.


Apply a small dot of glue to the center of both places where the neck strap meets the neckline ribbon.


Set a flat back stud/button/pearl on top of the glue. TIP: To pick up the stud/button/pearl easily, wet the flat end of a toothpick with your tongue. Touch it to the center of the right side of the stud. It will stick long enough to place it where you want it.


You can fold and bend the apron into a natural shape. You can also glue down the back ties, and even tie the neck strap into a cute bow.


Or just leave it long like a chef.  I've made dozens of different configurations of these over the years. Just have fun and use your imagination!


Once I had all the linens printed, folded and glued, it was time to load all the seasonal goods that make a house feel like home. I printed a colorful runner and shelf mats to add another layer of interest. Because I wanted to display the top drawer open with folded cloth napkins inside, I added a wood support piece to the bottom of the drawer. This allowed me to securely glue the drawer into position.


I used tulle for the chicken wire doors. It was yellow, but a quick paint wash made them look rusty.


I played around with the decor items to find the best arrangement. Some pieces needed a little paint and glaze. The empty bottles and pitchers will need fall flowers, but that will come later. I made the wreaths last summer when I was working on the Storybook Cottage's garden. I knew they's come in handy!


And now I'll leave you with shots of the finished back and right walls of the shop. The hutch ended up being the perfect piece for this spot and really allowed me to display a colorful and varied amount of all the good home goods!


In the next few days, I hope to start on the window displays, counter displays and floor displays. Then the flowers the week after. I feel hopeful about having the project pretty close to being finished for the first day of fall, but you know who laughs when we have plans. Either way, I intend to enjoy the journey!

Wishing you all pleasant journeys!

xo xo,
Jodi

Thursday, August 22, 2019

Autumn's Pantry: Baked Goods & Candles


This week my focus has continued to be filling up the shelves of Autumn's Pantry with things you might find at a fall farmer's market. In addition to homemade jams, canned goods and honey, I like to sample the delicious seasonal baked goods. Yum! Although my shop is small and I can't include everything I'm craving, I did make a couple must haves!


I found a bag pattern online and adapted it to size for my needs. I wanted the finished size to be 1/2" wide once assembled, so keeping the aspect ratio of the original pattern makes the finished height of the bag about 53/64" (just under an inch).

If you want to use the pattern, the one inch square
guide will help you print the pattern to the size that
is right for you.
I also found some cute gingham images in fall colors that I could layer the bag pattern on top of. If you want to print the bag pattern, layered over an image you've found online (rather than printing on scrapbook paper), just set your bag pattern to be transparent.


If you change the line color of the bag pattern to match the color of the background image you are using (recolor, then adjust the brightness), it ends up blending in nicely without being an obtrusive black outline in your finished packaging.
I printed several of them out on regular printer paper. Wait about 10 minutes, then coat the back (non ink side) of your paper with original Mod Podge. This will help set the ink. Let dry and then coat the ink side with Mod Podge. Using regular office paper and coating both sides makes the bags strong enough to work with, yet not too stiff and bulky like cardstock can sometimes look.


I wanted my baked goods to peek out of the bag, so I used a decorative hole punch to create a window. It helps a lot to find the center where you want the window so that you have a guide for the punch. I just used a pilot hole punch to mark a center hole, then centered it in the punch.


For the window material, I always have good luck with pasta film. Just carefully peel it away from the cardboard and then cut into pieces that give you an 1/8" seam around the window hole.


I lay the bag face down on a scrap piece of (waxed) paper, apply a layer of glue stick glue, remove from the scrap paper, then position the window over the window hole. Press gently, clean up any excess glue, then let it dry for a few minutes.


Pre-fold all of the fold lines to create a "memory" in the bag before you begin assembling. I start with affixing the left flap to the right inside of the bag. Let dry.


Then fold up the small tabs and glue under the long front and back tabs. I like to fold the front tab last so that the seam only shows from the back.


Once the glue is grabbing, I insert my tweezers into the bag and apply pressure to even out the glue and make it so the bag will sit nicely once dry.


I used three different plaid style/color images for assorted baked goods and dry mixes.


The green plaid bags will house the pumpkin scones. These are made using air dry clay rolled to 1/8" thick, cut into a 1" square and then cut into eight triangles. Once dry, I use artist's chalk in oranges/browns to color them.
To display them in the bags, I cut a 1/2" x 9/16" tray from cardboard. I arrange and glue the scones onto the tray, then slip inside the bag. Then just crease the upper side portions in half, fold the top down, glue, then add a label.


For the iced pumpkin and iced sugar cookies, I used a silicone push mold with air dry clay. Once dry, I colored them again with chalk. For the glaze, I used Stickles and glitter - orange for the pumpkin cookies and translucent for the sugar cookies. I used the same tray method for the cookies as I did for the scones.


I wanted to offer a scone mix that customers could take home and bake. For the "dry ingredients", I used an old jar of embossing powder that's been floating around in my craft drawers since 2002! It works great - just fill the bag about half way and seal well with tacky glue.


These will make a nice addition to the canned goods on the shelves, and the cost to make them up is next to nothing!


I did have the opportunity to make some real wax miniature jar candles. While I had fun and think it's an easy method, there are things I will adapt and improve the next time I make them. I ordered OO (zero zero) square braid wick to try, but it is backordered. So rather than wait, I just used floral wire which I did not bother to paint white. For my purposes with these candles in the shop, they will pass. For a feature candle on a coffee table, I would have given more effort to make the wicks look white/new/waxy. I intend to have another try with these when my wick comes in. I think it's still worth sharing my experience, because I know you brilliant folks out there will come up with an even better method (hopefully you'll share!)!


I am using an $11 crockpot from Amazon as my melting apparatus. Natasha (my daughter) and I took a candle making class last February and that is what they used (although they had a plastic roasting bag inside the pot which contained the wax). This crockpot will be dedicated to candle making only, as I hope to make real life sized candles from the wax my bee keeping brother saves for me. My other supplies are 32 gauge wire (in lieu of wick), uncolored tealight candles in metal cups, alcohol ink, a glass eye dropper and miniature jars.


My tealight candles just fall out of the metal cups which makes it really easy to remove the wick.


Next I placed the metal tealight cups with wax inside the crockpot. I set the crockpot to low and it took about an hour for the wax to melt completely. I am sure the High setting would be much faster, but I was doing other things so had the time to wait.

Still solid.

Melted.

To remove the cup from the crockpot, I used my tweezers and set it right onto a plastic dollar store plate. Then I added a few drops at a time of alcohol ink and mixed in with a wooden coffee stirrer. The alcohol in the ink will evaporate once it hits the hot wax, so don't let that freak you out. It's harmless unless there is an open flame. I found that the orange ink mixed right in, while the yellow and red took some stirring and still did not completely dissolve. It was fine and did not cause an issue. Once mixed, I sucked up the wax into the glass dropper, then filled up my mini jar. Be careful to go slowly so you don't overfill. Also, if you can get it all in in one squeeze I found the wax looked smoother in the finished candle.


Imagine what happens as the wax begins to cool. Yep - back into the crockpot, even the glass eye dropper (I removed the rubber bulb first). I was able to get all five of each of the different colored candles finished in one round before the wax began to cool, but if you are running an assembly line, be prepared.
Also, no brainer here, but BE CAREFUL! Even on low, everything is HOT and capable of causing burns. Use tweezers, not fingers. :O) A few minutes in the crockpot melted the eye dropper wax and I could wipe and ready it for the next color.


Not horrible for a first try, and I really think this has potential! I hope the 00 wick will look in scale and that a real life replica is possible without spending a whole lot of $$. To be continued...

One other note here. I have heard that using crayons to color wax is not a good idea because the pigment they use in crayons will clog the wick and the candle won't burn. BUT! If you are only making miniature candles and do not intend to burn them anyway, I think experimenting with crayons to color the wax would be fun. I have an old art container full of crayons around here somewhere, and since all my nieces/nephews/godchildren are grown up now anyway, if I find it, those crayons are going to become candle color guinea pigs!


I was able to begin loading and arranging the shelves. Gratuitous photos to follow...


Other than some random crates of food and some treats for the kids, the pantry part of Autumn's Pantry is wrapped up. Next up, I'll be making the home decor goods, flowers, and then the window displays. I have a family wedding to attend, and my parents are coming back to town for the month of September, so the time to finish this project for fall is fading quickly!

Hope you're inspired to take these ideas and run with them in your own fun fall projects! And please share! The more we raise our collective mini consciousness the more skilled we all become!

xo xo,
Jodi