Search My Blog!

Use the Search box below to find keywords that you're looking for quickly and easily!

Search Feature

Thursday, April 4, 2019

Chipping Away

This week's post is going to be a day or two earlier than usual. I don't have anything that is finished to share, just some in progress stuff. Russ will be home for the next couple days, so where I'm at is about all I will get done on the New Orleans this week. But I do have an exciting discovery to share! It's exciting to me, anyway! More on that in a minute. First...


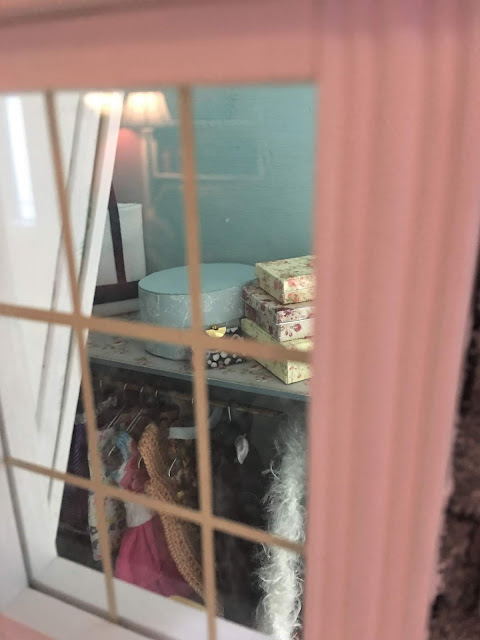
I had purchased some outfits from PaolaeSaraMiniature Etsy Shop right after I got my first ball jointed doll. They are really lovely, unfortunately, not all of them fit or looked good on the Zjakazumi doll. But fortunately, they worked perfectly to hang on hangers for the closet! And there were just enough that with the reflection, I think it will create a reasonable impression of a full wardrobe! I think the concept is going to work, though I still have to finalize the optimal placement of all that's inside.


A peek in from the outside dormer window

A peek in from the bedroom

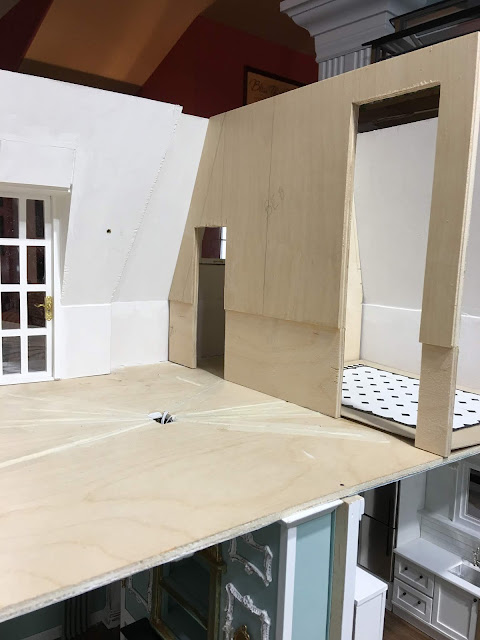
A glimpse with the wall up and the door propped open
And now for the exciting discovery... A couple years back, I discovered Bespaq Direct on eBay. They sold scratch~n~dent Bespaq furniture, sometimes for as little as $4.00! If you were planning on painting or recovering anyway, you could find some beautiful pieces at affordable prices. As of this writing, they have sold off all their inventory and are no longer offering items on eBay. Bummer, but at least I got some good stuff put away for future projects! I had purchased four chairs and a table for the dining room, only to discover later, that with the room so small, it would look better with just two or three. So, since I wanted a small chair for inside the closet, I pulled one out.


The chair is New Walnut with ivory silk fabric. The reason the set was discounted is because the glue joins where the fabric panels and the wood met were poorly done. I was going to recover them anyway, so this was not a problem. I pulled off the front and back panels and discovered I liked the chair even better without them!


I have always coveted the Bespaq Victorian Balloon chairs but never could justify shelling out $45 each for them. If I were a billionaire, I'd make Warren Buffet jealous of how thrifty I can be! Without the panels, they look surprisingly close! So what to do about the glue residue?


I sanded off the glue with a super fine sanding sponge, being careful not to take the finish off any place except for the very inside. A light sanding removed the glue and left enough of the walnut stain that I was able to match it to the rest of the chair's finish by applying a coat of clear nail polish.


But I wanted something fancier. Using my Krylon gold leafing pen, I carefully painted just the inside edge. I still didn't really think the ivory silk cushion was very interesting, so since I planned on recovering it anyway, I tried an experiment. With alcohol ink! This was the exciting part! Using a soft artists brush, I applied a little at first, and when it looked as though it would work, I applied more liberally. It dries super fast, so not much worry about over soaking. I just love the results!


So much so that I treated the other three chairs to the same makeover! I like them so much better, and what a quick and easy solution to a color problem.  The silk even retained it's shimmer! More experimentation will have to be done on different kinds of fabric, but who knew alcohol ink could be used as a fabric dye!


The rest of my progress was not as exciting. I received the replacement porch lights for either side of the balcony. I spent a couple days repainting them in aged bronze like the front porch light. Once I installed them I was able to apply the interior wallpaper over the wires.


I started on the built-ins and door install for the bedroom, and am deciding about the wainscoting design.


In the stairwell hall I finished the door and window trims and am currently working on the wainscoting and finish molding. There's a lot to do in this room with having to finish up the stairs and railing, but I.m chipping away at the To-Do list little by little.


So much to do and so little time! Hope you're all chipping away at your dreams, too!

xo xo
Jodi

Thursday, March 28, 2019

New Orleans: Second Story's Opening Story

This week had it's share of challenges and frustrations working on the New Orleans dollhouse, but at least there was enough in the positive column that it seems like I made actual progress with my time. And when that happens, it feels like a worthwhile pursuit!

To refamiliarize you with the layout, here is a photo with the labeled rooms.


To give you an idea on size, the bathroom interior measurements are 8" x 10".


The Closet's floor space is 5-1/2" x 8". The door measures around 7" tall, so a standard dollhouse height. I'm actually using the kit's original front door, and you can see by comparing it to the bathroom doorway that it will be significantly less substantial.


Here is the stairwell hall. The door leading from it into the bedroom will match identically to the bathroom door. The hall walking space is about 3-1/4" wide with the overall width of the room being 9-3/16" at the floor.


I had to get everything related to the closet figured out first since it will be in the back corner and will soon be inaccessible. The interior will only be visible through it's door, which I'll leave ajar. I am hoping that with a mirror on the closet door, as well as a floor mirror inside the closet, that through those reflections, you'll be able to see inside and get the feeling of a real closet with clothing, shoes, handbags, chair and hamper. Because you won't see much, I have just painted the interior walls, added wood flooring and baseboard.


Because of the limited wall space both inside and outside the closet, I've made the jambs up myself for a custom fit. After all of the walls and flooring have been permanently installed, I'll fix the closet door in place in the best position for viewing the inside via the mirrors. I am going to have to permanently attach everything inside the closet for lack of access after the walls and roof piece are permanently installed, so before long I'll have to make decisions on all of that


The door's not really that short - just had to leave room for the flooring!
So while working out the closet details, I had to make decisions about the wall coverings and treatments. The bathroom will be all black and white with the same brick type subway tiles in glossy white I used in the kitchen. The bedroom and stair hall will be done in teal tones like the rest of the house, with some type of wainscoting on the lower 3" of the walls.


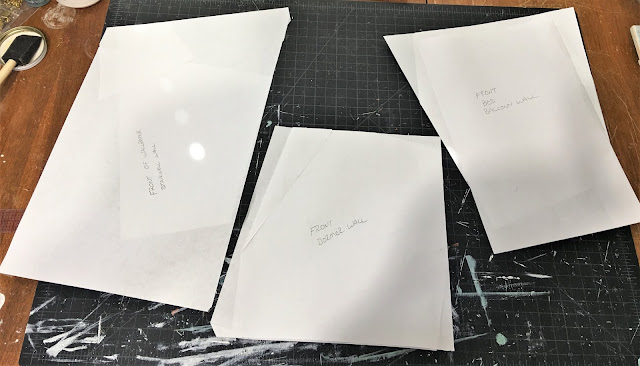
I had to make paper templates for all these funky angled mansard roof walls. Back in 2012, when I was first getting back into miniatures after my long hiatus, I learned how to do this from this video tutorial by Joann Swanson. That lady has been showing newbies How To for so many years and she is a true Giver and a Treasure! Thank You Joann!


I'll spend my mini time over the next week finishing up the wallpaper and wainscoting, hopefully the flooring, too.


Remember the really huge doorways? Well, there are no such doors that large on the market, so I decided to take a couple of the Houseworks, Victorian Glazed doors in my stash and make those work. First, I replaced the "glass" with 1/16" thick basswood panels to give me a solid door.


To add to the height of the door, I cut 1/4" thick plywood to add to the bottoms of the doors.


I had to add something to the bottom of the jambs and trims to make up for the new door height, so I made a little protruding pediment type thing at the bottoms. I also wanted to match what I'd done to the windows and doors downstairs so made a sort of  door pelmet for the tops with resin architectural pieces. The final height of the doors with the pelmet are 10-1/2".


Dining Room Window

Living Room Window

Door and Sidelight Window

Then, because the Houseworks doors do not come with interior molding, I had to make up my own to try and match for the other sides. Here are all of the parts that make up the two doors and their trims and decorations on all four sides.


I've got them all glued, painted, sanded, painted, sanded and waiting for their final coat so they'll be ready to install on the newly papered and trimmed walls. I hope when all is said and done they look grand and elegant in the rooms!


See you next week with hopefully, another happy chapter in the New Orleans saga!

xo xo,
Jodi

Thursday, March 21, 2019

Do I Sound Frustrated?

In my last post I talked about wondering what I'd gotten myself into. I am still feeling that way, because it seems that everything I have touched lately goes wrong. I hadn't intended to wait three weeks to post about my progress, but it just sort of turned out that way. The first week I didn't have much to share. The second week I was having all kinds of trouble and forgot to take photos. By the third week, I was already doing such a lousy job chronicling the progress that I decided it may just be better to show the after photos. So here is where the exterior stands today...


I'm trying really hard to use up what I originally purchased for this house, even if I don't quite remember why I bought it or what the intention for it was. I am also trying to use up as much of the kit components as possible while still trying to make it have some unique character. Since I made the center dormer window into a door, I needed a door and frame. I used some of the kit's trim pieces and the dormer window pieces for the doorway.


For the french door, I used 1/8" x 1/4" basswood to make two panels with mullions, 1/8" x 1/8" for a lip, then sandwiched Plexiglas in between it. I made the door hinged, but was so liberal with the glue that the pin/wood join was stronger than the wood. Trying to coax it open just caused the wood to want to split out, so the door will be non operational.


I mentioned in my last post that I may make the balcony a little larger. I had a Walmer balcony kit that I picked up at Auntie Em's in Glendale, AZ in 2017, so decided now was a great time to use it. Below is what it is originally intended to look like. I wanted to replicate the New Orleans kit's plain, round dowel porch spindles so I replaced the fancier ones with ones I cut from 1/8" dowel rods.


I added an 1/8" x 3/4" trim piece around the second floor to add visual weight and give the balcony and large cornice trim an anchor.


I also installed pins into the balcony and holes to receive them into the second floor of the house for added durability. It will protrude and I know at some point it will likely get bumped into. This step may save a future repair! 


I scribed 1/2" wide boards into the floor to match the lower porch floor. The angled pieces on each side of the door are where the light fixtures will go. I had one, ordered another, received the wrong one and it did not match, realized the first one I had was really wonky so am waiting on two new ones from HBS.


I spent a lot of time waffling about how to finish the balcony railing. In the end, it felt like I needed to incorporate the copper from the dormers to unify the front. It's not attached or even assembled completely yet, and like the entire front needs to filled and have it's final painting done. The copper paint pen takes ages to get dry enough to do second and third coats, so it will be an ongoing and methodical process.


I also spent a lot of time debating about the front porch. The original kit pieces seemed a little too ornate to me so I knew I would not use those here. It seemed like white railing would have been too cold and stark. Copper would have been too much competition with the balcony. I made an upper piece with grills and fancy brackets, but it just began to look too Victorian and blocked the door and windows. In the end, I went with no upper and a simple lower rail painted the darker trim color.

Original Grill Too Busy?


Now we'll talk about the trim issues. I had four lengths of Unique Miniatures molding to use for the exterior trim between the first and second floors. This is where a lot of my struggles began. You see, even though all four pieces were the same product and were ordered at the same time, each one was different. Some longer, some wider, some thicker in areas and some that were completely crooked. I have experienced this issue before with Unique Miniatures pieces so was not shocked. The packaging said it could be heated and bent, so, I tried that with my heat gun. I didn't have any luck. 


I decided to try straightening them by drilling pilot holes into them and the house. I was hoping that driving nails in would hold and straighten the heated piece. All but one piece just ended up breaking and splitting. Instead of ordering something different as I may have in the past, I decided to live with the broken pieces and make repairs the best I could. I have used a lot of Unique Miniatures pieces in this build, and honestly, the next time I even think about buying them again I will tell myself two words: Sue Cook. I will have to live with them the way they are, and it is really disappointing.


To give the exterior knee wall some interest (between the first floor and where the mansard roof begins to angle), I employed the Cricut to cut some panels. In the centers of these I added some decorative resin pieces and some fleur de lis pieces made using wood and jewelry findings. I was able to adapt some of the kits trim pieces for wainscot rail. I also added corbel brackets under the Unique Miniatures cornices.


I used the Alessio Miniatures asphalt roofing strips I had purchased for the Beachside Bungalow. That poor project is having all it's materials pilfered! It was pretty easy to install, easily cuts with scissors, comes in strips of 34 shingles and does not curl up like wooden shingles do from wet glue. I used a hot glue gun after using wood glue on the first row as I realized it would be the quickest method. The only drawbacks are that a great deal of sand comes off during the installation and gets everywhere, and that it costs $15 per roll. I used just shy of 4 rolls on this roof. Luckily, I had 5 rolls for the BB.


The wonky rows on the sides are purely my own fault. Georgia, Woodson and Rusty like to be really close to me while I am working. Like having all three of their beds around and right under the table. Instead of disturbing them, I installed the side roofing while reaching sideways over them. Love and straight roofing rows do not go hand in hand, but I'd rather have a crooked roof than puppies who think a dollhouse is more important to me than being close to them. :O)  I was able to catch myself and mitigate the problem before too long.


Now that I am just about wrapped up on the outside, I can begin to tackle the inside. I have created a lot of challenges for myself in there, and I truly hope that it will become more enjoyable for me than the last few weeks have been. This is supposed to be fun, and I am supposed to look forward to doing it!


I hope life has been more gentle and cooperative with all of you lately. I know struggle is what makes us grow, and I am grateful. But I'd sure like my trials to come in smaller portions, thank you!

xo xo,
Jodi