Search My Blog!

Use the Search box below to find keywords that you're looking for quickly and easily!

Search Feature

Wednesday, February 27, 2019

What Have I Gotten Myself Into?!?

I have a bad memory. It's a problem. Especially when I forget really important things, like why I put the New Orleans dollhouse on the shelf. When I finished the kitchen, I decided to keep the momentum going and continue solving some of the issues that had me stalled. There were a lot of them, and this week, they have all reacquainted themselves and re-reminded me that I might just be in over my head!!!

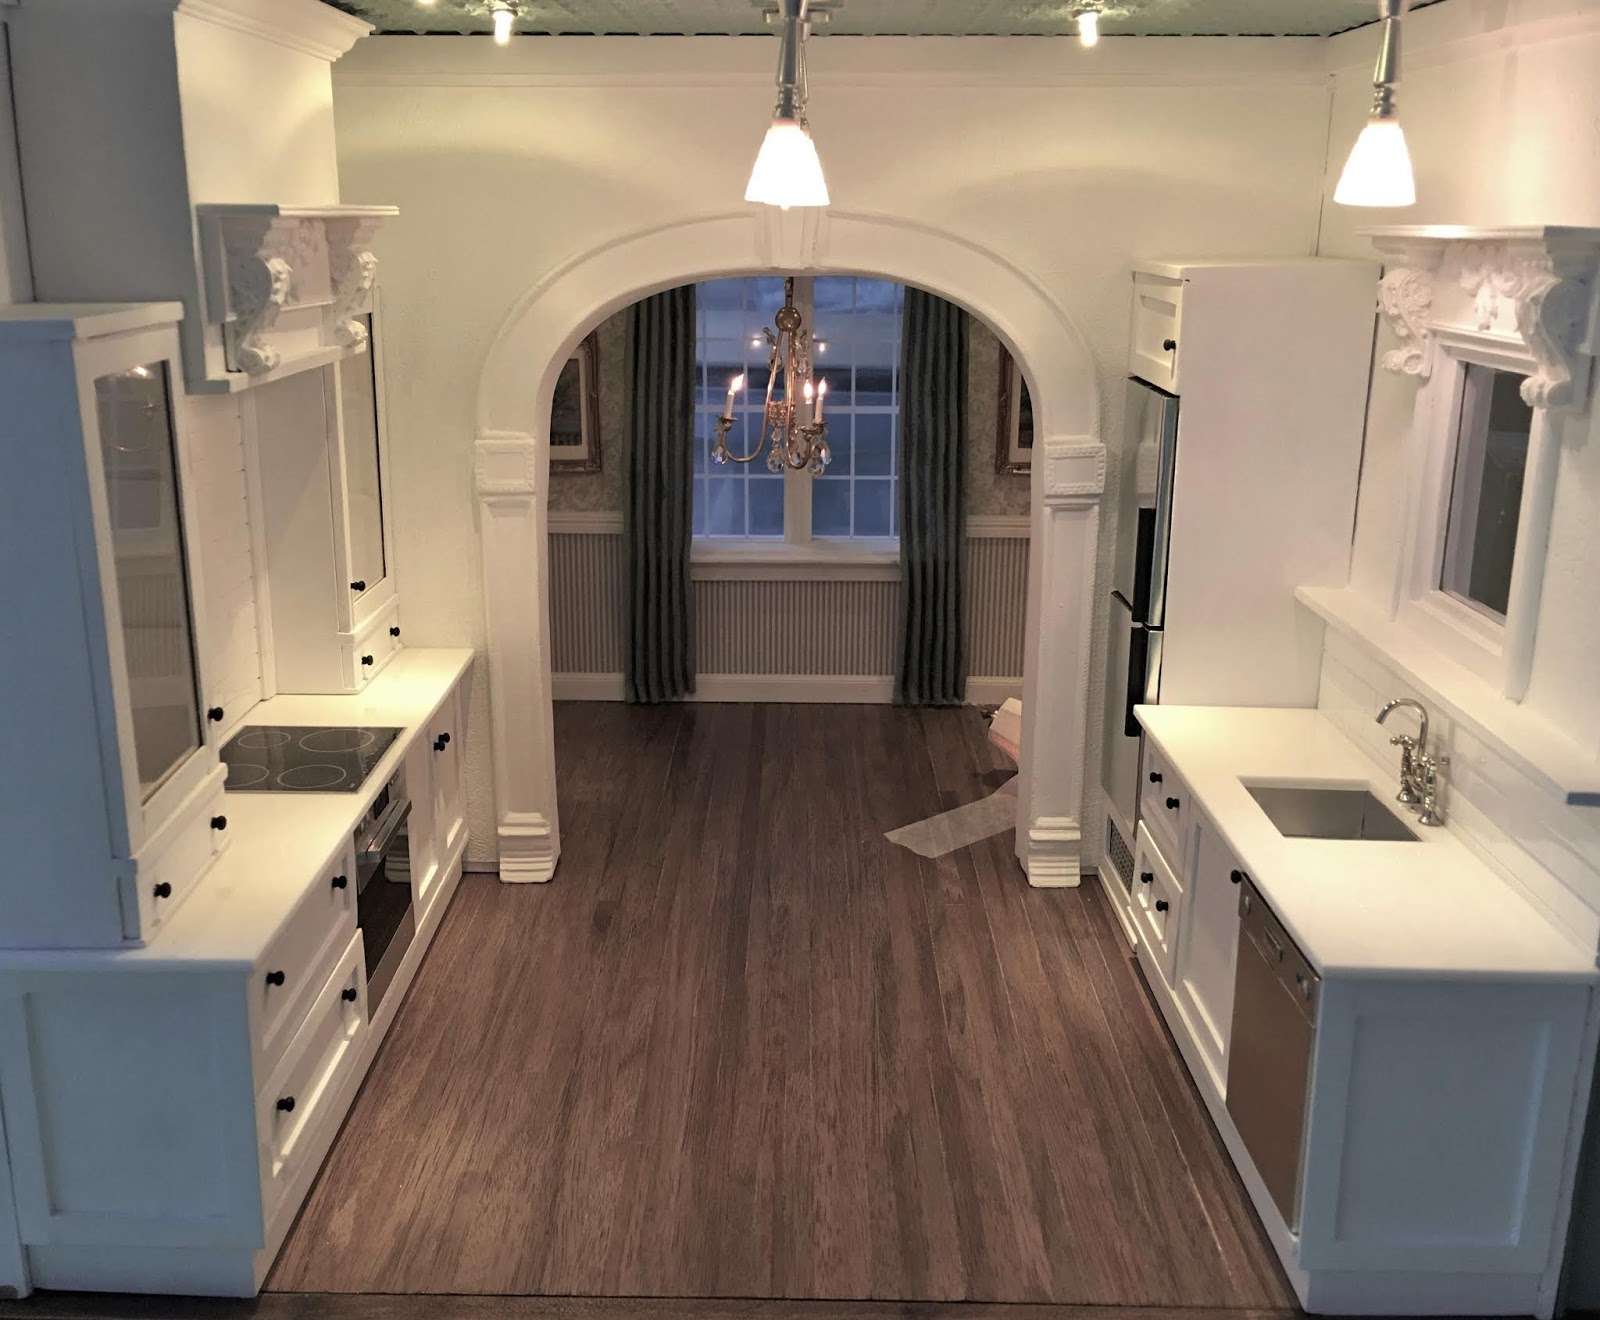
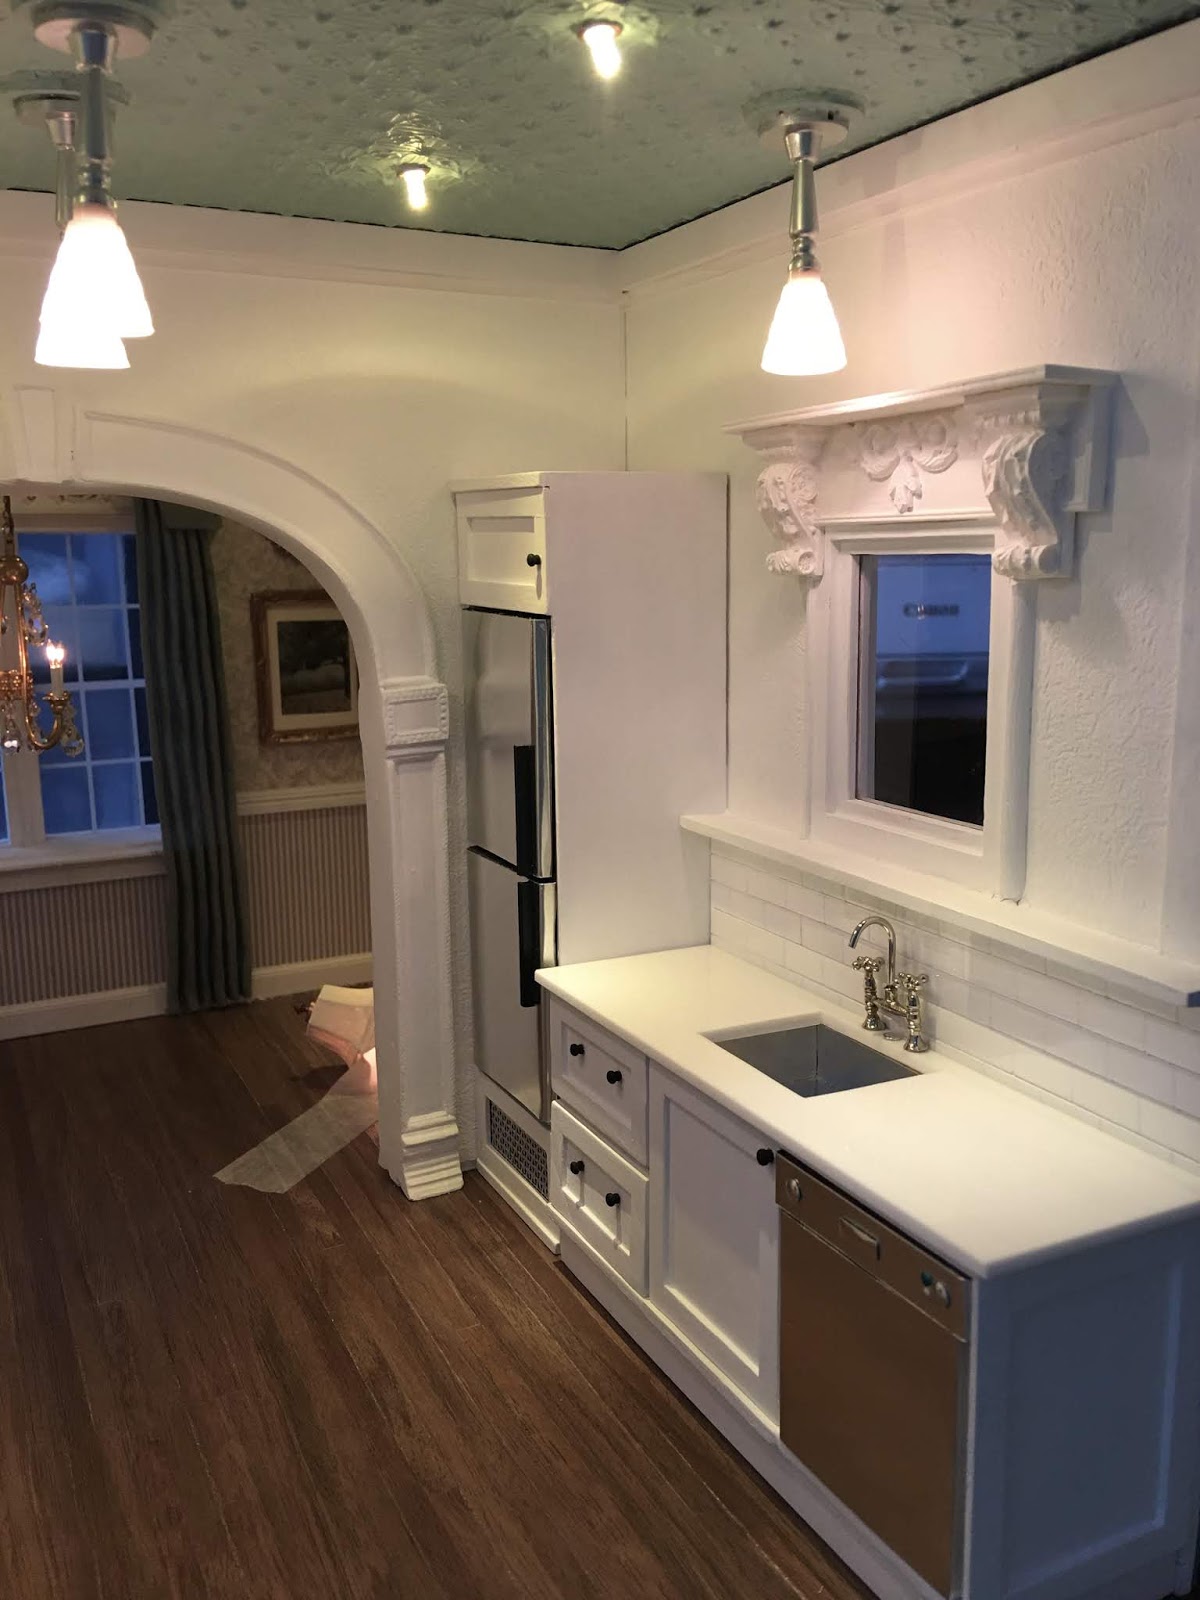
First, the electrical. My original plan was to run all of the ceiling fixtures via roundwire, in channels through the floors above, to a hub behind the fireplace. That was a great plan until I added some very fancy detailed ceiling molding and made it impossible, once I attached the ceiling,  for the chimney breast, with it's fancy crown molding, to slide past it any longer. The thought of coming up with a new plan, one that would surely force me to take off multiple plugs, add extension wires, add the plugs back and hope everything still worked, was daunting and easier left for "someday".

Old wire hub behind chimney breast.

Second floor with channels and wiring for first floor ceiling lights.

Obstructing molding.
Dreading it wasn't going to get me anywhere, so I came up with a plan and Just Did It. Honestly, the thought of doing it was much worse than the actual work. Now all of the first floor wires will be run down through an enlarged access hole in the floor behind the chimney breast, through new access channels in the floor joists and out the foundation wall to a new hub next to the kitchen window. I will have to build a small "garden shed" with hinged doors to hide the new hub or plug sockets, but that might be fun. Additionally, confirming that all the lights, even after sitting for so long, neglected, still worked!

Hub removed and larger floor access hole for exiting wires to run under the house.

New wire channels from the floor behind the chimney breast to new hub location.
New hub location and future home of a disguising garden shed.

The second floor lights will all lead to the bedroom closet, exit through an access hole in the wall and connect to the new hub. I can camouflage the wires in a downspout or some such when the time comes.

The next challenge came when I got the second floor wall and ceiling pieces out for a dry fit to refamiliarize myself with what I needed to do next. That's when I realized that unlike the first floor's wonderful 10" ceiling height, the second floor was only 8" high. That was not going to work for what I have in mind.


Stairwell and hall.

Bedroom

Bathroom in front, closet behind.
I really needed taller ceilings to make this house as grand as it could be. A serious challenge when you consider that the second floor is actually an attic with angled walls due to the mansard roof. Also, the walls in this Real Good Toys kit are either 1/4" or 3/8" plywood. I was going to need my Big Girl tools for this job!


Luckily, I had a bunch of 1/4" plywood. I ripped 3" strips until I had enough for the 96" of total wall length needed. Then I just cut the strips to length for each wall. The really challenging part was that the top and bottom edges of the original kit walls were angled for the mansard roof. I would not know how to use a compound miter saw if I had one, and I don't, so coming up with a way to laminate the new height extensions while keeping the angle true was a brain teaser. What ended up working was to add masking tape along the seam to hold both pieces together on one side, add the wood glue to the edges, press together, then add masking tape on the other side. Once I had all of the pieces taped and glued, I did another dry fit, taping all the walls together and keeping the correct angle while they dried. After they dried I went back and filled in any gaps, using the wood glue like caulking to fill them up. It worked!!!


After the walls with their new extensions were dry, I installed pins (nails with the heads cut off) through the second floor and into the first floor walls, then drilled corresponding holes into the second floor walls before gluing to add stability.


The center wall piece, which connects the two upper side sections, has a hole slated for a dormer window. With the taller ceiling it seemed like a perfect place to add a french door, so I enlarged the opening. The kit has a tiny indented balcony spot on the front of the house, so having a door there seemed like a great opportunity. I may make the balcony just a little larger.

New facade with added wall height, center french door and balcony location.

I'll have to make the french door to fit.

The new floor height, french door and angle meant that this piece also needed many refinements. Cutting away, adding in, figuring out how to make the door work with the angled dormer - a real head scratchier. The way the kit was originally laid out, this center wall piece stuck out past the walls on either side on the interior. The dividing walls on either side would butt up to the wall, creating a hollow on either side of about 1". I am eliminating one of the dividing walls and arranging the placement to maximize the bedroom space. Because of this, the center wall needed a lot of modification. I also moved each of the side wall sections out about a half an inch effectively adding another 1" of floor space.


Divider wall locations.
I also needed to have a mock up with the furniture to see where exactly the dividing walls would go, and how deep to make the bathroom. You see, behind the bathroom there will be a closet. It will only be visible through it's door, a mirror on the door and through a dormer window. I needed to know how deep the bathroom needed to be so I would know how deep the closet was and where to cut the closet door in the dividing wall. Then I needed to cut a new wall that would separate the bathroom from the closet. Another tricky job because of the angled roof. My bathroom wall still needs some sanding for a better fit!


One of the things I needed to do in order to figure out the amount of bathroom space was to get out the tile I have for the floor. It's been well over two years since I bought it, so I had completely forgotten what my plans were. It's the Marlike polished marble look tiles by Dollhouse Flooring. I bought three styles to create a central pattern, a border and then an edge, if necessary. In order to figure out how much I had and how I was going to lay it I did a mock up.


I settled on 8" x 10" for the bathroom, then cut the 1/32" subfloor to size, then began to lay the pattern. It's going to take me a while to get it done, but I think it will be fun!


So as you can see, I am definitely in over my head. Doing things way beyond my understanding, above my pay grade and beyond my skill level. But where there is a will, there is a way, and I am definitely willing to try!

Hope you are all getting to push for your mini dreams, too! 💗

xo xo,
Jodi

Thursday, February 21, 2019

An Unexpected Turn...

When last we spoke, dear friends, I was struggling to reach the next point with the Storybook Cottage. Spray painting furniture is out for a while - we've experienced  Snowmageddon here over the last couple weeks! Literally - that's what the news called it! Too cold to do a good job spray painting, I could have started on pillows, cushions and bedding, but sewing makes me really nervous! Until I find my bravery elixir, that's out for a little while too. The truth is, I am just kind of board with shabby at the moment.


I began to look around at the graveyard of unfinished projects on the shelves in my work room and think about why I stalled on them. I considered the kits I have and thought it may be fun to start on a new project. I quickly realized that was a bad idea! The guilt of having started yet another project (while so many are still waiting in varying degrees of completion for their turn to become all they can be) would crush me! I finally decided to drag out the card table again, bring down the New Orleans, and pick up where I left off - the kitchen. But there were a lot of issues to figure out. You see...

Original New Orleans Kit

Back in the summer of 2016 I used a 40% off plus free shipping coupon from Hobby Lobby to buy a Beachside Bungalow kit. It was a total impulse buy because it was so inexpensive. I liked the old LA bungalow look of the house, though it seemed small and hard to lay out a proper function. I began to make plans for a remodel and started collecting seaside and beach-y things for it. I also worked with Elizabeth from Elf Miniatures to design a really neat and contemporary kitchen. Then, like my usual M.O., it got put in the queue of projects and moved further down the list as I became excited about other things. I know! I am rotten!

Original Beachside Bungalow

But, could that kitchen, with a little adjustment, work for the New Orleans? I'd have to do a little bashing to make them fit, but I do enjoy kits and bashing. Not only would it assuage my guilt, I love the New Orleans and felt excited at the thought of working on it again! So that is what I did...

The Elf kitchen cabinet kits as intended for the BB had a wall of cabinets and an island with the sink. The New Orleans kitchen is laid out galley style, and after assembling the kits, I realized the room was just an eighth of an inch too short to fit each cabinet run. So the first puzzle to solve - how to lengthen the floor. Also, The original plan had a double door fridge/freezer built into a cabinet. The NO kitchen would need a smaller fridge and enclosure. Luckily, I had a small kit in my stash and could make an enclosure.

Original layout for the BB kitchen.


Base cabinets assembled without toekick.

Just slightly too long past the flooring.

There is no cabinet built around the fridge yet, so another 1/8" will make the right side too long, too.

With fridge cabinet, as predicted, too long.

Added 1/4" x 1/4" trim to edge and dividing wall across the whole length of the first floor.


Once the length and layout were worked out I could paint the cabinets. The kitchen plan was always going to be white on white with blue and white decor. The handles that came with the kits, "D" shaped stainless, seemed a little too modern for the traditional house, so I opted to go with simple wooden knobs painted black to help tie in the more contemporary appliances.


The fridge cabinet is right in front of the door molding, so I added a vent to the base so that the door would appear to clear the molding that may otherwise hinder it's operation (even thorough it is only a dummy fridge and won't really open anyway). The height matches the cabinets flanking the stove. It's a really neat feature in this kit that the ceilings are 10" high!


Whenever I set out to make up the appliance kits with aluminum, I get more nervous than I have cause to. They usually work out very well using E6000. The modern stove hood was the exception. The aluminum just didn't want to stick to the curved wood. I was just getting ready to sand the aluminum with steel wool and clean it with alcohol for another try when I realized: It wasn't supposed to work. The hood is just too modern and wrong for this kitchen. So, I set out to make one with a more traditional style.

I'll save this puzzle for another project!

Little side note here - when I was trying to figure out what to use to make the vents for both the fridge and the stove hood, I asked Russ for a piece of drywall patch tape. It's on a roll like tape, has a square mesh pattern, is yellow and is good to keep in mind. However, Russ brought me in a piece of leftover screen from when we re-screened the sliding screen door. This is the type that they make for people with pets who like to claw at the screen door when you don't immediately heed their demand to be let in. It has a rubber type of coating that keeps it from shredding at the hands of paws with nails. It worked out very well on our sliding screen door and is perfect for mini vents! The aluminum paint marker worked great, too!


I was so hoping to be able to use the Unique Miniatures shelves I've been saving for the project, and the stove hood gave me a great place for one of them! I made up a basic top and bottomless box, added crown to the top, a light bulb inside and a frame with light lens and screens for the bottom. The light lens is a piece of plastic packaging painted with many layers of opaque Gallery Glass.


For the stove backsplash, I wanted to try out a new product that I bought on impulse a while back, too. It's a Wood Brick Sheet which has the brick pattern scribed into it and is very inexpensive. It is 9" x 5" x 1/8" thick and was also easy to cut using the mini table saw. I painted it with three coats of white chalk paint, sanding in between, trimmed it in wainscot molding, then sprayed it with Krylon Triple Thick Glaze to make it look like porcelain subway tile. Yeah! No egg carton bricks this time!


With the stove light on... Yikes! That screen shadow is disturbing! Had to make some light block panels and install them... 


This is better!


While I was at it, I decided to add a couple pendant lights in the center of the ceiling for the eventual island/bar (more on that later). I also added very simple trim where the walls meet the ceiling. I may have to raise the ceiling up about an eighth inch (more on that later, too).


For the sink side of the kitchen, I had to cut the perspex countertop, originally the island dimensions, down to my counter width and length. Also an easy job with the table saw. I used the same tile backsplash, adding a shelf along the top, and was able to find a way to use the second Unique Miniatures shelf above the window by trimming up the window molding.


And some photos with the lights off.


I really love the way the kitchen worked out, and I love knowing that in just over two years my confidence, tools and skills in minis have improved enough that what was intimidating and stopped me from continuing with this project was only a temporary setback. There are many more challenges ahead of me with the New Orleans, but I am happy to feel ready to tackle more of them!

In closing... As many of my regular readers know, one of the most precious aspects of the miniature hobby for me is how having a blog and other social media resources has allowed me to be involved in a tiny world full of incredibly kind, supportive and talented miniaturists. From newbies to artisans, those connections have helped me get through some of the toughest of times in my life. You are truly a blessing and lifeline to me. In light of that, I'd like to take a moment thank all of my new and old followers, and tell you just how much it means to me that you visit and share this joy with me! If you have a blog, please do leave a comment and let me know so that I can follow your work, add you to my blog roll, and hopefully, help others find you, too. You can never have too many friends or too many minis! :O)

xo xo,
Jodi