Search My Blog!

Use the Search box below to find keywords that you're looking for quickly and easily!

Search Feature

Showing posts sorted by date for query geraniums. Sort by relevance Show all posts

Friday, September 28, 2018

Growing A Cottage Garden Part 3


With all those Geraniums ready to go, I only needed to make a couple other flowers to have what I needed to fill the flower boxes. I didn't want them to compete color wise with the house structure, but instead be a cohesive complement to it. So with all those pinky-peach Geraniums, I decided some nice off white Dahlias would be lovely. For these, I had Bonnie Lavish kits. I needed twenty of them, and luckily, had four kits - each kit makes six. The challenge was that petal sheets from two kits were a perfect off white, and two were white white. I was able to color the petals in my palest yellow ProMarker, Buttercup, then use the blending pen to wash out most of the color. I also brushed some alcohol ink onto the leaf sheets to give them more depth in color. They came out great!


To plant the boxes, I followed the recommendation for planting in pots from the SDK Kits. I also dipped each wire into glue before pushing into the air dry clay. The soil I used is Woodland Scenics Fine Turf Soil.


And here are the flower boxes all planted. I needed to keep the long box pretty low profile, since it will be placed across the back opening, separating the upper and lower floors. To the small flower boxes, I also added pale pink Daisies from Bonnie Lavish kits. I'll get some photos of them installed onto the cottage soon, but don't want to install them yet until I know I am ready to attach the house permanently on the landscape base.


With the flower boxes filled, it was easier to know how much more I'd need to make to fill the planters and pots for the rest of the garden. So next, I decided to tackle the tea blend planter. I don't necessarily have kits for all of the herbs and flowers that make good tea blends, so for these I'm going to have to attempt my own. One of the easiest looking flowers was Chamomile.


I thought I could create a reasonable facsimile using flower punches, yellow Floral Foam, Lycopodium, and floral wire.


I dipped the end of each wire into Fast Grab Tacky Glue to create a nice ball on the end, then let dry.


Once dry, I dipped in regular Elmer's School glue, then into the floral foam. I used my fingers to gently shape and press the foam into the glue, then let dry.


Meanwhile, I punched petals from plain white printer paper, and calyxes from some left over green colored silk paper.


Once the floral foam centers were dry, I assembled. Push one white petal up, almost touching the floral foam. Add a tiny dot of glue, then seat the petal  against the floral foam. Do the same with the next petal, offsetting the petal from the first. Then add the green calyx. I also made a few stems without white petals to simulate flowers in earlier stages of growth. To these, I added and extra calyx petal.


For the leaves, I made a bundle of the flower stems, wrapped lycopodium around them and secured with a wire. I cut off the excess wire, squirted hot glue into a water bottle cap, inserted the bottom of the bundle and held there until the glue was cool and the flowers secured. Then I cut away the bottle cap.


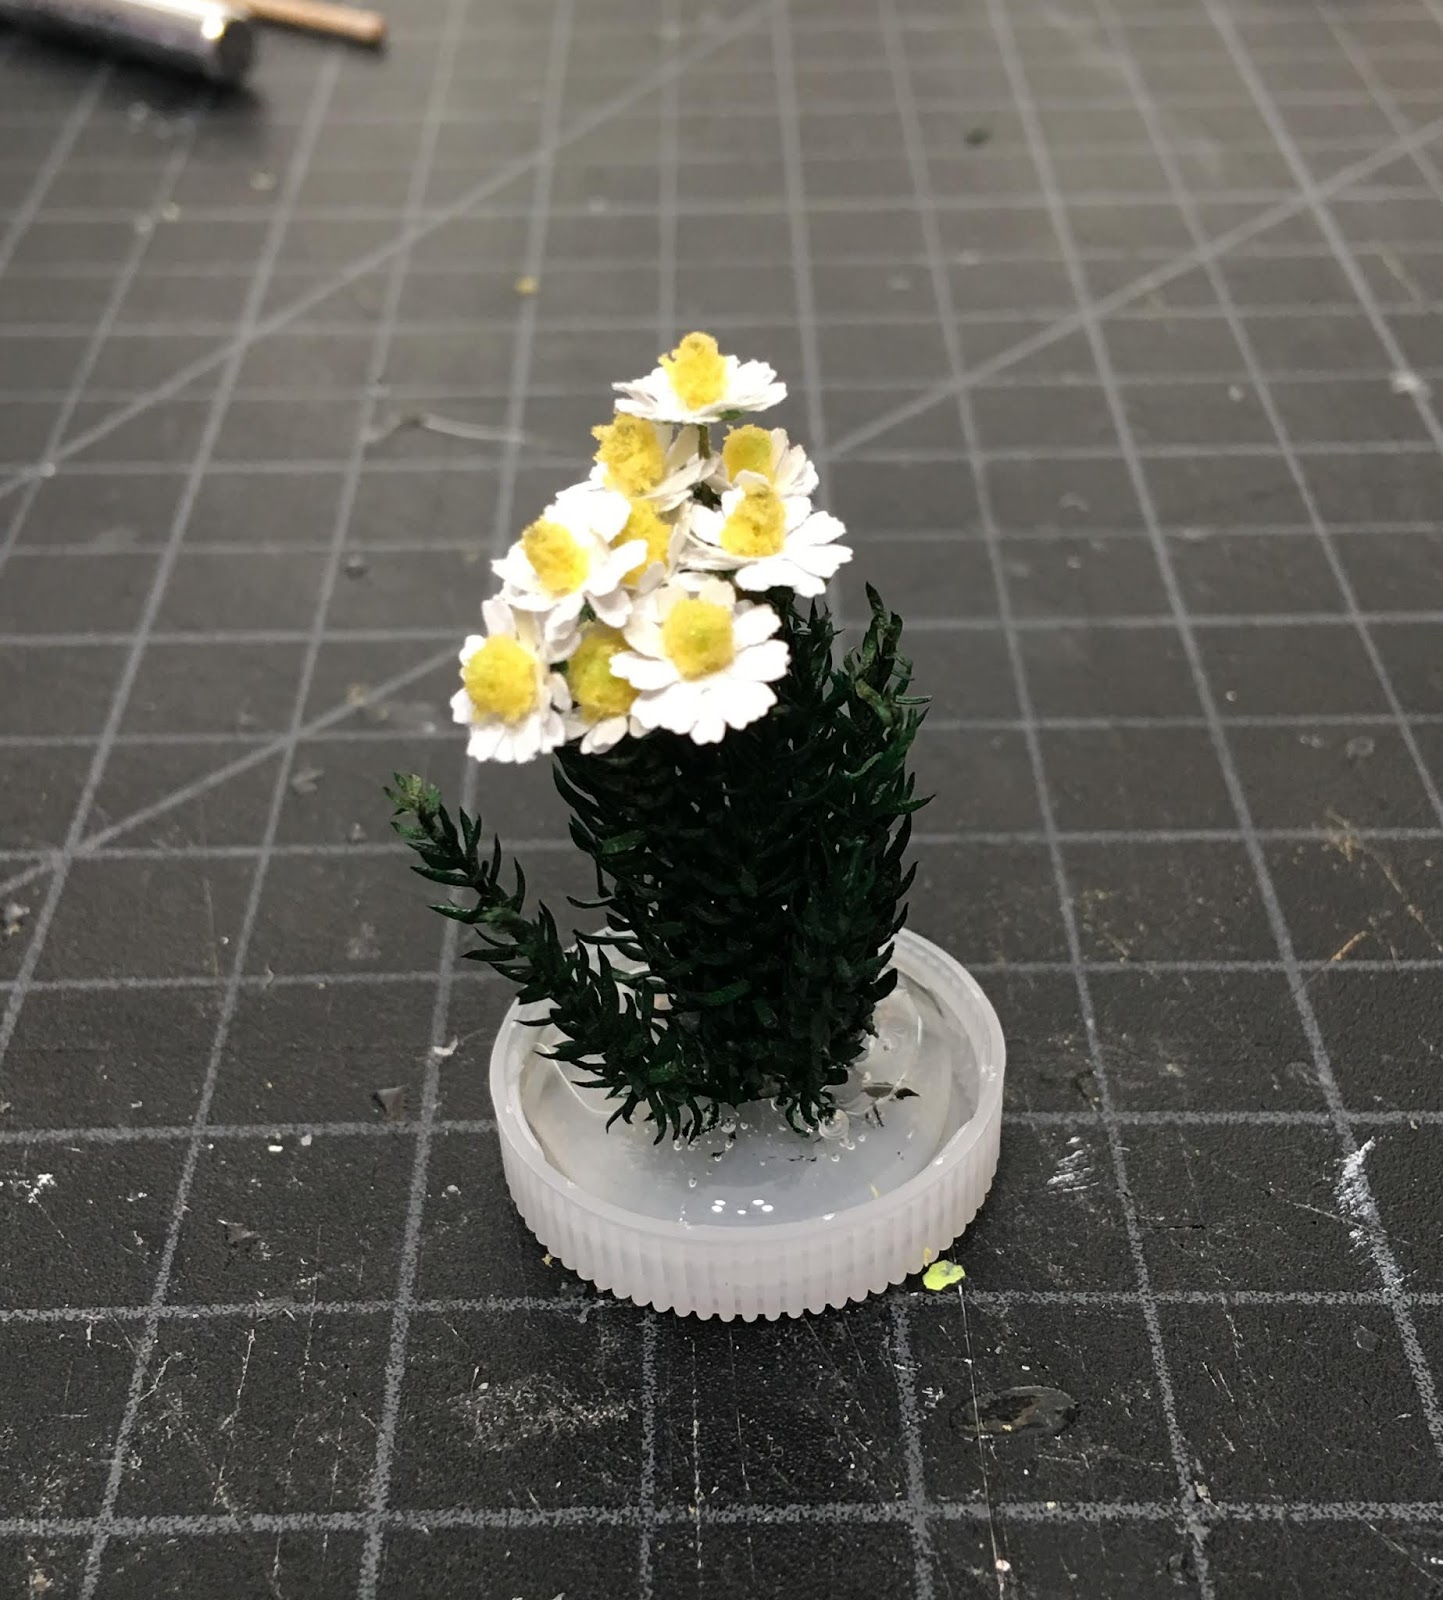
Then I just fluffed, shaped and arranged.


It came out pretty well, and I'm glad I gave it a try! I hope I have as much luck with the rest of the tea blend plants that I need to make for the planter. Luckily, I have kits for the Mints, and some leaf sheets I can use for the Lemon Balm!


Back soon, I hope, with more tea and bee garden goodness!

xo xo,
Jodi

Monday, September 24, 2018

Growing A Cottage Garden Part 2


Serendipity smiled on me this week and as a result, I ended up with some bonus mini time! I put it to good use and continued making flower kits. I stuck with the SDK kits since I was kind of on a roll with them.

First up was the Dandelion kit. I had two of them.


Each kit contains enough to make three clusters of three Dandelions. Because of my particular garden needs, I made one kit (almost) as directed, but opted to make some single Dandelions from the second kit. My gravel grout border on the paths is narrow, and fitting in a cluster of three might prove difficult. But three clusters in the cracks of each of the three outside fence planters should be perfect.

Once the flowers were made, I twisted them into groups of three, decided on the height I wanted them sticking out of the ground, then ran a bead of hot glue at that point.


Then, I cut off the excess wire, squirted a tiny puddle of hot glue onto my self healing mat, and pushed the Dandelion cluster into it - essentially creating a base for easier planting.


And I have six singles to be placed in the narrow path gravel or other cracks as needed.


Next I made the Ageratum kit. I made up some smaller buds based on photos I'd seen Googling. They are not the most beautiful flower, but I made two groupings and I think they'll make nice pots or fillers.


I really love Geraniums - probably because they were always the hardest flowers (in my attempts at real life gardening) to kill. Long after my over exuberant spring fever buying and planting frenzy had lost it's luster, and I'd forgotten to water too often, they were the last flowers standing. So, because they are such a forgiving flower, I thought the cottage should have loads of them. Exactly fifty-one of them, to be exact. But I only had one kit!


The kit makes three large and two small clusters using beads for the flower heads, then fifteen separate leaf stems. Very fun kit to make.


So taking my new found skills from the kit, I made forty-six more - twenty-four with 1/8" beads, and twenty-two with 3/16" beads. I knew I'd finally use these beads someday! I didn't want jewel colors to peek through, so each bead got a dip in salmon paint.


For the flowers, I used Rice Paper that I got from Pierce Miniatures a long while back. It has an almost translucent look, but is very strong because of it's fibrous nature. I colored it with a Cocktail Pink ProMarker, then used a blending pen to create a streaky, more natural and varied appearance.


I used my Punch Bunch five flower corner punch to make the petals. It comes with a removable corner guard that just pops off the bottom in case you don't want it for corners.


One issue I experienced was that the fibers from the rice paper wanted to catch and snag in the punch. You can see the badly cut flowers in the photo below. I remembered that the eBay seller had sent a handy How To sheet with the punches. It said to sharpen the punch, just use it on regular printer paper. So I experimented, and discovered that if I punched the rice paper and the printer paper at the same time, it cut almost perfectly every time. I also found that having the punch cut the rice paper first (so stacking the rice paper then the printer paper), I got a slightly better result. There was a lot of weeding the printer punches from the rice paper punches, but it was for a good cause!


Hopefully, fifty-one geraniums will be enough to make a good dent in seven small and one gigantic window box, plus a couple window sill pots! :o)


But there were still twenty-eight leaf stems to make! For those, I used the Silk Linen Paper, also from Pierce Miniatures. It is thicker and more textured than the rice paper, and perfect, it seems, for Geranium leaves! I used Botanical alcohol ink to color the paper, and my Punch Bunch Geranium leaf punch to cut out five leaves per stem.


Kris Compass over at One Inch Minis has a great Geranium tutorial, so if you can get the punches, go make some Geraniums!

And believe it or not, after all those Geraniums, I was still excited to start on the Daylily kit! The kit makes eight, but I purchased an extra set of leaves and petals.


The wonderful thing about Lilies is that you can make them in a gazillion different colors and have fun experimenting, which is exactly what I did!


I loved the one in the lower left, so I gave it a good try with the supplies at my disposal: ProMarkers and a blending pen.


First, I saturated the center of the Lily petal with the blending pen, then added a tiny dot of green, then blended with the blending pen to give it a soft and faded out look.


For the pink, again I saturated only the tips of each petal, added a dot of pink, then blended into the center of the petal.


They came out looking so lively, and I think all sixteen of them will make a nice impact in the garden! They were so much fun to do, I may just have to make an entire Lily garden one day and experiment with every variety!


I think the next segment of "gardening" will be the herbs and leafy plants. I have a whole Camellia tree to make, but that is going to be a project in itself! I'm watching tree making videos, reading posts from awesome and experienced bloggers, which hopefully, will give me the confidence to just jump in. Until then, leafy greens!

Hope you're enjoying the change of seasons, and all the special things that brings!

xo xo,
Jodi