Search My Blog!

Use the Search box below to find keywords that you're looking for quickly and easily!

Search Feature

Showing posts sorted by relevance for query flowers. Sort by date Show all posts

Saturday, November 17, 2018

Growing A Cottage Garden Part 9

The title of this post should include the words "Cloud 9", because I think I am finally finished with the Storybook Cottage's Garden! Oh, I may add a bell here and a teacup there, but all of the major elements I wanted to include are done!


Due to my wonderful "play day" with Sam's art gallery, and the fact that we'll be flying out to spend Thanksgiving with my parents in AZ, I did not take any "in progress" photos, but I'll do my best to explain the "after" photos as I go. First, a photo of the sides and back...


I don't think I posted a photo with the back window box planted and installed. It is removable so that I can get to the interior without crushing the geraniums!


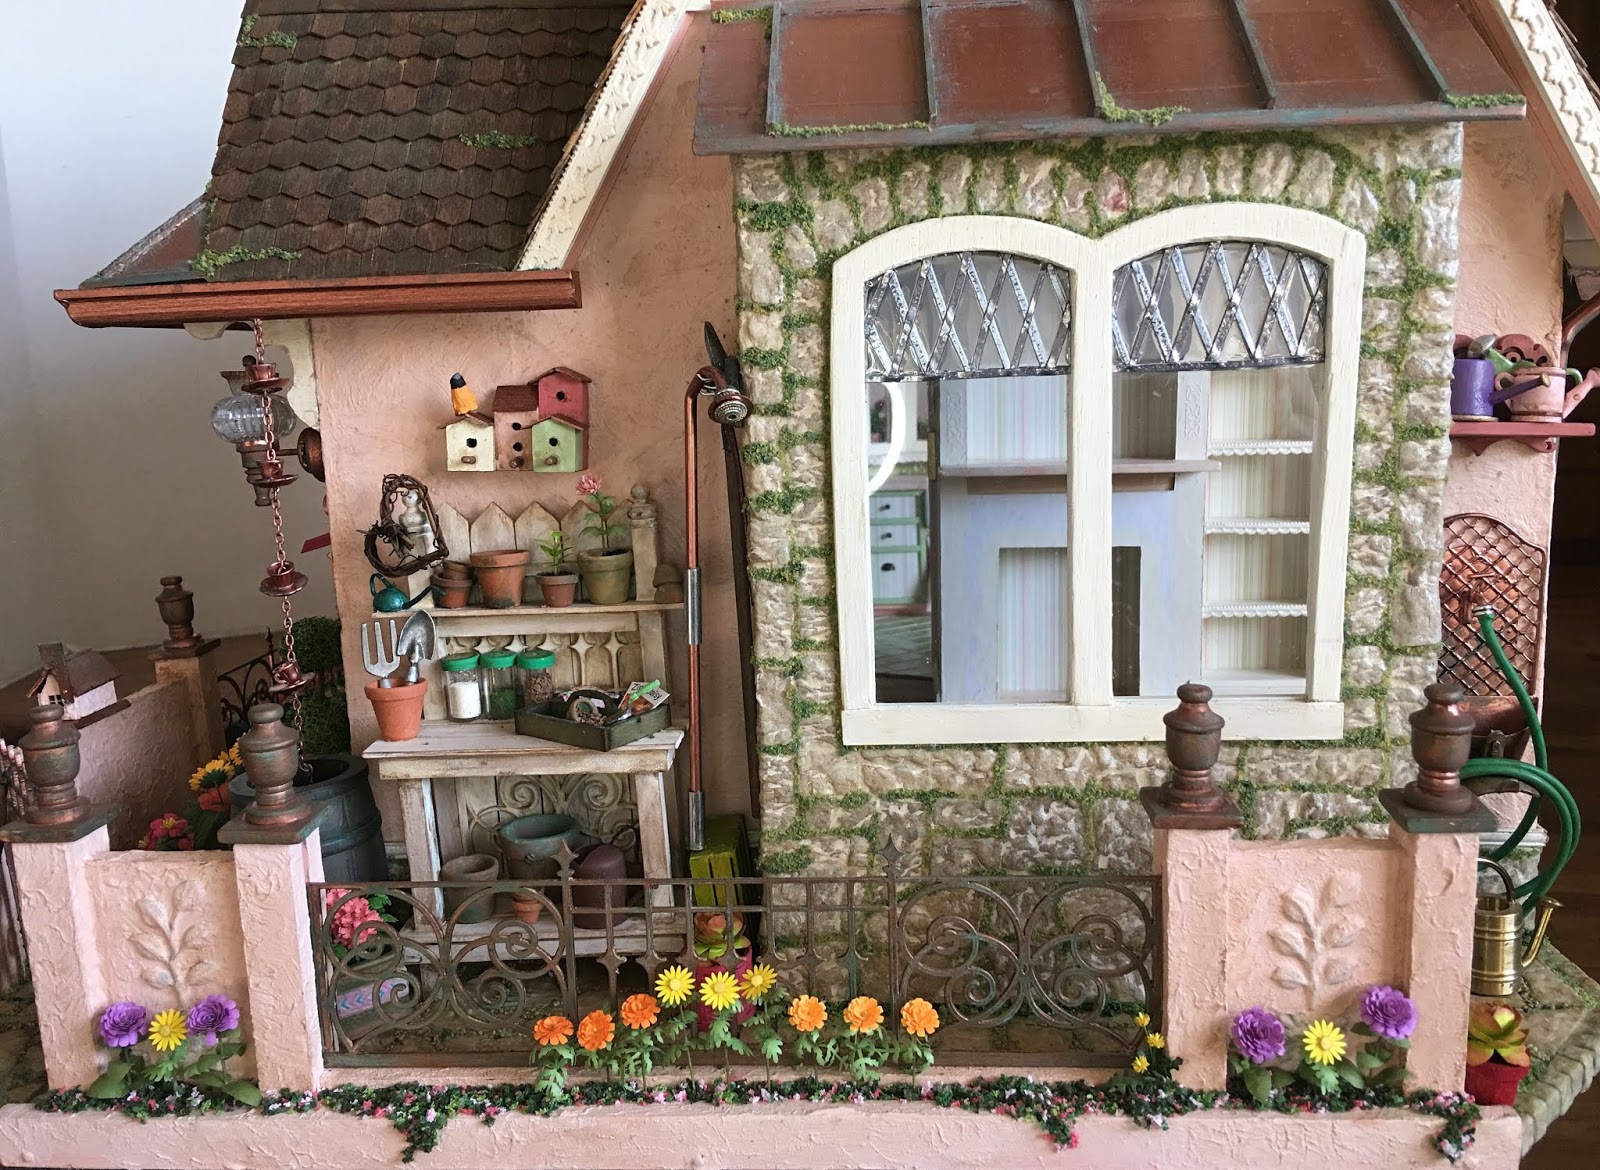
The gutters and downspouts have also been added...


On the Potting bench side of the cottage, I added a shelf with watering cans above the garden sink.


I also made additional flowers, took some of the leftovers, and made many more pots for the front step.


The front gate is decorated with Keli's favorite wreath.


My attempt at making tiny bees for the bee skep only resulted in my fingers becoming yellow, black and having wire stuck to them. I wanted to get these amazing bees on Etsy, but $12 each was a little more than my budget could justify. I settled for nail charms at 10 for $3. This way, I had enough to place a few on flowers, too. The birds got teacup feeders. They're not Barbara Meyer birds, because I forgot all about her wonderful birds until Keli reminded Sheila about them for her dovecote pigeons last week. Maybe I'll replace the Falcon birds with Barbara's in time.


I had a black wire hanging basket that I picked up at Aunty Em's in AZ. I painted it with copper leafing pen, lined the bottom with reindeer moss, squeezed in a Squeeze Me bush then planted some clematis flowers and leaves into it.


I had a little cottage kit from Michelle's Miniatures that was intended to make a purse. I think it makes a great mailbox! I added a knob instead of a handle, added a little working flag on the side, then used stucco and copper roof to simulate the cottage. I mounted it on a base to give it some detail. I just love to add cute little details like this to my miniatures. It makes me feel like a kid again!


Of course I had to plant the flowers on the inside fence planters before I could get them installed on the landscape base. I used up a good deal of the flowers I had left, I used purple coneflower, cosmos, daylilies and ground cover. I hope you're not allergic to bee stings!


With the inside planters finished, I was able to attach all three fence sections, then plant the exteriors. I ran out of flowers and had to stop and make more!!! Zinnias, marigold and more daisies. My flower kit supplies are now pathetic! :/ All I have left are red flowers! I did not want any red in this garden. Red does not like to share the limelight!


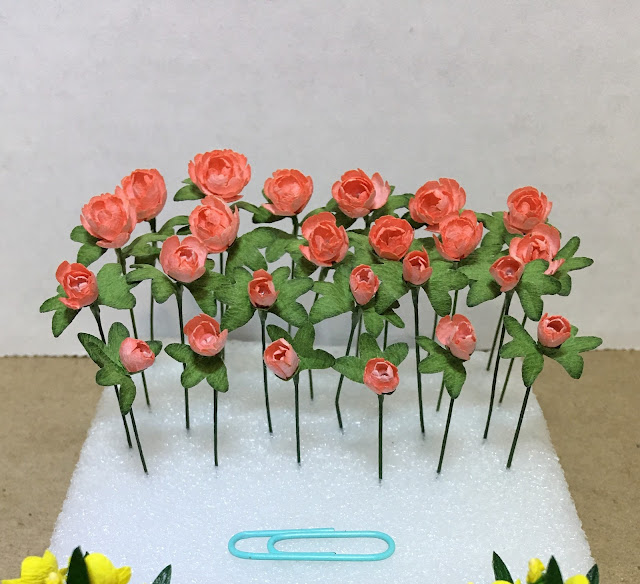
I kept a count of the number of flower stems I made, and it's a little insane. Hey - my blog is all about my miniature madness, so I do give you fair warning!

55 Coneflower
59 Aster
26 Black Eyed Susan
27 Ageratum
18 Dandelion
51 Geranium (plus 140 leaf stems)
16 Daylily
24 Dahlia
41 Daisies
15 Chamomile
9 Lemon Balm
9 Spearmint
9 Peppermint
10 Bee Balm
12 Lavender
12 Rugosa Roses
7 St. John's Wart
34 Cosmos
72 Roses
12 Mums
144 Camellias
18 Zinnias
9 Tulips
18 Marigold
24 Clematis

Grand total? 734!!!

After the exterior fences were finished, I affixed the rose arbor. My grapevine tree trunks did not want to play nice and get into their pots without lifting the arbor up off the ground. So, to solve this problem, I cut them off just above the height of the pots and made rose tree trunks out of air dry clay. They looked okay, and I could have done a much better job it I wasn't having to work over the top of the fence and around the back of the arbor. But as usual, problems are really just opportunities in disguise, so I had a little fun with camouflage.


Using a couple teapots that were just too large for 1/12th scale, I covered them in glue, then in fine ground cover to made topiary out of them. I glued them to the top of some more grapevine and added another Squeeze Me bush below. Now the rose tree will share a pot with the teapot topiary!


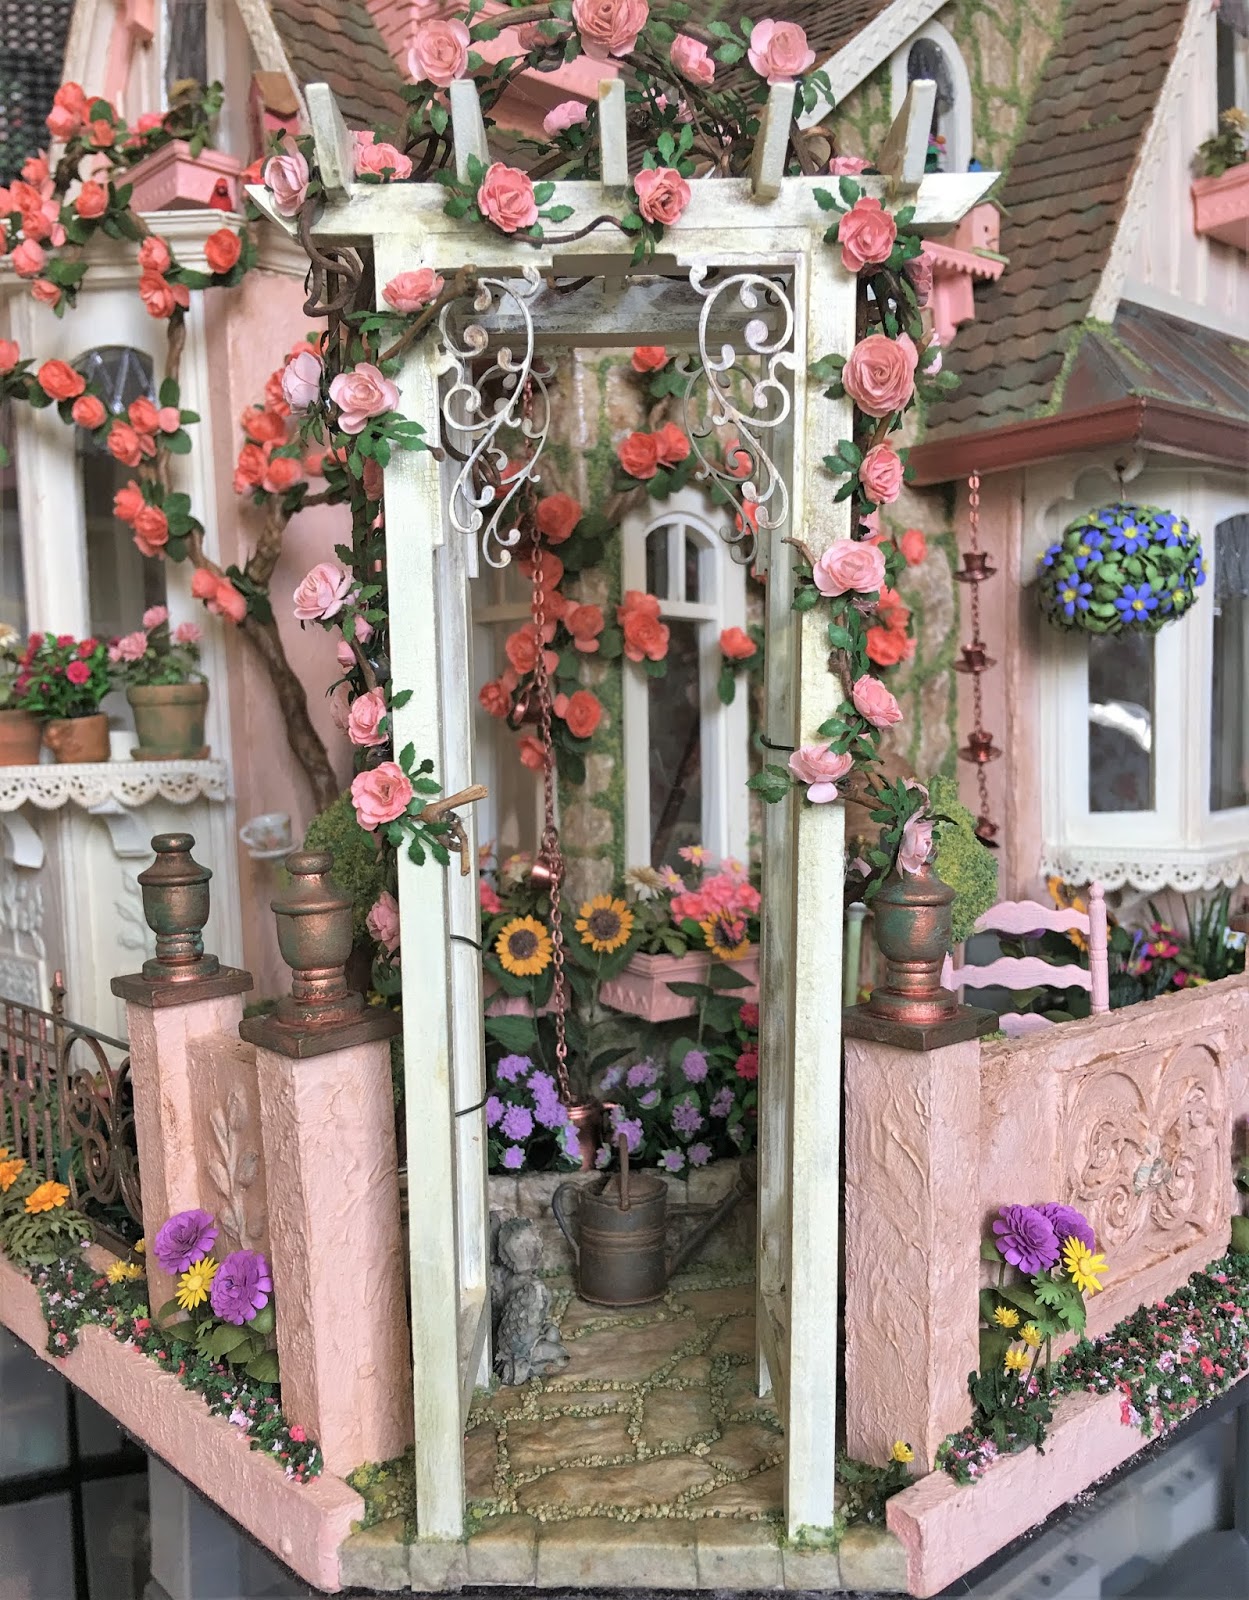
There was just enough room left to squeeze in a chair and a couple more pots, and still be able to walk down the path..


And so, my friends, the Olympic flower making saga has come to the end! Now I think I'll sit in the garden, smell the fragrant air, and nap for a while...


I thank you all so much for your encouragement as we moved through this epic journey together! For without you, your comments, suggestions and friendship, the cottage would have sat upon an empty lot!

xo xo,
Jodi

P.S. You know what this means, don't you? We get to move onto the inside!!! Yippee!!!

Sunday, March 20, 2022

How Much Is Enough?

How much is enough? Though I've been making flowers for weeks, it feels like my progress is slow. So slow that I wonder if I’ll have to adjust my Easter deadline. And, at the same time, I’m enjoying the process so much that I don’t ever want it to end. Truly, I’m just feeling so grateful that I’m allowed to bask in this glorious pleasure. At some point soon, there are household chores that won’t be delayed any longer. There again, I’m so grateful to be married to a guy who values a joyful soul more than a clean floor. :O)


This past two weeks (since my last post) I have embarked on several new flower varieties, though I stayed within the purple, orange, yellow and pink colorways. First were the lilies made from an SDK Miniatures kit


It was fascinating to see all of the color combinations that lilies come in. I settled on orange, purple and pink using alcohol ink markers and a blender by Windsor & Newton. When it came to the pink ones, I departed from the inspiration photo so that I could experiment a little. The flowers in the back are carnation kits by SDK Miniatures.


Next up were peonies from a kit by SDK. Here I used Ranger Alcohol Ink in shell pink, though the color comes out a very pretty and vibrant coral color on the kit's silk paper. I gave some of the blooms more petals than others to replicate the various growing stages.


These glorious roses were made from an SDK kit commemorating N.A.M.E.'s 50th anniversary. They came with a pretty square, opaque vase and a yellow ribbon. Yellow roses represent friendship, so this was a perfect color for my project. Trying to vein the leaves was tedious, so I opted to apply veins with a straight edge tool and ink pad.


These gladiolus kits took a lot of steps and patience to accomplish, but I really did enjoy the process. I just took my time and tried to work on them when I was in a peaceful and grateful state of mind. I wanted the choice to put them in vases and/or pots, so only attached one set of leaves to the flower stalks and left the rest of the leaves on their own floral wires as the instructions say. I love that there are buds and full flowers in all stages.


We went to Tasha's new house for dinner last weekend. She is in a rural, country setting, so from the freeway to her house there are many farms. I was delighted to see grazing fields full of daffodils! Spring is really here! Do cows eat daffodils? If so, they must love this time of year, too! Mine are a little bright, so before I place them in front of the shops, I think I'll dust them with a little brown artists chalk dust. The daffodil kit by SDK does not include buds, but it's easy enough to make them up as you complete the kit's steps.

I guess I should probably state here that SDK has not paid me or provided me with anything to promote their kits. I just enjoy them a lot. :O)


For the greenery that I need for the bouquet vases, I made up some eucalyptus branches from an SDK kit. I also made the lilac kit and made extra leaf stems for greenery - there are plenty extra! To color the leaves I used Ranger Alcohol inks. They come in various shades of green, and can be mixed and blended with their blending solution. It gives the leaves amazing shading and depth!


Mary Kinloch sometimes has rejects in her eBay store. They are the laser cut sheets where something went wrong and all are not perfect but many are still usable. I bought this daisy sheet for $2 and had enough passable petals to make thirteen daisies. I used leftover leaves from a Bonnie Lavish daisy kit. They will make great filler flowers.


I wanted to put a hanging basket out in front of each store. I had a couple cheap unfinished hanging baskets in my stash, so I stained them and then filled them with Paperclay. I covered the surface with glue, then sprinkled "dirt" on top. The SDK kits come with dirt, and there is always extra. I save it and never run out, but you can use scenic dirt, as well. I then applied glue in between the slats and applied reindeer moss over it. Once the glue was dry, I gave it a haircut. A moss covered hanging basket.


To fill the basket, I used an SDK Fuchsia kit. I thought I would have enough to make both baskets, but because I wanted a really full basket, I made one complete basket first. Turns out I did not quite have enough flowers and buds to make two baskets. There are plenty of extra leaves, though, so I will go with another idea for the second basket. It will be fun to figure out a solution!


I left the back of the basket flat so that the petals wouldn't interfere with the wall.


I'd like to believe that I have enough flowers to fill the shops -  seventeen different varieties! Some will go in vases, some will go in pots, and some will fill buckets with single color/variety stems. That process begins next, right after I publish this post, and will reveal the truth of the situation.


If it looks like I am falling short, I have the materials I need to make up topiaries, herb and plant pots, or I can just add some more décor type junk. In any case, it will be a fun and fulfilling endeavor!

I hope spring has brought fun and fulfilling endeavors to your doors, too! And to my friends in the southern hemisphere who are heading into fall... I hope the change of seasons is a welcome relief for you, as well!

xo xo,
Jodi