I'm not sure if this has ever been done in miniature home building, but what you are about to see attempted is the creation of a Trunkhouse. It's like a townhouse, in that the rooms are stacked on top of one another. But this one will be inside the "trunk" of a "tree". The "trunk" is actually a concrete form tube, known in the construction biz as a "Sonotube". These cardboard tubes are coated with a moisture barrier inside, and are ready made for concreting things like wooden fence posts into the ground. They come in various circumferences. My 10" tube is actually 9-1/4" of what I hope will become suitable living space for a very special Fairy Beary Godmother and her pet dragon.
 |
| 48" of heavy duty, moisture barrier coated, cardboard tubing. |
 |
| Intended purpose of a Sonotube |
Here's the rough idea, very elementarily demonstrated by combining generic graphics. Imagine the Sonotube becomes a Trunkhouse, like a Townhouse, only it's the trunk of a Treehouse.
Are you picking up what I'm putting down? Great! Let's move on...
Because my tube was 48" tall and I needed only 33" (three 9" tall rooms and a 6" base at the bottom to accommodate roots), I needed to cut 15" off. Have you ever tried to mark and cut a tube? Well, let me tell ya - it's tricky!!! The best way I could come up with was to hang my tape measure from the top, then mark the tube at 33" at many places around the tube. To connect the marks, I taped my fabric measuring tape just below each mark. I used the top edge to draw my lines around the tube. Then I rechecked my drawn line, just to be sure. Because the tube and lettering are constructed in a wrapped diagonal, my eyes didn't believe my brain! The method seemed to work and I employed it again to mark where each floor/ceiling would land.
I made note of the circumference in case I needed to know later on. 31"!
Once I had the length cut and the floors marked, I could create the openings. I wanted something large enough to be able to reach inside to finish the rooms. And to be able to see inside well. But I also knew I'd need to preserve some wall space. I made a cardboard pattern, then traced around it in between floors.
It took a little patience, but eventually, all three openings were finished.
In the interest of creating more trunk details and a little extra room, I decided to attempt to utilize the 15" of leftover Sonotube. I reasoned that if I cut it in half lengthwise, I could make smaller rooms that connected to the main room which would provide additional living space.
But this cardboard is extremely stubborn! It needed to be coerced into bending at a more severe degree. I was able to persuade it with some wood strips and lots of wood glue!
Once the strips had had a chance to set up well, I figured I'd better cut the openings into the room additions.
 |
| This is upside down, of course! Easier to reach! |
I wrestled the half tube in between the wood strips, glued them and taped them like an engineer. Luckily, this will all be covered in bark at some point, so there is no use trying to score extra points for neatness!
Once the gobs of wood glue had dried enough, I finally got a look at it upright. Like me, you'll have to do your best to imagine it clad in chunky bark and branches.
Russ asked me what type of base I was going to use. I told him it would be plywood, about the same size as the dollhouse. That should make for a stable and balanced diorama. He suggested that I glue a piece of plywood into the bottom of the Sonotube so that the base could be screwed up through it. A plug of sorts and much more secure with screws than glue alone. Great idea, Russ! Thanks!
I traced and cut the "plug" with my scroll saw, but when Russ saw that it was only 1/4" plywood, he said I should use 1/2" or 3/4" plywood. I told him I used what I had and what I had tools capable of cutting with. He chuckled like he always does at my "mini tools". Then he offered to cut a sturdier "plug" for me. Thanks once more, Russ! I will use my wimpy 1/4" plywood plug for the ceiling that connects the trunk to the treehouse.
I also cut and laminated the floors/ceilings out of two layers of very inexpensive chipboard. Because of the curved walls, I will likely create the floor bracing and the baseboards from cereal box cardboard. But before floor/ceiling installation, I should probably decide on windows/doors and cut the openings. I pulled a few things out of my stash, but will probably end up making custom windows with the Cricut. Bending chipboard to form around the curved walls will be much easier than bending wood, though I can create a few pop out boxes too.
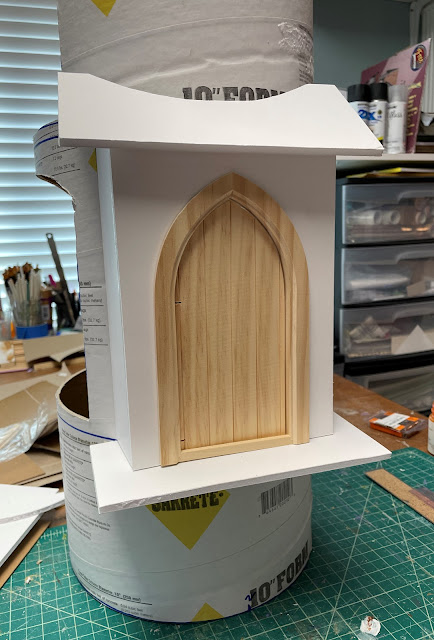
While the glue was setting up on the pop out trunk section, I had time to work on the front door. I'd picked up this door at Auntie Em's in Glendale AZ in 2017. I'd always envisioned it becoming a fairy house door, and now I actually have the perfect project to use it in! Getting the curve right for the enclosure and the shed roof was a bit of trial and error. Luckily, since I'm using foam board, it is easier to make adjustments than it would have been with wood. I'd really like to cut a window into the door, and to finish it while I can move it around, so for now, it will remain temporarily in place just for photos.
Here it is placed at the height that it will actually sit on the trunk. I imagine some stairs leading up, but my ideas are sure to evolve as I begin to incorporate the tree's roots.
I thought it might be nice for Roz to have a small balcony off her bedroom. Because wall space is at a premium, I decided on a single door. The door was a leftover from a previous kit - I just had to recreate a frame and drill holes for the hinge pins. I'll decide on railing details when I get to the exterior finishing.
The trunk's character is beginning to take shape, and that will help a lot in deciding on windows and their placement. Then, I can get those openings cut out, too!
I'm having a design meeting with Roz soon, and I think she's going to feel like the trunkhouse is off to a good start. I have exciting ideas for some interesting interior features, and I bet she'll agree! Hopefully, this addendum trunkhouse to the fairytale treehouse project will be fun for you to follow along with, too. Maybe it will even inspire you to make your own fantasy project!
Back soon with progress...
xo xo,
Jodi


