Search My Blog!
Use the Search box below to find keywords that you're looking for quickly and easily!
Search Feature
Wednesday, June 5, 2019
Feeling Grand!
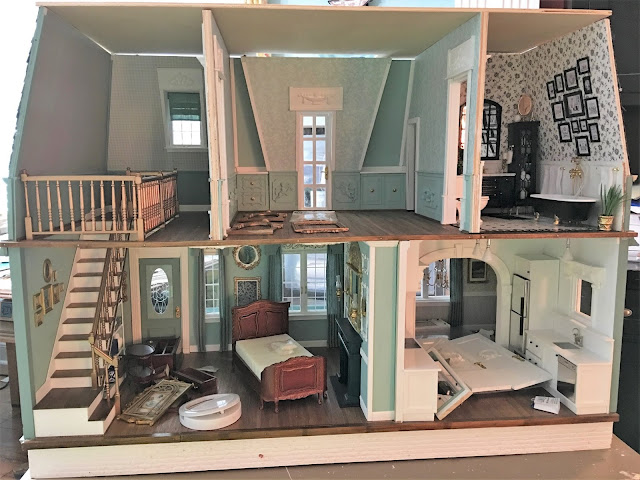
Before I got the doors installed last week, I had a real mess on my hands! The New Orleans was looking like a dumping ground for all the things I had yet to figure out and install. I needed to get the ceiling/roof out for a dry fit to see how things were going to line up. Adding three inches to the interior and exterior mansard walls made getting a perfect fit a challenge!
What I ended up doing was adding 1/8" strips to the tops of all of the walls. Except the interior bedroom/bathroom and bathroom/closet walls, as they had somehow ended up being higher by that much. Once they were all evened out, I attached the crown molding to the walls, before I attached the roof. This seemed easier than reaching in. Because of the angled mansard walls, I "cheated" and used square blocks in the corners rather than having to miter and cut complicated angles. I added the ceiling paper to the ceiling before gluing and nailing it to the house permanently. Then the house went on it's head for the ceiling work. I still had gaps here and there, so I filled them in with wood glue before playing with the ceiling designs.
I had several options at my disposal, so I played around with some layouts. I ended up changing my mind several times.
For the bathroom, I wanted to keep it pretty simple by using just a ceiling rose and some corner brackets. I ended up building a frame around the brackets just to give it a little extra detail.
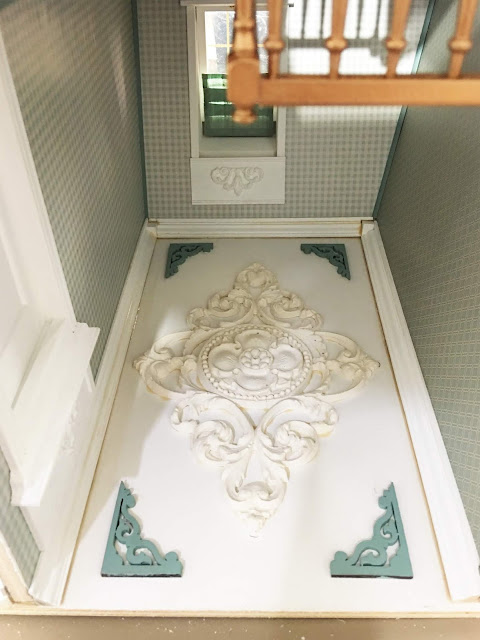
In the stairwell hall, I had a fancy Unique Miniatures ceiling piece, so I just added some JMG laser cut swan brackets to the corners. To get them all perfectly aligned, I used a couple pieces of 5/8" scrap wood glued into an "L" jig. This way, I could line the jig up against the molding and place the bracket into the jig to glue. Because the Unique Miniatures pieces do not lay perfectly flat, I had to use more wood glue to caulk the cracks.
My original plan for the bedroom ceiling was more dramatic. The oval Unique Miniatures piece I had turned out to be a little more egg shaped, and having more surrounding detail seemed to draw attention to the mis-shape. So I opted to create a shallow tray ceiling with 1/2" x 1/16" strip wood and keep to a simpler design. I really like the center resin frame - it is a perfect piece and the detail is lovely.
Once I had the ceilings painted with white chalk paint, it was time to add the lighting! Installing the delicate bi-pin bulbs on the Houseworks chandelier, testing the lights, cutting down the chain to the proper length and gluing the fixtures to the ceiling was nerve wracking!
But with a lot of patience and praying, all went well!
I'm thanking my lucky stars that this part went so smoothly, but I'm not in the clear just yet. I've got two led spot lights to add to each room which means back on her head she goes while I try to carefully drill the holes. Makes me sweat just thinking about it! But while I am sweating, I am also so grateful that this long neglected project has all it's structural pieces in place! I can see the end now, and because the challenges have been so big, the satisfaction is equally as grand!
xo xo,
Jodi
Thursday, May 30, 2019
Wrapping Up A Few Loose Ends
Several weeks ago I said I would share my idea for getting rid of those unrealistically intrusive thresholds that come on dollhouse doors, if the idea worked out. It was in the post where I'd remodeled some Houseworks Victorian Glazed Doors, adding wood panels where the glass used to be and making them taller for the larger doorways. I am so relieved to report that the idea worked and the hall/bedroom and bedroom/bathroom doors are in!
And they function just like I was hoping they would! Here's how I did them...
Make the hinge pin hole open to the front of the jamb so that the door can be slid into place through the front rather than having to be fed up through the bottom.
Cut a trim piece to cover over the hole after the door has been installed. I used 1/8" x 1/16" and cut it to cover the entire length of the jamb..
Measure where the bottom hinge pin will need to be in relation to the jamb (distance away and centered), then make a hole. I used a pilot hole punch, then pushed in the hinge pin with pliers until I reached the depth I wanted. Mark with a Sharpie where the floor meets the pin so you know how far you'll need to seat it into the door.
Remove the hinge pin head (I used wire cutters) and with a small dab of wood glue, insert it into the bottom of the door to the depth you have marked. Do the same for the top hinge pin and insert into the top of the door.
Angle the bottom pin into the hole in the floor, then work the door up and slide the top pin into the jamb opening you made.
Ta-da! Working doors with a realistic transition from one room to the next! Now they just need a little touch up paint, then I'll be ready to tackle the ceilings!
And the other loose end... The D.I.Y. Chocolate shop...
I took the scrap wood to the scroll saw and cut an approximate cash register shape that I'd drawn on the wood.
A sticker for the back and there is is! A homespun cash register in half scale!
I am just about as finished with it as I want it to be. I thought it would be fun to take it's photo inside the New Orleans bedroom for scale.
I might add a flower box, and I still have to finish up the wiring.
Since I am finally wrapping up a few things, maybe I'll even get back to the Storybook Cottage! It's so close, and it's the perfect time of year to spray the furniture! My work area is clean, so it feels like anything is possible!
xo xo,
Jodi
And they function just like I was hoping they would! Here's how I did them...
Make the hinge pin hole open to the front of the jamb so that the door can be slid into place through the front rather than having to be fed up through the bottom.
Cut a trim piece to cover over the hole after the door has been installed. I used 1/8" x 1/16" and cut it to cover the entire length of the jamb..
Measure where the bottom hinge pin will need to be in relation to the jamb (distance away and centered), then make a hole. I used a pilot hole punch, then pushed in the hinge pin with pliers until I reached the depth I wanted. Mark with a Sharpie where the floor meets the pin so you know how far you'll need to seat it into the door.
Remove the hinge pin head (I used wire cutters) and with a small dab of wood glue, insert it into the bottom of the door to the depth you have marked. Do the same for the top hinge pin and insert into the top of the door.
Angle the bottom pin into the hole in the floor, then work the door up and slide the top pin into the jamb opening you made.
Glue the trim piece over the top of the jamb.
Ta-da! Working doors with a realistic transition from one room to the next! Now they just need a little touch up paint, then I'll be ready to tackle the ceilings!
And the other loose end... The D.I.Y. Chocolate shop...
I took the scrap wood to the scroll saw and cut an approximate cash register shape that I'd drawn on the wood.
Made sure the scale was about right, then sanded and sanded...
Added a little paint and some buttons...
A sticker for the back and there is is! A homespun cash register in half scale!
I might add a flower box, and I still have to finish up the wiring.
The dust cover is drying now.
Since I am finally wrapping up a few things, maybe I'll even get back to the Storybook Cottage! It's so close, and it's the perfect time of year to spray the furniture! My work area is clean, so it feels like anything is possible!
xo xo,
Jodi
Subscribe to:
Comments (Atom)


