Search My Blog!

Use the Search box below to find keywords that you're looking for quickly and easily!

Search Feature

Thursday, May 17, 2018

Storybook Dreaming and Doing

I decided while I had the cabinet building fresh in my mind, I better continue getting the built in stuff made.

To refresh your memory, here's what I am working with in the Storybook's layout...


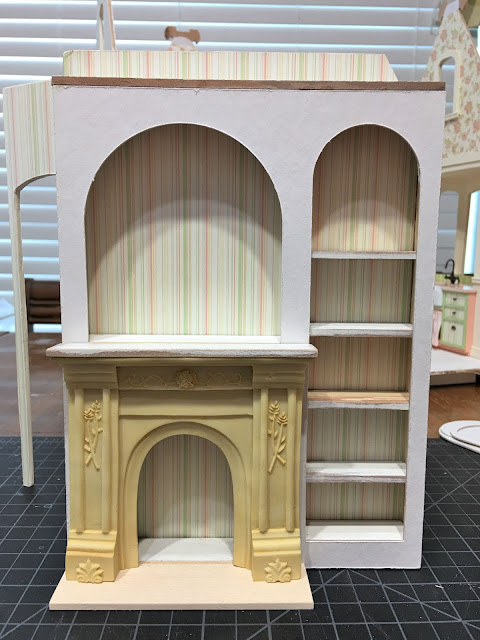
I bought the resin fireplace because of it's detail and super slender 5/8" depth, knowing I'd build a breast for it to sit in front of.


I wanted a built in bookshelf next to the fireplace, so I got out the graph paper again and drew the concept I'd been mulling in my mind. Then, I employed the Cricut Design Space again to help me get the arched openings right.


I made the side and center supports, top and shelves out of 3/4" basswood, then made a hearth and mantle top.


The hearth and mantle got the same "stone" treatment as the kitchen countertops, but in softer shades of vintage white, cameo blush and sandstone.


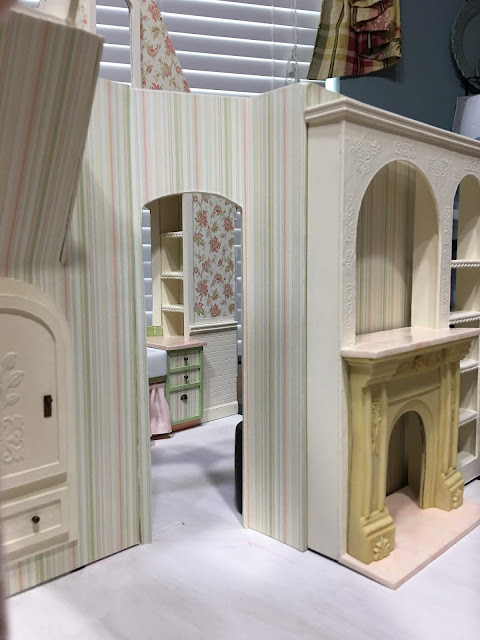
I added more dimensional stickers and moldings before I painted it vintage white. If you notice in the firebox, you can still see the striped wallpaper. That's because my little lady doesn't like messy wood or coal. She wanted to keep the fireplace and the cottage feel, but we are going to be placing a radiator in the recess. Still warm, no mess! :O)


If you notice in the background of the above photo, you can see the "built in" cupboard with drawer under the stairs. For these elements, I also employed the Cricut. To make them more interesting, I added some metal embellishments, another dimensional sticker and more aged bronze hardware including the half scale door plate and knob. You may notice that most everything, built ins and trim, will be vintage white. All the wallpaper is colorful enough!


The window seat got backrest and sides, then a few coats of paint. Can't wait to make the butt cushion, pillows and baskets for the cubbies!


Next I moved upstairs to the landing where both Sheila and Keli suggested I make a built in window seat. To make this one, I did it the old fashioned way with wood and lots of swearing - no, just kidding. Once I made a template to get the right angles, then drew out the design, it went very quick and easy.


During construction I checked it against the pattern several times to make sure it wasn't going awry. Like my hillbilly scaffolding? It was easier to glue against a brace on one side then add the angled end panels last. To keep it tied into the rest of the built ins, I added lace shelf edging, dimensional stickers, crown/cornice trim and aged bronze hardware, then painted it vintage white.


I did another partial dry fit of the upstairs to make sure it all fit. I like it - thanks for the suggestion ladies! More butt cushions and pillows on the way!


I added some trim and a little shelf to the weird little recess created from the stairs in the dining room - something small can sit on the shelf with a framed picture behind it.


I also started on a shelf for across the front wall. This is as far as I got because I am not 100% sure about the size of those brackets, and, I just need a little break from painting.


Once I had the ceiling over the rooms, I got excited. I just love the feel that is happening here.


So much nicer than what it looks like with my harsh overhead lights...


I don't anticipate making any built ins for the bedroom - just the bed that came with the kit and a couple furniture kits I've had saved away for a while now. I am not solid on any ideas for how to outfit the bathroom yet, so I can't do anything in there. In other words, who knows what I will do with my mini time next week. This weekend both my house and my husband will get all of my attention, leaving time to mull it over.

Hope your weekend is full of dreaming and doing!

xo xo,
Jodi

Tuesday, May 15, 2018

Vanity Fair

I guess announcing that the last five vanities are up for auction on eBay is itself a form of vanity. Something to ponder...

Nevertheless, they are, and once these are gone, I expect I won't make any for sale again. It's been interesting, fun, educational, but sooooo much work!

These are the last five:


There are lots more photos of each in the listings, bidding started at $.99, and here is the link:

https://www.ebay.com/sch/tiny-little-smithy/m.html?item=123127334452&ssPageName=STRK%3AMESELX%3AIT&rt=nc&_trksid=p2047675.l2562


Meanwhile, I'll leave you with a peek at what I decided to work on next for the Storybook...


Back in a couple of days with a real post! :O)

xo xo
Jodi

Thursday, May 10, 2018

Storybook Kitchen Cabinets

This week's Storybook tale is all about kitchen cabinets. When you're working in a dollhouse, especially one with unusual spaces to fill, you often have to make your own. As is turns out, I really enjoyed the process, and I love the feeling they've created in the kitchen!


This wall, the one that divides the kitchen from the living room, is one I added to the kit to create the separate rooms. The return is not very deep, and the angled door opening created some space challenges. When I drew out the plan for both the upper and lower cabinets, my measurements had to be spot on.


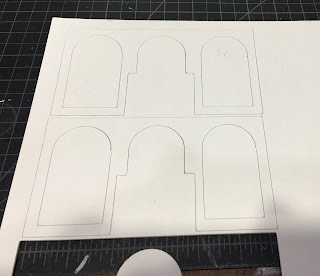
To make the arched cabinet fronts, I employed the Cricut. I transferred my upper cabinet measurements into the Design Space using a solid rectangle, then using smaller rectangles connected to circles, I sliced out the openings. I cut three sets out of 1/16" chipboard.


Making the box with the shelves was pretty straightforward. I carved a set of three drawers out of laminated 1/2" scrap wood for the bottom of the left and right cupboards. Then, using 1/8" x 1/8" basswood strip and fancy toothpicks, I made a plate rack for the lower center section.


I added beadboard, wallpaper, lace edging, textured vine stickers and crown molding to give them a real cottage feel. I did consider doors with glass, but quickly decided open cabinets were the way to go for this build.


Next were the lower cabinets. Like the built in sink cabinet, I did not want functioning drawers or doors. Just simple boxes with a toe kick, wallpaper fronts edged in 1/8" x 1/16" trim to suggest drawers/doors, aged bronze hardware, and the same "stone" countertops as the sink cabinet.


The end wall in the kitchen was a challenge as there is only 3-1/2" of usable space, and that is where the fridge will go. Since the fridge is 2" wide, only an upper cabinet was going to work. I modeled it after the other upper cabinet unit, but added crown molding to the bottom instead of more drawers.


I bought the Phoenix Models gas stove and fridge kits for another project, but thought they would be wonderful in the Storybook. They are compact and perfect for a kitchen where space is at a premium. Actually putting them together is going to be interesting. Apparently, you use quick set epoxy, and the stove has a million pieces! Figuring out what to paint in what colors and what to paint before and after assembly is certainly going to challenge my brain!


There are lots of decorating opportunities for such a small space, and with the large kitchen windows, being able to view them should be easy.


Here is the kitchen with cabinets in dry fit. I am loving the layout and the amount of floor space. I may even have room for a small prep table in the center!


Now that the foundation pieces for the kitchen are planned or finished, I have to decide whether to assemble the appliances or continue into the living and dining rooms with built ins. I have several days to mull it over, as Mother's Day weekend is FULL of family activities. Which, if I am lucky, may include a trip up to CJN Miniatures in Edmonds, WA. Fingers crossed!

And to every nurturer, whether you've give birth or not, whatever your chromosomes, ~Happy Mothers Day~! I hope the love you've given to anyone comes back to you seven fold!

xo xo,
Jodi