Search My Blog!

Use the Search box below to find keywords that you're looking for quickly and easily!

Search Feature

Friday, October 16, 2015

No One Around Here Is Flawless

I am finding that as I get older, it's a lot easier to be honest with myself, and to actually accept that I have a few character flaws. Some of them I really need to work on, and some of them I am really okay with.

One of the things I am okay with admitting is that I am either completely board with something, or completely obsessed with it. Enter 3D modeling and printing...

I was watching the first season of House Of Cards with my husband the other night (we are starting with the first season so we can binge watch the other seasons on a lazy, rainy weekend), and I kept noticing all of the incredible set decor. Things like lamps and headboards. Suddenly I am designing them in my head and not even paying attention to the show! Thank goodness for the rewind button!

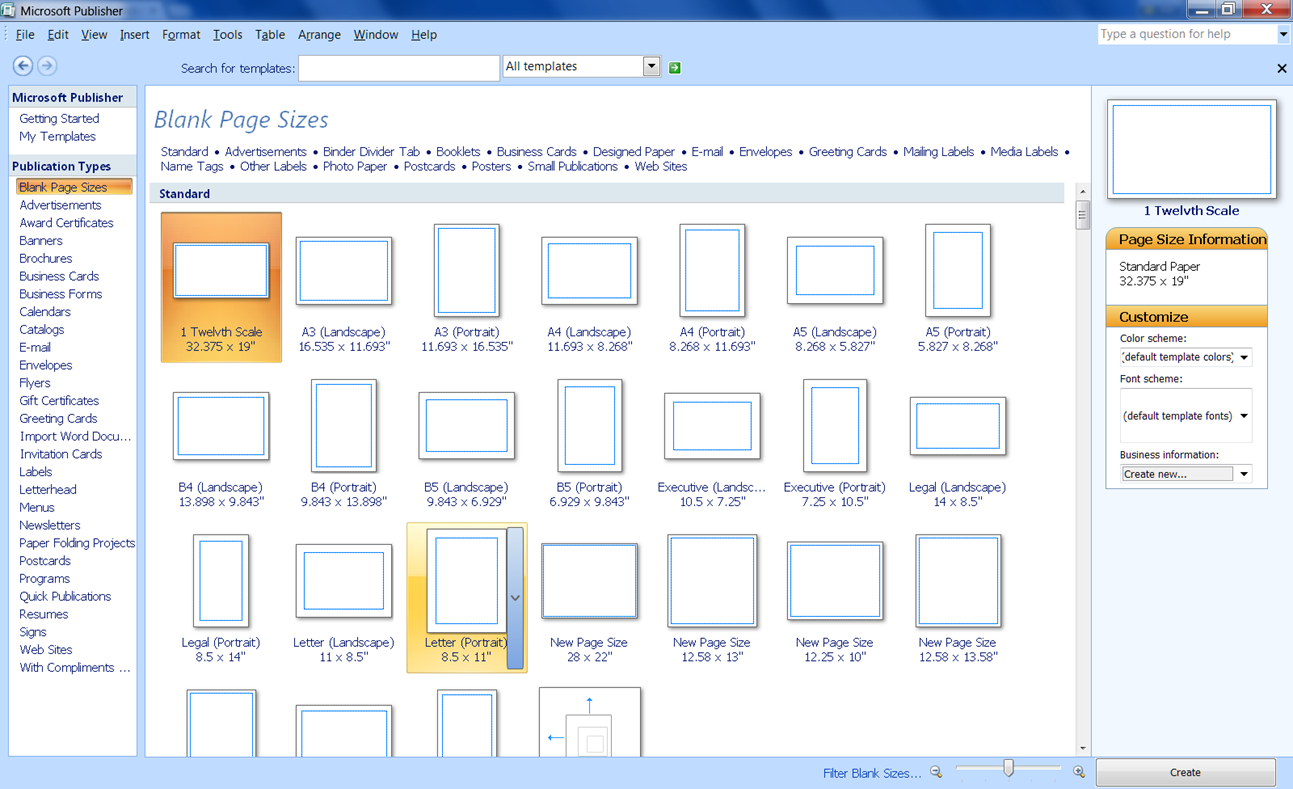
 I'd been watching quite a few tutorials on SkillShare lately. One was by Lauren Slowik from Shapeways. It was interesting, but the way she went about creating and uploading the image wasn't going to work for me. My subscription to PhotoShop has expired, and I am still really on the fence about committing again when I rarely ever use it. Anyway, to make a long story a bit shorter, I just signed up with TinkerCad (it's free) and started playing with shapes. I can design with shapes - I really don't need to do much sketching on paper, so this was perfect!

I started by Googling some real life sized lamp measurements, then converting them to 1:12 scale. Then I took some of the ideas in my head and quickly drew them on paper, just so I wouldn't forget. I converted the measurements to millimeters, then began to "doodle" in TinkerCad.

I just so happened to have a 1:12th lamp shade with a built in 12v standard bulb/socket holder. It was easy to use the dimensions in my lamp and base designs. They should perfectly cradle the bulbs and support the shades. I made all of the bases hollow and made cord exits on the bases. I have finished a couple lamps so far, and I have drawings for a couple more. Once I am finished, I'll order them and see it they actually do work the way I planned! If so, maybe I'll try a couple headboards!


See! Obsessed with 3D printing! Meanwhile, the barn sits among my messes on the dining room table, just waiting until I am no longer board with it. As soon as I am not, I will become obsessed with it again.


Oh! By the way... I went and retrieved Enoch. He was hiding behind some trees waiting for campfire stories to begin. I talked him into letting me repair his loose leg. Poor guy! That must have hurt!

While he was recovering, he and Gerdy chatted up a storm. They have become fast friends, and Enoch agreed to carry her wherever she needs to go. Must be tough when arthritis sets in and you can't straighten your legs out any more.

I guess we all have some flaws.

Have a great weekend, everyone!


Tuesday, October 13, 2015

Workshop? Garage?

I've spent the last couple days working on little projects for the barn's workshop/garage. I'm still not too sure what to call it, because our real life garage functions in so many different ways. My husband would LOVE for it to NOT function as a storage space for the lawn mower and other gardening implements, but building a shed is probably #23 on the "home maintenance" priority list. That's another story, but for this 1:12th scale workshop/garage I made sure not to include any gardening stuff of any kind. Unless you count the chainsaw, but that's really more of a Jeep tool than a "garden" tool.

In true frugal fashion, I ordered a bunch of unfinished metal tools on eBay. This barn project has already cost $6,154.55! Not really, but you all know what I mean...

Unfinished metal can be a great option to help mitigate costs, but be aware of a few things:

1. Make sure to look at and imagine the measurements of the item in your scene. "Small" might not be small enough and vice versa.
2. Unfinished metal is, well, Unfinished! You'll possibly have to trim away excess sprue, file and sand a bit before painting/finishing.
3. Beware items that have small and not very well supported metal pieces. These often break off in shipping, and can't always be easily repaired. I had two iffy repairs to make. Hopefully, no one notices.

I wanted a lot of detail in mine, so I took the time to tape off areas that I did not want painted. My husband has a lot of black, red and blue handled tools, so those are the colors I chose.


I like to use spray paint on these items, because you get a much better finish and way less paint build up. Be sure to let them dry thoroughly, especially if you need to paint both sides of an item.


I had ordered some unfinished metal can and jug blanks, so they needed to be painted in the base color, then have labels added. I took a look around Russ' shelves and cupboards to see what he actually uses, then got images from Amazon.

To see a little label making tutorial, click here.


Here is what I've gotten finished on the workshop/garage so far. I have cans, boxes, sleeping bags, tents, coolers, signs, calendar, and many more little details to add, so I'll just update progress as I go. I also think that many of the items here are too clean. They need grime and greasy fingerprints added.

Printing Labels For Products

Lots of miniaturists know all about printing labels for their mini products, but some have no idea, and some have better ideas on which media to use for what effect. This post will give you what I know, and what I learn as we journey into the future!


Program I Use
I began using Publisher back in the late 90's and have stuck with using it for the majority of my printing projects. It is easy to use, and has all of the basic functions you need to get great labels. Most Microsoft Office Professional Suites now come standard with Publisher.

I start with a blank page that is the size and orientation of the paper I am printing to. Once you have the page in layout view in front of you, change the page margins to .25 on all four sides. >File/Page Setup/Margin Guides. You'll notice that the blue margin guides allow for more print space.

Be Prepaired
I am frugal, so I like to use up as much of the paper as I can in one print. For this reason, I decide what I need several steps ahead and make up a print list.

Have the measurements you need all figured out and written next to the item on your list.

If you have bottle/jar blanks, measure height. Write that down.

Then measure depth and width (remember all four sides). Add that number together. Add 1/16 to 1/8" extra to your depth+width number. Write that down.

How many do you need? Write it next to the measurements and circle it. This also helps to avoid forgetting something.

Just under each of the measurements, you are going to write the decimal conversion. You'll need this number soon.

Here are the decimal conversion charts I have used for years:

http://www.hamuniverse.com/antfrac.html

Or for figuring larger fractions over 1"

http://www.printmini.com/calc.html

(thank you to HamUniverse and Printmini!)

Make A Template

In Publisher, use the Auto Shape tool to draw a rectangle.


Once the rectangle has been drawn, right click and select Format Auto Shape, then click the Size tab.

Enter the decimals from your list for height and width. Click OK.

Now you know that the image file for that item must fit within that box. If so, and if you are a careful trimmer, your label will fit perfectly!

Here is a .pdf file to some boxes I have created. Feel free to use and share.


What To Print On
Glossy photo paper is the best product to use (imo) for a realistic looking label. There are a couple precautions, though. This paper is very thick and that can help or hurt your end product.

Use If - you are using a box pattern and are making the paper into the actual product packaging, this thickness will help you. The end box will be strong.

Use If - You can peel off the paper backing and have a thinner veneer to work with. This method is best for adhering to blanks and/or wood blanks you have made.


Don't use If - Your item needs a matte finish. In that case, use plain paper or cardstock.

What Adhesive To Use

Glossy Photo Paper
Yes - Tacky Glue (I use Fast Grab)
No - Modpodge. This will result in curling and no adhesion.

Cardstock or Plain Photo Paper
Yes - Mod Podge (matte or gloss) will give weight and add vibrancy.

As as this writing, I have not used a glue stick on either. I go for what I know, but am always interested in knowing more! Feel free to leave comments and I will update the post!