Search My Blog!

Use the Search box below to find keywords that you're looking for quickly and easily!

Search Feature

Showing posts with label Three Little Pigs: Revenge. Show all posts

Monday, November 21, 2016

2016 HBS Creatin' Contest Photos Submitted!

Greetings fellow mini makers!

My contest photos have been taken and submitted! Oh boy! This means that soon those of you who have been building in secret will show us the goods! How exciting! I hope that all of you are feeling good about the deadline and where you're at with your builds!


Now I must finish cleaning and organizing my work room, which is also my dining room, just in time to host 18 for Thanksgiving! I am certain to go through mini withdraw, especially since I have to wait until Saturday to start my Super Secret Mini Miniature Project! Shhh... Don't tell anyone!

I am so grateful, for family, for miniatures, for all of the billions of blessings and good things that make up my life each day, and especially for the friendships with kindred spirits that the blog and social media world have made possible!

I wish all of you a very Happy Thanksgiving, and hope you are enjoying this special time of year!

Jodi

Thursday, November 3, 2016

The End... Oh! And A New Beginning!

First, for the happy ending...
Bob, Joe and Sam are so happy to inhabit their new home!
I promised myself that I was going to GET MY LIST DONE TODAY! Well... You know how that goes. While you have the stuff out to finish up the last details you suddenly realize that a space needs this or you need to rearrange that. Instead of crossing off, you're adding to...

Front edge landscaping is finished!
But the good news is that I am (probably) finished except for final touch ups, adding the felt bottom, and setting up for contest photos! I decided to wait a couple weeks on the photo shoot just in case of any 3:00 AM epiphanies! I am bound to run across something I forgot.

Wolf Stew is just about ready to eat!
I know that all of you are probably tired of seeing any more of this project, so I promise these will be the last photos I share until after the contest deadline. Then I'll share the photo shoot photos and we'll put this one to bed!

Joe loves his well appointed and organized kitchen!
That cookbook sure came in handy!
Sam appreciates the nicely set table!
Bob is laughing at how ironic it is that "Hungry Like The Wolf" is playing on the radio right now!
Sam says come on in and grab a bowl!
But first check out my flowers! It's a cutting garden!
And now our little village saving heroes in their close ups:

Bob the brick house builder extraordinaire!
Then...
Joe - the culinarily creative!
Last but not least...
Sam, our clever cultivator!
Thank you all so much for sharing this incredibly fun process with me, and for all of your encouraging and lovely comments! 

And now for a new (or renewed) beginning...

This darling little gal has been sitting on the shelf behind my worktable, patiently awaiting for it to be her turn again. She was so gracious when I told her that she would be on hold while I participated in this year's Creatin' Contest. But now, she's back on the table!

Just look at her smile!
I had not forgotten her at all! In fact, over the last few weeks I've had my visions renewed of what she is to become and it is lovely! A frilly, girly, smelling fabulous and chic-ly shabby favorite soap shop!


Her bodice and roof are getting a makeover! The garden I am preparing for will be spectacular!


The interior will be a wonder for the eyes and heaven for the nose! Soap, lotion, shampoo, conditioner, body scrub, drawer sachets, candles, potpourri, and wonderful cards and gifts!


I'll be learning new skills and techniques in mold making & casting, polymer clay, sewing, fabric printing and making plain and shabby items chic!

I hope you'll come along and share the journey! I think it's going to be super fun!

Jodi

Tuesday, November 1, 2016

I Made Pillows!

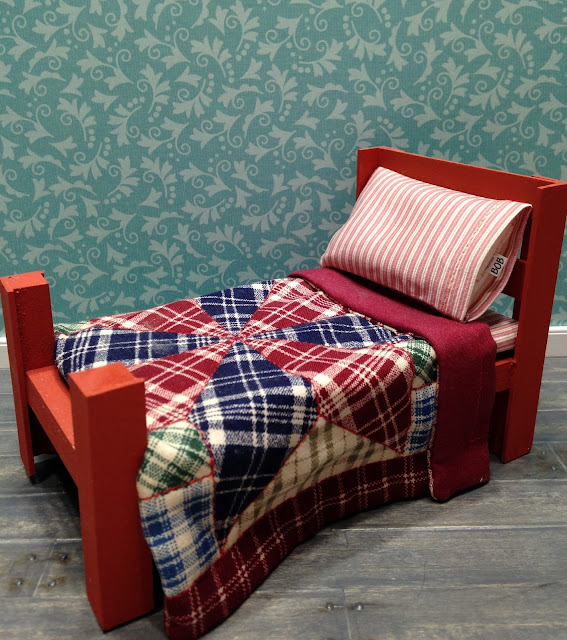
Sam loves his new pillow!

Last Saturday I finally unboxed the new sewing machine! One look at the 77 page instruction manual and about a dozen individual loose informational sheets and I knew that this was going to require some real concentration! I haven't really done any sewing on a machine since the early 90's, and even then I was really just a novice. My memory isn't all that great either, so this might as well have been my first time.

There are so many stitches and functions! It even sews letters!
With absolute silence in the room, I opened the manual and began to read it methodically. I did my best to absorb each word and understand the terms and the functions before moving on to the next section. I learned some new words (feed dogs) and had a few "aha" moments. It literally took me two full days  of reading and doing, but by Monday night I had the bobbin threaded, the needle threaded, and began to practice sewing on the pillow material.

I had to draw out a diagram to plan how I would sew the pillows, where they would fold, how much of a seam allowance to plan for, where the hand stitch opening would be, what size would work well for the beds etc... I thought having a real pillow inside of a pillowcase would be great, so I planned for both.


Once I had it on paper and felt comfortable with the plan, I cut the fabric. Before I sewed them, I wanted to incorporate name tags. This was probably the largest mental challenge; I'm sewing the pillows inside out, the tags need to be on the right finished side, and the label needs to face up. I really had to sit there for a long while and ponder all the angles! I kicked myself for not making the tags double sided!!! In the end, I figured it out correctly! My hand sewn ends could use more practice, but since they'll be hidden inside the pillowcase, I think they are great!

I used pink thread so that I could keep a good eye on my machine stitches as I went along.
 

A perfect fit for the bed!
After sewing and stuffing the pillows, I was feeling a little more confident with the pillowcases. Rather than just going by my planned measurements, I cut extra fabric and measured for length and width as I went along. It worked out really well! I love how they turned out!

Look at those stitches! Awesome, right!?!


The machine was a dream to use, and I will no longer be intimidated to make my own pillows! Hopefully, I'll be making lots of other great mini items myself, too! Making is the part I really love!

My to-do list is getting shorter and I expect to be finished up with this project by the end of next week. Then I can set up for the photos! In-between now and then, I am doing more on the organizational plan to my work space. More storage and a display shelf are happening this weekend! I'll post some photos when I get it all completed!

Have a great first week of November (OMG!, NOV?)! Anyone else in the mood for meatloaf!

Jodi

Friday, October 28, 2016

I Confess...

My last actual full working day was Monday. I should have more to show for the week, but honestly, I was pretty lazy...

Tuesday was a blur, and aside from emptying and refilling the dishwasher and feeding the puppies, I did nothing productive (except catch up on Game of Thrones, which I enjoyed very much).

When it came to the Creatin' Contest, I crossed old items off the list and created a new list. I farted around with it for a while yesterday, then on and off between loads of laundry and housekeeping today (I had groceries delivered - my life is so hard! :O>). When I looked at the list again, I was surprised that I got so little done. I enjoyed myself, so that's something...

The next bit is going to be a bit less organized than I usually try to be. I think all those long hours took a toll, and I'll need a couple weeks to restart the old brain again. Enough whining... Here I go...

I had to change the sandpaper on my sanding stick, so I thought for the sake of any newbies who happen by, I'd risk the redundancy of a little "how to" because learning about the sanding stick really helped me to become a much better sander.

Very briefly... You'll need:
  1. 2 different grits of sandpaper (I use 220 and 400)
  2. Double sided tape
  3. A stick, of course
  4. Scissors and/or Xacto knife

Cut the double sided tape to the length of your stick, peel the backing (only the stick side) and adhere.


Cut the sandpaper to cover the stick. Each piece should cover half of the stick. Cut the width so that it wraps to meet itself at the center of the back sides.


Peel off the top backing and carefully adhere the sandpapers.


Viola! Now you have a sturdy and flat surface to sand on that lasts a long time. No more rounded edges or uneven surfaces! So simple, but so handy. To the forgotten person who suggested this to me so long ago - a giant cosmic Thank You! I hope you just received good shivers!

Next up, I needed some throw rugs. I have some wonderful velour paper that has an adhesive backing. I bought mine on Amazon about a year ago and have not seen it in all white packs since. They do have multi-colored packs, but there are only 2 white sheets included. S.E.I does sell velvet non adhesive backed paper by the sheet in Coconut. Order at least a dozen to make it worth the $7.50 shipping. The service is excellent.

I found some rugs in colors I liked on www.rugs-direct.com. I made a kitchen runner, a round rug for under the table, an oval rug for the hearth (I think I need to print it a bit larger) and an inside and outside doormat.


 I let them dry overnight, cut them out, then colored the raw edges in coordinating Sharpie. 


Once I've done a "final" cleaning, I'll peel the backing off and adhere them down. Since this build will be displayed in a library, I am going to "nail" everything down.


This next section we'll call "How to make a NON GOOD LOOKING cherry pie because you have not done it in 14 years".

I started off with some light beige and translucent Sculpey, some Translucent Liquid Sculpey, some artists chalk and the leftover choke cherries from the previous canning. Oh! And a pie tin - duh!


To make the pie filling I added some Translucent Liquid Sculpey and chalk scrapings into a cup, then added in the cherries. Don't panic - the Translucent Liquid Sculpey does not actually become translucent until it is baked. Right at this stage it looks like Pepto Bismol. Not exactly a good association when expecting a cherry pie!


I mixed a tiny bit of the light beige into a large amount of translucent to make the pie crust. I flattened it out then set the pie tin up-side-down on top of it and cut around it with the Xacto.


You'll have to forgive me here, as I was more worried about messing up the pie than I was about showing you how (not) to do it. The photos are sparse.

I poured the filling into the tin and covered over it with the "crust". A little peek...


I rolled out a snake of pie crust and placed it along the edge of the tin, then made little pinch marks with a toothpick. What I failed to show here were the little "vent holes". I cut six of them, then used the remaining Translucent Liquid Sculpey to indicate oozed out filling.


Then I baked it, brushed the edges with brown chalk to give it a fresh baked crust, scraped some more cherry colored chalk into a bit of varnish and coated the top. Not beautiful, but passable in this setting. I obviously need some practice!!!


There are still several things "to do", and the one I hope to tackle this weekend are the bed pillows. I've had this new machine since July and have not even opened it yet! There it sits as if it's purpose was to be a pile holder! The nerve of me! 


Send good thoughts my way for the reawakened adventure into sewing. I'll make sure to practice on some scraps before I get out the good fabric!

And I'll leave you tonight with a beautiful fall shot of Mt. Rainier from the back yard. If October is any indication, I think the snow pack is going to be good this year!


Have a happy weekend, and don't forget to buy candy!

Jodi

Saturday, October 15, 2016

All Work And No Play...


Makes me a very cranky miniaturist! Therefore, this time in my bi-monthly work overload, I instituted staggered deadlines! It's been brilliant! Every 9 days or so I get 1 or 2 days off! I am at the end of the second day of play time, and while I will be back at the grindstone tomorrow, I managed to finish up quite a few items on the Creatin' Contest To-Do List!

First up, it felt like the kitchen area needed some more detail. I decided to reconfigure another Michael's hutch to make a small shelf for under the window. This involved popping the piece in the microwave for about 30 seconds. After each time in the micro, I would pull the parts off that I didn't want or that I wanted to reconfigure. For anyone who's new to softening glue with this technique, please make sure to remove any and all hinge pins before placing in the microwave. Also, only handle the hot piece using potholders or in my case an Ove-Glove. They work great!

Original hutch - removing the doors and metal hinge pins.

After the first 30 seconds in the micro, I separated the top and bottom.

I had to use a variety tools to saw off some curvy bits to make the bottom flush.

I popped it in the micro again to remove the shelves - there was not enough space between them to display what I had in mind.

I wanted to use the scrolly piece, but needed to cut it down a bit.

Scrolly bit and first shelf were ready for painting, gluing, filling and sanding.

I decided to stain the shelves and top, and use Georgia Clay on the rest to tie the piece to the other furniture in the build.
Once everything for the shelf was finished, I glued it together. Now I could work on the shelf fillers. I believe the last time I worked with polymer clay was when I was working on Starbucks back in 2013. The last time I made canning jars was way back in 2003! I made some basic fruit and vegetable shapes, and a couple loaves of bread. I had a couple adorable, wonderful loaves that I purchased for this project, but they completely disappeared someplace and I was forced to just make my own. I do hope I find them one day - they were so stinkin' cute!!!

Rolling balls for peach slices. I like to bake the balls, then cut the slices while the clay is still warm.

I made apples, peaches, choke cherries, green beans and potatoes.

Here the canning jars are getting ready for filling. I like to use food coloring, alcohol ink or chalk pastels for coloring the resin.

Chalk gives the loaves the perfect just baked look!

I also needed to fill the kettle with wolf meat and vegetables in wine sauce.
Now I needed to make some groceries for the shelf. I cut 1/4" dowels into 1/2" lengths. These were going to become canned goods. Instead of painting the tops, I decided to try out the aluminum tape that I have. I used a paper punch to punch the tape then affixed one to the top and bottom of the cans.


I thought that food labels from the 40's seemed kind of appropriate for the piggies. I found some really great labels googling, then adapted them in my graphice program to fit some wooden shapes I cut.


Here is the filled up little shelf in it's new home. I was careful not to block the view out the window of poor Sam's straw house still being blown about in the wind. I added a few other details I had in my stash, unused from past projects.

These little piggies won't be going hungry!
I made some napkins, added some silverware and painted plates and bowls for the table. Since they're celebrating their freedom from that terrorizing wolf, they'll even partake in some wine with dinner.

Musical instruments are always close at hand for these merry fellows!
Joe likes to display his daily epicurean genius on the menu board. Today's menu is truly an inspired culinary experience!

Kettle braised wolf tenderloin, harvest root vegetables in red wine bordelaise.
Mmmm... Looks delicious!

Ooohhh and crusty french loaves, too!
Nothing beats a home cooked meal shared with the piggies you love!


This was just the relaxing break I needed to fill up my happy tank again! I'm ready for more hard work, and soon after I'll be back to my beloved mini world! This time, to begin adding final details to this fun little build!  See you in about 10 days or so!

Jodi