Search My Blog!

Use the Search box below to find keywords that you're looking for quickly and easily!

Search Feature

Showing posts with label RGT Barn Bash. Show all posts

Friday, October 16, 2015

No One Around Here Is Flawless

I am finding that as I get older, it's a lot easier to be honest with myself, and to actually accept that I have a few character flaws. Some of them I really need to work on, and some of them I am really okay with.

One of the things I am okay with admitting is that I am either completely board with something, or completely obsessed with it. Enter 3D modeling and printing...

I was watching the first season of House Of Cards with my husband the other night (we are starting with the first season so we can binge watch the other seasons on a lazy, rainy weekend), and I kept noticing all of the incredible set decor. Things like lamps and headboards. Suddenly I am designing them in my head and not even paying attention to the show! Thank goodness for the rewind button!

 I'd been watching quite a few tutorials on SkillShare lately. One was by Lauren Slowik from Shapeways. It was interesting, but the way she went about creating and uploading the image wasn't going to work for me. My subscription to PhotoShop has expired, and I am still really on the fence about committing again when I rarely ever use it. Anyway, to make a long story a bit shorter, I just signed up with TinkerCad (it's free) and started playing with shapes. I can design with shapes - I really don't need to do much sketching on paper, so this was perfect!

I started by Googling some real life sized lamp measurements, then converting them to 1:12 scale. Then I took some of the ideas in my head and quickly drew them on paper, just so I wouldn't forget. I converted the measurements to millimeters, then began to "doodle" in TinkerCad.

I just so happened to have a 1:12th lamp shade with a built in 12v standard bulb/socket holder. It was easy to use the dimensions in my lamp and base designs. They should perfectly cradle the bulbs and support the shades. I made all of the bases hollow and made cord exits on the bases. I have finished a couple lamps so far, and I have drawings for a couple more. Once I am finished, I'll order them and see it they actually do work the way I planned! If so, maybe I'll try a couple headboards!


See! Obsessed with 3D printing! Meanwhile, the barn sits among my messes on the dining room table, just waiting until I am no longer board with it. As soon as I am not, I will become obsessed with it again.


Oh! By the way... I went and retrieved Enoch. He was hiding behind some trees waiting for campfire stories to begin. I talked him into letting me repair his loose leg. Poor guy! That must have hurt!

While he was recovering, he and Gerdy chatted up a storm. They have become fast friends, and Enoch agreed to carry her wherever she needs to go. Must be tough when arthritis sets in and you can't straighten your legs out any more.

I guess we all have some flaws.

Have a great weekend, everyone!


Tuesday, October 13, 2015

Workshop? Garage?

I've spent the last couple days working on little projects for the barn's workshop/garage. I'm still not too sure what to call it, because our real life garage functions in so many different ways. My husband would LOVE for it to NOT function as a storage space for the lawn mower and other gardening implements, but building a shed is probably #23 on the "home maintenance" priority list. That's another story, but for this 1:12th scale workshop/garage I made sure not to include any gardening stuff of any kind. Unless you count the chainsaw, but that's really more of a Jeep tool than a "garden" tool.

In true frugal fashion, I ordered a bunch of unfinished metal tools on eBay. This barn project has already cost $6,154.55! Not really, but you all know what I mean...

Unfinished metal can be a great option to help mitigate costs, but be aware of a few things:

1. Make sure to look at and imagine the measurements of the item in your scene. "Small" might not be small enough and vice versa.
2. Unfinished metal is, well, Unfinished! You'll possibly have to trim away excess sprue, file and sand a bit before painting/finishing.
3. Beware items that have small and not very well supported metal pieces. These often break off in shipping, and can't always be easily repaired. I had two iffy repairs to make. Hopefully, no one notices.

I wanted a lot of detail in mine, so I took the time to tape off areas that I did not want painted. My husband has a lot of black, red and blue handled tools, so those are the colors I chose.


I like to use spray paint on these items, because you get a much better finish and way less paint build up. Be sure to let them dry thoroughly, especially if you need to paint both sides of an item.


I had ordered some unfinished metal can and jug blanks, so they needed to be painted in the base color, then have labels added. I took a look around Russ' shelves and cupboards to see what he actually uses, then got images from Amazon.

To see a little label making tutorial, click here.


Here is what I've gotten finished on the workshop/garage so far. I have cans, boxes, sleeping bags, tents, coolers, signs, calendar, and many more little details to add, so I'll just update progress as I go. I also think that many of the items here are too clean. They need grime and greasy fingerprints added.

Thursday, October 8, 2015

Making A Work Bench

Last night after supper I asked the hubbs if he'd like to come and help me make a workbench for the garage. He enthusiastically agreed!

We scoured Google photos until we found one we could simulate and make our own. Just a pretty basic workbench, just made of stripwood and held together with tacky glue.

We used the photo to help us determine a cut list (you list all of the pieces you need for the project and have them cut and ready before assembly). If I have enough lumber, I like to tape the pieces together and make one cut on my rip saw. For example, I needed 8 - 3" 4x4's (what I call my 3/8x3/8" wood because it looks like real life sized 4x4" post) for the frame. I taped 8 of them together with painters tape and cut them all at one time. Doing this ensures that all of the pieces are EXACTLY the same length. I cut all of the pieces this way.

I used my gluing jig to make all of the support pieces first, then let them dry. Meanwhile, I scored a trim piece with my xacto knife to look like separate drawers. A little sanding to round off the drawers, and it was ready to affix.


Once that layer was dry I glued the bench top and shelf boards, clamped everything, and let dry overnight.


Here is the work bench after drying overnight. I added a "backsplash" then did a light sanding - not to make it smooth (more on that later), just to round off the edges a bit and remove any glue that made it's way out.


I wanted the work bench to have a well used look, just like my husband's real sized one. I have had great results in the past watering down acrylic paint and treating it as a stain for the wood. I chose a color called... wait for it... Barn Wood! Here you see that I used just a couple small squirts of paint, then added little bits of water until I got it to the right consistency.


TIP: If you don't have stain on hand, or if you don't have a good acrylic color for staining, you can use artists chalk. You'll need a little white paint or gesso as a medium, then you just shave the chalk into the medium until you achieve the color you want. Mix well. You can then turn it into 'stain' by adding water, or use full strength for vivid color. Watered down, it will have the look of milk paint. Use a sealer when dry to preserve the vibrancy.

I started applying the stain on the bottom so that I could be sure I was getting the results I wanted. The stain will soak in, so if you keep adding layers, you'll increase the depth of the stain. It also dries a lot lighter, so experiment until you feel comfortable staining your actual piece.


This is after the first coat. I like to let my stain dry for a bit. The water in the stain will have really raised the grain in the wood, so I like to sand, stain, dry, sand, stain, dry several times to achieve the look. On subsequent stain layers, you can apply just to certain areas to vary the "wear". Since this is a work bench, I am not looking for smooth in the end. It's more realistic if it looks like there is potential for slivers!

After I get the base coat about where I want it, I go back in and add shadowing. Notice here that I have a squirt of Barn Wood and a squirt of black. I mix the two colors in various shades to use for the shadowing and highlighting. I use a small brush and add darker color where I want, then go back over it with my moist stain brush to soften the edges.


This is about where I'll stop the bench for now. Once I install drawer pulls and begin to dress it with little accessories, I'll add dried spilled paint and oil stains wherever it needs it.


One quick note: Don't ever worry about showing your work. Be proud of it! Don't compare yours to other's work. There are always going to be miniaturists out there with more experience, higher skill level, different ideas, more time and most importantly, better tools. The fun in miniatures is getting to see your ideas come to life, and the journey and the things you learn along the way! Share with everyone, be kind, and remember to help those with less experience. This is how we all pay it forward and welcome new enthusiast to our crazy crew!


Tuesday, October 6, 2015

Finishing Touches


It's the little details that make me want to become 5-1/2 inches tall and live in my little projects. Pillows, plants, books, sculpture, photos all draw me in and make me want to stay awhile...

Today, I managed to carve out a little time from the busy day to add a few final touches to the barn's living room. Namely, rugs and curtains.

I think I posted before about the printable fabric I purchased from Amazon a while back. Avery makes one, too, but this one came with 10 sheets instead of 5, and was a little less pricey. Currently, it is just over $9, and if you have Amazon Prime there is free 2 day shipping. So far, I really like it!


I had read a thread somewhere that it was nice for making mini rugs. I thought I'd give it a try, and I am very pleased with the results! I was able to fit one 8"x5" and four 2"x3" rugs on one sheet. I set the coloration on my Cannon printer to a 10% increase in the saturation, and I really like how well the color and the detail shows through.


Here is the smaller door mat sized rug. I read also that someone makes velour printer paper. The original link to the site showed that the web site was no longer in existence. I did a Google search, and found a web site 'Across The Pond', but nothing closer to home. Amazon did have an Epson paper that says it is velvet artists paper, but I am not too sure that is what I am looking for. $21 is a little more risk than I am willing to take on a project.


I was avoiding the curtains for a while in hopes that I would come up with something brilliant for the awkward living room window. No cleaver ideas whatsoever have come to me, so I am just going with the same style and material that I employed for the loft windows.


I needed a rod (prestained dowel - check), and rod holders. In the loft windows they are set far back so the rod is just glued to the frames. This window is totally visible so I needed something better.

I had these leftover trim pieces from some old dollhouse furniture that I bashed, so after a little Xacto work and some sanding, they'll work perfect!


I made some measurements, cut the fabric out, ironed a hem in, cut away the excess fabric, then used fabric glue to glue them.


I waited a while for the glue to dry, attached them to the rod, added ties and hung them up.


I think (I may add more photos to the wall) this living room is getting close to being Ta-Done!


Monday, October 5, 2015

Quick and Cost Saving Paint Sample Tip

Many of you may already know this because I am usually the last to know or find out. Could it be that I am fiercely independent and don't usually resort to asking for help first? Likely, but I just found an inexpensive and convenient way to order paint online. Free delivery, no traffic, no parking lots and no crowds? Sign me up!

I went to the Home Depot web site to start narrowing down the color choices for the exterior of the barn. I went to the Paint category, then the Interior paint section. I was delighted with what I found!


 It the search results window, there were several drop down menus to narrow the search. I chose the Blue paint color category, then selected Free Shipping To Home under the How To Get It menu, then typed in $0 to $5 in the Price Range menu, and then sorted by Price Low To High in the Sort By menu.

This brought up all of the paints in the blue color family, that offer free to home shipping and that offer the 8oz sample paint for $1.94. Now all there was to do was choose a color!

I went with a flat, matte BEHR sample called Waterscape. I got 4- 8oz samples for $8.37 including tax. The quart prices start at $12.98, so I saved $4.61! If you can wait 8 days (mine says it will arrive 10/13), this might also be a good solution for you.


I hope this information will make someone's day like finding it made mine!

*** UPDATE***

The sample paint arrived one day early. It was packaged well, a band of tape to seal the jars, then packed inside zip top bags.

havanahholly on the GreenLeaf blog pointed out that your computer monitor might mislead you on the actual color. That is a good point to consider if you are looking for something very specific.

In my case, a warm and country looking blue was all I was after. I brushed on a patch and I think it will work out perfectly for me! I am very pleased!


Sunday, October 4, 2015

On A Fruition High

It is such a great feeling when you get on a creative roll! Motivation rages as you see the fruition of ideas coming to life, and more and more inspiration begins teaming through your mind! This feeling is why we spend countless hours, and why so many miniaturists become hopelessly addicted.

Today, there was no Seahawks game to watch (they are on Monday Night Football this week), so I delved into the barn's To Do List. Next item: Wall sculpture.


This is the empty living room wall that I needed to fill up. I do like the modern and minimal look in miniatures, but my current home, and what I imagine our retirement barn will be like, is much different. Maybe it is because I need to get rid of some stuff, or maybe I am just very sentimental (hoarder). Either way, I like my home to have elements that make you feel as though you've just received a big, warm hug. As soon as you walk through the doorway.


It is pretty difficult to reach into the back of the space, and my eyesight isn't as good as it used to be. They are no good for measuring at a distance, so I made a template of the wall. It's very, hmmm... Rustic! That's it! But it will do...


These are the items I've been collecting to use as wall decor in the barn. I didn't really have a solid plan as to what would go where. There are some plastic frames from HBS as well as some unfinished metal frames that I purchased from Minis And More on eBay. A couple of the metal frames are from Russ' aunt Lu. She gets free stuff at the casino and likes to give it to us. Love you aunt Lu!


I measured and drew ley lines on the template (my version - remind me to pick up some drafting paper) so that I could lay out and trace around the final design. This way, after I got everything painted and assembled, I'd remember where everything was supposed to go. 


Here is the layout that I finally settled on. 


I have a mixture of all kinds of metals in the barn, because that's what I have in my 1:1 scale home. I'm kind of disorganized eclectic in the way I accumulate things to decorate with.

 I decided to paint the frames in flat black, then spray a light coat of aged bronze over the top. Here they are before spraying them.


I wanted to print photos of Russ and I on our forest adventures together, because wherever we are together, that is home. I resized and cropped them to the frame sizes in Publisher. Then I printed them in black and white on glossy photo paper. Here are the photos with the finished frames.


After I cut them out with my Xacto knife, I glued them into the frames. Then I drilled a pilot hole for the coat hooks and affixed them to a piece of trim board. I made the plate rack and plates in July when I delved into learning how to solder. I'd love someday to get involved in a mini swap and make them for my new kindred friends.


Now it was time to transfer everything to the actual wall. That's the hard part! I concluded after much thought that the chances for success would be greatly improved with the assistance and employment of gravity (although it's not doing my boobs any favors). I carefully removed any items that were not glued down so that I could put it on it's side on the floor. That way, I'd be gluing on a flat surface, and would maybe have a better chance of getting everything even and straight.


That reminds me. I've been really curious... How many of you permanently attach everything in your projects? I usually do, but I am not the proud owner of any expensive art pieces from artisans at this point. Pros? Cons?

I just have a few more details to add on the entry/living room before I can move on. The next project will be the garage, and I'm really looking forward to getting my grease on!


Saturday, October 3, 2015

New Friends...

After reading and lurking for months on several different blogs, I finally subscribed to several and summoned up the courage to reach out and introduce myself on The Greenleaf Miniature Community forums. I shared the story of my miniature journey and received many warm and friendly welcomes! Incredibly, one of my favorite and repeat customers, from back in the online miniatures store days (2002-2003), is one of the community admins! It was so wonderful to reconnect with Tracy! It is so wonderful to connect with kindred spirits and see where imagination has taken them! Really incredible work to see there!

Speaking of new friends, I often check in on what's for sale on eBay. Now, usually, this can get me into trouble. It leads to chronically persistent ideas for incredible new miniature projects. That leads to starting a new category in My Collections. That leads to "oh crap this auction is about to end! This item is so unique and I really need to bid!". That leads to starting to collect items from other places for future projects (trust me, I have everything I need for the next two ideas already). That leads to boxes coming in the mail, which leads to my husband shaking his head, which leads to me feeling really guilty about all of the cardboard I recycle (god please let it be true that it really does get recycled into new boxes so people just like me can not feel so bad getting boxes delivered because they really are just recycled from ones we've already gotten stuff in). You see, there's always trouble when I 'check in' on places...

But this time, I swear it was different! I saw this poor woman, and just couldn't leave her in that situation! The humanity! Sometimes you just have to be the one to save somebody! If you can, you must! And I had to.

I'm not going to make formal introductions until my new "rescue" arrives (and until after I've explained the whole thing to my husband), but I am sure you will all agree. It had to be done. There was no choice in the matter. Hopefully, she'll arrive safe and sound sometime in the coming week.

Meanwhile, I perused so that I could catch up on the many wonderful miniature blogs out there, I came across Kris Compas' tutorial from July on How To Make A Mini Ottoman From Faux Vinyl. What luck! It just so happens the little barn living room needs an ottoman! Hers tells you how to make faux vinyl by painting silk with acrylic paint! And it's pulled right out of the pages of an old catalog. It's really cool!

It didn't occur to me to start to chronicle the project from the beginning, and most of you will probably be inspired to go to Kris' site and make your own anyway. Even for those of you who aren't into minis, the idea can be adapted to make an adorable pin cushion or something. Think holiday gift giving...

My space is not Mod, but more traditional/contemporary so I opted to make a rectangle version. It's got to be easier than the round one, because mine won't have any sewing (yes, even a simple running stitch counts as sewing in my book), I'll use the same fabric from making the sofa  and I won't have to make cording.

Here are a couple photos I finally remembered to take during the construction. It's just foam core, card stock, mat board, batting, fabric and glue. The only tools really needed are an Xacto knife and some scissors.


And here is the final product:


What a lovely way to spend a Saturday afternoon, after such a lovely morning making new friends.

And my list items are being struck through one after another!


Thursday, October 1, 2015

I Found Them!


Last night when I was thanking my grandma for her help with the pillows (some very weird synchronicities happened throughout the day), I also asked if she could help lead me to my missing window trim pieces for the living room window. This morning, I suddenly knew exactly where they were. I went right there, and voila! Understand, I looked everywhere for them. Thanks grandma!

With pep in my step, I set about happily making little details for the living room. Did I mention how much I love and am addicted to the feeling that comes over me when creating? Minis or anything else my mad mind comes up with? Madness in the name of my blog is completely apropos.


I save the leaves and flowers and branches from silk and plastic flowers I use in other projects. Lots of times they can be used to make 1/12th scale plants. In my pretend mini world, they are legitimate species. :o) One time, when I was working on CannaBliss, I ordered way too many little bags of the rubberized brown mulch from HBS. This works perfectly to camouflage the stems and glue in the container. I just squeeze some Tacky Glue into the pot, trim leave stems, arrange  the stems to look "natural", then sprinkle the mulch on top. After it dries, I shake the excess off back into the bag. I still have one full and one partial bag left. It goes a long way!


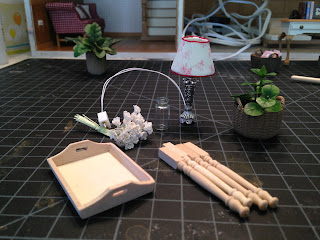
This is the lamp shade from the little bead lamp I made in July. I decided to cover the shade in the same toile fabric I used on the sofa pillows.I didn't have a pattern, so I had to make one by tracing the lamp shade onto card stock. I made a couple of these before, but with full sized lamp shades. The mini lamp was definitely harder to roll while holding onto the pencil, but I made the pattern close enough to work. It's times like these that I really wish I had taken drafting classes and had fancy drafting tools. In my house, we really try to make due with what we have.


I needed a little lamp table for the lamp to sit on. I wasn't sure what I'd make it out of, so I did what I always do when I need inspiration: I went through drawers and boxes until something sparked an idea. I had a couple of these unfinished trays and some legs. I knew I'd use them "someday". Today was the day!


Here is the finished table with the lamp. I added a book, a jar of fresh picked flowers (not), and a plant basket. Looks like I need to tie up that lamp wire a little better! Also, maybe it is time to mop the floor...


Here is the other little table, all dressed up with tchotchkes. I have two shelves full of real sized tchotchkes. None of them are really useful, but I do like to look at them a lot!


Here is the table in its new home. The room is still far from complete. I have pictures in frames to make, the coat rack, a shelf filled with junk curtains, and I think it still might need a rug and an ottoman. 


Those projects will have to wait a few days. It looks like I'll be car shopping with Ande! The Jeep he's been driving since he was 17 is no longer fit for daily driving. This time, he's looking for fuel economy rather than lift height and tire size. He's really all grown up now! :0)