
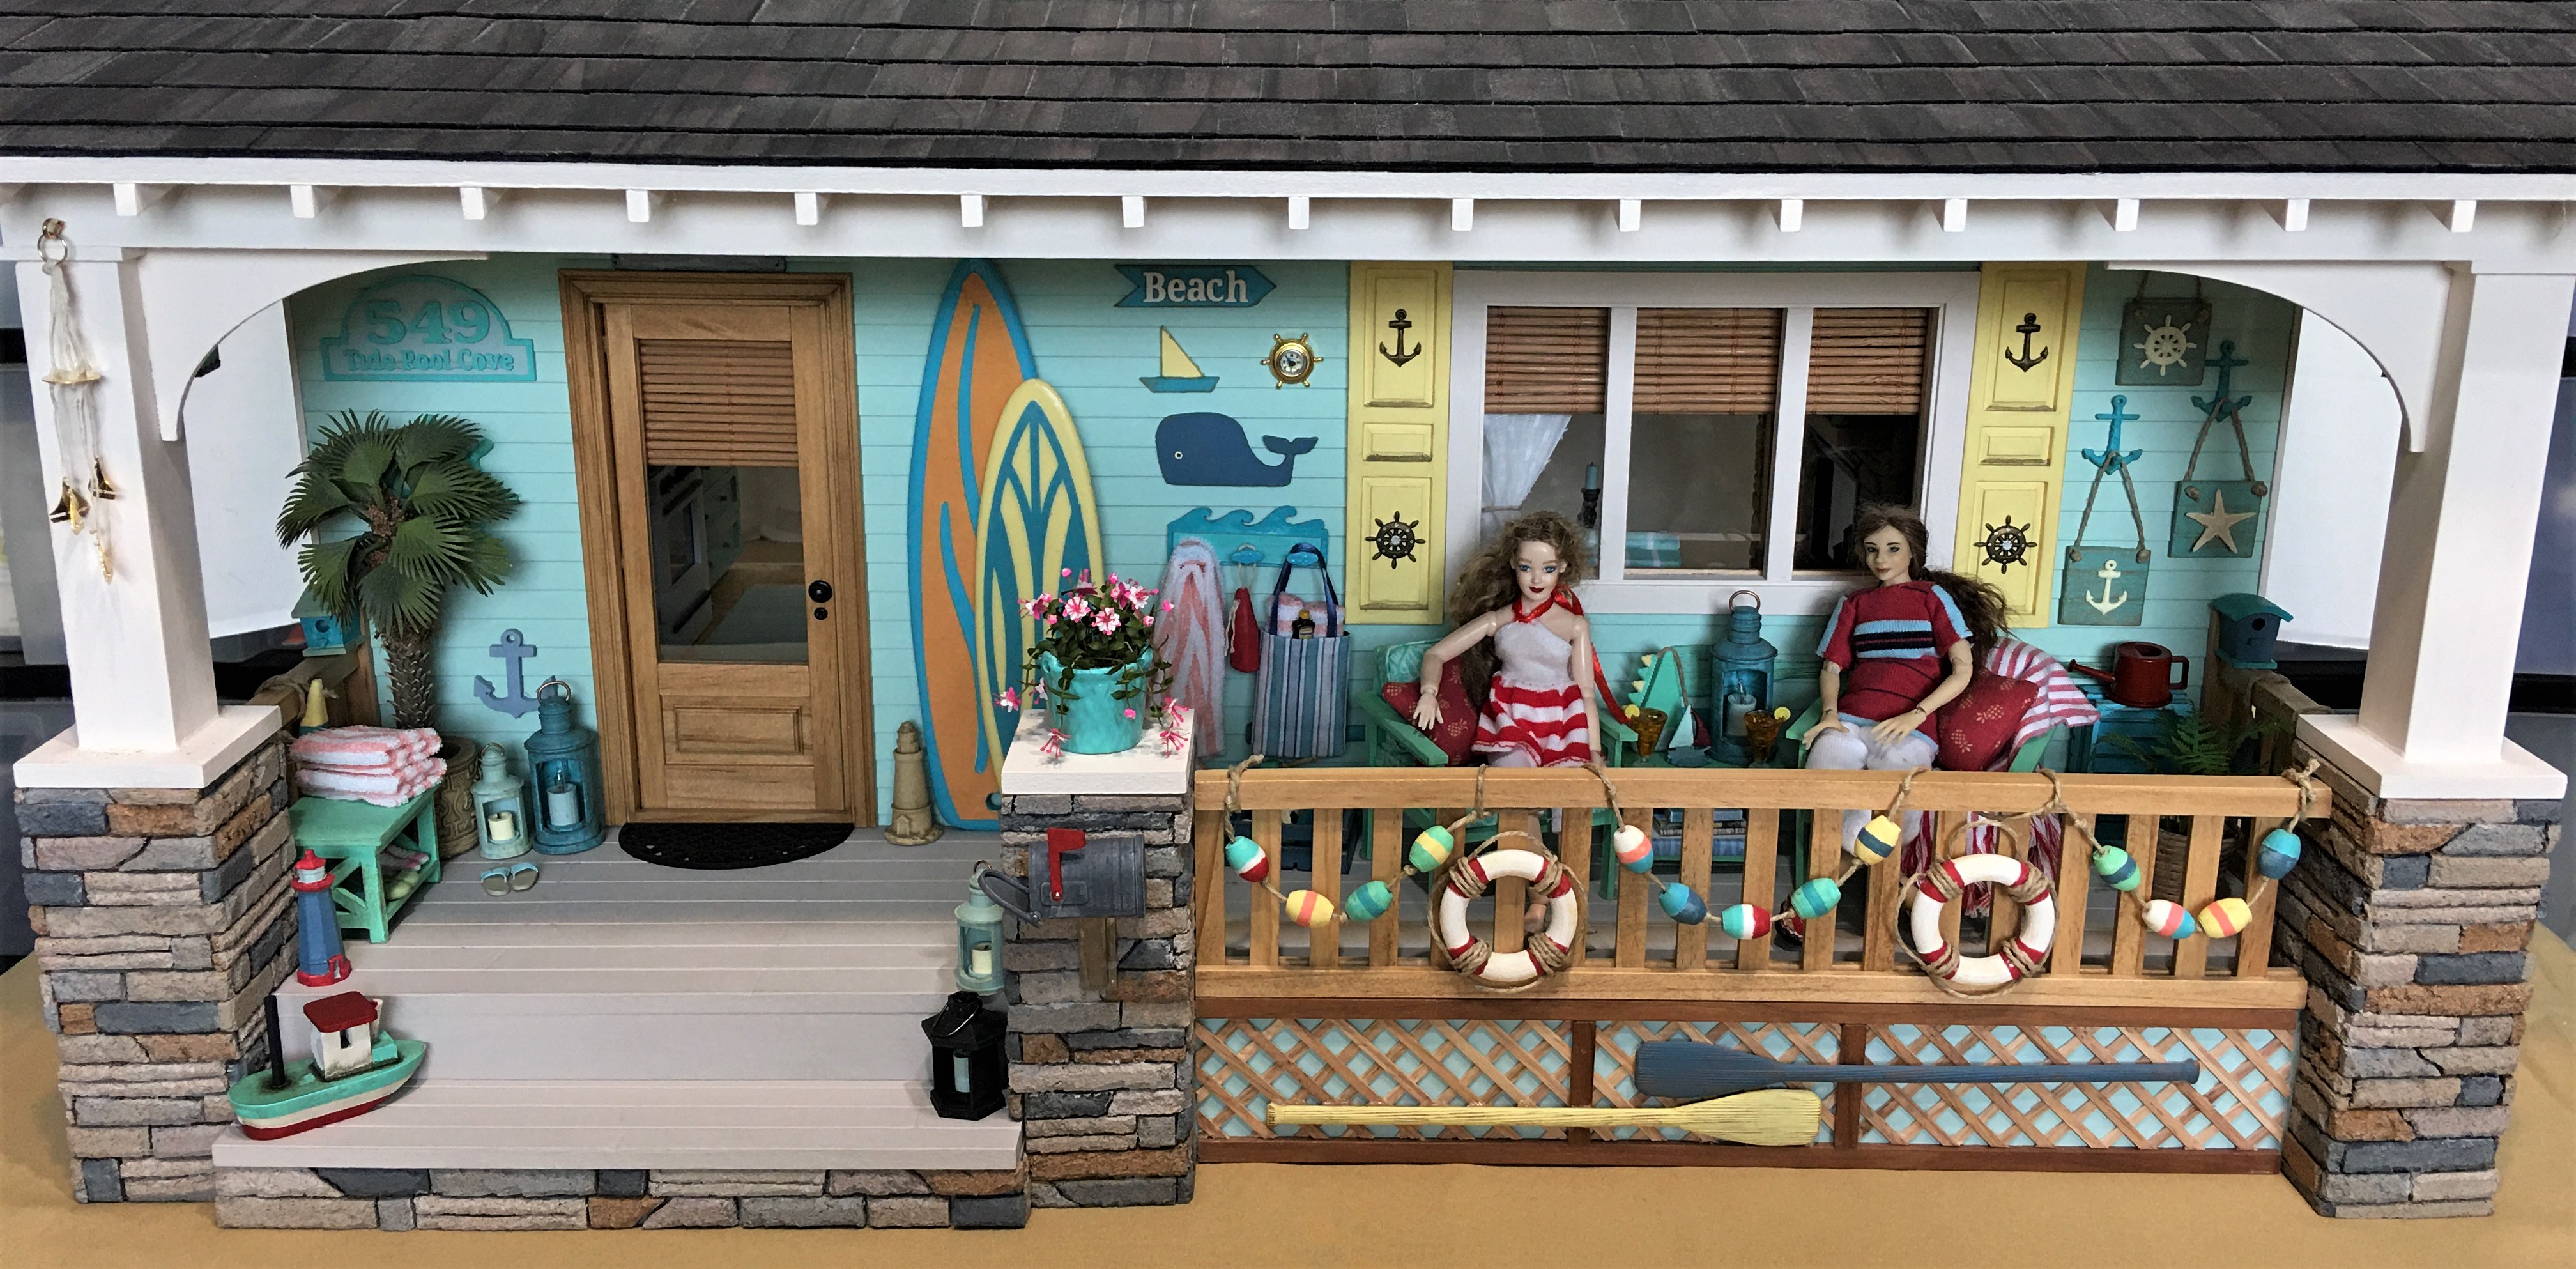
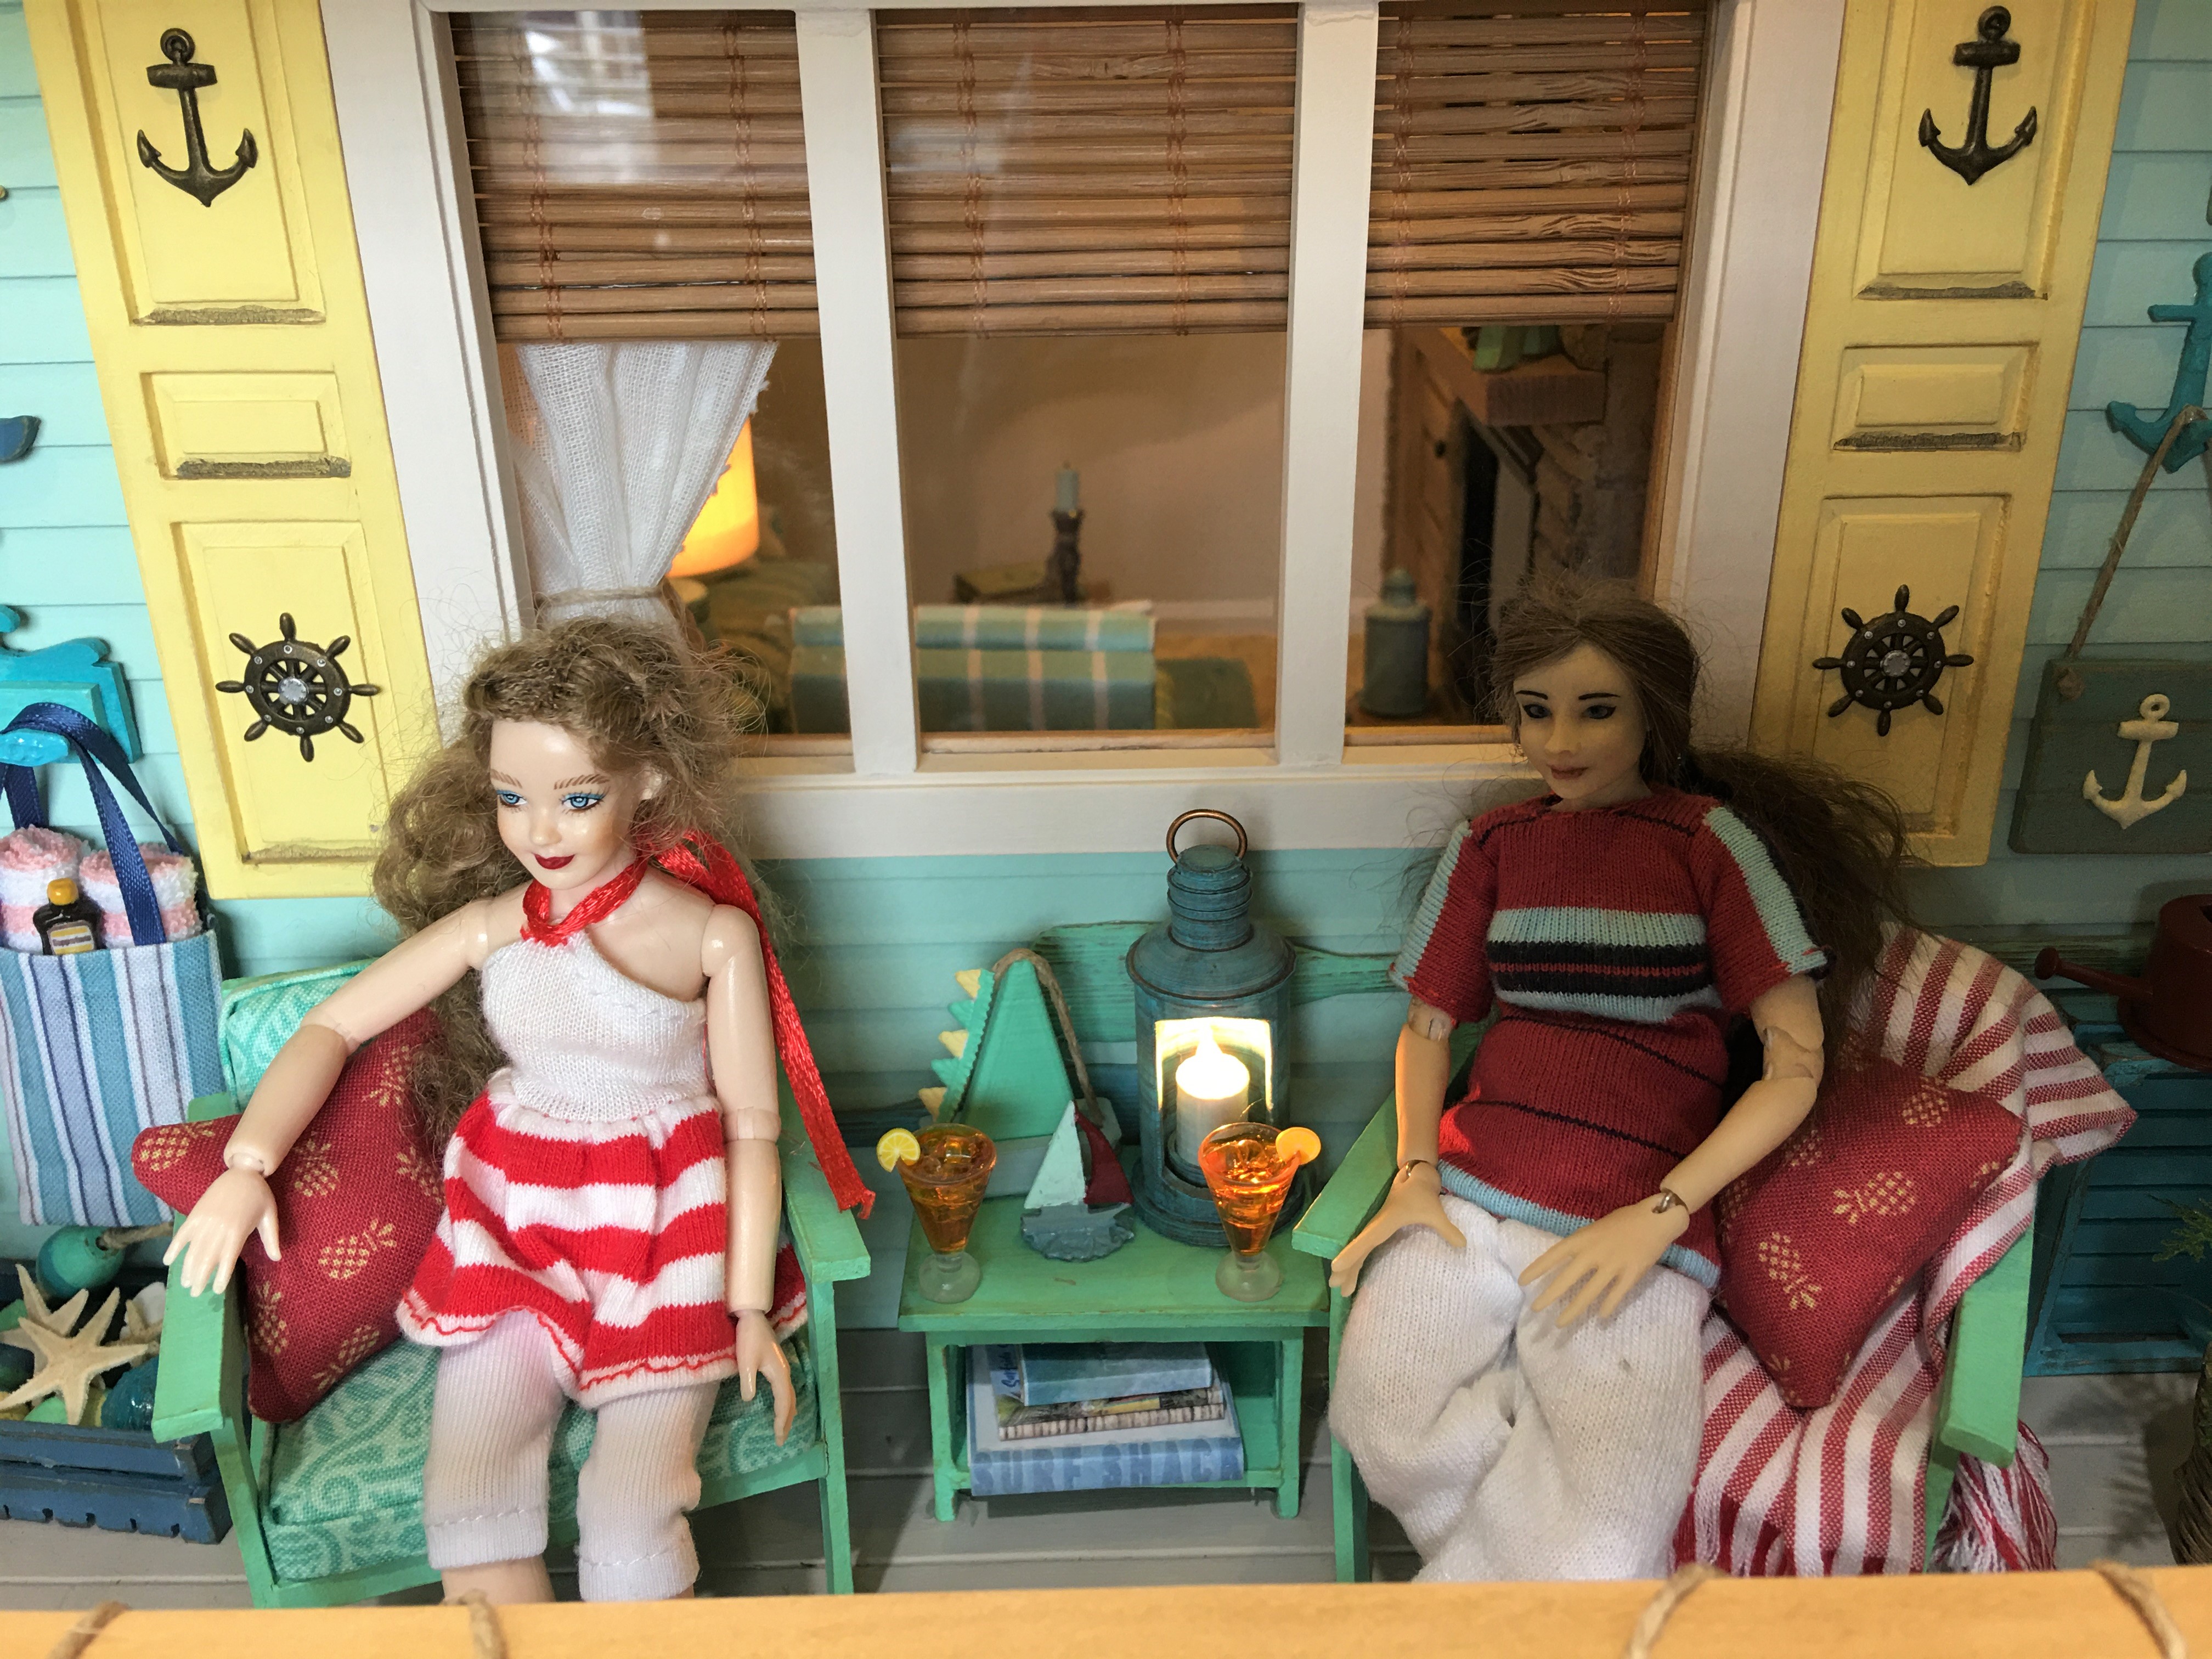
The Beachside Bungalow is officially finished! And as you can see, it didn't take the girls long after I placed the last item to get the celebration started!

There was a surprising amount to do for such a tiny area, but I decided to start with the seating. I looked around online to find outdoor chair styles that I liked and ended up on the Ikea website where I found their Bondholmen chairs. Since Ikea provides detailed measurements and diagrams, converting the measurements from metric to Imperial and then scaling them down to 1/12th was simple. I made a few design changes just to keep them similar to the bungalow's other furnishings. I had the Cricut Maker cut the chipboard.

Unfortunately, once I'd assembled them, they seemed a bit too short for the occupants to see over the porch railing. They are meant to be low and are very stylish, but aren't good for placement behind porch railings. I finished them anyway, just to have fun, practice with the upholstery and possibly use them in a future build.

 |
| A pair. |
 |
| And a spare. |
Back to the drawing board for the bungalow's chairs. I added 3/8" to each of the legs, and then they were perfect to sit and watch beachgoers pass by. When I first dreamed up this project in 2016, I ordered several of Brae's pillows. I am so happy to finally display them - they are perfection!


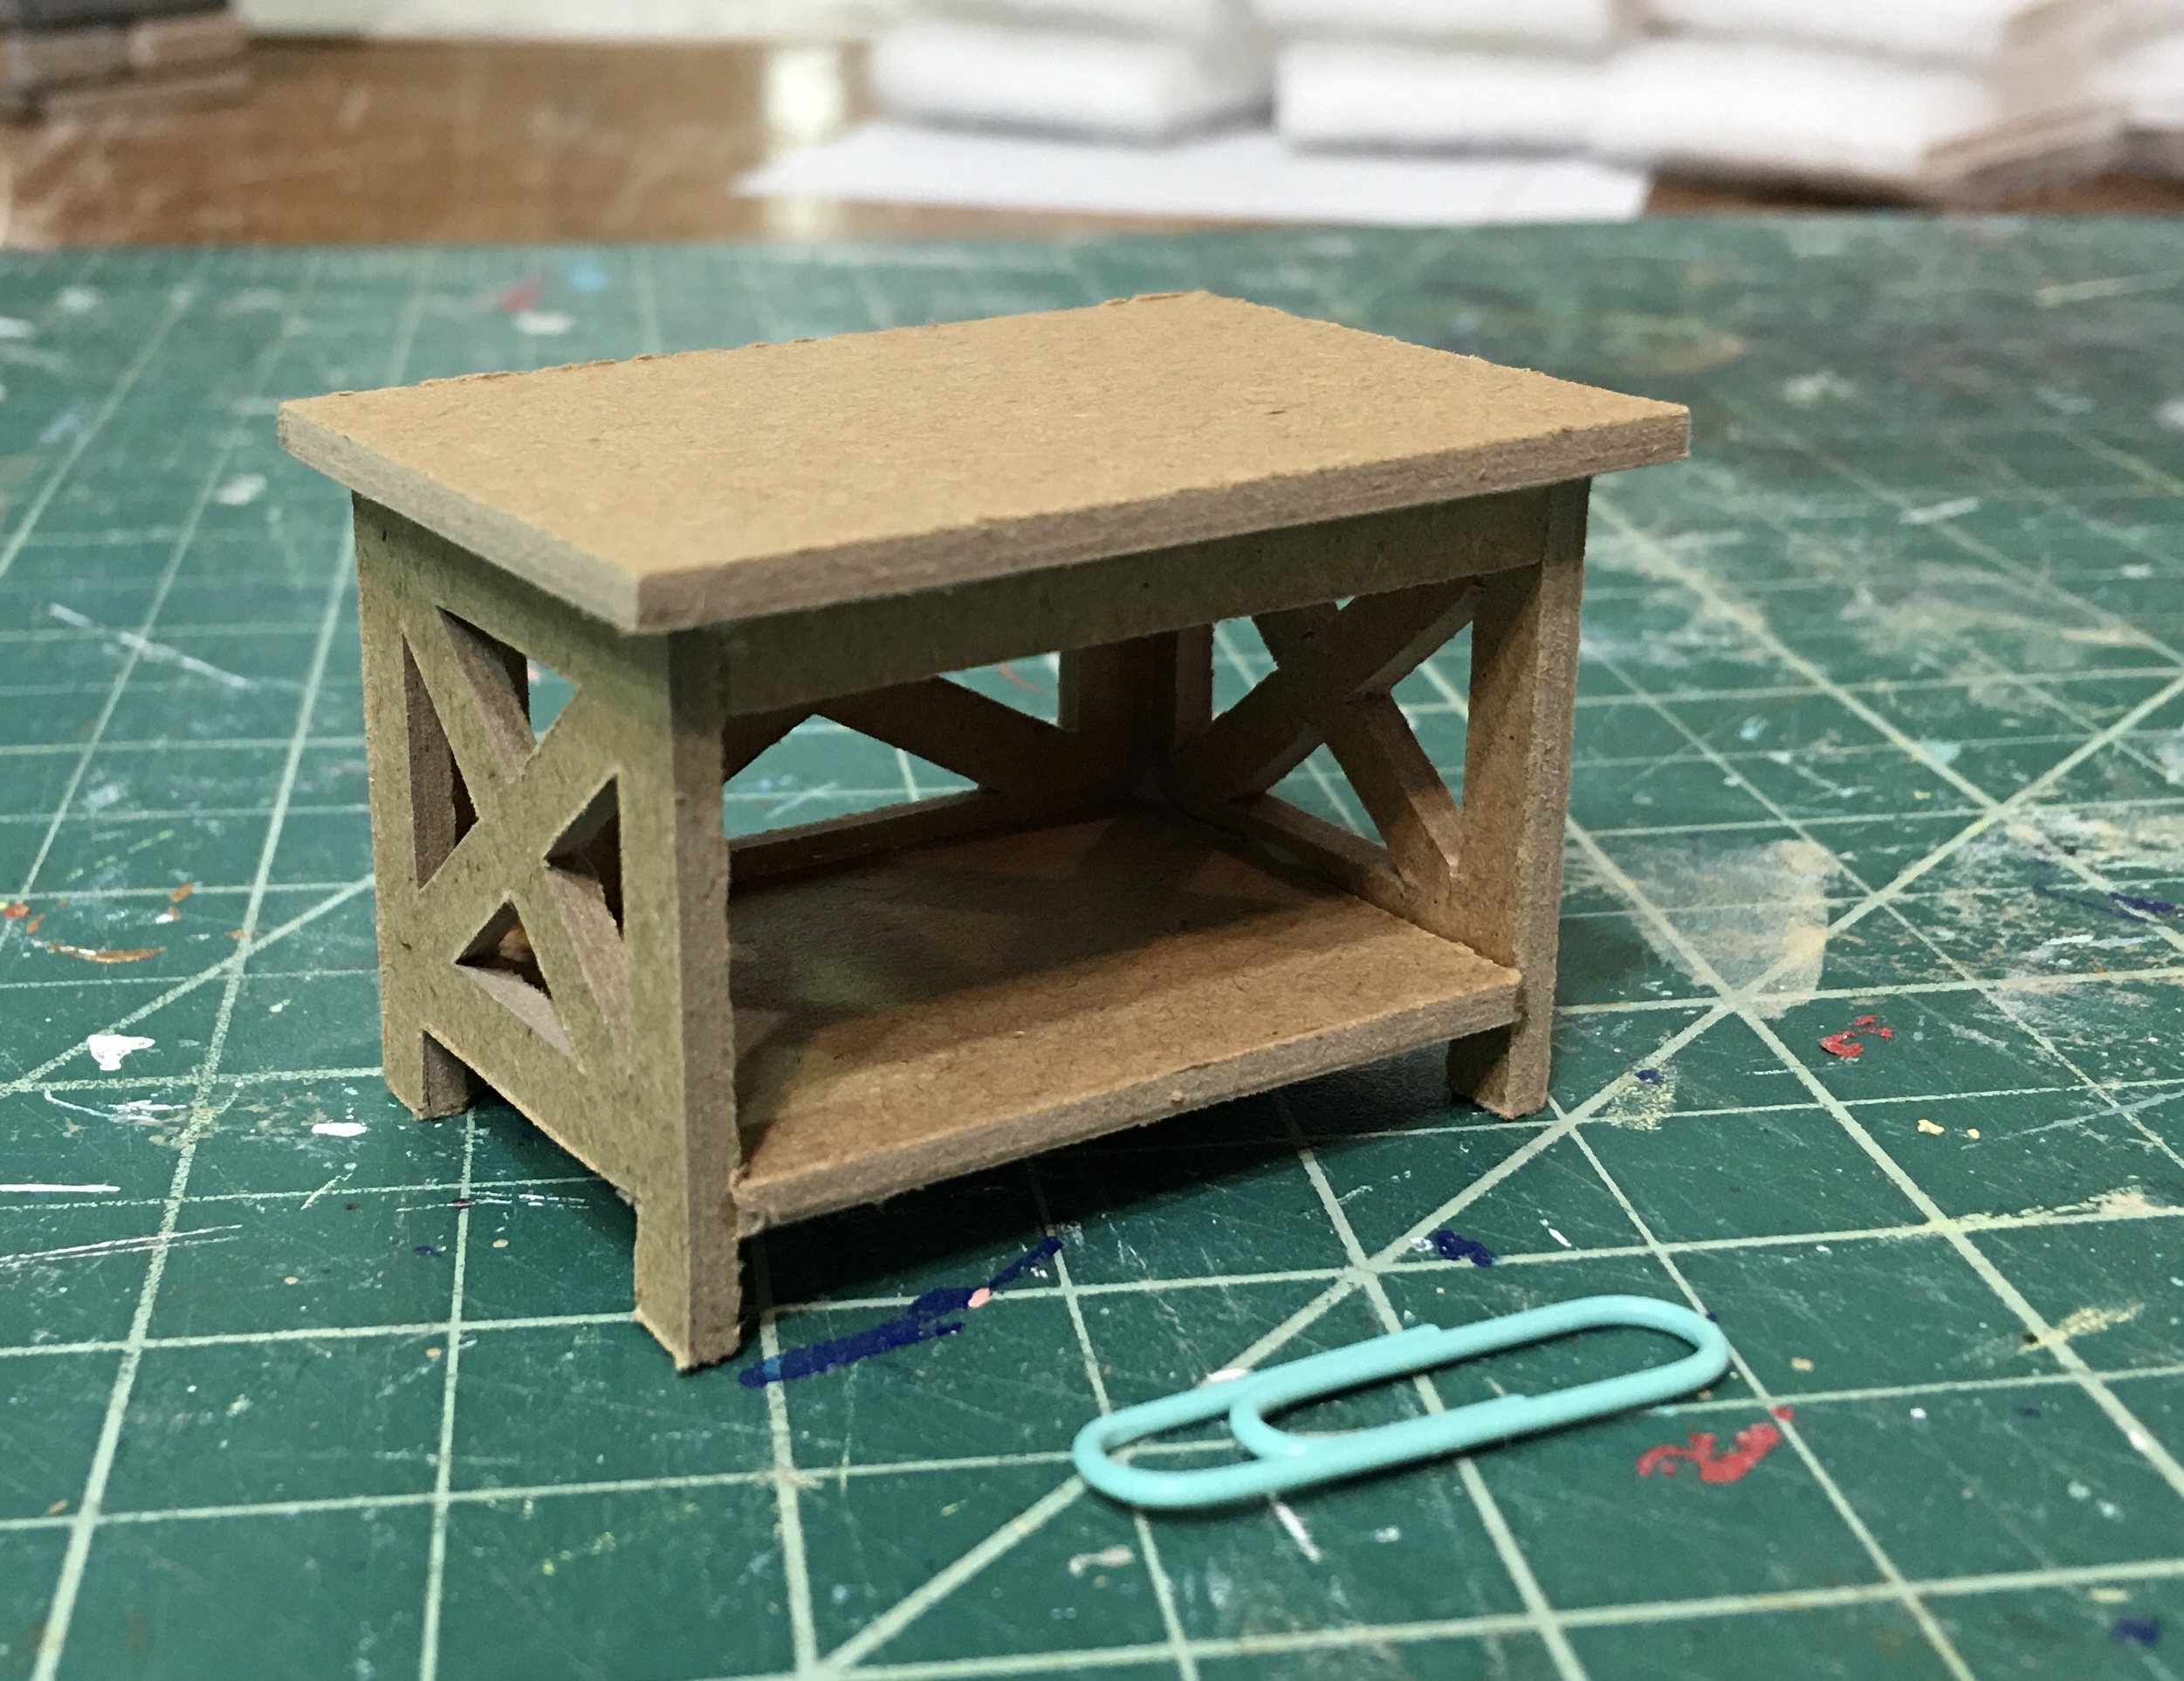
I made some other furniture pieces out of chipboard, too. The shoe bench and the table between the deck chairs are the same interchangeable design. I made a shelf, as well, but the porch seemed a bit too crowded with it. Another piece to save for later!


Here is the result of the address plaque I made on the 3D printer. There's just no end to the accessories that you can come up with!


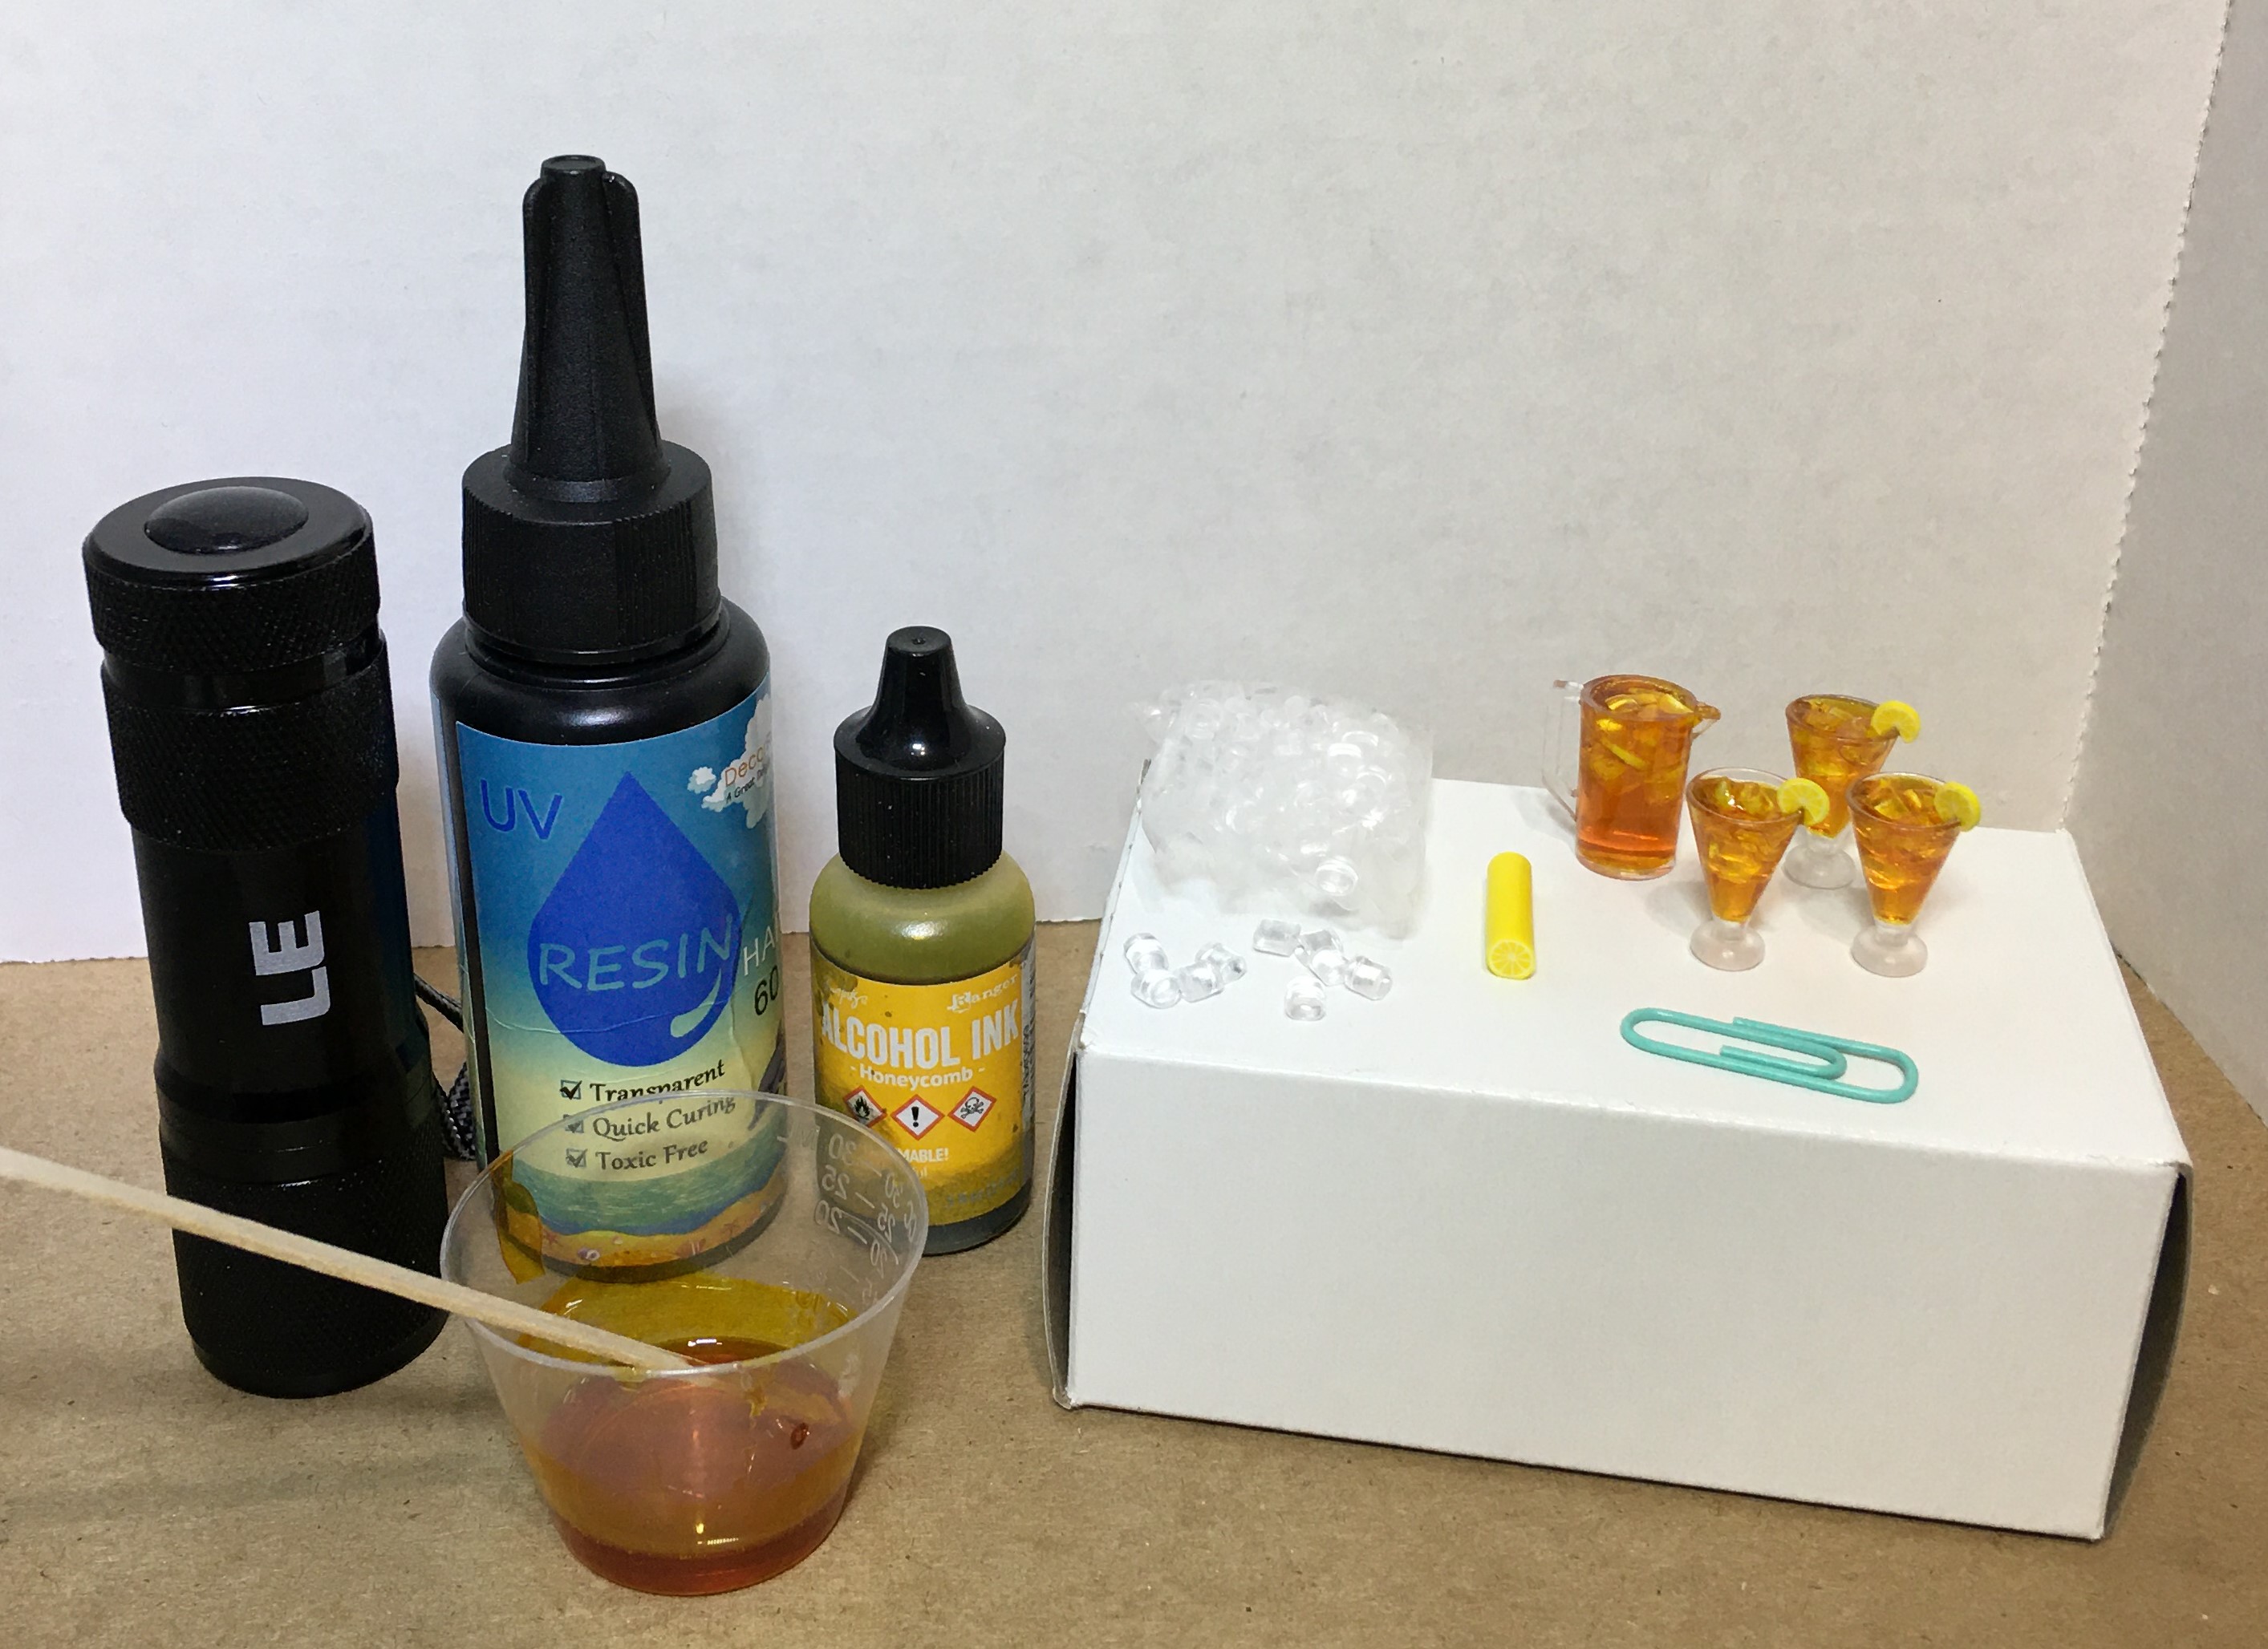

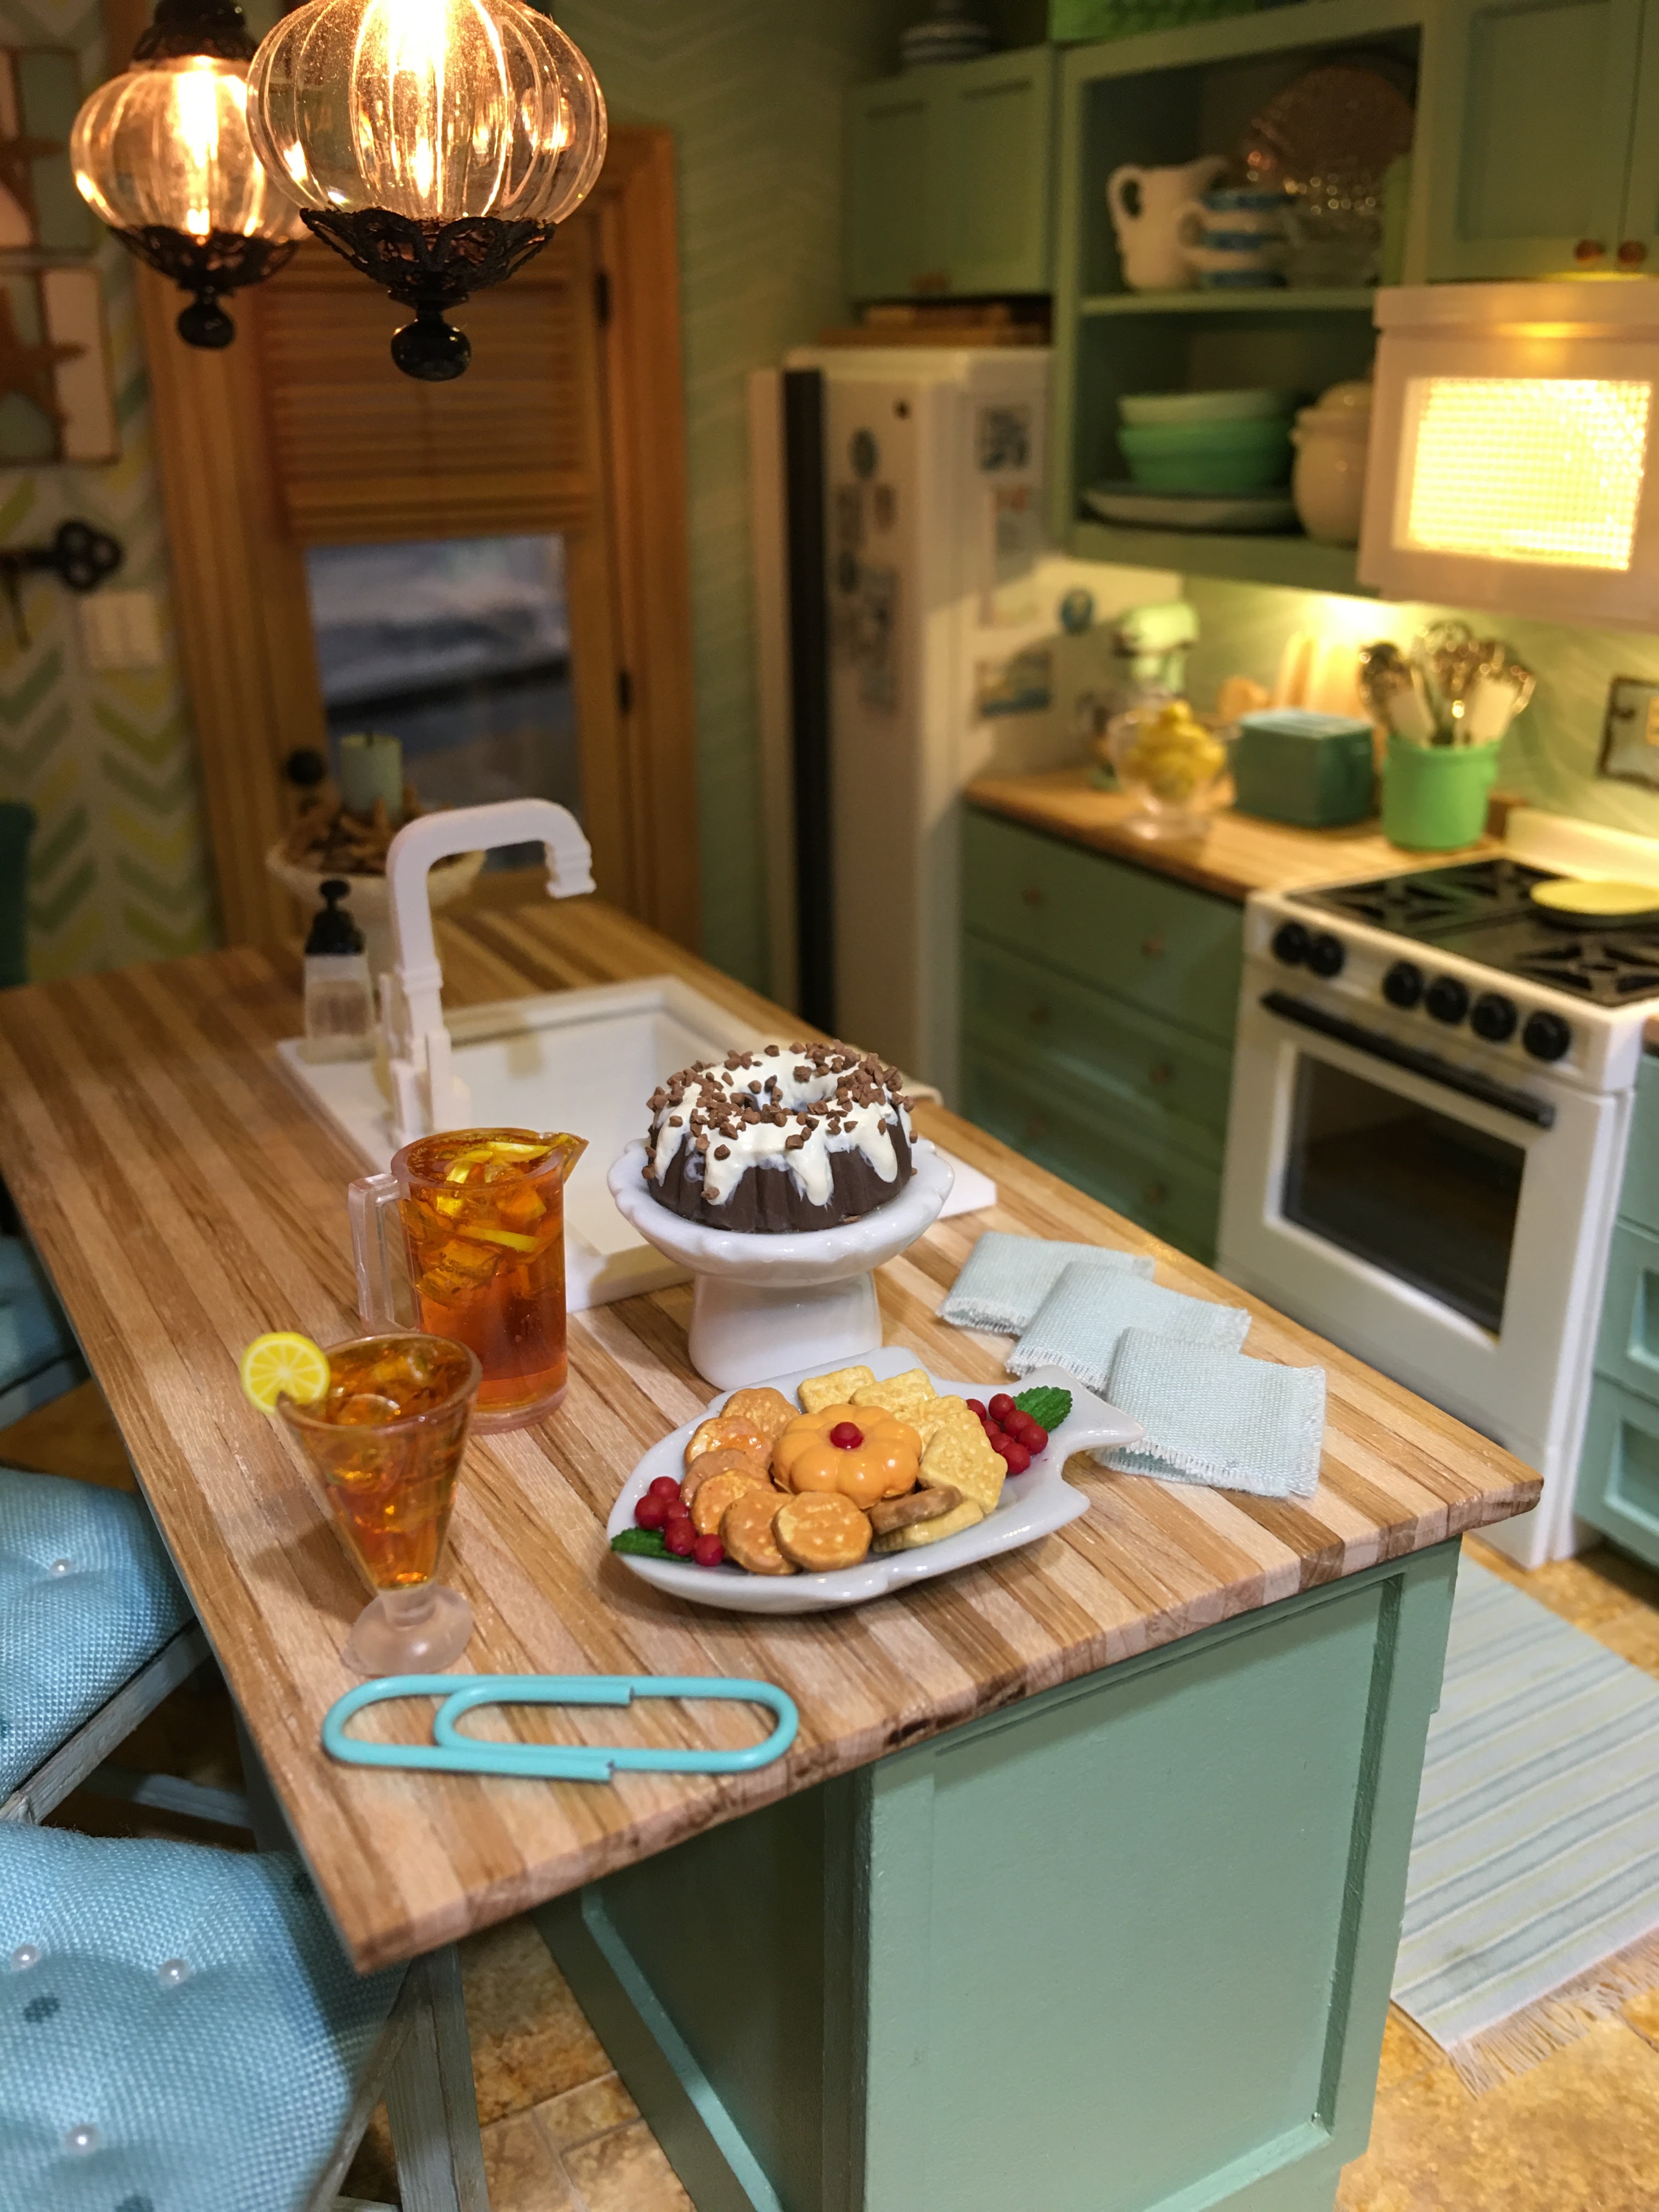
For the crackers, cheese and Bundt cake, I had push molds which I filled with Paperclay. Chalk dust colored the crackers, and the cheese was painted with orange paint and Mod Podge. The cake was painted brown, then topped with puff paint frosting. I'm not a very experienced or proficient mini food maker, but Rose seems happy enough.


Kairi wanted to be sure to send out new house announcements to her friends right away. You all know Fiona and Enoch from past projects, but Alice and Goldie haven't had a proper introduction on the blog yet. They are both the inhabitants of a future project which I hope to begin someday. I used the Maker to score and cut the envelopes for me, then just printed these teeny labels to be applied to the tops. The font size is 2, so they are very tough to read.


 |
| By removing the table leaf, I was able to span the dollhouse across the opening to get access to the underside where the wiring can be accessed. This was my view from below. I stopped counting how many times I hit my head (and glasses) on the metal bar which is part of the support from the table.  |
 |
| All buttoned back up again! |
And here was the payoff...


At "night"...


And here are some exterior shots of the Beachside Bungalow from different angles...


Una maravilla Jodi, te pones a mirar los detalles y fluyen cado uno en su sitio. Una maravilla los sillones de Ike, estoy enamora de tu cricutMaker, pero estoy convencida que lo principal es tu creatividad. Disfruto de cada foto y al final la iluminación es una maravilla , tan tenue la hace muy acogedora, yo estaría feliz en esa cabaña. Gracias por esta entrada , feliz fin de semana. Besos
ReplyDelete¡Muchas gracias, Rosa María! ¡Estoy tan feliz de que te guste cómo quedaron las sillas (y la casa también)! ¡Tener el Maker y la impresora 3D es como quitarle las cadenas a tu creatividad! ¡Espero que en poco tiempo estén disponibles para todas las personas que los quieran!
DeleteAwesome Jodi!! Congrats for finishing another build, and making it amazing. It really looks great, and love all the porch details. It was worth the effort of adding in extra lights, but it does make me think that it would be wise to add a few extra loose wires into the bundle just in case! It’s always hard to perfectly plan every detail from the start. It’s also great to hear the bug has bitten to finish another project. I have plenty I need to sit down with and progress. Take care and enjoy what’s left of your week!
ReplyDeleteThanks Shannon! I am glad you like the way the porch came out! It really would have been smart for me not to have jumped the gun an finishing the wiring. This was a good lesson for me and I think you are right - in the future, I will leave myself some avenues for new fixtures right up until the last touch up is done!
DeleteIt feels so great to finally have the motivation to finish up some lingering projects. I've learned that it's not something I can force myself to do, so I have to jump on the ambition train or get left behind again for who knows how long, lol! Have a great weekend, Shannon!
This is fabulous! So much detail! And it's all coordinated so perfectly. So much to look at.
ReplyDeleteThanks Emjay! You know how it is when a project ends up looking completely different than you thought it would? Well, this bungalow definitely had me guessing all the way through, but I really do like where it ended up. It was a lot of fun and I got to try out so many new materials, techniques and ideas. And overcome a few challenges! It just doesn't get any better than that!
DeleteThe beach house is perfect. Absolutely wonderful with all of the realistic details with everything that you, made and added. So what's next?
ReplyDeleteThinks Ann! I'm so happy you like the bungalow! Here is the list of unfinished projects that I can choose from: Starbucks, the photo shoot studio, both Vera and Virgil's cottages, the Street Of Shops Two Window Shop (no ideas what it will be yet), The Storybook Cottage and Pound Cake. I could also rewire The Sweet Christmas Cottage if I felt like a major remodel. My motto is always to start small to get the snowball rolling, so I'm probably going to begin with Starbucks. But I have been known to suddenly change my mind and follow inspiration, so we'll see. As long as my hands are doing something, I am content! :O)
DeleteYour beach house is very fine, and the porch is very cozy and beach. Very good work! Britt
ReplyDeleteThanks Britt! I'm so glad you like how it turned out! It feels great to have it finished for Kairi after so many years!
DeleteYour beach house is amazing and gives a feeling of relaxation. The scene in the porch is perfect. I really like everything. I really wish I was one of those characters.
ReplyDeleteThanks Faby! I'm so happy that you like the way it turned out and that you want to hang out here! If you can find a way to inhabit one of the girls, you are welcome to stay as long as you like!
DeleteHi Jodi! This porch looks so Fantastic "lit" at night!!! And the extra couple of lamps were definitely worth the sweat.... even if it didn't feel like it at the time, you Persevered and you did it!!! And those lit lanterns are the Coolest accessories for a beach porch! I can still imagine sitting there with the surf swishing and the wind chimes ringing! (I am so glad you made a start with the little brass sailboats! I am sure you will get it to perfection!) I can understand why the girls all have such great smiles! :):) The chairs are great and the shoe bench is a wonderful (necessary!) item! I'm glad you added the shutters too, yes, they are more fun decoration, but they are also more realistic for this type of house! This whole project has been soooo much fun to follow... I confess I was dreaming of seaside cottages last night..... the temptation to start just one more "little" project (kit already in stash) is agonizing...! But I will persevere and stick to my current "little" unfinished projects... for now! :) It is so much fun to see your creativity blossom... I can't wait to find out which project gets your attention next!!! :):)
ReplyDeleteThanks Betsy! If there is anyone in the world to turn to when you need support for a "crazy" mini idea, it is you, my friend! Thanks so much for your encouragement! Now when I look at the porch photos I wonder why I didn't wire every lantern, lol! If you knew how I struggled with "rope", thread and string these last couple weeks, being the expert stitcher that you are, you'd laugh at me! My "Japanese glass buoys" were supposed to get fishing net covers, but mine were a disaster! It might take me a while to bravely try the wind chime again, lol!
DeleteI'm either a great friend or a really bad influence Betsy, but I am going to tell you to follow your inspiration. It's about finding joy, not the finish line. Start that beach house the very next time you feel the urge!
Oh Jodi,
ReplyDeleteThis turned out such a beautiful beach house. I wish I could shrink myself and spend a relaxing time on the porch. The lit lamps are just perfect for the nights, I hope they won't attract mosquitoes...All the accessories are wonderful. To know how much creative work you put into making them is mind blowing.
Interior, exterior, night and day photos are stunning. It's been so great to follow this project and I'm ready for the next one.
Hugs,
Drora
Thank you, Drora! It makes me happy to know you'd like to spend time here! The wonderful thing about minis is, there are no mosquitos unless you make them, and I definitely won't make any, lol! As for the next one... It's an old project that was really close to being finished, and now my ideas for it have rekindled! Now, if I can just get my chores done so I can start on it!
DeleteCongratulations Jodi on another FUN and INSPIRATIONAL Build! 👏🏽👏🏽 Your "Tide Pool Cove" is definitely a Relaxing Seaside retreat both inside and OUT.
ReplyDeleteI think your organization of the porch is Amazing: And as I've mentioned before, I LOVE the surfboards but I also LOVE your seating along with the specific accessories you've chosen to include particularly the lanterns ( the size and shape of them is Absolutely FAB! I also like the stack of striped beach towels and the handy storage for sandy flip flops- practical AND good looking!
The EATS and Drinks that you've cooked up on the fly for the girls to enjoy, look really YUMMY ( yet another demonstration of your fledgeling Culinary Skills and their Delicious Results!
In short: The entire atmosphere immediately evokes the sound of the ocean waves gently slapping against the shore, people passing by waving to each other and/or stopping to chat. Life IS GOOD at Tide Pool Cove and what a HAPPY PLACE it has become for each of us who chance to visit here, as well!
BRAVO Jodi and "let the Orinoco flow"!
elizabeth
Thanks Elizabeth! I am so happy to know that you like the Beachside Bungalow! It was a fun theme to work with, and this kit was a great testing ground for many ideas and materials. I can't express how grateful I am to have your encouragement and support on these explorations. Finishing another long project is like taking a deep, cleansing breath!
DeleteI understand why you waited so many years to finish this beach house. You needed the technology tools to execute your plan 😉. And your comment, “I could not pass up a chance for more detail” says it all. Your talent for adding detail is amazing. Tide Pool Cove is really fun and inviting.
ReplyDeleteThanks Sherrill! It is so true that the house I could have produced in 2016 would be very different from what I am able to accomplish today with tools, experience and a whole new world of possibilities! When I look back at my earlier projects I can see my progress, and it encourages me to keep pushing just beyond my abilities so I can keep getting better. That's what I love about this amazing hobby - it never gets old!
DeleteAs always an astonishing creation. Enriched with a gazillion details and every one of them just perfect and in just the right place. You have a magic touch. Too many to mention but love things like the shoe kicker-offer corner and the mail in the box. I have just been trawling ideas for a holiday place and here it is just waiting for me. Marilyn O
ReplyDeleteThanks Marilyn! 💗 It makes me so happy that you like the beach house! There were points with the porch where I thought I was adding too much, and others where I thought I needed more. But in the end I just stayed with the flow and let it become what it wanted. It was so much fun to just let myself have fun!
DeleteMean to say how much the nose sweat was worth it, those little lamps are the absolute icing on the cake.
ReplyDeleteThanks Marilyn! I am so tickled that the design worked, and I learned how to add arch supports in the design to allow a great deal of overhang. It's so exciting when a theory actually works!!!
DeleteIt's Sheila, I can't seem to stop commenting anonymously no matter what I do. But I couldn't wait to say how much I love this! The lights came out so great, all those bumps on the head were worth it (from this perspective anyway). And the chairs are gorgeous.
ReplyDeleteWhen you're making furniture out of chipboard, do you cut duplicates and glue them together to get the thickness of wood? Or are you working with a thicker chipboard?
I love your pair and a spare just as much as the 'final' version of the chairs. The colors are beautiful.
I'm always amazed at how you manage to color coordinate an entire house without resorting to neutrals.
This is beautiful and now I'm really wondering about redoing my bungalow since I haven't worked on it in sooooo long. You're an inspiration!
But first the contest entry.
Hi Sheila! Thanks for commenting! Just when we have the Blogger updates figured out, they throw us another curveball! I think Google and Apple are in cahoots to keep us "pre-millennials" on our toes! Hope you find the solution soon!
DeleteI'm so happy that you like the way the bungalow turned out! If you are feeling a desire to remodel yours, I say go for it! It's so much fun to reimagine our dollhouses, and with all the new skills and abilities we've gained since our first tries, we can make them so much nicer!
When I use the Cricut 2mm chipboard (they are .078 inches thick) doubling isn't usually needed unless you are adding drawer fronts or structural bracing. When I use the Cricut Kraft board, such as with the powder room vanity, I use three or four layers. Often, it's just a matter of me doing a quick prototype in order to visualize the scale and then adjusting from there. When I laminate them, I use the thin Gorilla wood glue, using a toothpick to spread an even layer on every surface and then clamping until dry. This prevents delamination really well, then the first coat of acrylic paint acts lie a sealer to the chipboard.
I'm so happy you like the spare chairs and the color palette! It was all a matter of starting with that scrapbook stack and just going with all the colors in it. The creators did the coordinating work for me!
Contest? Girl! You're a machine! I can't wait to see what you have planned for that porch!!!
Ha quedado maravillosa.
ReplyDeleteQue pena que haya terminado esta aventura, menos mal que ya nos dices que tienes otro proyecto en marcha porque tus trabajos son excitantes y nos mantienen en vilo.
Me encanta la dulzura de los colores que has empleado, son preciosos.
Un saludo
¡Gracias, Mariana! Es muy amable de tu parte decirlo. No temas que me quede sin proyectos para compartir. Es la alegría más grande de mi vida ya que a los 30 y tantos hijos aún no me han bendecido con nietos, jajaja! ¡Mi mente está feliz cuando mis manos están ocupadas!
DeleteHello Jodi, I also like your beach house and the veranda. I think, it is a place for the young generation, very cheerful and making good spirits. Great job. Nina
ReplyDeleteHi Nina! Thanks so much! I'm glad you like the bungalow's playful vibe! The girls who will be spending their lives there are definitely young or at least young at heart! It was so much fun to delve into this cheerful aesthetic!
Delete¡El porche es encantador! ¡Tiene tantos detalles que lo hacen tan acogedor! Me encanta la perfección con la que se hacen los cortes en Cricut Maker.
ReplyDeleteLas luces son perfectas.
¡Gracias Isabel! ¡Me alegra mucho que te guste cómo quedó el porche! El Cricut es un amigo tan confiable, ¡no sé qué haría sin él! ¡Me alegro de que te gusten las luces también! ¡La próxima vez me dejaré un trabajo más fácil de agregar más!
DeleteDear Jodi, I love how you take an 'old' craft and update it to today's styles and colors, while still keeping it traditional. Who wouldn't want to move into one of your lovely creations. So cute, realistic and colorful! Quite the feet, and the lighting is amazing, I can't imagine dealing with all those wires. Lovely, Sandi
ReplyDeleteThanks Sandi! I really appreciate your kind sentiments! When I started off thinking about the vibe I wanted for this kit, it was always going to be in the "now", but once I saw the Mint Julep paper stack, it changed to an updated beach house with a sort of 70's vibe. I'm not sure I nailed that, but I sure had fun with all the colors, patterns and textures! Getting to challenge myself to make the appliances and décor on the 3D printer and the furnishings with the Cricut Maker was so satisfying! We really can make anything we can dream up with some thought and creativity! As for the lighting, I am finding that if I have a good plan to start with and can think through the steps ahead of time, it usually turns out good. From now on, I also have to plan a bit better for add on lights like the bedroom lamps and the porch lamps. I'll work on that!
DeleteOh, what a wonderful post! ;O) But this time the "wonder" part comes from this post showing beautiful, stunning miniature work while being at the same time frustrating. Sorry, I can't help it... finishing is the part I dislike the most... even more when the finished projects are those of talented friends who gave me so much joy with every new post about the new steps of the build... I'm going to miss updates about Kairi's home...*sigh*
ReplyDeleteBut what a relief that I'm able to comfort myself by looking forward to your next project. And whether it may be a completely new project or keeping up with a WIP... there will be more posts for me to enjoy. Yippiieeee!
You've outdone yourself with the porch and the finishing touches, too much to mention, but everything right in place adding just the right touch and creating atmosphere. No surprise the girls are happy. And with the lights on... what a sight! All your effort and pain paid off. And you hit me with those invitations, what a funny detail, that's soooooo you. And who would have supposed that Miss Goldie Locks lives in Idaho!? And who would have thought that Alice married a Mr. Wonderland and moved to Montana... you live... you learn... *grin*
Speaking of learning... I'm sorry having to disappoint you. The name of our most common mobile toilets is no German slang, it's in fact a brand's name. But the company's founder was a former US soldier, however the company's history tells nothing why he named it Dixi and I don't suppose he lost an "e" on his way. Who knows... perhaps he loved Latin and wanted to set a statement (dixi = I said)... or he was a fan of the Dixi cars. ;O)
Hugs
Birgit
Thanks Birgit! And I am sorry... To some, finishing is a sad farewell, to me it is a happy opportunity to explore the next set of ideas! And I have too many ideas to let them swim around in my head for too long! They all taunt "use me or lose me"!
DeleteAs for the next project... I brought it down from the shelf and dusted it yesterday. Then I had to test it's old wiring and appraise what it would take to bring it to a fully completed and useful life. It's a lot more than I bargained for. Uh oh! But stay tuned... We're going to hope for a happy ending!
I'm so glad you like how the porch came out, and that you get tickled by funny little labels like I do! The world is magical if you live by the imagination!
As for old Dixi Loo... I think that the American soldier must have grown up in the south (Dixieland) without indoor plumbing, lol!
Jodi, has creado el ambiente perfecto para un retiro en la playa, la casa "respira" tranquilidad y felicidad por todos los rincones. El porche me encanta, me imagino ahí sentada simplemente dejando pasar las horas!
ReplyDeleteDisfruto de cada paso en tus proyectos y cuando terminas, estoy deseando ver el siguiente, siempre logras inspirarme, darme ideas y me complace cada post tuyo!!
Besos.
¡Muchas gracias por tu amable ánimo, Pilar! ¡Tu trabajo también me inspira y estoy muy feliz de habernos convertido en mini amigos!
DeleteLove it!! Great job.
ReplyDeleteThanks Wanda!
DeleteOh Jodie, it's a masterpiece, no wonder the girls are celebrating, everywhere you look it's gorgeous. I love all the accessories, your attention to detail is awesome.
ReplyDeleteThanks Polly! I'm so glad you like how the porch came out!
DeleteJust getting a chance to catch up with everything I have missed over the last few months and, as always, I am so impressed with your work, Jodi. You leave no detail undone and anyone would kill to own a full-sized cottage like this. I loved the shot of Rose sitting at the kitchen island because I could see the stripes on the living room sofa playing off the stripes in the butcher block counter. Nice touch that I had not noticed before. Fabulous job. Hugs - Marilyn D.
ReplyDeleteThanks Marilyn! I appreciate your kind comments and that you took the time to leave them! There was so much of the materials in this project that were not exactly planned - I just happened to have them in my stash and luckily they worked nicely together! I'm so glad that you like how it all came together!
DeleteAwesome job, Jodi! So much detail! I built the very same beachside bungalow. The address of mine is 1225 Christmas Tree Lane, Cape Cod MA. The reason for the address is because a nice woman noticed that I was admiring it in a display at our local Hobby Lobby. I said that I would buy it, if I had the money. She reached into her purse, and gave me $100 to buy it. She said that it was a Christmas gift from her to me.
ReplyDeleteI love how detailed yours is. What did you use for wallpaper? I used scrapbook paper. Once again, awesome job! Peggy K.
Thanks Peggy! It was such a fun challenge and a wonderful beach-y theme to indulge in! I just love your address and the story behind it! What an amazing thing to give someone the gift of creativity! I used the Mint Julep paper pack from ColorBok. The paper was super thin so I had to be extra careful, but I loved the vibrant colors and bold patterns. Dollhouse wallpaper has become so expensive in the last few years, especially when you factor having to order it online, sight unseen, and pay shipping/tax on top of it. I love the way a paper stack is already coordinated so it takes the uncertainty of harmonious aesthetic out of the equation. The only challenge then becomes finding a fabric to coordinate!
Delete