
Last week, I shared the process for 3D printing the appliances for the Beachside Bungalow's kitchen. This week, I'll share the process of designing and cutting the cabinet pieces using Design Space and the Cricut Maker. The least hope, even if you don't have a cutting machine, is that you find it interesting. The greatest hope is that it helps, in some way, for you to achieve your very own dream kitchen. Whether by hand or by machine, paper or wood, or even plastic.

As you all know by now, I start with the sketch. Using graph paper with 1/4" squares, I draw the kitchen to scale. Because the graph paper is only 8.5" x 11", if my room is larger (which it is), I tape a couple pieces together, matching the squares. Now I have a true representation of the space I have to work with on one wall of my dollhouse. In the Beachside Bungalow, that is 11-3/4" (29.21 cm) deep and about 9" (22.86 cm) high. If I'm trying to decide on a layout, I account for the space that the appliances will need first, and then see what space I have left for the cabinets. Seeing a visual really helps me to end up with a symmetrical layout, no matter how large or small the space.
 |
| Scale sketch of the right kitchen wall. I much prefer deep drawers to cabinets with shelves for any kitchen. No stooping or reaching! |
Once I have the drawing and the overall measurements, I can begin to work up on paper the pieces and precise measurements of each cabinet that I will need to create. I have an idea about how they will go together by asking questions: Do I want the sides to overlap the back to hide my seams? What is the exact thickness of my material (in this case chipboard)? Where will I need support pieces? I either imagine or draw how the pieces will fit together so I know where to subtract material thicknesses. This allows me to stay within the overall width, depth and height. I assign a name to each piece that I'll remember, then I create a "cut sheet" with the measurements. The quantity that I need of that particular piece is placed at the beginning of the line with a circle around it.


Since I am sticking to true 1/12th scale, it's important to know a few things about the standard measurements in real life kitchens. For example: What is the standard depth for upper and lower cabinets, how wide are appliances, how far do countertops overhang the fronts of cabinets, how far above the lower countertops do uppers get hung and how tall and deep are toe kicks? Once I know these measurements, I can convert them to 1/12th scale. I'll need the decimal numbers to create the pieces in Design Space. Here is a link to convert fractions to decimals.


In Design Space, I start with a square from the Shapes menu. I unlock the aspect ratio, then set the width and height to my needs. Ever assemble flat pack furniture from Ikea? This is just reverse engineering.


You'll see that some of my measurements in the above cut sheet are color coded. Those are then coordinated in the Design Space program. This is because I often need to cut several sheets due to the 10.5" x 10.5" limitation on each 2mm chipboard sheet. Color coding helps me to organize my pieces all through the process, and allows me to group them together so I can control what cuts where on each sheet. It would be a great feature if Design Space would let you label each piece in the design screen. It would be so helpful to those of us with complicated jobs and a whole lot of pieces to keep track of! Plus, you could print out a screen shot to use as a key when you assemble them away from the computer.
 |
| Color coded in Design Space. |
 |
| The pieces cut on the sheet exactly how I assign them. |
Cutting can take several hours. Each piece of 2 mm chipboard receives 24 cutting passes. Once the cutting is finished, the assembly process begins. Keeping your pieces organized is essential so that you don't get confused and glue the wrong pieces together. I leave them on the mat until I am ready to assemble those pieces. You can also label them in pencil. Dry fitting is a must, and you may have to cut corrections or additional brace pieces once you see the design going together. I use wood glue in a bottle with a small nozzle to glue my cabinets. I find that the thin consistency makes for a cleaner job.
 |
| "Caulking" the seams with glue where they won't be seen or interfere with function adds great strength to the piece. Add a thin bead of glue, then run your finger along the joint smoothing the glue and removing excess. Just like real life caulking! |
 |
| The drawing helps me to remember my intentions. |
Some crafters seal their chipboard edges with CA glue. I have found that not to be necessary. I apply several thin coats of regular acrylic craft paint, lightly sanding between, with great results. My first chipboard cabinets, made in early 2016, are still in perfect shape. CA is messy if you are not extremely careful, can create a rough surface requiring sanding, is hard to clean off fingers and may also give off harmful (and invisible) gasses which are not good to your lungs. That's my experience, but feel free to take it for what it's worth to you. :O)
Now comes the hardest part! What color? I narrowed it down to two shades of green which I matched and pulled from the chevron wallpaper: Sea Glass (left) and Mint Julep (right). I liked them both so much and kept vacillating between the two. Finally, I painted a chip and took several photos with them against the walls.
 |
 |
| With the floor tiles. |
 |
| In the light. |
 |
| In the shade. |
Although the Mint Julep was such a pretty, soft green, I liked that the Sea Glass had a little blue to it. I reasoned that this would allow me to cohesively toss another color family into the design when it's accessory time. And I'd be able to use the Mint Julep to paint some of the kitchen accessories.

Once they were painted a few times, sanded in between and had their pulls installed, I was happy with my choice. I think they will make a nice backdrop and allow all the kitchen things and colors to stand out.
The drawers open but the closed cabinets do not. Pin hinges and chipboard do not make good bedfellows. So why do I choose to use chipboard instead of wood when the Maker will cut either? Because the Maker can only cut wood which is less than 1/16" thick (1.5 mm). This is fine for furniture, but I have found that with cabinets or large pieces, thin woods tend to warp or are especially vulnerable to breaking when sanding. And the chipboard is more in scale and cost effective. When I can machine cut in 2mm or above thicknesses, I will likely return to wood cabinets and make them all open. That is also why I went with open cabinets - I like to see all the pretty kitchen stuff!
 |
| Uppers just resting on the lowers. |
With the cabinets ready, I could turn my attention back to the finishing details on the 3D printed appliances. There was a little sanding and assembling to do before I was confident that they were really going to work. Here's how the stove/oven went together...
 |
| Oven interior to be painted with Zinc. |
 |
| Visible stovetop areas painted with Zinc. |
 |
| First, adhere the frame to the stovetop. I used Aleene's The Ultimate contact cement. |
 |
| Next, center the gas hobs and glue. |
 |
| Finally, the burners. The photo with the knobs attached is coming... |
 |
| Main box, top, door front, fan housing, food plate and spinner. |

 |
| "Glass" affixed on the door first... |
 |
| Then the "radiation blocking metal screen". |

 |
| Ignore the medicine cups. :O) |
 |
| Stovetop/fan light and under counter lights. |
 |
| Ignore the medicine cups. :O) |

 |
| Oven interior light. |

Now that the right side of the kitchen was pretty well in hand, I could begin working on the left side. The plan was for it to be comprised of an island which would house the sink and dishwasher, a dummy under sink cabinet, opening drawers and dining space for three stools. I created it in the same way as the other cabinets, making a scale drawing and then using that to create a cut sheet for the chipboard pieces.

I decided that since Kairi is an artist, and already has shown her preference for her home to have some character, she wouldn't want matchy-matchy kitchen cabinets. So for the island, I went with the mint julep paint color. It's such a pretty green!
 |
| The dishwasher will cover the unpainted area. |
 |
| The back and sides of the island have detail trim. There will be a 1-1/2" overhang of the countertop from the back with space for three stools. |
The fridge was made from a styrene kit that Model Builders Supply used to sell. I've had it in my stash for years and I don't think they make them any longer. It is totally non functional, and my intention is for it to remain a stand in until I have the time and brain power to create a 3D printed and functional model. It was perfect for this kitchen because it is compact and white to match the other appliances.

Now that the cabinets and appliances are ready, I'll have to decide on countertops. Remember how I did the vanity counter for the main bathroom? I loved the way they came out and really considered going with that style for the kitchen. But is it the right look for this kitchen? Somehow, I think Kairi would prefer to have simple, light colored butcher block counters.

While I contemplate, I'll continue playing with accessories on the 3D printer. Here's what I've got designed, so far...
 |
| K for Kairy, canisters, plates, plungers, tp & towel holders, faucet, Keurig, "K-Cups", coffee mugs and toasters. |
And here are a few of them after printing to test out in the kitchen for scale. A few more tweaks and I think they'll be great!

And that is the end of a very long winded post! Thanks for sticking with me, and a ~Hearty Welcome~ to all the new followers! There is no better priviledge than the opportunity to inspire and encourage one another in our mini passion!
xo xo,
Jodi
I love how it looks so far! When you finish the accessories to your standards you should put the designs up in your Shapeways shop!
ReplyDeleteThanks Sheila! Great idea! Shapeways charges a little more than I feel is sometimes worth the item, but it would be interesting to make a set of things so it was more cost effective.
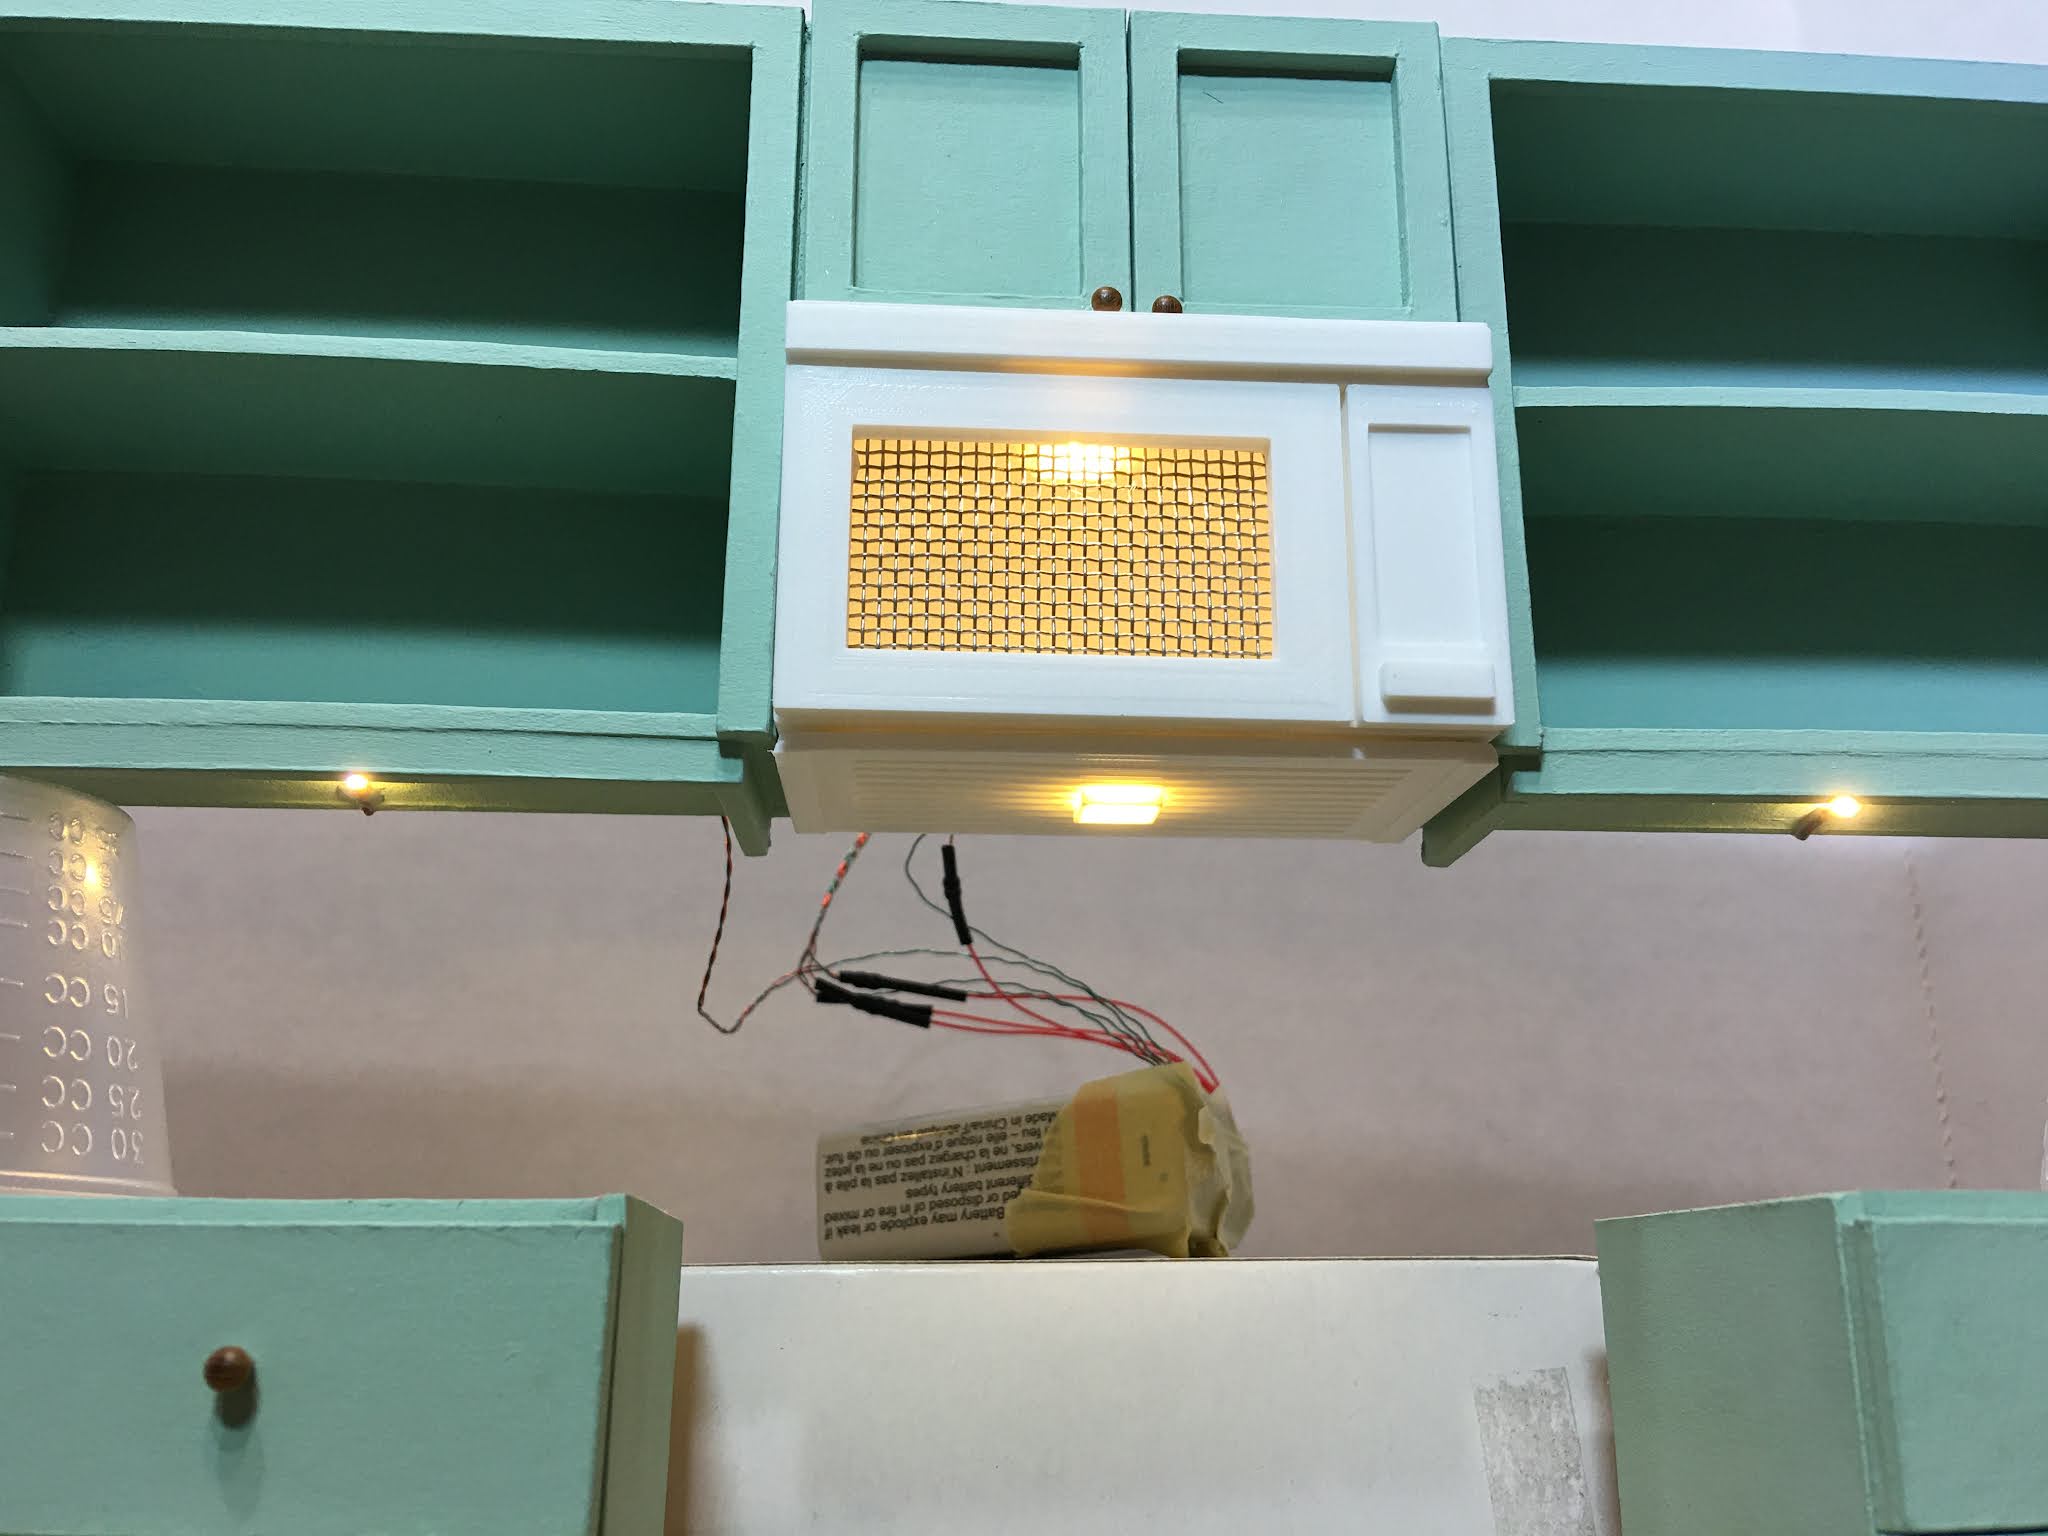
DeleteMe encanta como te esta quedando. Veo que te apasiona respetar la escala al maximo y ajustarte a la realidad, por eso me permito ponerle un pero.. grande a tu cocina. Nunca, Jamas, un tecnico o electricista colocaria el microondas encima de los fuegos, aparte de que esta prohibido ( al menos en España ), es poco aconsejable por los riesgos. Espero seguir tus avances, y aunque algo largas me encantan tus entradas, aunque no suela comentar. saludos ram7255
ReplyDelete¡Hola Ricardo! ¡Es bueno verte aparecer en los comentarios! Y gracias de verdad por preocuparse por el realismo con respecto a la instalación de un microondas sobre una estufa de gas en la casa de muñecas. En los EE. UU., Es perfectamente aceptable y se realiza con mucha frecuencia. Para calmar su preocupación, he incluido un enlace a continuación que incluye respuestas a la pregunta "¿Se pueden instalar microondas sobre estufas de gas?". Aparentemente, depende de la placa de cocción, el microondas y el sistema de ventilación. Pero en el caso de los electrodomésticos de Beachside Bungalow, crearemos la historia de que todo cumple con el código. : O)
DeleteGracias de nuevo por visitarnos y lamento las largas publicaciones. Realmente estoy tratando de ayudar a las personas a sentirse cómodas dando un salto con sus propios proyectos.
https://www.google.com/search?q=can+microwaves+be+installed+above+gas+cooktops&rlz=1C1ONGR_enUS932US932&oq=can+microwaves+be+installed+above+gas+cooktops&aqs=chrome..69i57j33i22i29i30.16172j0j7&sourceid=chrome&ie=UTF-8
Bravo! I appreciate your discussion on wood vs. chipboard. I've always chosen 1/16 basswood, but I'd prefer to us the thicker 3/32 because it is more substantial, and while my Maker will handle it, it seems that is works harder--certainly longer. I've made my prototypes using chipboard and like the result. I'm not sure that I have another kitchen project in mind, but I think I'll work with chipboard as you have very nice results. My favorite item: the coffee maker! I've yet to find online as realistic looking as yours. Double Bravo!
ReplyDeleteThanks Ann! I have a feeling Cricut is going to roll out an improved Maker soon. They are giving crazy discounts on the current model. Best of luck with your cabinets! I can't wait to see what you're creating!
DeleteOh! And... Send me your address again and I'll pop one of these coffee makers in the mail to you!
Thank you again for sharing your plans and designs. I love to see the results and so far they are very good.
ReplyDeleteHugs, Drora
Thanks Drora! I think the mini market has War era, Victorian era and modern styles covered. It's when you want realistic, contemporary and common that you have to come up with your own. Thanks goodness for the 3D printer and the Maker!
DeleteAnother stunning kitchen! You should consider a you tube channel on using the Cricut for cabinets....I'd totally subscribe.
ReplyDeleteThanks Carrie! It thrills me to know that I am helpful, but I have what you'd call a face made for radio! :O) And a pretty wicked social anxiety problem. I'll leave video to the pretty and presentable Julie Warren's of the world, lol! :O)
DeleteAbsolutely FAB-U-LOUS!!!!
ReplyDeleteThanks Elizabeth! 💗
DeleteThough I will never progress to a Cricut I still love following your processes and seeing the terrific results. Much of the satisfaction in this hobby is starting something from scratch and seeing it decelop into the thing you imagined. Thanks for letting us share that feeling.
ReplyDeleteThanks Marilyn! You'd have the Cricut machine figured out in an afternoon! You are one smart cookie but even mediocre folk like me can get the hang with a little practice. But, when you have the amazing Elizabeth at Elf Miniatures to help, why make trouble, right? Thanks for being here to share with! 💗
DeleteEstás creando nuevamente una cocina fabulosa. Me gusta el color elegido.
ReplyDeleteEl microondas es espectacular !!!!!
¡Gracias Eloisa! ¡Me alegra que te gusten la cocina y el microondas! ¡Me mantienen desafiado y divirtiéndome!
DeleteAwesome work Jodi! Looking great. You are powering through this build!
ReplyDeleteThanks Shannon! I am having a lot of fun but am in a hurry to get it really finished before I lose my enthusiasm. The last thing I need is another built project that I just can't bring myself to finish/furnish!!!
DeleteOh what a wonderful post! ;O) However it was somehow a true case of right-into-my-face... because seeing once more how impressively organized and structured you are always reminds me so badly of my own working method... which is chaos and of course always a good dose of "but I'm pretty sure it must be in that pile of stuff". *LOL* But before I'm telling you how lucky Kairi is to get a beautiful kitchen like this I first need to thank you for always taking the time to make tutorial posts full of useful and helpful information. You're always so generous in sharing your knowledge, the results of your own trials and errors as well as your techniques and knowing well how time consuming it is to write such long well explained posts I really want to say thanks for all your work and effort. Be sure it's well appreciated! ;O)
ReplyDeleteSpeaking of appreciation - you should consider sending a short message including a link to this post to Cricut's Customer Service. I suppose craft companies like this really appreciate feedback of their customers and like to hear ideas for improvement from the ones who use their plotters. It doesn't cost to ask for a new feature, does it?
And now to the kitchen - it's amazing how well you managed to get the most out of the very few space you had. Although it's not big Kairi will still have a lovely kitchen with everything at hand and all the appliances she needs. I also like your choice of colours and I'm impressed that you used both shades of green for the different units - I would not have thought of that but it turned out awesome. I'm also amazed by your kitchen accessories - btw, have I ever told you before that you and your machine park are a dream team???
Hugs
Birgit (who had somehow difficulties to ignore the helpful cups *grin*)
P.S.: It made me smile that you liked the Santa-egg the most as this was the most fun to make. And I had to smile even more about "War and Piece". Do you know a Peanuts episode where Charlie Brown is doomed to read "War and Piece" over the winter holidays and even falls asleep at Peppermint Patty's New Year's Eve Party because he tortured himself so much trying to read it? Well, in this episode the ever helpful Linus van Pelt points out that Tolstoi's wife made seven copies of that book... of course by hand and without electrical lights and during the nights after her daywork with the household and many children. So Linus asked if she could write it down 7 times then why would Charlie not be able to read it at least one time? Well... I must confess I like Linus very much but in this case I'm more Team Charlie. ;O)
Thank you, Birgit! I hope you will not ever let my method of creating make your method seem inferior or wrong - just the opposite! You and your ways are genius! It is amazing to learn how we all accomplish our mini goals, and it encourages everyone to know that there is no right or wrong, no special talent or skill required to achieve your dreams. Every creator has their own way of doing things, and discovering that about yourself is what makes each of us special. Russ works best in chaos (you should see his garage) and comes upo with the most amazing ideas! I admire that so much about him because I am incapable of working that way. He is better at adapting to any environment and can still accomplish great things. I am unable to work in a mess or function in disorganization. I am limited by that lack of adaptation. Russ will definitely be the one to follow in a crisis and I know you have those same special qualities!
DeleteI am so happy you like the kitchen so far, and I am definitely a Charlie Brown, too! Tolstoy was a very lucky man to have a partner who believed in him so much that she was willing to go to those lengths for him. We should all strive to give love like that to every person in our lives at every opportunity! 💗 I knew War and Peace would make me a better person, but this was an unexpected way! Thanks for the great story!
I really admire your ability to think through all the aspects of your kitchen before cutting any pieces. It’s looking really nice. Also you are such a quick learner with the 3D printer. The kitchen appliances are fabulous.
ReplyDeleteThanks Sherrill! I really enjoy the whole process of design through build! It's amazing what you can accomplish when you are just fascinated by something and are willing to try and fail a bunch of times. Sound familiar? :O)
DeleteYou are a fantastic interior designer. This kitchen is perfect in this room; a cozy kitchen.
ReplyDeleteThank you Faby! It is such a joy and priviledge to express this compulsion through miniatures!
DeleteDear Jodi, You are so efficient with your building process! and the results are just so realistic... I could walk into that kitchen! I think your color choices make perfect sense and really balance the two wallpapers in the room. But I have to say, your appliances are beyond fantastic! With the light on that microwave is ready to start humming! (I need a cup of tea....!) And the little added pieces... the coffee maker and the toaster... I am so used to trying to find where to buy these items... and you are just making them for yourself!!! I am so impressed!!! Keep up the great work!! :):)
ReplyDeleteThanks Betsy! It's been fun to challenge myself to make everything for the kitchen. Like you, finding unique and realistic appliances, big and small, is a challenge and often a good wallop to the pocket book! My progress is bound to slow down now, though, because the printing part takes so long and usually a couple tries to get things right.
DeleteMe encanta como disfrutas con tus diseños y como cuidas todos los detalles.
ReplyDeleteY me encanta como disfruto yo viendo tus trabajos.
Precioso.
Un saludo
¡Gracias Marian! ¡Es encantador saber que te ha gustado la publicación!
DeleteJodi, I can't thank you enough for this post. I have had my Cricut for about a year now and still have only used it once - to cut paper letters out for the sign for the North Pole Postal Service. I have taken the summer off and am ready to get back at things. Your explanation is so detailed I may actually be able to use my Cricut to make the front service counter for the Post Office. I will have to use mat board as our local Michaels never has the Cricut chip board or thin wood in stock and I have not been able to order it online for Canada delivery either. However, I can get mat board anywhere and once it is painted up it should be fine. Thank you for giving my courage and, even more importantly, great instructions!!! Big hugs. - Marilyn D.
ReplyDeleteHi Marilyn! It's nice to see you! I am so happy that you found the post helpful, and I am excited to hear you excited about making the service counter for the post office! It must be so frustrating not having supplies readily available, but I guess that is what makes us creative and resourceful! Mat board should work, but you may have to give it additional passes to cut through. The mat board I have takes more than 24 passes when I use the chipboard setting, so you may have to experiment a bit until you find the right combination of settings and pressure. If you find that it has not cut clean through, you can finish the cut with an xacto knife. Also, you can cut cardstock or kraft card and use the pieces as patterns to cut wood or the mat board in a pinch. Best of luck, feel free to email if I can help in any way, and I can't wait to read about your progress and summer on the blog!
DeleteCuantas cosas me he perdido en mis vacaciones desconectada de internet! Pero es un gusto volver y verlas todas juntas!
ReplyDeleteDe nuevo inmersa en una preciosa cocina, me gustan tus planos y estoy segura que cuando termines va a ser sublime!!
Besos.
¡Gracias Pilar! ¡Estoy feliz de que hayas vuelto y poniéndote al día con las publicaciones del blog! ¡Espero que hayas tenido la oportunidad de soñar y planificar un montón de nuevos proyectos durante las vacaciones! Estoy esperando un pedido de madera para las encimeras de la cocina BB, pero he estado ocupado con otras cosas mientras espero. ¡Me alegra que te guste el progreso!
DeleteWhen cutting the chipboard, how do you keep it from getting torn up by your Cricut machine? I'm using Cricut brand 2.0 mm chipboard, on a strong hold mat with the chipboard taped down on all 4 sides, a knife blade and a Cricut Maker machine. My machine makes about 8-9 passes and then gets hung up and won't continue cutting. I assume it's because there are small "shaving" looking peels all over the surface and those are interfering with the cutting process. I've tried several times and the peeling happens every time. Would love advice! Anne
ReplyDeleteHello Anne!
DeleteI'm so sorry to hear that you are experiencing difficulties with your chipboard! I'll try to help with what I know. The only time I have experienced the top layer peeling up, coming off and interfering with the cuts is when 1) My cut lines are less than 1/8" apart. 2) My design is very intricate and has cut lines very close together. or 3) It's time to install a new blade.
Here is a link to Cricut's official Maker/Chipboard/Knife Blade info page. It may help you to get the settings adjusted correctly, too.
https://help.cricut.com/hc/en-us/articles/360009431434-Cricut-Maker-Cutting-Cricut-chipboard-with-Knife-Blade
There are lots of great YouTube videos out there, too, so check them out. There may be someone with your exact issue and a workaround.
Best of luck, and please come back and let me know how you resolved it!