In my continuing effort to pursue a bit of realism in the Beachside Bungalow build, I have endeavored to design and 3D print the kitchen appliances. Maybe a better and more truthful title for this post would be "The Tries And Retries Of 3D printing At Home". In any case, I thought I would share the process and the outcome.
 |
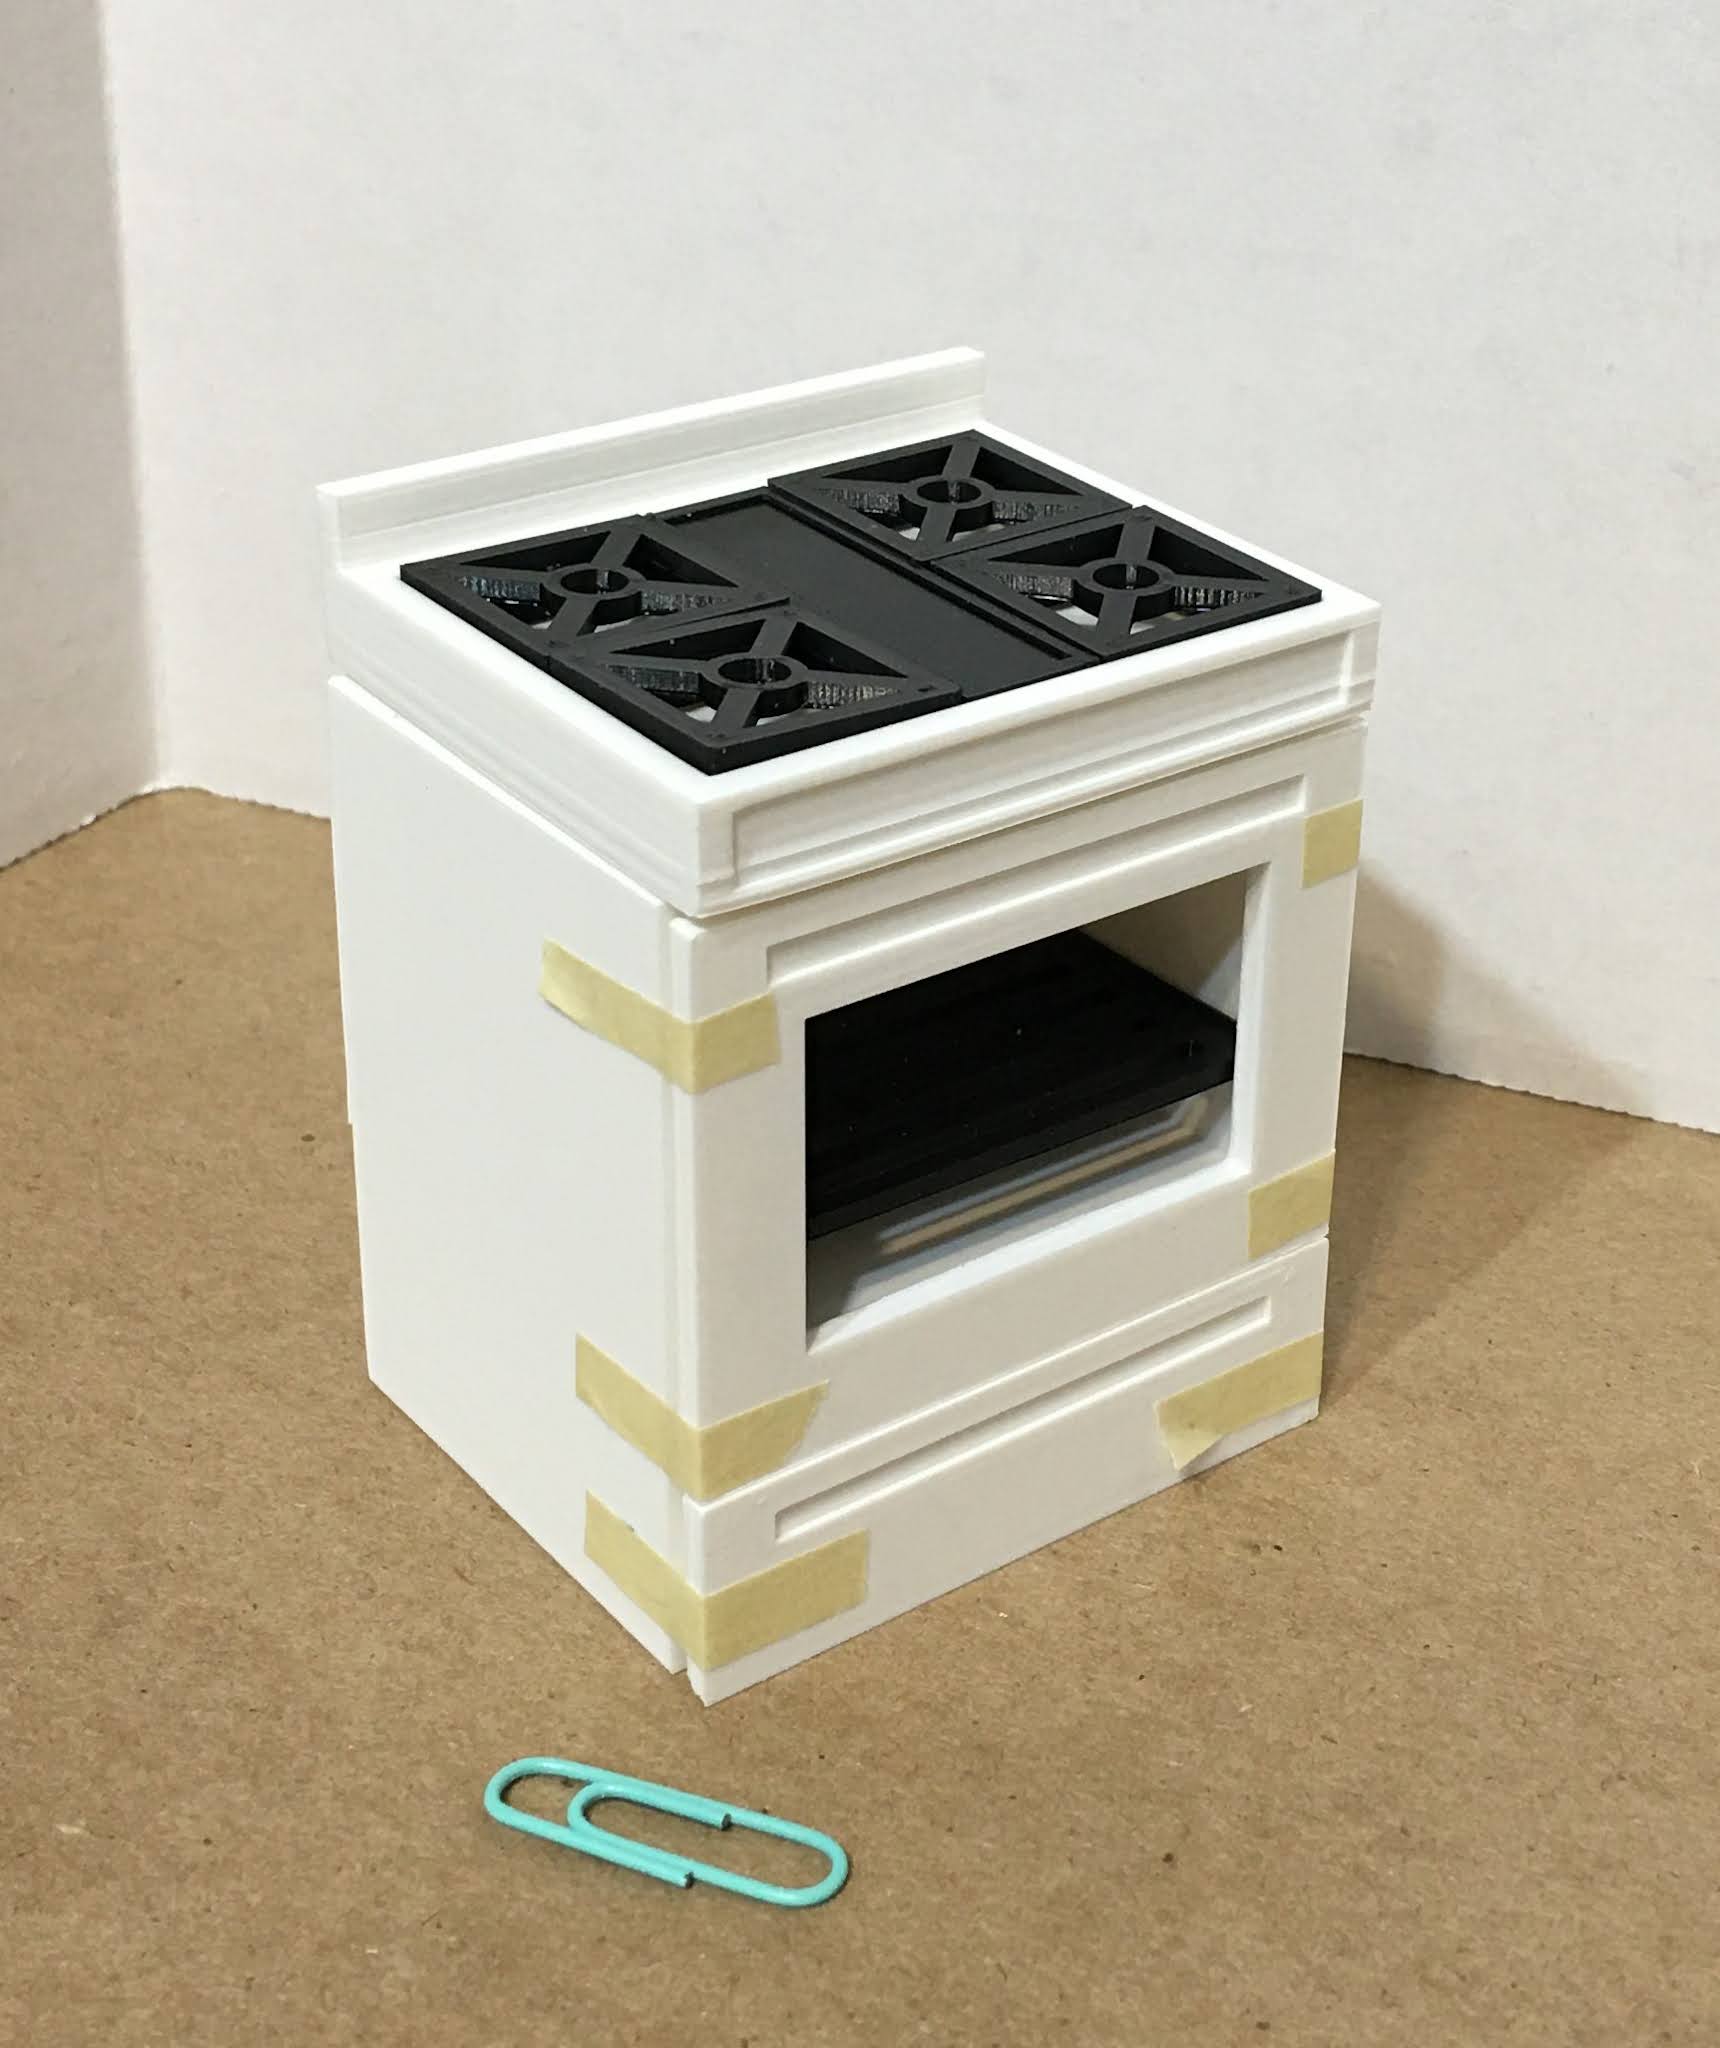
| Oven/Stove Unit Before Finishing. |
It all started with an idea (those tend to get me into trouble), and then I tried to draw it out on paper. This helped me to get measurements and see what it would look like.
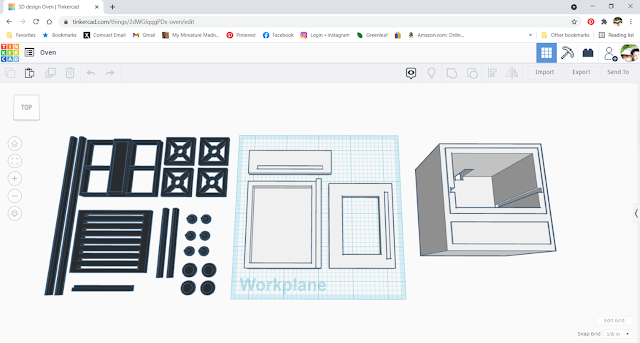
Then I headed on over to Tinkercad to see if I could come up with a design for the appliances. I played with the shapes that they have available. By combining them and cutting away from them, I created the parts and pieces. I have to keep in mind my printer's limitations and, from past experience, what orientation will work best for the end product. Some things I have to consider are: What sides of it are going to show, are there any overhanging parts that will need support (and ultimately more finishing) and which surface do I want to be the smoothest. These answers effected the orientation of the pieces.
 |
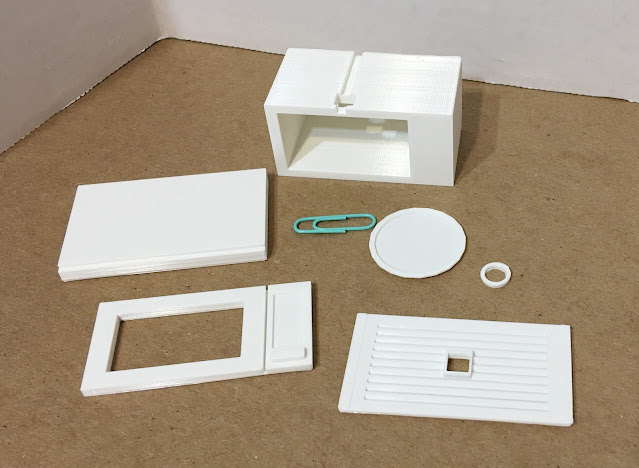
| The Parts and Pieces for the Oven |
Because I am limited to about 5" x 5" x 5" on the print bed of my printer, I had to split some of the appliances into several files, especially because some of the parts needed to be printed in different colors. I saved each "Tinker" as a separate file and then export it.
 |
| Black parts: rack, burners, frame, knobs, gas hobs and handles for assorted appliances. |
 |
| Main oven unit. |
 |
| Oven top, drawer and door. |
Once exported, I opened the file in my slicer program to select the settings. There is a BIG learning curve here (ask me how I know), so I won't even begin to try to scratch the surface in this post. I'll just say this is where the trial and error begins, where I have experimented a good deal, and how I've begun to build my foundation of knowledge. I still have a long way to go! Once I was happy with the settings, I saved the file to a thumb drive.
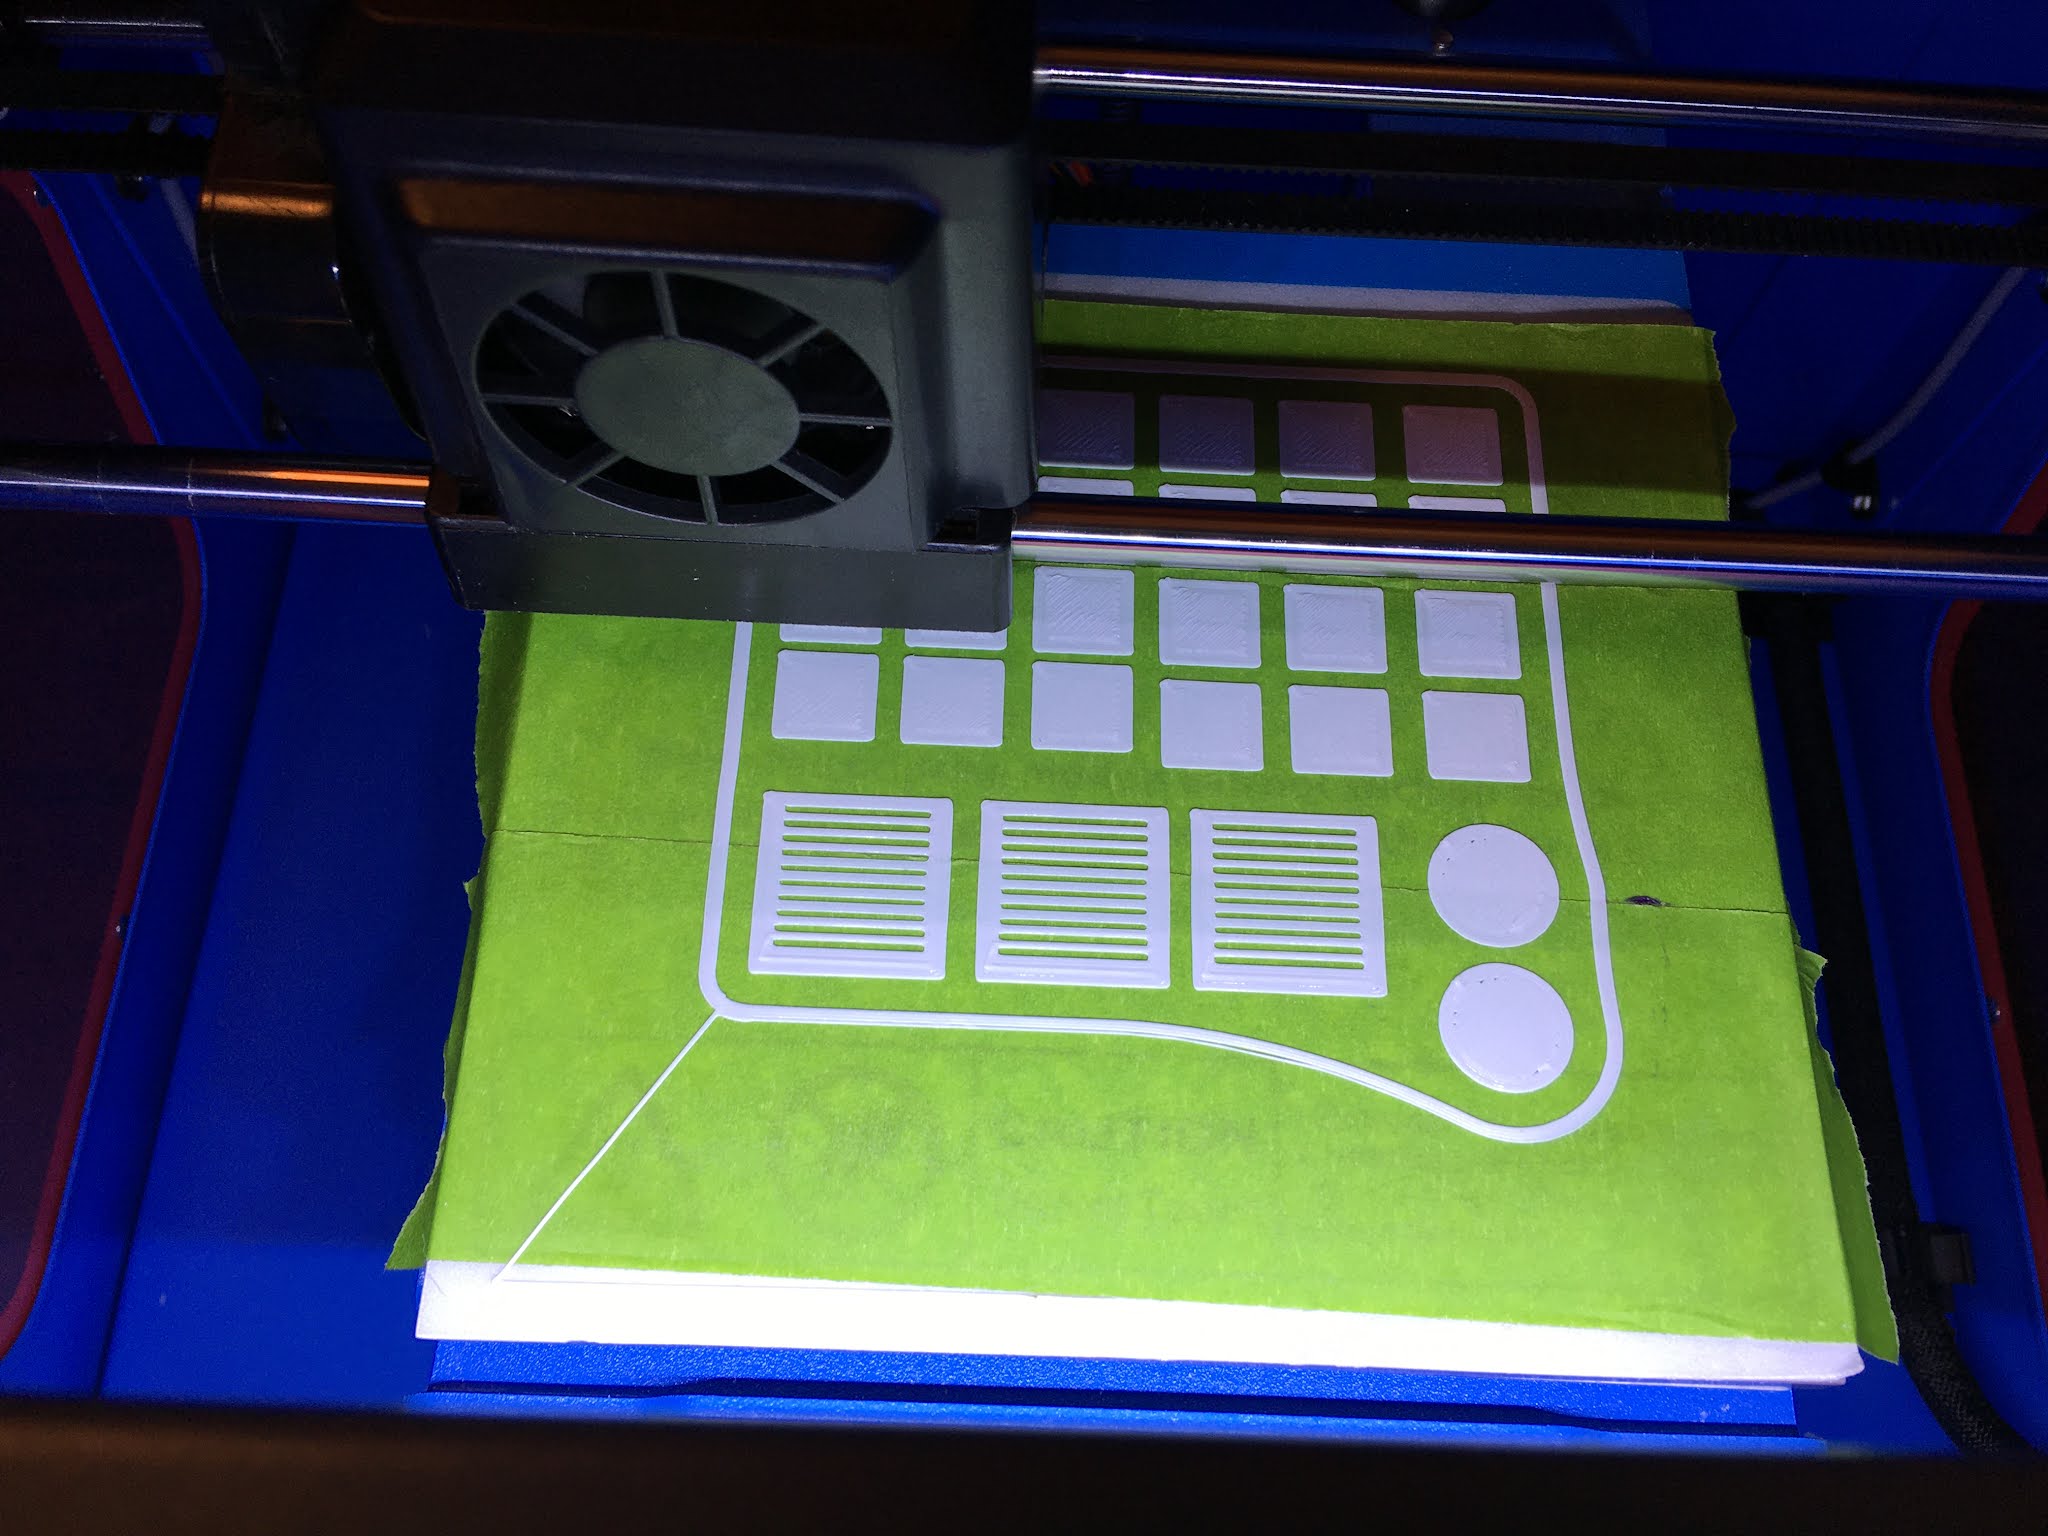
Finally, it was time to start the adventure that is printing itself. At the 3D printer, I leveled the print bed, loaded the print material (PLA, changing colors if necessary), added adhesive to the print bed, plugged in the thumb drive, selected the file, started the print and HOPED! Sometimes, all is well and I end up with nice things like fans, light switches and wall outlets.
 |
| Light switches, paper towel holders, fart fans and outlets. |
 |
| All is well after the first few layers. |
 |
| After the print is finished - a success! |
 |
| Wee switches and outlets. Nearly perfect and this is REALLY Magnified! |
 |
| Fart fans for the bathroom need a little sanding. |
Sometimes, for a vast array of reasons, I come back to check on things and see an unwelcomed problem like this. In this particular case, things started off well, then a layer did not stick to the previous layer. That became stuck to the nozzle, caught and dragged all the other pieces and made a mess of everything. Nothing for it but to start over. If I can identify the issue (temperature of nozzle or bed, layer height, speed, enough adhesive on the bed etc...), I can adjust the settings and begin again. Sometimes, it's just my unlucky day. :O(
Often the problem arises from a total brain fart that is all my own fault. This oven top is obviously way too deep for the oven. Where was my head when I wrote down these measurements?!?
And the burners and frame were not long or wide enough, either! But I didn't discover this until the piece was finished printing and in the test fit. Hours and material wasted, but it's just a part of the process. It's humbling, but I dust myself off and try again.
Waiting is often the hard part. It generally takes anywhere from 3-1/2 hours to over 12 hours for a design to print.
The best medicine is to use the opportunities to improve your designs.
 |
| Adjusted top tray and all new burner design. |
And if I'm willing to spend the time, I may end up with something better. Once finished and detailed, this oven will light up, though the door and drawer will not open in this first prototype.
 |
| With gas burners and frame. |
 |
| With oven rack. |
There is generally some finish work to be done, such as jagged edges which require a little sanding.
 |
| Drop in sink and lip before sanding. |
 |
| After sanding. |
Some creators go all out with their post production finish work. This piece has been dry sanded with several ascending grits, then wet sanded, and finally had an epoxy coating applied over it.
But I'm not there yet. I think I'll be content with a little sanding and detail work just to make the appliances and fixtures look a little more authentic.
 |
| Microwave parts and pieces. |
 |
Microwave printed. This version will not open - maybe someday.
But it will be lighted inside and have an above stove light in it's fan housing. |
 |
Dishwasher dummy front and cabinet spacer.
Maybe one day I'll try an opening model with pull out racks. |
 |
| Recesses for handle and control panel. |
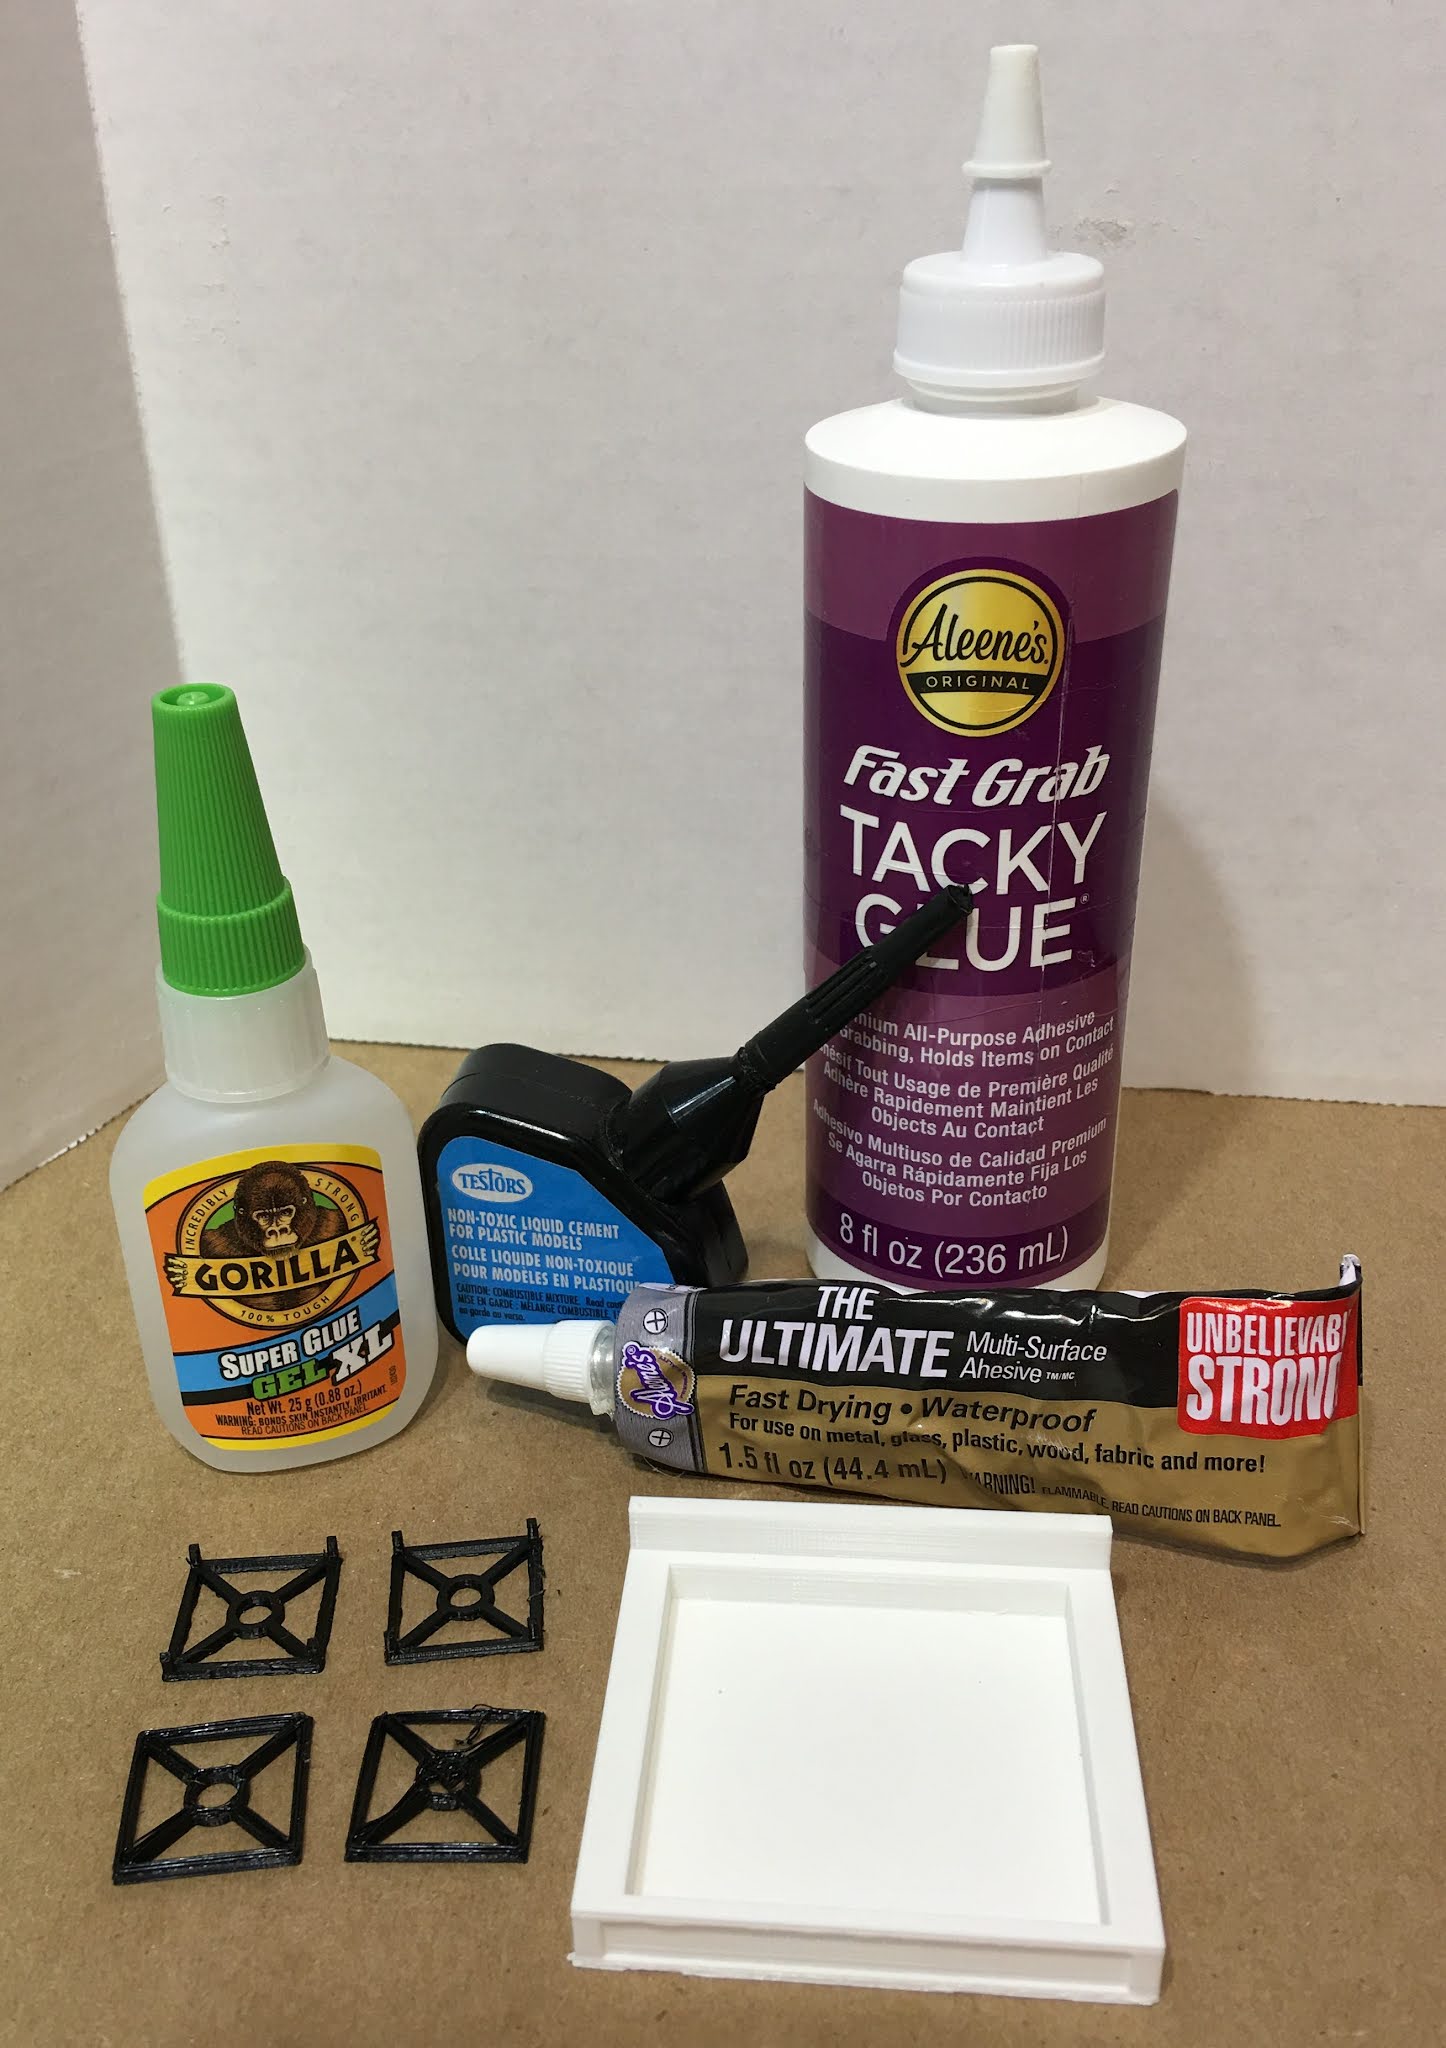
Just when you think you have all the printing figured out, you realize that a lot of these pieces will need to be glued together. Oh, no! Is there an additional learning curve to negotiate when it comes to gluing PLA together? Yep. Yes, there is. And like so many topics that you research on the internet, there is loads of information, much of it conflicting, to sort through. So, I took what seemed like the best four suggestions and tested them myself.
Super Glue Gel,
Testors Plastic Cement,
Fast Grab Tacky Glue and
Aleene's The Ultimate contact cement.
I used the faulty oven top and burners as my guinea pigs. I applied a liberal amount of each adhesive to the burner, then pressed it firmly to the surface of the stove top. I let them sit for 48 hours with no interference.
 |
Super glue gel top left, The Ultimate top right.
Testors bottom left, Tacky bottom right. |
I used my tweezers to try to pry the surfaces apart. As you can see, there were two clear winners.
The Gorilla Super Glue Gel was hard to pry up. Even when I did finally get hold of a corner, the rest of the piece stayed attached and fought me while trying to remove it.
The Ultimate Glue was much the same - strong hold and one that did not break when one section was finally pried up.
The Testors, while it is specifically indicated for ABS 3D prints, does not perform well at all with PLA. There was absolutely no resistance against force.
In fact, I had tested it on the microwave prototype at the same time. The pieces easily pulled apart, and in spite of sitting undisturbed for two days, the adhesive was actually still wet. This type of adhesive is supposed to partially melt plastic, causing each of the surfaces being glued together to become one. Apparently, it does not cause PLA to melt. It's a definite no on this adhesive for PLA.
The Tacky glue was just as disappointing. No resistance, and I suspect that over time, even if no force or pressure was applied to the piece, it would spontaneously fail. It just peeled away from both surfaces.
So the good news is: 1. Now we know! And 2. There are two contenders in my arsenal! Super Glue Gel and Contact Cement. I'll let you know how they perform as I assemble all these pieces in the coming days.
 |
| Winners! |
When I pull back the curtain you can see that 3D printing isn't glamourous or easy. Like every other skill I acquire in dollhousing, there is a learning curve. Practice, practice, practice makes nearly perfect, and if I am willing to spend the time to learn, it can be very rewarding. Just keepin' it real!
Hopefully, back next week with kitchen progress on both the appliances and cabinets! To all the US residents - Happy Labor Day! Enjoy your long weekend!
xo xo,
Jodi


This is so interesting to read! And educational!
ReplyDeleteI love how the appliances look so far and I can't wait to see them in the kitchen. I know you'll end up with something that looks perfect for the space.
Oh, I'm glad, Sheila! Thank you! It has been fun coming up with something that works, but I'm having a hard time stopping at "good enough". Am I an overachiever trying to reform? Maybe!
DeleteYou are on quite an adventure. The finished products will authentic and amazing. I am enjoying watching you work through the process, learning as you go, for which I admire you. Being able to design and develop your own inspirations gives you so much freedom to get your desired results in your project; I admire that ability.
ReplyDeleteThanks Ann! It's almost freeing, though each time something goes awry I ask myself if making the wood version wouldn't be easier, lol! It is fascinating, though, and continual learning supposedly keeps us young, right? :O)
DeleteOh Jodi! I love it when you get technical! Thanks for sharing the good, bad and the ugly with us. The results are looking really good.
ReplyDeleteThanks Sherrill! It is great to see the designs coming along with each new "opportunity"! :O)
DeleteThanks for sharing your trails and errors Jodi.
ReplyDeleteWhat I love about this hobby is that we can play with so many different materials and techniques and the learning is endless. I doubt, I will be 3D printing any time soon, but this is a great remainder to keep on trying no matter what we are making.
I look forward to see how you finish these beauties.
Have a great weekend,
Anna X
Thanks Anna! You are so right! It's the challenge that keeps us interested and coming back for more! And there is still so much to try! I think we'd be awful board without dollhouses, or we'd be awfully good at video games, lol!
DeleteThanks for this detailed post. While I probably won’t be 3D printing, I can use the info about the glues. Can you melt the booboos and reuse?
ReplyDeleteThanks so much! I am glad you found something helpful! I do wish we could melt down the material to reuse it! Luckily, PLA is made from renewable and natural raw materials such as corn. For the home user, you'd have to have a device that could melt it and extrude it back to rolls of 1.75 mm string. Maybe one day there will be such a device!
DeleteThank you for detailing the process so well. If I hadn't been so far along my mini journey I would be sorely tempted to get a 3D printer. Like you, I like the challenges of new skills. That has been a big part of why I love this hobby. You will look back on this post in a few months and see how far you've come by then. Thank you mostly for not just glibly saying how easy it is like some users might. Much to learn. Enjoy the end results. They look very promising.
ReplyDeleteThanks Marilyn! I would encourage you to never say never! You may just decide to embark on the 3D adventure with your grandson. The prices of good models have come down enough to make them like a special Christmas gift. And with your skill at learning, you'd be making marvelous things within weeks! If you do decide to go that way, I'd be happy to point you in some more direct directions. :O)
DeleteIt's good to see how you progressed with the appliances. I wish the door in my old stove opened sideways. It's always a struggle to keep it down when taking out a hot tray.
ReplyDeleteHugs, Drora
Thanks Drora! When Russ and I were first married, his parents let us rent the bunk house on their farm. It cam with a stove from the 1960's which was avocado green with side opening doors! It was pretty handy, and seemed to be less apt to cause an accident getting food in and out!
DeleteTe admiro de verdad, cuando veo como proyectas tus creaciones.
ReplyDeleteYo, seria totalmente incapaz.
¡Gracias Eloisa! Sé que sería excelente en cualquier cosa que le interesara. Es solo una cuestión de encontrar el tipo de instrucción adecuado para comenzar. Como crecí con un padre que era carpintero y luego me casé con uno, he estado construyendo toda mi vida. Quiero que consigas papel cuadriculado y lo pruebes. ¡Lo harás de maravilla!
DeleteEs todo un reto proyectar algo y conseguir un resultado satisfactorio. Estas nuevas herramientas son geniales aunque requieran mucho tiempo de aprendizaje.
ReplyDeleteBuen trabajo!!!
¡Gracias Isabel! No puedo explicar lo emocionante que es tener algo en la mano que, antes de que las herramientas de la tecnología fueran posibles, te eran imposibles. Es una gran victoria y te enorgullece mucho de tu voluntad de aprender (y fracasar). :O)
DeleteAnd another wonderful post - it was very interesting to follow you on this special journey. It's always great to learn how you're achieving your results and how you're sharing your knowledge and even your fails. It's pretty clear that something like 3D-printing needs a lot of trial and error until the desired result can be reached. But seeing what you're able to create by now shows pretty well how much you've learned already. And as always I admire very much how methodic you are - your glue test was spectacular and will be very helpful to many. Personally I had another benefit from this post - I learned the expression "fart fan" today. I had no idea these thingies are called that in English - but you live, you learn. Some of us how to work miracles with their trusted machine park and others learn some new words. ;O) As usual I'm looking forward to see the next steps in your kitchen making process.
ReplyDeleteHugs
Birgit
Thanks Birgit! You are exactly right - it is in the failing that you learn the most. You begin to understand how things work, and they become fascinating! I hope that one day I will look back at these early and simple designs and feel great pride in where I've come, what I've learned and how I was willing to take the leap. I really hope that when folks see my story, it will encourage the same in them.
Delete"Fart Fan" is the colloquial term used mostly by builders and installers, not really in polite society, lol! But since I live with one of those builders, I tend to pick up their funny nomenclature. I am happy that you enjoy hearing them, too!
3D-printing isn't easy but it does open up new opportunities for miniaturists. I think your kitchen looks marvellous! >>It all started with an idea (those tend to get me into trouble)>> So many ideas, so little time!
ReplyDeleteIt is such a wonderful thing to have the freedom to design and make your own versions of things! Funny how a block of plastic can be so thrilling! And so little time - So True! There are so many demands on our attention in life I wonder how quickly we'd master something if only there were no "have tos" and only "want tos". :O)
ReplyDeleteWhat an interesting post. I will probably not get a printer but good knowledge. I think i would have used the mishap stove top as a shower base. So many ideas :)
ReplyDeleteThanks JCH! It's so true! One idea spurs so many others and you're left longing for more mini time! I did make a shower tray many moons ago, and it's in the Alki Point build! If you do ever get a 3D printer, let me know and I'll give you the file!
DeleteWowww.
ReplyDeleteMenudo trabajo de investigación y ejecución que has realizado. Es fantástico y seguro que el efecto final sera muy real con el gran trabajo y dedicación que realizas de cada pieza.
Un saludo
¡Gracias Marian! ¡Es un gran comienzo, espero! Cada nuevo desafío le permite descubrir hasta dónde puede superar las limitaciones de la impresora. ¡Seguiré hurgando y compartiendo lo que descubra!
DeleteThe oven is adorable!
ReplyDeleteThanks Carrie! :O)
DeleteHi Jodi! This tutorial on the mechanics and design-trics for the 3D printer is very well put together and clearly shows some of the many pitfalls to learning this technology! (And the successes of perseverance and brain-power!) I am Soooooo far behind in technology.... Medievalist that I am... even a lathe is a modern wonder to me! LOL! But I do understand the wonders of this new technology! I am still pondering the woodworking with my hack saw techniques.... when I ever get past the big rough cuts of plywood.... Someday I will be making the more refined parts of my projects! Your constructions are a wonder to see! Keep up the great work! :):)
ReplyDeleteThanks Betsy! Technology can be fun and useful, but the old ways still hold their charm and are often irreplaceable! It is being able to experience all the methods we long to try that keeps things interesting to each of us, individually, and keeps our visions and projects unique! Your methods produce inspiring art that we all admire greatly, so you just keep doing you!
DeleteThe appliances for the kitchen are fantastic. How nice to be able to 3D print.
ReplyDeleteThanks Faby! It really is so much fun to imagine a thing and then try to create it with the printer!
DeleteJodi ,cada vez mejoras más con la impresora 3 D, es una gozada ver el plano en papel y luego, como si fuera magia, el elemento creado! Me encantan todos los electrodomésticos!!
ReplyDeleteBesos.
¡Gracias Pilar! ¡Siento que cada problema que encuentro surge como una oportunidad más para aprender un poco más! Si bien a veces puede ser frustrante, ¡estoy muy agradecida por la oportunidad de aprender y crear!
Delete