

Once I had the glue applied, I clamped the walls to the center of the outside walls where the ceiling met them. I added heavy weights to the floor to help with the slight bow that still remained from pasting the ceiling paper with heavy gel paste. It seems to have settled with no more of a curve than the average old building has. Phew! That's a relief!

Next, I added crown molding and quarter round trim where the ceilings and walls met. I didn't manage to take a lot of in progress photos this week, so I won't be able to provide good before and after pictures. I apologize. You can see the trims in the later ceiling photo with the lights on.


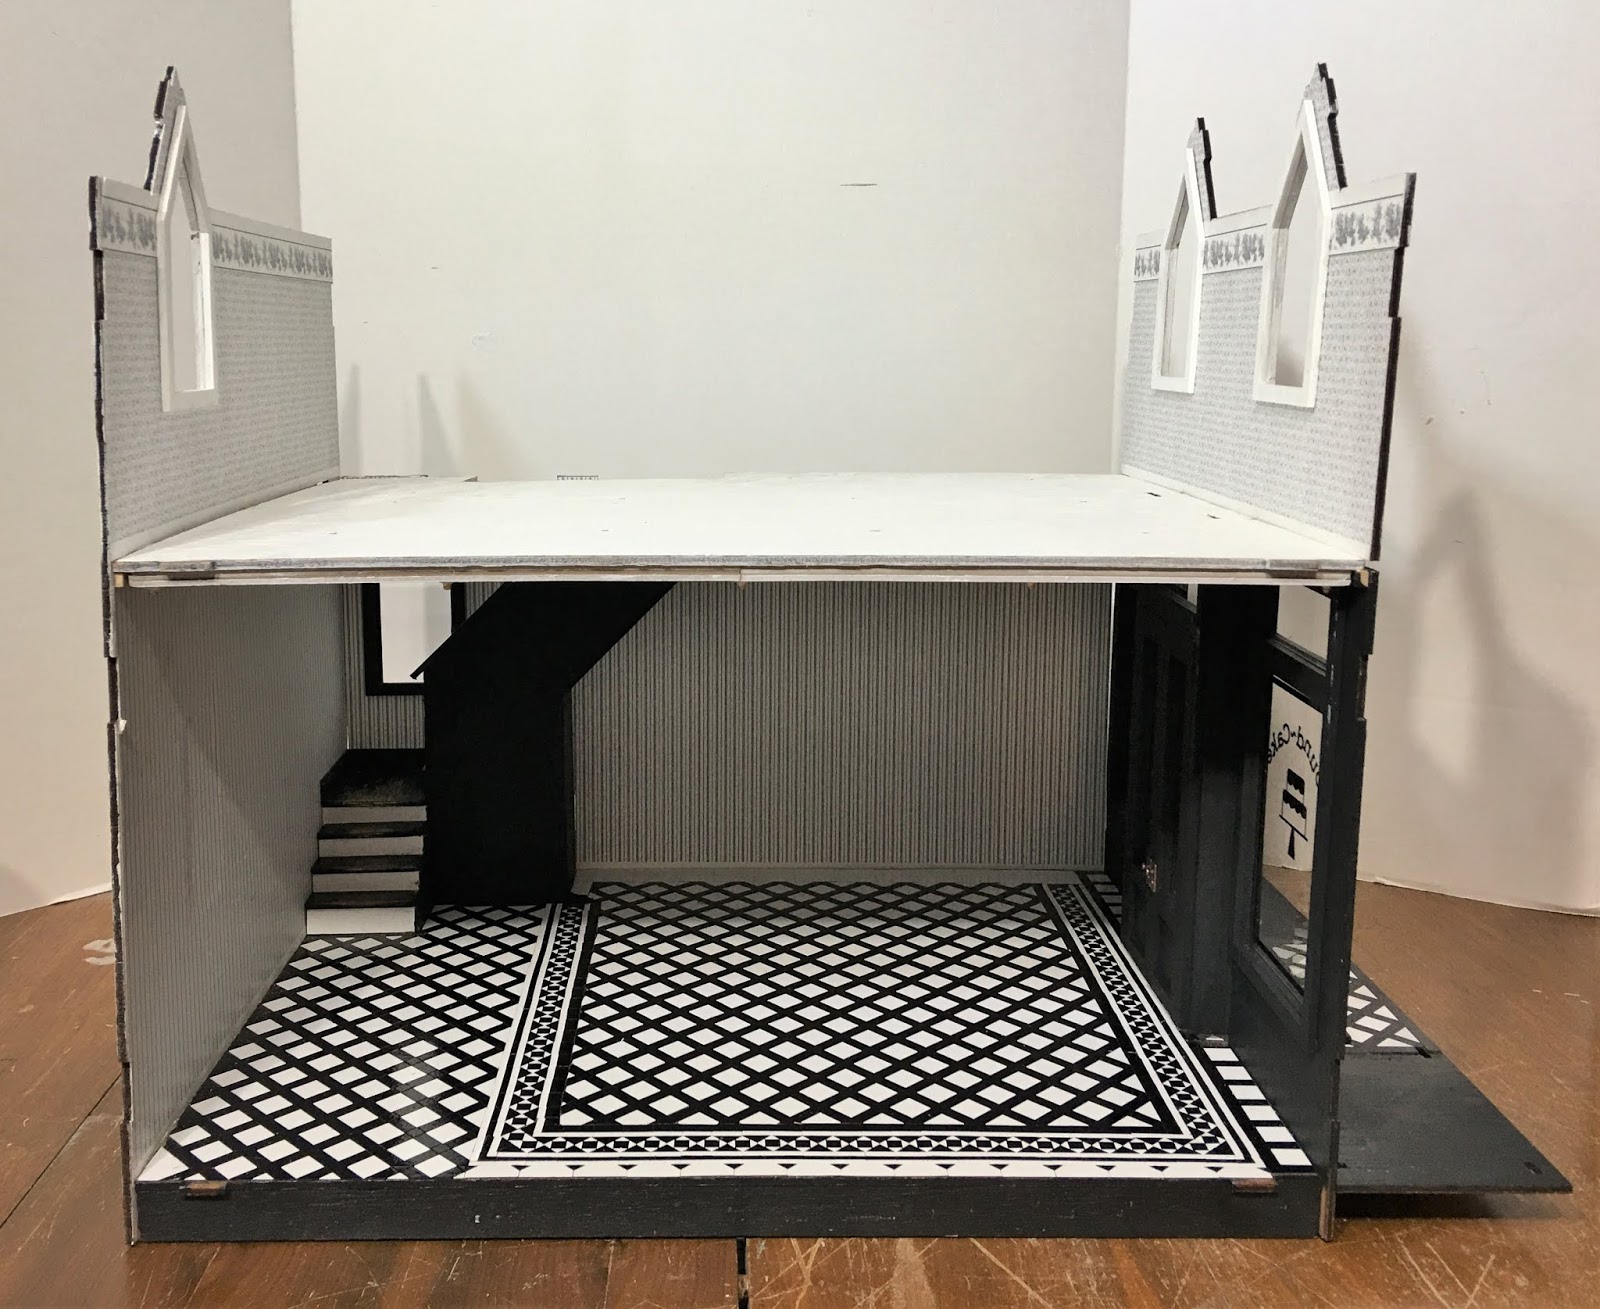
The next task was to prep all of the lighting kits. If you remember, I was going to use Chrysolite Zenith Hanging Lamp kits, This meant that I had to prep all of the pieces and then come up with a system to paint them. I wanted simple black fixtures to match the furnishings in the shop.

In prepping them, I discovered a huge problem. Both the 2mm chain and the wires from the bulbs would have to be threaded through the crown. The problem? The opening in the crown is less than 2mm. Not only would the provided 2mm chain not go through the opening, there was no way you'd get both the chain and the wires through without damage.
I know what you're thinking - Just make the opening bigger, right? Unfortunately, the crown is not a solid piece. It has 5 perforations with a tiny strip of plastic separating one from another (sorry no photo). To make the opening larger would risk breaking the piece altogether, and would interfere with the way the globe seats into the crown.
How about using smaller gauge chain? Smaller links also mean even less room to thread the bulb wires through. And having normal gauge wires right next to very delicate chain would mess with the scale illusion. What a bummer!
I suspect that this is why Brae opted to run her bulb wiring up through a pipe. And maybe why the kits were discontinued?

I opted instead to use all of the pieces to build a single ceiling fixture and eliminate the hanging aspect. I would still end up with an old time feeling fixture, it just wouldn't swing. This seemed safer, anyway, knowing I would have to reach my hands in and out of the space numerous times to decorate. It was not what I originally envisioned, but I do still like them and feel it was a satisfactory compromise. You never know what challenges you'll run into building a dollhouse, or what creative solutions or compromises you'll have to make to move forward. Being flexible is a requirement.

Problem solved, lights installed! Since these are all running off one nine volt battery for the testing, it will be interesting to see the amount of light given off when they are running on the transformer.

Another challenge to overcome was the first floor ceiling wiring, which by necessity, would be running across what will be the second floor. Even at less than 1/8" (the maximum thickness caused by bundles of wires which have been heat shrinked together), it will still cause a noticeably bumpy floor and interfere with future walls and furnishings if left unanswered.

Solution: Make a subfloor with 1/8" trim framing to bridge over the wiring. First, I made a pattern of the second floor using printer paper and tape, then transferred that onto a sheet of 1/32" plywood. I did not have a sheet deep enough, so had to laminate a strip onto the main sheet.


A little shave here and there and we have a perfect fit.


The next challenge might be a little harder than the ones I faced with the ceiling, lighting and floor. That's because the next challenge involves a decision, and those can be the hardest challenges to face! What kind of flooring do I want for the bakery's kitchen and what shall I make it from? That's going to require some thought and research. And probably a little trial and error.
Until next time, hope all your challenges are met with satisfactory solutions!
xo xo,
Jodi
To be honest, I liked the lights better without the chains. They look more like the lights you want find in an old-fashioned store to me. So--excellent solution! I also like the way you handled the floor, and it's given me an idea for the art deco house. :-) For the kitchen floor, of course I would want something that hides the stains/mess, like Marmoleum. ;-)
ReplyDeleteThanks Deb! I am so glad to hear that you're not disappointed about the lights! I had struggled with them and racked my brain with them for so long that by the time I decided to just make them solid singles I was ready to let the hanging part go! And I am glad the subfloor helped solve a quandary for the deco house, too! Marmoleum... That sounds like a very interesting idea!
DeleteI love the nice warm glow of the lights. I can't wait to see the next steps.
ReplyDeleteThanks Carrie! Crossing my fingers there will be enough light with the transformer that additional LEDs won't be necessary!
DeleteYou have embraced your challenges and come up with the perfect solutions. I also like the lights installed without chains. For the flooring I also agree with Deborah. I made checked “Marmoleum” flooring for my Peachstone cottage. I went to their website and chose two colors from their samples, then copied and positioned them to make the whole floor. I printed it out on photo paper, sprayed it with a sealer and then made grooves with a smallish ball stylus. This build is looking wonderful.
ReplyDeleteThanks Sherrill! I am so happy to hear that you like the light fixtures in spite of the reconfiguring! I like the Marmoleum idea very much and will be seriously considering that as an option. It seems like the right time period for the bakery kitchen and easy enough to achieve with a little time. I am back to the chicken or egg conundrum so we'll see where the next phase leads me!
DeletePienso que el problema de que la cadena de las lámparas no pasara por la moldura del techo,te ha beneficiado,por lo menos a mi gusto,ya que las lámparas pegadas al techo quedan mucho más interesantes y originales! Me gustan muchísimo así!!
ReplyDeleteBuena idea el falso suelo para esconder el cableado!
Me encantará seguirte en la aventura de decidir cual será el mejor suelo para la cocina!
Buen fin de semana Jodi!
Besos.
Gracias pilar! ¡Estoy tan contento de que te gusten las luces! ¡Tengo algunas ideas para probar con el piso y espero encontrar una que se pegue! ¡Estoy muy feliz de tenerte conmigo para toda la aventura y los desafíos!
DeleteGlad you managed a satisfactory solution to the lighting problem. It does look authentic and quite classy! I also have a house that's stalled at present because I have to make a decision about hiding the wiring. Try to cut grooves or do the sub-floor thing? Both have drawbacks and advantages. I look forward to seeing the kitchen floor.
ReplyDeleteThanks Megan! With thicker material I have always cut the grooves and it worked out just fine. With the 1/8" plywood in the Greenleaf kits, I don't think it's thick enough, so the subfloor was necessary. I hope whatever you decide to do that it works out perfectly! Sometimes making decisions is so paralyzing that you just have to leap before you look! Best wishes!
DeleteThe sub flooring is brilliant. The flooring that covers wiring in the farmhouse on the second floor is made out of craft sticks glued on to cardboard, which sits nicely over the tape wiring. I like the idea of a wood sub floor since it is more stable. Nice work. The lighting is also a good fix. You are so smart, Jodi.
ReplyDeleteThank you, Ann! You are so good for my self confidence, lol! :O)
DeleteNecessity is the mother of invention, but if you saw how long I stare at the problem, until an answer finally came to me, you'd think I was in a trance! I like your solution of craft sticks and will file that away for future consideration!
You've thought out wonderful solutions for your issues with the flooring and the lighting, Jodi, excellent work! I like the warm glow of the lights, however I can imagine that you miss the chains at the lampshades, which was your first intention/plan. But you had to solve it in a satisfying and more handy way, which you actually did at the end. Now you won't have any trouble when you have to reach into the shop several times, instead of taking care for all of the chains hanging at the ceiling, which would have made the lights swing, or were getting knot (sorry, for my poor English, I just hope you can understand what I mean?).
ReplyDeleteHave a lovely weekend.
Hugs, Ilona
Thanks for your encouraging support, Ilona! Sometimes, the thought of compromising an original idea breaks your heart. But other times, you are just ready to stop ruminating and just get on with it! Luckily, this time, it was the latter! And your English is perfect! I admire so much that you can speak, read and write in at least two languages! In Spanish and French I can tell you who I am and find a bathroom, but beyond that, I am no use, lol!
DeleteGreat solutions as always. To be honest I think the lights suspended in any way, chains or tubing, would have been a huge distraction from your lovely shop and its just as lovely contents that I know will happen. Sometimes being stopped from something is pure good luck. As for the wire sandwich flooring. I recently did the same and for the same reason and wished and wished it had happened about six years ago! I would do all my floors like that now, no more making those wretched grooves for wires in wretched MDF.
ReplyDeleteThanks Marilyn! I agree with you that this may just prove to be a happy accident! And hooray for subfloors! They are a whole lot less work than channeling MDF or heavy plywood, and a whole heck of a lot safer!!! If the room can stand to lose a little head space, it is the way of the future!
Deletewell you know the old saying, if life gives you lemons squirt them in the eye of someone that annoys you :) not really. I like the lights better without the chain. if you had 12 foot ceilings like they did in some buildings then Im sure youd want them lower. I'll be waiting till the next installment
ReplyDeleteHugs
Marisa
Ha ha! Thanks Marisa! It's usually myself that I'm annoyed by, lol!
DeleteBy the time I'd measured to figure out how low I wanted the fixtures, the chains were only going to be 1-1/2"! Barely hanging anyway, so the universe did me a solid by taking the chain option away from me! :O)
Oh Jodi, very satisfactory solutions. You've overcame brilliantly problems that happen only when you build something. I love the ceiling and the lamps look perfectly suitable without the chains.
ReplyDeleteHugs, Drora
Thanks Drora! I am so happy you like the end result and I am glad not to have been disappointed with the compromise, too! Just grateful that I could still use them and that they all work! Phew! Hugs!
Delete¡Me encanta como han quedado las luces! Muy buena adaptación.
ReplyDeleteGracias isabel ¡A veces los problemas nos llevan a mejores soluciones y en este caso estoy feliz de que las diez bombillas todavía funcionen al final!
DeleteHi Jodi! It is such a shame that those lamp kits were not designed properly... because that must be the problem. I am so glad you figured out a way around it and can still use those lamps. I agree, it may even be better that the lights are not hanging down! It would be hard to work around so many....! Besides, the ceiling being "lower" by all those embellishment thicknesses... I think the hanging lamps would have needed a higher ceiling altogether. (And I know first hand what difficulties that kind of kit-bashing can cause...:/) But the way the shop looks now with the lights in place seems just right to me! :) I am enjoying the way this project is looking... and am trying to not get dizzy with keeping up with your speed!!! :):):)
ReplyDeleteThank you Betsy! You should have seen me trying to come up with a way to make them work! I even used thread and a needle to pull the chain through! I managed to get one through without breaking the chain but I bet at least four of the fourteen total chains would have broken. So delicate! Then, once the chain was through I was so deflated to realize that the bulb wires had no hope of sharing the tiny space. With the height of the ceiling, I had to reduce the chains down to 1-1/2" anyway, so not much hang left to speak of. I am just so glad I was able to use the fixtures, that I like them in spite of the change, and that all of the bulbs still worked after all of that fiddling!
DeleteI am sorry about my pace making you dizzy! To me, it feels like I have not taken all the advantage of time that I could have, so am feeling a little behind. :O) I am now mired in the next phase of things which means so much sanding, painting, laying flooring, doing things out of order and having to make decisions that my progress will definitely slow down and hopefully, stop your spinning, lol! :O)
What a beautiful beautiful ceiling and the lamps are amazing
ReplyDeleteThanks Gonda! It is such a relief to have them all installed and working!
DeleteI think the lights without the chains look wonderful. Cleaner somehow if that's the word? And the subfloor idea to deal with the wiring is genius. Will it throw off your stair height at all or does that still work well?
ReplyDeleteFlooring for the kitchen... Honestly, I'd go with a tile? Less ornate than the shop portion but still practical. Likely an old second floor would have wood but I can't imagine that being easy to clean.
Thanks Sheila! I am so relieved to have found a suitable solution! As for the stairs, it's such a shame because in spite of all the work to make them look worn and trim them out, they are just barely visible through the windows (if you crane your neck and try really hard)! The subfloor adds an additional .15625 to the height of the landing, so in real life, it would equate to just under a 9" rise when the rest of the stairs would have a 7.5" rise. In my mind that would be a perfectly reasonable thing to see in an old building, especially one that had several layers of flooring over the years. So not bad at all.
DeleteTile or linoleum are the front runners, but I am leaning toward the linoleum to avoid the whole grout saga. We'll see what I can manage to do with this Cricut debossing attachment!
Another great post! I love the black and white color scheme. It photographs to well, I bet it looks even better in person! I love your solution (s) with the lights too. I have having a similar dilemma on my radio box house. Trying to find light fixtures that are style appropriate and seeing new ones that are only battery powered. Would love to know how it turns out or if its easy to turn battery powered into hard wired to a transformer. Looking forward to your progress - Troy
ReplyDeleteThanks Troy! I am so glad that you are liking the color scheme, though with my sketchy lighting I am finding it hard to photograph (with my generations old iPhone camera)! If I didn't have the Windows 10 photo software to help remove some of the shadows, I'd be sunk!
DeleteIf you can solder well, you may just have good luck converting the battery lights. Otherwise, you may want to consider making some of your own. Chat with TS over on Instagram @miniaturesintheory. She's the lighting wizard and can give you some great advice!!!
I hope you find the perfect solution and will post soon about the radio project! I am so excited about it!
Hello Jodi,
ReplyDeleteThis room is coming together so well! I love the ceiling. And the lighting just gives that lovely period charm!
Huibrecht
Thanks Huibrecht! It is so much fun to see the idea actually happening! Even when not exactly as envisioned!
DeleteMe encanta como han quedado esas lámparas fijas al techo, y cuanta iluminación darán.
ReplyDeleteToda la planta baja es preciosa.
Gracias Eloisa! ¡Me hace tan feliz que también te gusten!
DeleteGood Heavens, I'm late… but not too late to admire this wonderful post! ;O) The lamps turned out wonderful and I enjoyed very much to see them with the lights on. I too think that it was a good thing that the chains caused you troubles, to me it seems it will be much better for the total view of the shop and its goods with the lamps being under the roof and not hanging in the scene.
ReplyDeleteAnd your solution for covering the wires is great, very well done. But now I wonder what is "Marmoleum" (which was mentioned in some comments)? Excuse me, I need to ask Uncle Google now... ;O)
Hugs
Birgit
Dear Birgit you are never "late" and in fact I am always so touched by your thoughtful and insightful comments on every post! So Thank You so much for taking the time to encourage my progress! I am so happy that you agree that the lights look fine as they turned out to be! I had not heard it called "Marmoleum" either, but recognized it as the linoleum type squares that were used in hospitals and schools when I was growing up. In fact, in high school, I worked in the neighborhood grocery store and got to learn to use the floor polisher on these very tiles! Ah, memories... I may end up in that direction, but for now, am experimenting with what the Cricut can do with cardboard. :O)
DeleteJodi - I am so loving the Pound Cake build! And I especially appreciate you documenting all of your "problem-solving" techniques and solutions. As being fairly new to miniatures, I really love learning from all of the more experienced artisans such as yourself. I really love the style of those lamps and think your solution was perfect. I think, as beautiful as they are, if they had all been hanging lower it might have looked a bit "busy". Thank you for taking us on such a wonderful journey. - Marilyn D., New Brunswick, Canada
ReplyDeleteThank you, Marilyn! I am so happy that where the bakery is taking me is appealing to you and I hope you'll find some inspiration in something I share! It encourages all of us, new or old, if we see that problems are just a normal part of the creative process and there really isn't anything we can't overcome in a dollhouse build! Sometimes, we just need to adjust our expectations. :O)
DeleteI don't know how I managed to miss this posting but now having read it and seen the results: I am GOBSMACKED AGAIN! Your projects are always more ambitious than I would ever have guessed and so I am constantly Surprised and Impressed by your Extreme Creativity and the Professionalism of the finished project!
ReplyDeleteThe ceiling lights LOOK AMAZING installed inside the coffered ceiling and what a Great Idea to have made a subfloor above to accommodate the wiring- a Useful Tip!
But how in the world did you manage to score 10 of those Chrysolite light fixtures???? They are absolutely Stunning Jodi, and I'm glad that the chain problem has worked out to your benefit because the final effect makes any other option negligible -
Take ANOTHER bow!
Thank you so much for your encouragement, Dear Elizabeth! It makes me so happy that you appreciate the thought and effort that I feel compelled to put in to my projects! It is artisans like you who inspire me to push beyond what is easy and comfortable to a place where we can see what is possible if we only try and are willing to keep trying.
DeleteHow did I get so many kits? Planning! I have been dreaming of this project for so long and have actually been collecting things since 2014! I was able to purchase the light kits in two batches - one with eight kits and one with six. It was through an online retailer called Dollhouse Miniature Scale. Their web site is:
https://www.dollhouseminiaturescale.com/Default.aspx
If you are keeping count, that means that I have four more to use upstairs to maintain a little consistency. I did not see any more Chrysolite kits on their site, but I do see them from time to time when I dare to poke around. I hope that they will be enough, with a little task lighting thrown in. Until I actually plug them in to the transformer, I can only hope!
The ceiling is amazing with these lights and the solution for covering the wires is perfect.
ReplyDeleteIt's a wonderful project and and it is proceeding very well.
Thank you, Faby! I am so relieved that this crazy and complicated idea has worked out as well as it did! I hope my luck continues for the rest of the project, too!
DeleteA subfloor! So much easier than chiseling channels for wires. Brilliant :)
ReplyDeleteThanks Keli! Yes easier! Especially on 1/8" brittle and splintery plywood which has your delicate cardboard coffered ceiling on the other side! :O)
DeleteAmazing work and very interesting blog post. Hugs!
ReplyDelete