

I also made another discovery. Cricut's 2mm chipboard isn't actually 2mm. That would be .0787 and some change. It is actually closer to .083. It doesn't seem like a lot, but it is enough to throw off your measurements when trying to make corners on fixtures meet up precisely. Lesson learned: Never trust the packaging and take your own measurements. I was able to re-cut some pieces with the Cricut and add trims, add to or hand cut and sand others. And I will be measuring every sheet in the future prior to designing new pieces.
Tip: If your measuring device doesn't have small enough markings, just stack the pieces until they reach a measurement that your ruler does have. Then use this conversion chart to find the decimal number. Then divide that number by the stacked number of pieces. This is the number to use in Design Space to account for the thickness of the material. Make sense? Or you can just buy a nice set of $30 calipers from MicroMark. :O)

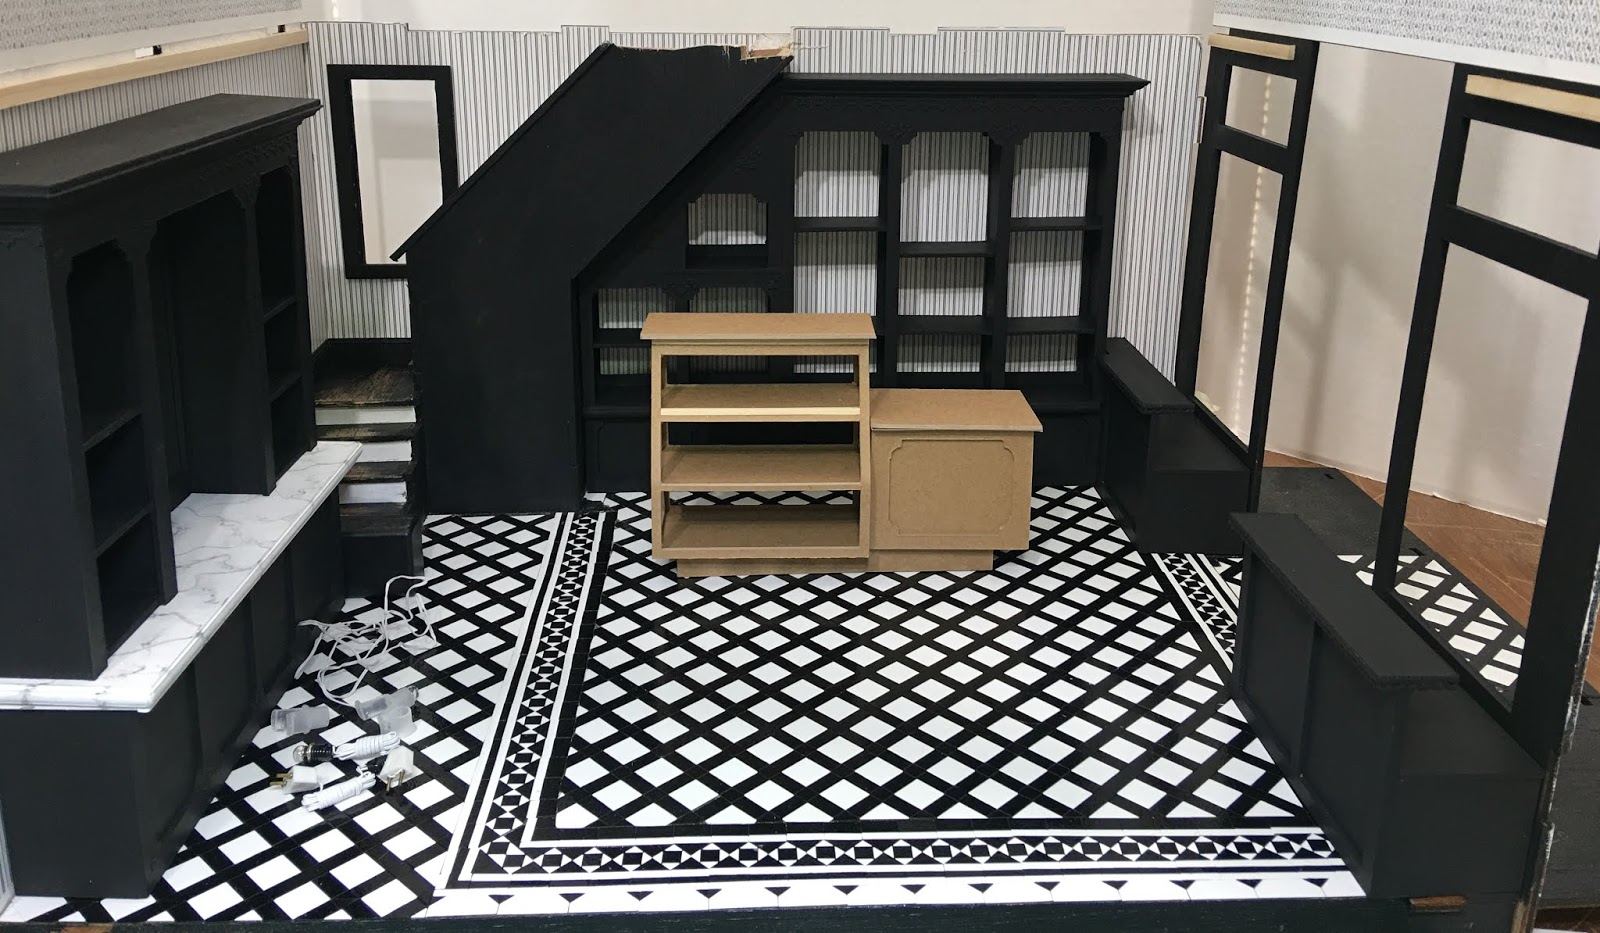
I started with the built in shelves on what will be the right hand side of the shop from the front door and what will be the back wall looking in from the open "fourth wall". I split the space up in segments made up of the full height area from the end of the stair run to the front window and then the space under the stairs.

I further split up the work by making base cabinets and then the upper shelves. It made getting good measurements and the triangle's angle much easier.


Next were the front window display bases on either side of the double door entrance. I wanted them deep enough to provide plenty of space for displaying enticing baked goods. Each is about 4-7/8" wide x 1-7/8" deep. Plus I added another 1" wide shelf along the top. Double display space to tempt shoppers!

Here they are after painting - again with different lighting adjustments to help best see the details.


I also added the same bulb and socket wiring used in the back bar for each of the main shelves'/shelf's (what is the correct plural here?) top three sections to light up feature displays.

The next thing on the list was the bakery display case and cash register counter. I looked at a lot of designs for inspiration and came to the conclusion that simple was good. Just the raised profile created by the recessed toe kick should be enough character in the design. And in the end the baked goods will be the focus.


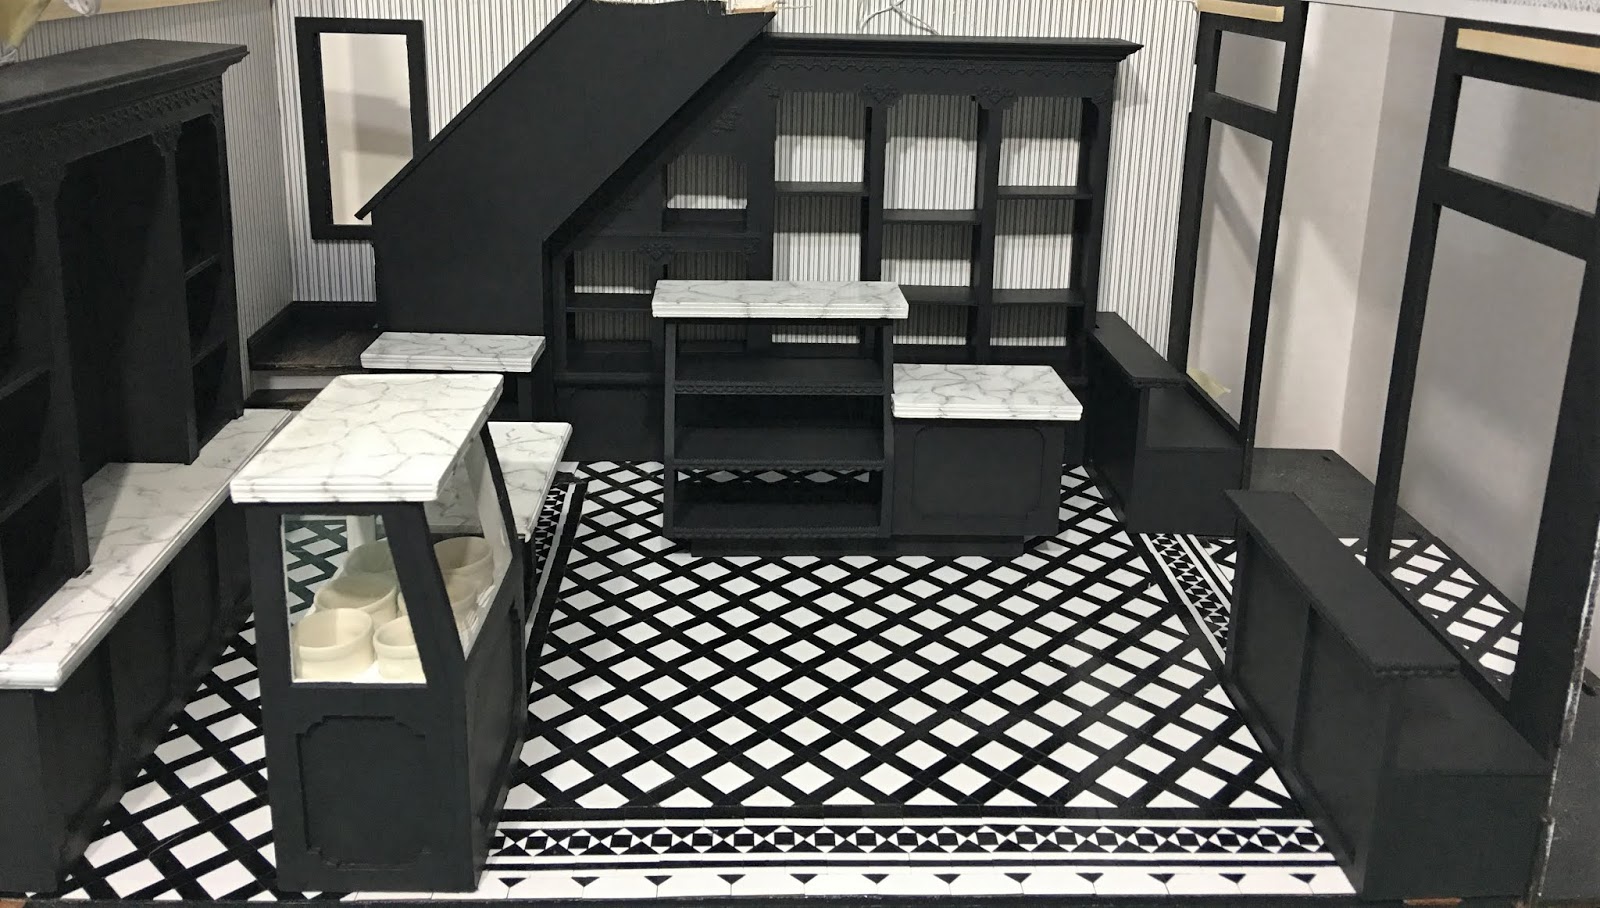
The ensuing piece to tackle was the ice cream freezer. My initial design loomed large in the space so I went back to rework the design. My one hard measurement was the six ice cream crocks that would have to fit into the unit. I economized the amount of space between and around the slots for them and was able to trim half an inch off the original design.


I sandwiched transfer film between two layers of chipboard panels for the "glass" and added LED lights to each of the cabinets (seen here powered by a 9 volt battery for demonstration). Just that little bit of saved floor space makes a difference. I will probably list the first prototype on eBay one of these days when I need to make space for a new project.


Next to the ice cream freezer there will be a soda fountain counter with two stools. I made that cabinet as well as a hot beverage station cabinet for next to the stairs. Speaking of the stairs, I took Betsy's great advice about removing the pony wall on the first flight due to the crowding caused by the back bar. It really did open the space up and for now I think it works left open.


There will be a couple cafe tables each with two chairs, plus at least a couple floor displays, but this gives you an idea on the layout of the shop area. Good thing I am a fan of crowded miniature shops!


For the countertops, I stuck with the faux marble look, adding 1/4" trim pieces to the edges of the chipboard to give the impression of thick marble. I achieved the look with several coats of white acrylic background sanded as smooth as possible then used soft charcoal pencil to make the veins. I used a soft dry paint brush to smudge and soften the veining and then finished off with several light coats of Krylon Triple Thick varnish sprayed on.


And here are all the pieces completed and in their likely places...


It seems like the next logical step is to get the front wall ready by installing the doors and windows. Then I can install the ceiling and begin working on the rest of the shop lighting. I'm both excited and nervous to see if the plans I have made in my mind for the look of the shop will work well in the real world. We'll discover that together, soon, I hope!
xo xo,
Jodi
Such a lovely shop! Why in the world do we not have these now? I love the nostalgia in this build. I am enjoying every aspect of your designs and can't wait to see what is next. You never disappoint.
ReplyDeleteWhere are you buying your chip board? Is it the Cricut brand?
Thanks Carrie! I agree - Cold Stone Creamery and Baskin Robins Just aren't the same experience! I'd definitely visit a real old fashioned soda shop and work my way through the menu if one existed!
DeleteSo far, I have only used the Cricut brand. I did but some 1.5mm to try via Amazon but have not had time to experiment with it yet. I'll report what I find...
It appears that your Cricut has taken your work to an entirely new level. How can we possibly keep up with you? It's so much fun to see what you are able to make, that there is little doubt that what will vision in your mind will be realized. Love it.
ReplyDeleteThanks Ann! The Cricut has made daunting ideas more feasible! Just having it cut all of the pieces saves the arm muscles and gives you perfect cuts. I think the cost savings over even bare wood pieces will allow me to splurge on a really special piece now and again, too!
DeleteIt is exciting and fun to see Pound Cake become a reality. I agree with Ann, you are taking miniature making to a whole new level. Does Cricut have an auto blade that cuts the chipboard or do you use a deep cut blade? I love your marble counters. It is reminding me of Wil Wright’s Ice Cream parlors in 1950s Los Angeles, that was the BEST ice cream ever!
ReplyDeleteThanks Sherrill! I think these cutting machines are giving us greater confidence to dream bigger with our ideas since they are so helpful and precise with the work!
DeleteThe older Cricut models such as the Explore use a deep cutting blade. The Maker uses what they call a knife blade. It fits into a housing with gears that then fits into the cutting gear on the machine. This allows more cutting pressure to be applied. It seems to last a nice long time, as well. The one I received cut all of the basswood for my swap projects, and cut all but the last two pieces for the bakery before I had to swap it out. At under $10 it's a pretty great bargain!
Russ and I searched for Wil Wright's and were delighted to see photos of it and of other old time ice cream shops. He didn't remember them from growing up in L.A., but he';s going to ask his mom who surely will remember. We had Ferrell's here growing up, and I imagine they were much the same. Such a treat and big deal to be able to go there!
Thanks for the info on the knife blade. The Cameo is different. I’m attending a class in Salem on Saturday in hopes of getting some questions answered.
DeleteI Googled Wil Wrights after I commented. The photos were not as cute as the store I went to in Sherman Oaks. I remember it being like the See’s Candy stores (another L.A. institution). They had little marble top tables and the chairs with curly ironwork. Very cute.
Oh that will be awesome! There was a gentleman with the username Mike UK over on the Greenleaf forum who made some amazing cabinetry using his Cameo! I bet with a little info, you'll be doing the same in no time!
DeleteI know See's a little too well! :O) Their stores are very much an influence for the black and white nostalgic theme!
wow, i am really impressed! I believe this is the first totally black and white project that is vibrant, cheerful and not gloomy ... I usually find that the rooms that are totally black and white are a bit boring and heavy, but this is truly fantastic !
ReplyDeleteThanks Elenè! I am so happy that you like the black and white foundation colors! I wanted the eye to be drawn to the tasty delights and special fixtures I have planned in color, and the black and white fixtures will hopefully set the stage for that old time feeling.
DeleteYour shop is amazing! I really like the colors black and white and marble is perfect
ReplyDeleteThanks Faby! If I could, I would redecorate my real life house using all the methods we employ in mini! That's where bravery is the easiest!
DeleteThis is beautiful! I'm just amazed at the level of detail and how perfectly fitted your fixtures are.
ReplyDeleteSeriously looking into the cost of these machines and how difficult learning to use it might be. Your work is just amazing!
Thanks Sheila! I think you would love using the Cricut as soon as you gained your confidence. And gaining confidence is just a matter of determination to learn. Start with small projects, like making cards for everyone's birthdays for the year. By the time you have finished that project, you will have the confidence to start making things with kraft/chipboard/basswood. There are so many videos from Cricut and from amazingly talented users that in no time you'll be creating dream projects! I belong to a FB group and the thinks people are doing with the machines there will thrill you too!
DeleteWow, it's so interesting to see your cake shop grow, Jodi, I think your speed and making designs in building these counters, cash register and cabinets are impressive!
ReplyDeleteThe B&W colors in combination with the marble make the whole elegant and very stylish.
Hugs, Ilona
Thanks Ilona! Once I kind of knew what I was doing, it really only takes a few hours to design, cut and assemble the pieces. The embellishments and painting can be done the next day, so over a weekend, you can make some pretty encouraging progress! With the skill you have in all of the things you create and deconstruct to replicate in miniature, you could master this too in no time at all!
DeleteJodi,has hecho unos diseñoa perfectos,me gustan mucho sus formas lisas,los tonos en blanco y negro que harán resaltar todos los colores delos productos.El efecto mármol,muy bien conseguido! Es difícil esperar hasta el siguiente post,estoy ansiosa!
ReplyDeleteMuchas gracias por los consejos de corte,me vienen genial ya que soy nueva en máquinas de corte y me vienen muy bien.
Besos.
Gracias pilar! ¡Estoy tan feliz de que te guste cómo salen los accesorios y que el proceso te resulte útil! Si no fuera por el Cricut, estaría comprando piezas de madera sin terminar y haciendo todo lo posible para que sean únicas. ¡Pero de esta manera es muy divertido!
DeleteDi una oración por mí para que el siguiente paso: ¡instalar el techo, vaya sin problemas!
Wow, Jodi, it is looking Amazing! You are going "full steam ahead"! The layout of the many functional parts of the store shows how much time and "dreaming" you have put into this project. It might be crowded, but it all will fit and look fantastic! I am glad my suggestion with the stairs has helped... I almost sent you a picture of my own RL stairs which have the bottom two steps stick out beyond the wall at the bottom! (Yes, it is an older house with not much spare room! LOL!) Your method to add the lighting with tiny LED's has me re-thinking my older projects... I don't have to stick with one form of electrical or the other.... they can both be used in the same project! I am really looking forward to seeing more! :):)
ReplyDeleteThanks Betsy! I could throw a little flour on my face and act like I worked really hard but in all honesty it took only three full weekend days and a couple evenings to get this far! So much less time than it used to take making everything from hand cut wood!
DeleteI am so happy that you gave me the suggestion to reduce the wall. I started by hacking away the wood by the first step, then the second. Then I thought "Well, heck! The stairs will be barely visible anyway. I don't have to spend that much time on them!". So off the rest went and I like it so much more! I will likely add more trim around the steps and of course a hand rail to pass inspection, but beyond that, I will focus on the focal points, lol!
I am glad you are encouraged to mix LEDs and 12 volt lighting together! As long as you assign a + {positive) to each plug and power strip, and plug them in correctly - you're A OK! If the LEDs don't work, turn them around and try again! Just keeping things organized is the only trick to it! I never know until the end if I've planned enough lights, so that is my nagging worry!
Quite Marvellous!!! Your counters, countertops and display stands have turned out so Professionally and I especially like the looks of the ice cream stand: it's Thrilling to watch your Creative Ideas unfold and take shape!
ReplyDeleteThanks Elizabeth! They are pretty simple designs and other than having the thickness of the material incorrect, went together pretty well. My rule of thumb is to try to keep the seems on the sides to make the fronts look cleaner, and the black paint helps to hide any imperfections pretty well! As with all of my grand ideas, I am prepared to ask myself one day "Why'd you do it that way, dummy?"! :O)
DeleteWow! It looks amazing. And I was so happy that you shared your technique for making the marble countertops. I have been collecting techniques as I plan to make a marble countertop for my restaurant kitchen. :)
ReplyDeleteAnd I love your ice cream stand. PS I thought the next step would be trying out what the goodies look like on the shelves. Maybe this is why I don't finish my builds. LOL.
Thanks Kathy! The method for making the faux marble couldn't be easier! I used Windsor & Newton Soft Charcoal, then used my Xacto to sharpen one end to a pencil lead type point. I rolled it as I dragged it across the surface to get varied lines. Looking at a real piece of marble helps a lot! If you don't like a line, it wipes right away. To soften and smudge a line, very gently dust it with a very soft bristled paint brush. Once you are happy with the look, spray a light coat of varnish on the top. This will set the charcoal. Let it dry a couple hours, then you can start spraying on heavier layers until you reach the thickness that give it that layered marble look. You can do it, and it will be fun!
DeleteIt is so tempting to start on making all of the goodies for the shop! But that is where I have the least experience so will really need to take my time to learn and experiment. It is going to take all my discipline to get the structure finished before I start to play, though!
What a difference half an inch makes when it comes to 1/12" scale. The ice-cream stand is stunning. The marble counters look great, thanks for showing how you made them. Marvelous work!
ReplyDeleteHugs,
Drora
Thanks Drora! It is one of those things where there is no way to learn but to do it! I am glad that since I had to remake it, it was just chipboard and no wood!
DeleteYou have been very busy! What a lot you've accomplished! I love all the counters and cabinets you've been able to create with your Cricut. Everything looks so clean and professional. I really like how this is all coming together, and I don't crowded is bad at all! :-)
ReplyDeleteThanks Deb! It really has been fun to play with the Cricut and make all of the fixtures from scratch! Black paint like black clothing really does make everything look better! Now if that ceiling goes in pretty easily, and the lighting cooperates, I'll feel a great sense of accomplishment!
DeleteI bet everyone is like me and just itching to see the goodies come piling in. This is like watching someone refurb a real life shop. Designers, shop fitters, joiners, marble chaps (wonder what they are called?), decorators all coming together to create a lovely new 'sweetie' shop. See how many you are all at once.
ReplyDeleteHonestly someone has just done this in our village in pink (!) and white and nostalgia (called Pastel) my grandson and a thousand other folk just love the 'pink shop' as it is known. Bet your locals will call yours checkers or something similar.
It is a fabulous idea and even more fabulous execution. Marilyn
Thanks Marilyn! It is so much fun and truly satisfying to make all of this stuff come to life and to try out ideas! I am not sure what the marble professionals are called, either, but I am glad that in miniatures we can be the jack of all trades! I bet the pink shop is marvelous and so much fun! There may just be a little pink happening in this shop, too!
DeleteSomehow I feel like a snail now… a very sloooooooow snail… *sigh* The speed in which you, your miniature genius and your wonder machine are working is amazing, it would take me months to achieve as much as you did in just one week.
ReplyDeleteI've so enjoyed looking at Pound Cake getting filled with fabulous furniture. You are right when it comes to crowded miniature spaces - hey, this is a shop and not a ball room… or in other words this is about displaying temptations and not about free space. *LOL* What a stunning construction for the ice cream (btw - Fluby wants me to remind you that you shall not forget all the strawberry ice cream lovers in the world *smile*) and I can only agree with Drora. It was amazing to see the difference a few mm can make.
The black and white color scheme still proves to be the perfect choice, the whole room is so elegant and stylish but also inviting and friendly. And it will be perfect to showcase candies in all colors of the rainbow. And thanks for explaining your marble technique.
I'm already looking forward to see your next steps about the front etc. - but I must say I admire how straight you're working on your building. With all this furniture I could not resist the temptation to play… eh... try how and where to place my stuff. ;O)
Hugs
Birgit
Thanks Birgit! I am so happy that you like the black and white theme happening in the shop! Hopefully, all that is supposed to fade into the background will!
DeleteTo design, cut, assemble, embellish and paint all of the pieces truly only took three full days! The two last weekend and then Saturday. In between, I spent a couple evening hours, but can't take credit for more time dedicated than that. It would have taken me longer to sand, paint and finish barewood pieces! Chipwood is the lazy person's material of choice!
Tell Fluby that I would not dream of NOT having delicious strawberry flavored ice cream, loaded with slices of real fresh strawberries, available to customers at all times! And Rosey will be pleased, as well, because strawberry ice cream is always pink!
It is so difficult not to get in the drawer, pull out all the exciting treasures I have saved and have a grand old play! But, I am trying to be diligent and disciplined. I want to get the interior layout and structure settled. That way, the only challenge left will be the enormous one of learning all the things I need to learn about making delectable and tempting goodies! I have very little mini food experience, so that may take me a good, long, time! :O)
Me encanta como va el resultado de tanto trabajo. Es maravilloso.
ReplyDeleteEl efecto de mármol me fascina. Siempre me quedo con ganas de probar un intento en alguno de mis muebles pero no me atrevo.
Estoy deseando ver el progreso de los detalles.
Un saludo
Gracias marian ¡Estoy feliz de que te gusten los accesorios hechos con el Cricut!
Delete¡Espero que pruebes el efecto mármol! ¡Solo practicar con papel de impresora normal es suficiente para darle el truco! ¿Quién sabe? ¡Tú podrías ser el próximo Michelangelo!!
Wooo impresionante el trabajo que has realizado, me parecen todos ellos muy finos y elegantes ; te va a quedar de lujo. Felicidades.Besos:-)
ReplyDelete¡Gracias por sus amables comentarios, Rosa María, y por su continuo apoyo! ¡Abrazos!
DeleteHello Jodi,
ReplyDeleteMy, that ís some progress you have made on Pound Cake. (I made one last week with lemon and sliced almonds)The room and the cabinets and shelves really come together. I also like the cool colourscheme that you have chosen for the shop. This way all the colours of the confectionary and products will jump out even more! that being said... i could go for something sweet...
Thanks Huibrecht! Your pound cake sounds delicious and there is nothing better than home made! And you are exactly right about the color scheme! Some things know their place in the background while others were meant to be stars! As a wallflower myself, it is good to just sit back and observe! :O)
DeleteTe felicito por manejar la herramienta de corte de una manera tan perf.ecta. Me encanta como has mezclado el blanco y el negro. Gran trabajo
ReplyDeleteGracias isabel ¡La herramienta y el software que lo acompaña son muy fáciles de usar y con solo un poco de práctica uno puede hacer lo que se imagina! ¡Ha demostrado ser muy útil en este proyecto y también muy económico!
DeleteHi Jodi, I always feel like starting my comments to you with a Wow. So here it is, Wow!! You have made so much progress and all your shelves and furniture pieces are fantastic. One of the things I love the most is how you achieve the perfect look by making layers with different materials, so clever and effective. Your marble tops are also wonderful, to me they look perfect, just like real marble, amazing. Your Pound Cake Shop is already great, that´s for sure. Big hugs, xxx.
ReplyDeleteThanks Alex! That is so nice of you to say! Often the people we are closest to in life don't see the mini thing the way we do, so having someone else understand and celebrate our successes with us really buoys our spirits! A giant hug back to you, my friend!
DeleteO wow you go fast, the entire interior with the color black and white and marble looks great, beautiful cupboards, you are a great talent.
ReplyDeleteThank you Gonda! I feel as though I am taking credit for a lot of work and skill when in reality it took very little time and brain power, lol! Glad you like the fixtures!
Deletewow, you have made a lot of progress and it all looks so good! Great job on the marbling and that floor is looks really good! I'm excited to follow your progress, its very inspiring.
ReplyDeleteThanks Troy! If it inspires you to work on your dreams then my purpose is being fulfilled!!!
Deleteme encanta ese espacio y todo el mobiliario, muchas gracias por las plantillas
ReplyDeleteGracias carmen!
DeleteJodi, you make me look at my cricut with new eyes.
ReplyDeleteThat's awesome, Keli! If you haven't already, go to FaceBook and join the Miniatures Made By Cricuters! group. There are free files and so much inspiration that your machine will become your workhorse!
DeleteHello Jodi, your blog is fantastic!! I am very happy to meet you!
ReplyDeleteA greeting
Hello Rosella! Or shall I also say Ciao! I'm so glad you found me and that I have found you! You are a creative kindred spirit and it was so much fun to sample your blogs! I love the tutorials! I have added you to my blog roll so I won't miss a post and I am excited to find time to explore your projects! Welcome!!!
ReplyDeleteHi Jodi, I've got to say your store is stunning! I'm a huge black and white and ice cream fan. I had no idea you could do all this with the Cricut - I have one but am still struggling with imputing my designs. Do you have to draw them out and do a ton of math (adding and subtracting chip board widths)? How do you figure that all out before you go to printing it??? I'm so happy I found your site and will be watching your progress!
ReplyDeleteThank you Janice! I am so glad that you found me too and it is so encouraging to have comments telling me I am heading in a pleasing direction!
DeleteI think that many of us are pioneers with the Cricut and we are learning exponentially by all of the information sharing happening on blogs and in groups like the Miniatures Made By Cricuters FaceBook groups. If you are not yet a member, I recommend joining as there are free files and a wealth of knowledge and help there.
In my furniture designs, I generally measure the space I have to work with and try to make shapes in Design Space representing the parts. Imagine flat pack Ikea furniture and that's how I begin. To get the specific dimessions for the parts I consider the depth, width and height of the space in my dollhouse, which pieces will be facing pieces and which will be sandwhiched, and then take off the thickness of the material. I use a fraction to decimal conversion chart to convery the measurements for Design Space. You can find the chart here:
http://www.hamuniverse.com/antfrac.html
I am not a math genius either, and find that a very quiet space where I can concentrate is the best environment for avoiding mistakes. Once you have the patterns made, though, you'll become a fast pro!
Another great resource is watching YouTube tutorials by some really generous creators. Just by doing a search of "Cricut Maker Dollhouse Tutorials" you'll find creative and generous people like Bently House Miniatures and Spellbound Miniatures to help your brain click in to the what's and how's.
Best of luck to you and I am so happy to have you along for the bakery's journey!
Oh my god I cannot believe the wealth of information you give! Thank you so much! You're awesome!
ReplyDeleteThanks Janice!!! I'm glad it's helpful! 💗
DeleteReally amazing what you’ve been able to build with your cricut Jodi! It’s really inspiring! So will pound cake sell breads as well or is it purely an ice cream and cake shop (sounds like heaven to me :P)
ReplyDeleteThanks Sam! It is so much fun to see an idea for using the Cricut actually work out!
DeleteIf you are Russ, BREAD IS DESSERT so of course you'd have lots of loaves and rolls on Pound Cake's shelves. :O) I think it will really depend on how much space I need to fill and how quickly I get board with making food, lol!